Welcome to Mastering C2C Crochet: Your Ultimate Guide to C2C Crochet! Corner-to-Corner (C2C) crochet is a fabulous crochet stitch and color work technique that is used to crochet stunning blankets, scarves, and more. Whether you’re new to C2C or leveling up your skills, this guide has everything you need—from mastering basic stitches like standard double crochet and mini-hdc to advanced techniques like seamless color changes, how to design your own personal graphs with Stitch Fiddle, and crocheting custom-sized or rectangular projects. Bookmark this page and jump into step-by-step instructions, video tutorials, and expert tips to create your C2C masterpieces!


What makes C2C Crochet Special?
C2C crochet involves working diagonally from one corner to the opposite corner, building a grid of “pixel” blocks. Each block is typically a combination of double crochet stitches (or variations like half-double crochet) that form a square (or rectangle – more on that later!). The technique is ideal for creating graphic designs, as each block can represent a pixel in a charted pattern.
The graph below shows that you work a c2c graph starting with Block 1 and the last row will be row 21 working along the diagonal.
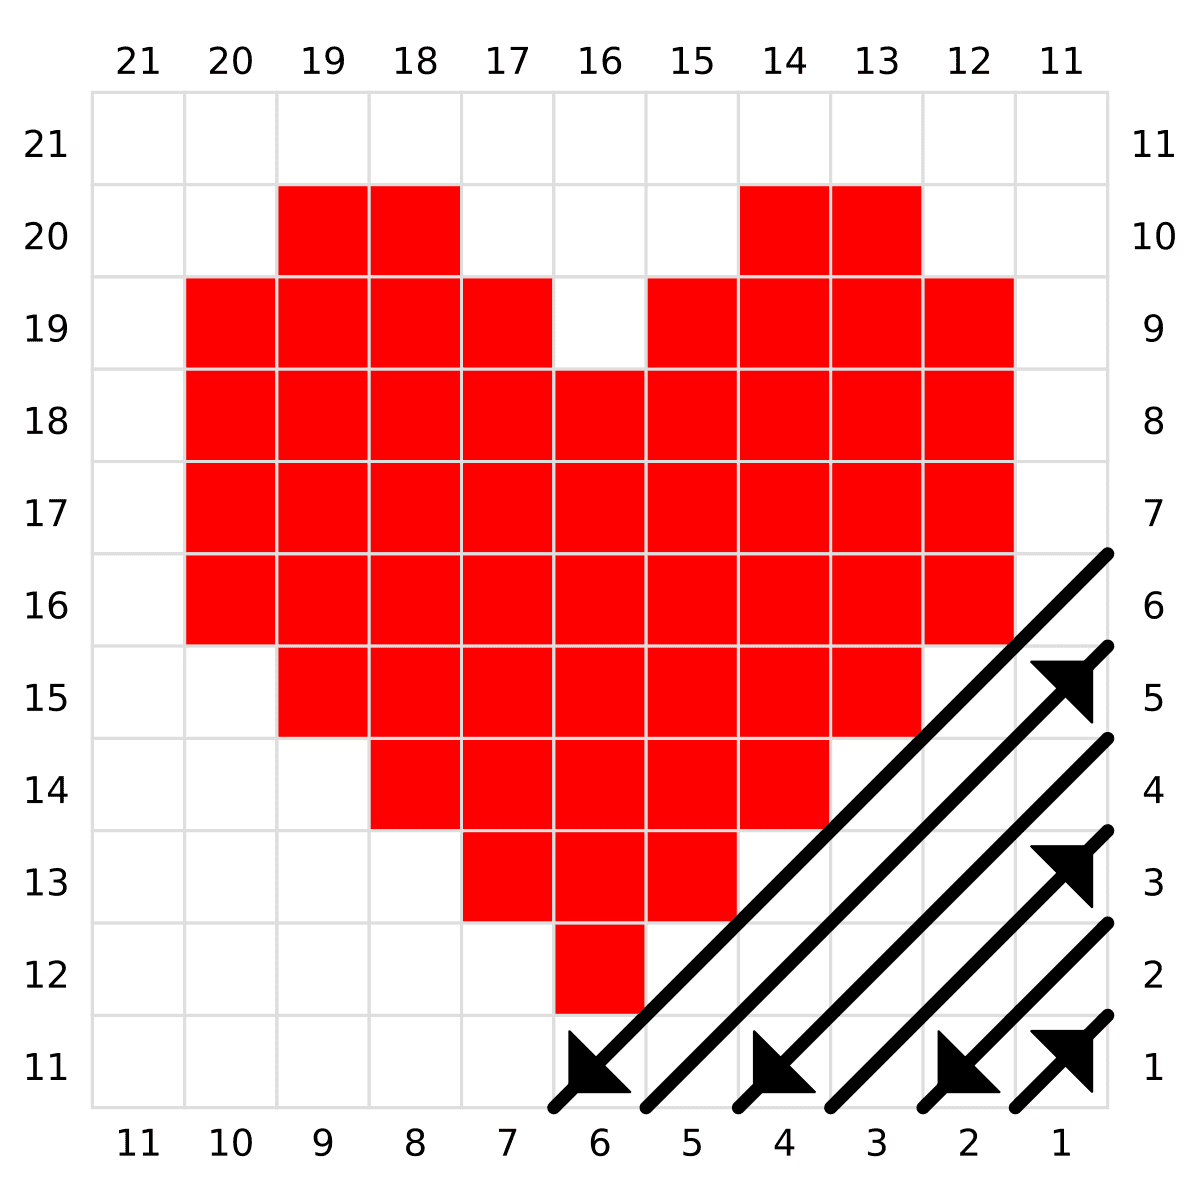
This graph shows the diagonal path of C2C, starting at Block 1 and ending at Row 21.
Why You’ll Love C2C Crochet
- Endlessly Versatile: Crochet cozy blankets, stylish scarves, playful pillows, or even eye-catching wall art—the only limit is your imagination.
- Perfect for Graphic Designs: Create pixelated patterns like letters, animals, or custom graphs, bringing your ideas to life with vibrant, charted designs.
- Customizable and Scalable: Easily adjust your project’s size by adding or removing rows, making it ideal for everything from baby blankets to king-sized throws.
- Engaging and Quick to Work: The diagonal construction keeps every row exciting, as you watch your design take shape with each satisfying block.
Inspired to try C2C? Let’s jump into the basic techniques next!
Master C2C Crochet: Step-by-Step Double Crochet Guide
Ready to create your first C2C masterpiece? The standard C2C technique uses double crochet (dc) stitches to build “pixel” blocks, growing diagonally from one corner to the next. This step-by-step guide will walk you through crocheting your first blocks and increasing your project to its widest point. With clear instructions, helpful tips, and video/photo tutorials, you’ll be stitching with confidence in no time! Let’s get started.
Step 1: Create Your First Block (Row 1)
- Chain 6.
- Double crochet (dc) in the fourth chain from your hook, then dc in each of the next two chains.
- Congratulations—you’ve made your first C2C block! (1 block total)
Visual Help: Watch Block 1/Row 1 or see the photo tutorial.
Step 2: Increase to Two Blocks (Row 2)
- Turn your work, then chain 6.
- Dc in the fourth chain from your hook, then dc in the next two chains (this forms a new block).
- Slip stitch into the top of the chain-3 space (ch-3 sp) of the previous block to connect.
- Chain 3, then work 3 dc into the same ch-3 sp to complete the second block.
- You now have 2 blocks!
Visual Help: Check out How to Increase Row 2.
Step 3: Keep Increasing (Row 3 and Beyond)
- Turn, chain 6, and dc in the fourth chain from your hook, then dc in the next two chains (first block of the row).
- Slip stitch into the top of the ch-3 sp of the next block from the previous row, chain 3, and work 3 dc in that ch-3 sp.
- Repeat this process (slip stitch, chain 3, 3 dc) for each block across the row.
- For the final block of the row, slip stitch into the last ch-3 sp, chain 3, and work 3 dc.
- Pro Tip: Each row adds one new block, so Row 3 has 3 blocks, Row 4 has 4, and so on. Keep count to stay on track!
Visual Help: Follow Row 3 and Beyond or refer to the photo tutorial.
Why It Works: The diagonal growth of C2C creates a textured, pixelated look that’s perfect for building your project to its widest point. Stay tuned for how to decrease and finish your piece in the next section!
Ready to practice? Make your first corner to corner project with the Caron Cake Spring Blanket!

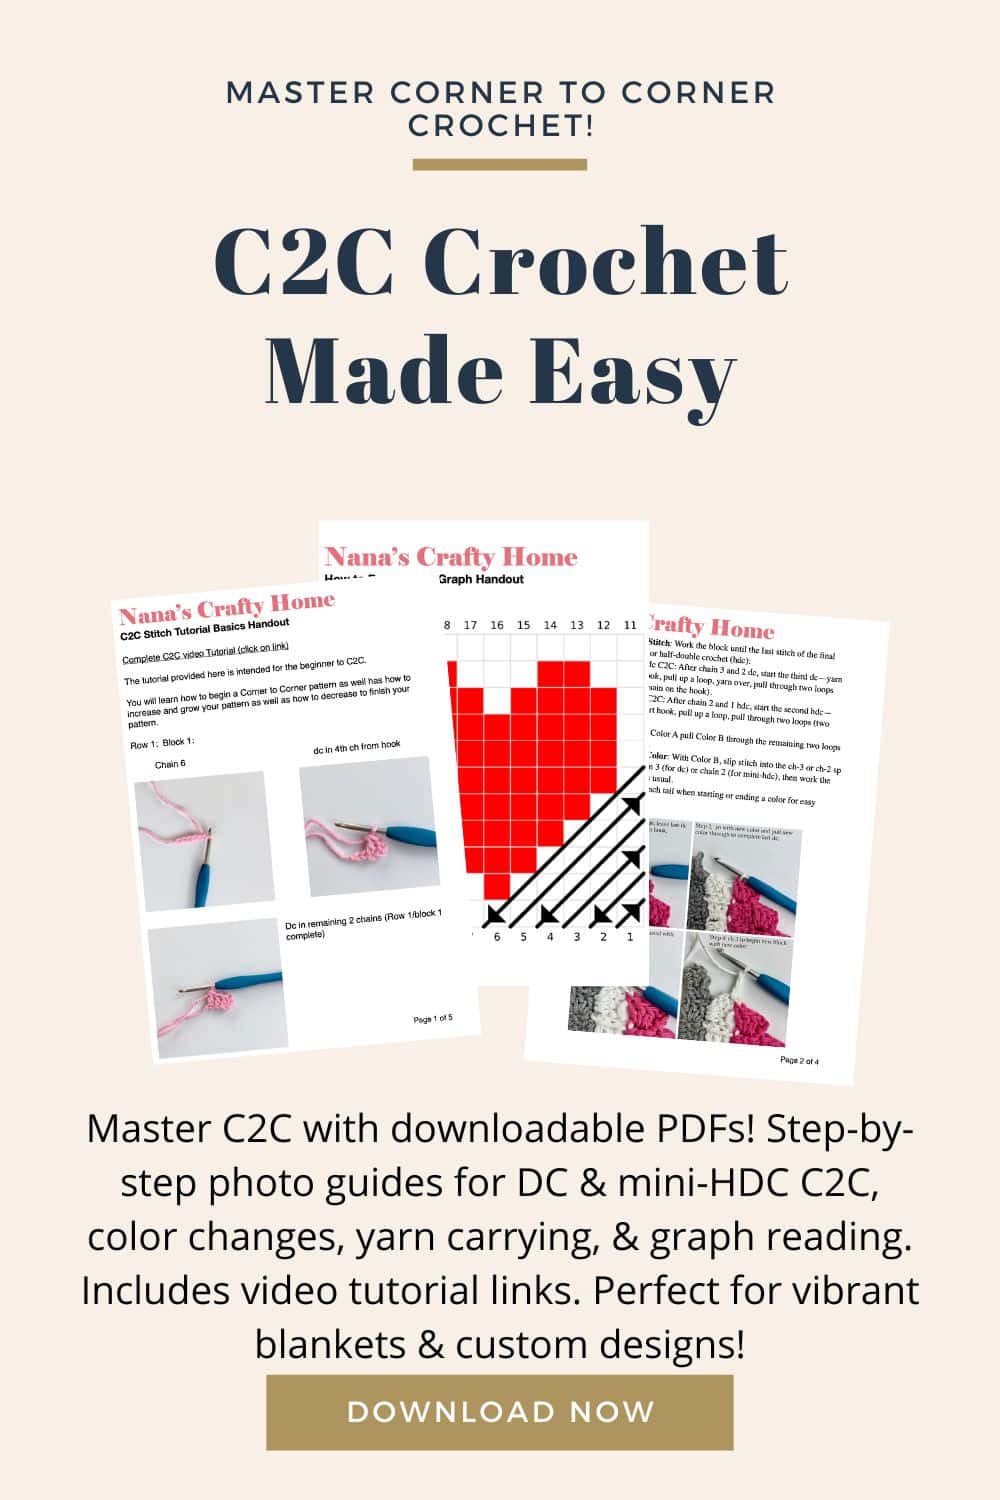
Elevate your C2C crochet skills with our C2C Crochet PDF Tutorial Bundle! This handy guide is a must-have for crocheters wanting to create stunning blankets and custom designs with ease. Packed with step-by-step photo tutorials for standard DC, mini-HDC, color changes, yarn carrying, graph reading, and making a rectangle shape in c2c, plus links to helpful videos, it’s perfect for beginners. Save time, avoid mistakes, and unlock your creativity—grab your downloadable PDFs now and start crocheting pixel-perfect projects! Includes beginner-friendly patterns to practice your new skills!
Shaping Your C2C Crochet Square: Mastering the Decrease
You’ve built your C2C project to its widest point—now it’s time to shape it into a perfect square by decreasing! Decreasing in C2C is like climbing back down the diagonal, reducing one block per row until you reach a single block. This step-by-step guide will make the process simple and fun, with a video tutorial to guide you. Let’s finish your square with confidence!
Step 1: Start Decreasing at Your Project’s Widest Point
- Once your project reaches the desired width, stop adding new blocks.
- Turn your work, then slip stitch across the three double crochets (dc) of the last block from the previous row to reach its chain-3 space (ch-3 sp).
Visual Help: Watch How to Work a Decrease for a clear demo (starts at 9:43).
Step 2: Work the Row
- Chain 3, then work 3 dc into the ch-3 sp of the next block from the previous row.
- Continue across the row: slip stitch into the ch-3 sp of the next block, chain 3, and work 3 dc in that ch-3 sp. Repeat until you reach the last block.
- Pro Tip: Keep your slip stitches loose to avoid puckering and to ensure a smooth edge.
Step 3: Repeat to Form a Square
- For each new row, repeat Steps 1 and 2: slip stitch across the three dc of the last block to start, then work blocks across the row as described.
- Each row decreases by one block on both sides, gradually forming your square.
- Continue until you’re left with just one block—your square is complete!
Why It Works: Decreasing mirrors the increasing process, creating a balanced, diagonal square shape. Next, we’ll explore how to make a Rectangle Shape!
Need Extra Guidance?
Check out the C2C DC Video Tutorial to see each step in action, or to practice a small swatch to perfect your technique.
Want to practice C2C? Check out the Caron Spring Blanket Pattern!
Stretch Your C2C Crochet Skills: Making a Rectangle
Ready to take your C2C skills to the next level with a rectangular project? Unlike a square, a C2C rectangle requires a clever mix of increasing and decreasing to create its elongated shape—perfect for scarves, table runners, or custom blankets! This step-by-step guide will walk you through building a rectangle, from reaching the desired width to shaping the final block. With clear instructions and pro tips, you’ll craft a stunning rectangle with ease. Let’s jump in!
Step 1: Increase to Desired Width
- Work standard C2C increases (as described in the previous section) until the short side of your rectangle reaches the desired width, e.g., 30 blocks.
- Each row adds one block, so count carefully to hit your target width.
- Pro Tip: Sketch your rectangle’s dimensions (e.g., 30 blocks wide by 50 blocks long) on graph paper to visualize your goal and track progress.
Step 2: Increase One Side, Decrease the Other
To stretch your project into a rectangle, you’ll increase on one side (e.g., the bottom edge) while decreasing on the other (e.g., the top edge), alternating sides each row to keep the width steady. This creates the elongated shape you’re aiming for! Here’s how to do it:
- For Rows Starting with an Increase (e.g., odd-numbered rows):
- Start (Increase): Chain 6, then double crochet (dc) in the fourth chain from your hook and the next two chains to create a new block.
- Work Across: For each block, slip stitch into the top of the chain-3 space (ch-3 sp) of the next block from the previous row, chain 3, and work 3 dc in that ch-3 sp. Repeat until you reach the last block.
- End (Decrease): Slip stitch into the ch-3 sp of the last block, turn, then slip stitch across its three dc stitches just made to reach the edge. Do not work a new block.
- For Rows Starting with a Decrease (e.g., even-numbered rows):
- Start (Decrease): After working a slip stitch across the three dc sts of the last block from the previous row, chain 3, then work 3 dc in that ch-3 sp.
- Work Across: Slip stitch into the ch-3 sp of the next block, chain 3, and work 3 dc in that ch-3 sp. Repeat until you reach the last block.
- End (Increase): Slip stitch into the ch-3 sp of the last block, chain 3, then work 3 dc in last ch-3 sp.
- Pro Tip: Your block count stays the same during this phase because you’re adding one block and removing one each row. Count your blocks after each row to stay on track, and use your sketch to confirm your rectangle’s shape!
Step 3: Maintain Length Until Complete
- Repeat Step 2 for each row until the long side of your rectangle reaches the desired length, e.g., 50 blocks.
- Check your progress against your sketch to ensure the rectangle stays on track.
Step 4: Decrease Both Sides to Finish
- Once your rectangle is the desired size, decrease on both sides to close it off:
- Start of Row: Slip stitch across the three dc of the first block to reach its ch-3 sp (no new block).
- Work Across: Chain 3, work 3 dc in the ch-3 sp of the next block, and continue across as in Step 2.
- End of Row: Slip stitch into the top of the ch-3 sp from the final block, turn and work slip stitches across the block just worked to decrease.
- Repeat until you’re left with one block—your rectangle is complete!

Why It Works: By balancing increases and decreases, you create a rectangle’s unique shape, maintaining width while extending length. Next up – how to work a c2c in half double crochet!
Need Extra Guidance?
Practice a small rectangle (e.g., 5×8 blocks) to master the increase/decrease rhythm. For visual help, visit the photo tutorial for how to create a Rectangle Shape in C2C.
Mini-HDC C2C Technique
The mini half-double crochet (hdc) C2C creates smaller, denser blocks, perfect for detailed graphs or smaller projects. This stitch is my personal preference for my c2c color work graphs. The gaps created with c2c are smaller with the hdc stitch meaning your finished project has a more polished finished look. If you find a graph that is provided for the hdc stitch but you want a larger finished project simply adjust to dc for a larger size!
Mini-HDC C2C: Crafting Smaller, Denser Designs
Want to create intricate C2C projects with a polished, professional look? The mini half-double crochet (hdc) C2C technique uses smaller, denser blocks, making it ideal for detailed graphs, wall decor, scarves, or blankets. With tighter stitches and fewer gaps, your designs will shine with crisp, pixel-perfect precision! This step-by-step guide will teach you how to work mini-hdc C2C, from starting your first block to increasing and decreasing. Let’s jump into this game-changing variation!
Step 1: Create Your First Mini-HDC Block (Row 1)
- Chain 4.
- Half-double crochet (hdc) in the third chain from your hook and in the next chain.
- You’ve made your first mini-hdc block! (1 block total)
Step 2: Increase to Two Blocks (Row 2)
- Turn your work, then chain 4.
- Hdc in the third chain from your hook and the next chain to form a new block.
- Slip stitch into the chain-2 space (the space created by the skipped chains of the previous block).
- Chain 2, then work 2 hdc in the same ch-2 sp to complete the second block.
- You now have 2 blocks!
Step 3: Keep Increasing
- For each new row, start as in Step 2: chain 4, hdc in the third and fourth chains from your hook to create the first block.
- Work across the row: slip stitch into the ch-2 sp of the next block from the previous row, chain 2, and work 2 hdc in that ch-2 sp. Repeat until the last block.
- Continue increasing until your project reaches the desired width, adding one block per row (just like standard C2C).
Step 4: Decrease to Shape Your Project
- To decrease (e.g., for a square), stop adding new blocks:
- Slip stitch across the two hdc of the last block from the previous row to reach its ch-2 sp.
- Chain 2, then work 2 hdc in the ch-2 sp of the next block.
- Continue across the row, slip-stitching into each ch-2 sp, chaining 2, and working 2 hdc.
- Repeat until you reach one block, following the same decreasing pattern as standard C2C.
Why It Works: The mini-hdc C2C technique creates smaller blocks for finer details and a denser texture, making your graphs pop with clarity. If you want a larger project, try switching to double crochet (dc) stitches for the same graph!
Need Extra Guidance?
Practice a small mini-hdc swatch (e.g., 5×5 blocks) to master the tighter stitches. For visual help, revisit the half double crochet c2c photo tutorial or the mini hdc video for even more visual help!
Now let’s head into the world of color changing in c2c!
Adding Color to Your C2C: Mastering Color Changes
Ready to make your C2C projects pop with vibrant, pixelated patterns? Changing colors in corner-to-corner (C2C) crochet is the secret to creating stunning graph-based designs. Whether you’re working with standard c2c in double crochet (dc) or mini half-double crochet (hdc) blocks, this step-by-step guide will show you how to switch colors seamlessly for crisp, professional results. With clear instructions, pro tips, and visual resources, you’ll be mastering color c2c graphs in no time! Let’s get started.
Please note on the video tutorial that I am working through a complete heart dish cloth color graph from start to finish. Watch the color changing portion of the video (marked at 12:30). If you want the free crochet heart dishcloth pattern, head on over to my complete photo tutorial for changing colors in c2c!
Step 1: Plan Your Color Changes with a Graph
- Before you start, choose or create a C2C graph that shows where each color block goes. Each square on the graph represents one C2C block.
- Mark the rows and colors on your graph to track your progress (e.g., “Row 5: 3 blue blocks, 2 red blocks”).
- Pro Tip: Print your graph or use the written row by row color changing instructions to check off blocks as you go, keeping your place in complex designs.
Step 2: Start Your Project and Prepare for the First Color Change
- Begin your C2C project as described in earlier sections (standard dc or mini-hdc), using your first color (e.g., Color A).
- Work until you reach the block where the graph indicates a color change, stopping before the last stitch of the block’s final hdc or dc. For example:
- In standard dc C2C, stop before the third dc of the block (after chain 3, 2 dc).
- In mini-hdc C2C, stop before the second hdc (after chain 2, 1 hdc).
Step 3: Switch Colors Smoothly
Transform your C2C project with crisp, vibrant color changes! Here’s how to switch from one color (Color A) to another (Color B) for a seamless, professional look:
- Prepare the Final Stitch: Work the block until the last stitch of the final double crochet (dc) or half-double crochet (hdc):
- For standard dc C2C: After chain 3 and 2 dc, start the third dc—yarn over, insert hook, pull up a loop, yarn over, pull through two loops (two loops remain on the hook).
- For mini-hdc C2C: After chain 2 and 1 hdc, start the second hdc—yarn over, insert hook, pull up a loop, pull through two loops (two loops remain).
- Switch Colors: Drop Color A pull Color B through the remaining two loops to complete the stitch.
- Continue with New Color: With Color B, slip stitch into the ch-3 or ch-2 sp of the next block, chain 3 (for dc) or chain 2 (for mini-hdc), then work the next block’s stitches as usual.
- Pro Tip: Leave a 4-6 inch tail when starting or ending a color for easy weaving later.
Why It Works: Switching colors mid-stitch creates clean transitions, making your graph’s pixels pop with clarity. You’ll use this technique for every color change in your project!
Ready to practice some of the techniques you have learned?
The Flower Scrubby C2C Dishcloth is the perfect quick project and a great way to practice your color changing!

Now let’s jump into all of my tips and tricks for carrying yarn colors in C2C!
Effortless Color Carrying in C2C: Keep Your Projects Tidy
Say goodbye to weaving in dozens of yarn ends! Carrying colors in C2C crochet lets you switch colors smoothly all while keeping the back of your project neat and snag-free. This technique is a game changer for more complex graph designs, saving time and effort. Whether you’re crocheting with standard double crochet (dc) or mini half-double crochet (hdc), these step-by-step tips will help you carry yarn like a pro. Let’s make your color work shine with minimal cleanup!
Carrying yarn (instead of cutting it) reduces the number of ends to weave in. Here’s how to do it effectively:
Step 1: Decide When to Carry Yarn
Pro Tip: Study your graph before starting to plan carries—highlight colors that reappear close by to keep your work neat and efficient.
Only carry yarn if it’s touching a pixel block of the same color in your graph, and keep carries to a maximum of 2-3 pixel blocks. This prevents long “floats” that could cause tension issues or distortion to your project.
If the same color doesn’t reappear within the next 2-3 blocks or in a block touching the same color in the next row, cut the yarn, leaving a 4-6 inch tail for weaving later.
Step 2: Carry Yarn Neatly Forward or Backward
- Lay the unused yarn (e.g., Color A) flat across the top of the stitches you’re working into with your active yarn (e.g., Color B).
- Crochet over the unused yarn as you work your block’s stitches (e.g., chain 3 and 3 dc for standard C2C, or chain 2 and 2 hdc for mini-hdc), encasing it inside the new stitches.
- Carry yarn forward (toward the next block in the row) or backward (toward the current block), depending on your row’s direction and where the color reappears.
- Pro Tip: For complex designs with multiple colors, use yarn bobbins or clips to keep strands organized and tangle-free.
I am not a big gadget girl but bobbins are a must for me when I am working any kind of color work in crochet. Check out my recommended products for yarn bobbins on Amazon: Clover yarn bobbins are perfect for smaller projects or small amounts of yarn or these larger bobbins will hold more yarn and are very inexpensive!
Let’s practice with another easy project – the Owl C2C Scarf! This project will be perfect for practicing How to Make a DC C2C Rectangle and how to work color changes in crochet!

Now let’s learn how to make your very own color graphs!
Design Your Own C2C Graphs with Stitch Fiddle: Unleash Your Creativity
Ready to turn your ideas into stunning C2C crochet masterpieces? Stitch Fiddle is a free online tool that lets you create custom graphs. Whether you’re using standard double crochet (dc) or mini half-double crochet (hdc), this step-by step guide will walk you through designing your own C2C graph with ease. Pair these graphs with the color-changing and yarn-carrying tips from earlier sections, and you’ll be crafting pixel-perfect designs in no time. Let’s jump into the fun of graph-making!
Step 1: Set Up Your Stitch Fiddle Account
- Visit Stitch Fiddle and create a free account to save and access your projects.
- Log in to start designing—no advanced tech skills required!
Step 2: Start a New C2C Project
- Select “Crochet” as the craft, and choose “Corner to Corner” as the chart type. Note that there are several options available for other crochet color work designs including tapestry, tunisian – even filet crochet!
- This sets up a diagonal grid tailored for C2C, where each square represents one block.
Step 3: Choose Your Yarn Preference
- Select “No Preference” unless you have a specific yarn in mind for your project.
Step 4: Choose Basis of Design
- Select “Empty” to create your own design. Note you also have the option to upload a photo and Stitch Fiddle will create a graph based on that photo! I don’t go into details on this in my tutorial but it is something you could easily explore.
Step 5: Choose Your Grid Size
- Set the number of blocks for your project (e.g., 50×50 for a square blanket, 30×50 for a rectangle). Each block equals one C2C block (dc or hdc).
- Pro Tip: Start with a smaller grid for your first project to avoid overwhelming detail—smaller grids mean fewer blocks and simpler color changes!
Need additional guidance? Check out my step-by-step photo guide for creating your own custom c2c graph!
Craft Any Size C2C Blanket: Your Guide to Custom Dimensions
Dreaming of a cozy baby blanket, a snuggly throw, or a massive bedspread? C2C crochet’s flexibility makes it easy to create blankets of any size, tailored to your vision! Whether you’re using standard double crochet (dc),mini half-double crochet (hdc), or a colorful Stitch Fiddle graph, this step-by-step guide will help you plan and crochet the perfect blanket size. Pair these tips with the color-changing and yarn carrying techniques from earlier sections, and you’ll have a custom masterpiece in no time. Let’s size up your next C2C project!
Size Your C2C Graph Perfectly with Stitch Fiddle’s Gauge Calculator
Want to design a C2C blanket that’s just the right size for your vision? Stitch Fiddle’s free gauge/size calculator makes it a breeze to calculate the exact number of blocks needed for your custom graph, ensuring your projectfits perfectly whether it’s a cozy baby blanket or a sprawling throw! This step-by step guide builds on the “How to Make Your Own C2C Graphs Using Stitch Fiddle” and “Craft Any Size C2C Blanket” sections, showing you how to use the calculator before setting our graph’s grid size. Pair this with your color-changing and yarn-carrying skills, and you’ll be crafting a pixel perfect masterpiece in no time. Let’s size it right!
Once you have worked through Step 4 in the previous section for How to Make a Custom C2C Graph before you choose grid size:
- Select Gauge/Size Calculator
- Make a gauge swatch (e.g., 10×10 blocks) using your desired stitch (dc or hdc), yarn and hook.
- Measure the swatch to calculate how many blocks in 4″.
- Input number of blocks under “Square Count”
- Input the desired size of your finished project (e.g. 36″ x 48″).
- The number of squares will populate according to the gauge and the desired finished size. In my example I would need 45 horizontal squares and 60 squares vertically to achieve the desired size.
- Crochet the Blanket:
- For a square, increase until you reach the desired width (e.g., 40), then decrease.
- For a rectangle, follow the rectangle method above.
Add a Flawless Base Edge to Your C2C Project
Ready to give your C2C blanket a professional, polished finish? Before adding a decorative border, start with a seamless base edge – a foundation round of single crochet stitches that creates a smooth, invisible framework for your border design. Whether you’ve crafted a vibrant graph-based square or a custom-sized rectangle, this step-by-step guide will show you how to add a single crochet base edge to your C2C project. Pair this with the sizing and color work techniques from earlier sections, and you’ll be ready to add a border that pops! Let’s set the stage for a stunning final touch.
Step 1: Prepare Your Completed C2C Project
- Ensure your C2C project (square or rectangle) is complete, with all blocks crocheted and loose ends woven in.
Step 2: Start the Single Crochet Base Round
- Attach your yarn to any block’s edge with a slip stitch, starting at a corner for a neat beginning.
- Understand Pixel Blocks: A “pixel block” is one “set” of stitches from your graph—3 dc stitches (plus a chain-3) for standard dc C2C, or 2 hdc stitches (plus a chain-2) for mini-hdc C2C. Along the edge, blocks alternate:
- Long pixel block: The top or bottom of a dc or hdc block (e.g., working into the dc stitches or chain-3/chain-2).
- Short pixel block: The side of a block (e.g., working along a dc stitch or chain-3 for dc C2C, or hdc stitch/chain-2 for hdc C2C).
Stitch Counts:
- For DC C2C: Work 3 sc into each long pixel block (e.g., across the top/bottom dc stitches or chain-3 space). Alternate 2-3 sc into each short pixel block (e.g., along the side of a dc or chain-3), depending on tension and yarn thickness.
- For Mini-Hdc C2C: Work 2 sc into each block (long or short), as hdc blocks are smaller, adjusting to 1-2 sc for short blocks if needed to prevent puckering.
- Work sc stitches around the entire edge, following the stitch counts above.
Example: Along a dc C2C edge, you might work 3 sc (long block), 2 sc (short block), 3 sc (long block), 3 sc (short block), repeating to maintain evenness. - Pro Tip: Practice your stitch counts on a small C2C swatch (e.g., 10×10 blocks) to ensure even spacing before starting your main project.
Step 3: Handle Corners for a Flat Edge
- At each corner, work 3 sc into the same space on the edge at the corner to create a smooth turn and prevent curling.
- Continue working sc stitches along each edge, following the stitch counts from Step 2, until you complete the round. Join with a slip stitch to the first sc.
Step 4: Check and Adjust Your Base Edge
- Count your stitches along each side to confirm even spacing (e.g., ~80 blocks × 2.5 sc average per block ≈ 200 sc for an 80-block dc edge).
- Check the front and back of your work to ensure the base round lies flat without pulling or distorting the C2C blocks.
- Pro Tip: Choose a yarn color for the base edge that blends with your project (e.g., a neutral or matching shade) to keep it invisible under your border, enhancing the design.
Why It Works: A single crochet base edge evens out the alternating long and short edges of C2C projects, creating a stable, professional foundation for any border style. This tailored stitch count ensures your base edge is smooth and ready for a flawless finish!
Need Extra Guidance?
Check my Single Crochet Base for C2C Tutorial for a full visual walkthrough. For practice, crochet a 5×5 block swatch and practice your base edge to perfect the stitch counts.
Additional Tips for C2C Success
- Practice with Simple Patterns: Start with a simple corner to corner blanket with self-striping yarn before tackling detailed graphs.
- Once ready to move on to color graphs start with small projects with fewer colors so you can get the feel of color changing.
Troubleshooting Common C2C Issues
Don’t let a wonky edge or tangled yarn derail your C2C crochet masterpiece! Even the most seasoned crocheters face hiccups, but with a few simple tricks, you can troubleshoot common issues and keep your project on track. Whether you’re crocheting a vibrant graph-based blanket or a cozy solid-color throw, this guide tackles problems like skewed shapes, tangled yarn, color mix-ups, and more. Build on the techniques from earlier sections—like increasing, decreasing, and color changes—and you’ll be back to creating pixel-perfect designs in no time. Let’s fix those pesky issues with confidence!
Common Issues and Fixes:
1. Skewed or Misshapen Project
- Problem: Your square looks like a parallelogram, or your rectangle is lopsided.
- Cause: Incorrect increasing or decreasing, often from adding or skipping blocks in a row.
- Fix: Count the blocks in each row to confirm they match your pattern or graph (e.g., Row 10 should have 10 blocks for a square). Compare with the “Standard Double Crochet C2C” or “How to Make a Rectangle Shape in C2C” sections to ensure you’re increasing/decreasing correctly (e.g., chain 6 for new dc blocks, slip stitch to decrease). If you spot an error, carefully unravel to the mistake and rework the row.
- Prevent: Count blocks after every row, especially during increases/decreases, and use stitch markers to mark the first and last blocks.
- Pro Tip: Lay your project flat every few rows to check its shape visually, catching skewing early.
2. Tangled Yarn in Colorwork
- Problem: Your yarn colors are knotted or twisted, slowing you down.
- Cause: Multiple colors in a graph-based project can tangle during color changes or carrying.
- Fix: Pause after every 2-3 rows to untangle yarn, gently separating each strand. For complex designs with many colors (e.g., from “Adding Color to Your C2C”), use yarn bobbins or clips to keep strands organized, as suggested in “Tips for Carrying Colors in C2C.” Rewind yarn into small balls if tangles persist.
- Prevent: Keep yarn balls or bobbins in separate containers (e.g., bowls or bags) and position them in order of use.
- Pro Tip: Work in a spacious, well-lit area to manage yarn flow, and take short breaks to detangle before knots become unmanageable.
3. Colors Don’t Match Your Graph
- Problem: Your project’s design looks wrong or shifted.
- Cause: You may have miscounted blocks or switched colors at the wrong point in your graph.
- Fix: Compare your project to your Stitch Fiddle graph (from “Design Your Own C2C Graphs”). Count the blocks in each row to pinpoint the error (e.g., 3 blue blocks, 2 red blocks, 3 blue blocks in Row 8). Check color changes against the “Adding Color to Your C2C” section to ensure you’re switching mid-stitch correctly. Unravel to the mistake if needed and rework the row. You are back on track!
- Prevent: Do a quick visual check every 2-3 rows. Mark completed rows on your chart with a highlighter or marker to stay on track.
Ready to move on to more complex designs?


Conclusion: Your C2C Crochet Journey Awaits!
Congratulations, you’ve unlocked the vibrant world of corner-to-corner (C2C) crochet with this Ultimate Guide to C2C Crochet: Techniques and Tips! From mastering standard double crochet and mini-hdc to crafting custom-sized squares and rectangles, you’ve learned the skills to bring any c2c vision to life. You’ve explored seamless color changes, efficient yarn carrying, and the art of designing pixel-perfect graphs with Stitch Fiddle. With troubleshooting tips to conquer common hiccups and a flawless single crochet base edge to prep your projects, you’re ready to create blankets, scarves, and more that dazzle with creativity and precision.
Now, it’s time to grab your yarn, hook, and imagination! Whether you’re stitching a cozy throw, a personalized gift, or a bold graph-inspired masterpiece, C2C’s versatility empowers you to make every project uniquely yours. Keep practicing, experimenting, and revisiting this guide for inspiration—bookmark it, pin it, or share it with your crochet crew! For more tutorials and tips, check out resources like Nana’s Crafty Home or dive into the C2C Basics Video. Happy crocheting, and may your C2C creations shine with joy and color!
Copyright 2025 Tonya Bush/Nana’s Crafty Home
Social Media links:
Facebook: https://www.facebook.com/nanascraftyhome
Instagram: https://www.instagram.com/nanascraftyhome/
Pinterest: https://www.pinterest.com/nanascraftyhome/
YouTube: https://www.youtube.com/c/TonyaBush
Twitter: https://twitter.com/nanascraftyhome
Facebook Group: https://www.facebook.com/groups/829792060522798
Sign up for my Newsletter: https://nanascraftyhome.com/sign-up-for-my-free-newsletter/
 Hi! Thank you so much for being here! I am Tonya the designer behind Nana's Crafty Home. As a wife, mother, Nana of 9 & with 2 fur babies, my days are filled with love, laughter, hugs and yarn! Here you will find colorful and creative crochet designs for yourself or loved ones. My hope is that you will be inspired to learn and create along with me!
0 Comments