Learn how to make C2C Crochet in a rectangle with this complete photo and video corner to corner (c2c) crochet tutorial by Nana’s Crafty Home!

I design a lot of c2c crochet patterns and one of the questions I get asked the most is “How do I make a c2c crochet project that is not a perfect square?”
Many of you may be familiar already with c2c crochet and have worked a standard square crochet pattern. However, if you have ever wondered how to work a rectangle instead – this tutorial is for you!
When you work a square in c2c crochet you will begin decreasing on the same row. This creates a square shape.
In order to create a rectangle shape in c2c crochet you will decrease on one side while continuing to increase on the other.
Why C2C crochet rectangle shapes?
Most commonly you will see this used for c2c crochet scarves – a scarf is typically only 7″ – 10″ wide and can be anywhere from 40″ – 80″ long. My Owl C2C Scarf and Unicorn C2C Scarf are great examples of this style.
Many of my c2c crochet blankets are also rectangles; the Koala C2C Blanket, Panda C2C Blanket, Night Before Christmas C2C Blanket, Penguin & Polar Bear Pals C2C Blanket, Sunflower Daze C2C Blanket and the Desert Sun Cactus C2C Blanket – all different sized rectangles!
This tutorial will show you how to make a c2c rectangle in “portrait” style & in “landscape” style.
Now your question might be, “Why in the world do I need to know how to create a landscape rectangle? Just turn a portrait blanket to the landscape view!” That works just fine if you are crocheting a rectangle with a single color, in bands of stripes or with self-striping yarn. However, if you are working a color work c2c color graph you may need to know how to work both a landscape & portrait rectangle shape depending on the design.
This tutorial is geared to someone already familiar with c2c crochet. If you want to start at the beginning and learn c2c as a beginner to this technique, check out these tutorials:
Basic C2C tutorial
How to Read Graphs in C2C
If you scroll to the bottom of this post you will find graphs, written instructions and photos for creating rectangle shapes in c2c. I have a complete video tutorial for you as well. If you aren’t able to view the video on the blog you can also find it on my YouTube Channel. Subscribe to my YouTube Channel to get notified whenever I post a new video.
C2C Crochet Rectangle Tutorial Video Marks:
C2C Rectangle Portrait: 4:30
C2C Rectangle Landscape: 9:03
Ready to dig deeper into corner to corner crochet and master this versatile technique? Our Ultimate Guide to C2C Crochet: Techniques and Tips is the foundational c2c resource on the blog, packed with everything beginners and for those that need a c2c refresher! From standard DC and mini-HDC C2C basics to seamless color changes, efficient yarn carrying, custom graph design with Stitch Fiddle, and troubleshooting common issues, this comprehensive C2C crochet guide includes step-by-step tutorials, video links, and free pattern ideas to get you started. Whether you’re tackling your first C2C project or refining your skills, head over to the guide now for all the FREE essential C2C crochet tips and resources in one place!
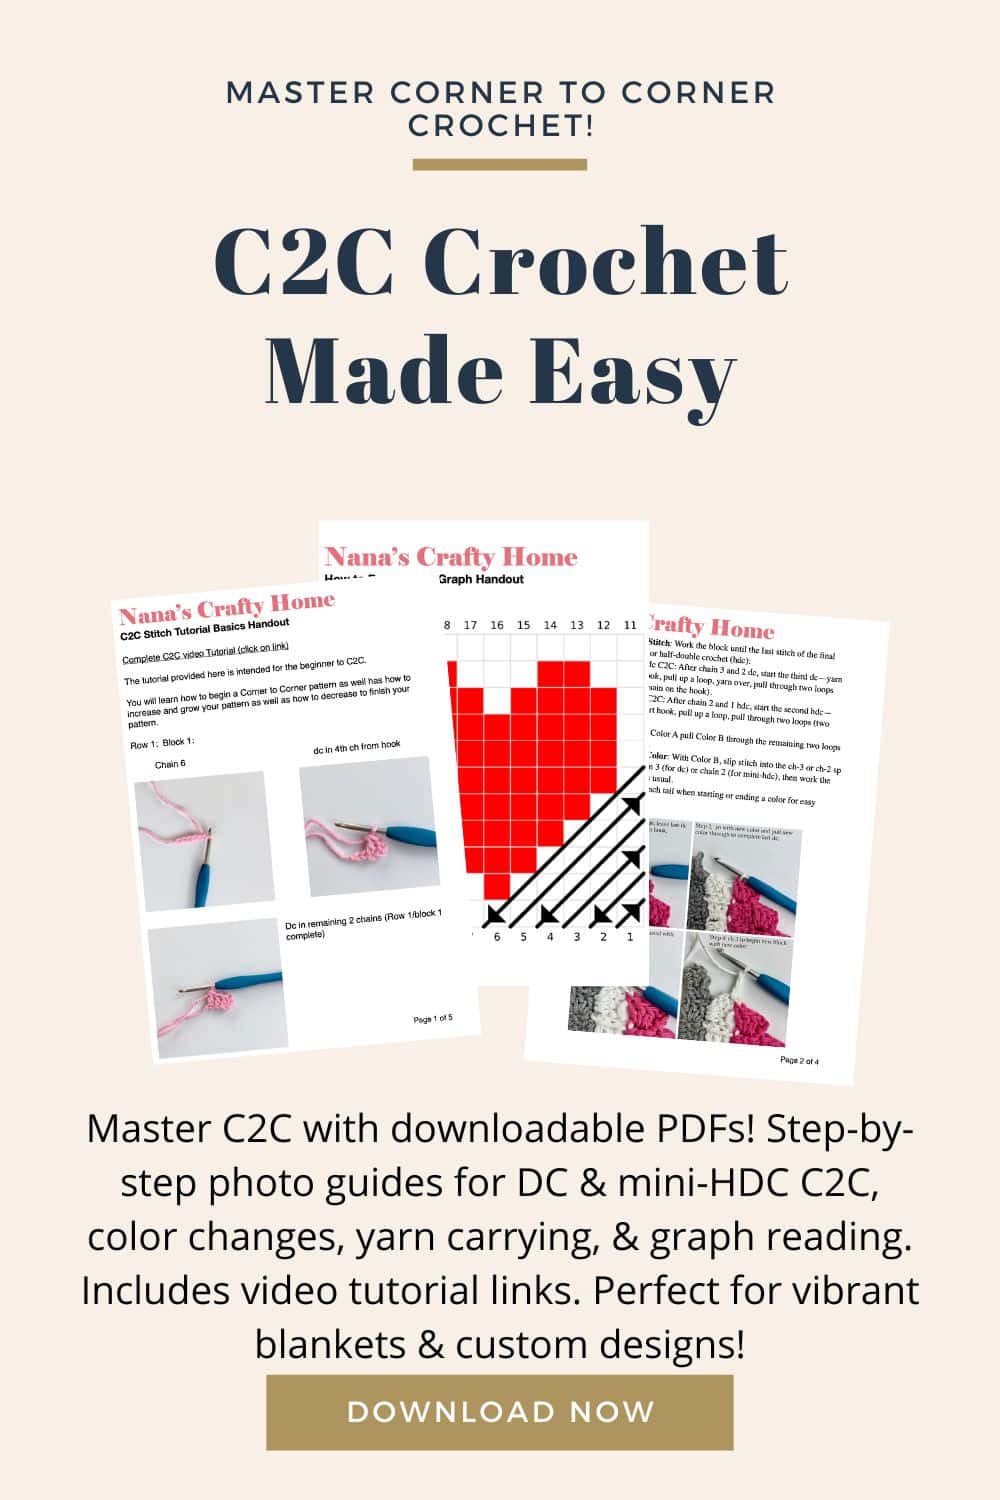
Elevate your C2C crochet skills with our C2C Crochet PDF Tutorial Bundle! This handy guide is a must-have for crocheters wanting to create stunning blankets and custom designs with ease. Packed with step-by-step photo tutorials for standard DC, mini-HDC, color changes, yarn carrying, graph reading, and making a rectangle shape in c2c, plus links to helpful videos, it’s perfect for beginners. Save time, avoid mistakes, and unlock your creativity—grab your downloadable PDFs now and start crocheting pixel-perfect projects! Includes beginner-friendly patterns to practice your new skills!
To get free crochet patterns and get notified of future giveaways, sign up for my newsletter. I never share or sell your information to third parties — it stays private!
If you would like daily crochet inspiration be sure to follow me on Facebook, Instagram, Pinterest, YouTube, Twitter and Tumblr.
You may like the following free C2C patterns at Nana’s Crafty Home:


- Desert Cactus Sun C2C Blanket free crochet pattern
- Panda Bear C2C Blanket free crochet pattern
- Koala C2C Blanket free crochet pattern
C2C Crochet How to Make a Rectangle Shape Tutorial
C2C crochet Square Shape:

You can see by the above graph that once you complete row 10 you will begin decreasing on both sides of your pattern. This creates a square shape and you are now decreasing on both sides through the remainder of your graph.
The written instructions for a square shape in c2c crochet would look like the following:
← Row 1 [RS]: Pink 1 (1 square)
→ Row 2 [WS]: Pink 2 (2 squares)
← Row 3 [RS]: Pink 3 (3 squares)
→ Row 4 [WS]: Pink 4 (4 squares)
← Row 5 [RS]: Pink 5 (5 squares)
→ Row 6 [WS]: Pink 6 (6 squares)
← Row 7 [RS]: Pink 7 (7 squares)
→ Row 8 [WS]: Pink 8 (8 squares)
← Row 9 [RS]: Pink 9 (9 squares)
→ Row 10 [WS]: Pink 10 (10 squares)
Corner (begin decreasing)
← Row 11 [RS]: Pink 9 (9 squares)
→ Row 12 [WS]: Pink 8 (8 squares)
← Row 13 [RS]: Pink 7 (7 squares)
→ Row 14 [WS]: Pink 6 (6 squares)
← Row 15 [RS]: Pink 5 (5 squares)
→ Row 16 [WS]: Pink 4 (4 squares)
← Row 17 [RS]: Pink 3 (3 squares)
→ Row 18 [WS]: Pink 2 (2 squares)
← Row 19 [RS]: Pink 1 (1 square)
In the written instructions for a square you will see the instructions for where to work your corner in one place only – the row you will begin decreasing on both sides of your pattern.
The first photo below shows work complete through row 10. The second photo shows row 11. You are now decreasing on both sides of your work.

C2C Crochet Portrait Rectangle
The graph below will create a rectangle “portrait” shape. You can see that I will begin decreasing after row 10 on the left edge of my work, while continuing to increase on the top edge until I reach row 15.

In a written pattern the above rectangle graph will look like the following:
← Row 1 [RS]: Pink 1 (1 square)
→ Row 2 [WS]: Pink 2 (2 squares)
← Row 3 [RS]: Pink 3 (3 squares)
→ Row 4 [WS]: Pink 4 (4 squares)
← Row 5 [RS]: Pink 5 (5 squares)
→ Row 6 [WS]: Pink 6 (6 squares)
← Row 7 [RS]: Pink 7 (7 squares)
→ Row 8 [WS]: Pink 8 (8 squares)
← Row 9 [RS]: Pink 9 (9 squares)
→ Row 10 [WS]: Pink 10 (10 squares)
Corner (begin decreasing)
← Row 11 [RS]: Pink 10 (10 squares)
→ Row 12 [WS]: Pink 10 (10 squares)
← Row 13 [RS]: Pink 10 (10 squares)
→ Row 14 [WS]: Pink 10 (10 squares)
← Row 15 [RS]: Pink 10 (10 squares)
Corner (begin decreasing)
→ Row 16 [WS]: Pink 9 (9 squares)
← Row 17 [RS]: Pink 8 (8 squares)
→ Row 18 [WS]: Pink 7 (7 squares)
← Row 19 [RS]: Pink 6 (6 squares)
→ Row 20 [WS]: Pink 5 (5 squares)
← Row 21 [RS]: Pink 4 (4 squares)
→ Row 22 [WS]: Pink 3 (3 squares)
← Row 23 [RS]: Pink 2 (2 squares)
→ Row 24 [WS]: Pink 1 (1 square)
You will notice that you see corner instructions in two different places in your pattern – after row 10 and after row 15. You will increase on both sides through row 10 and after row 10 will increase on one side only through row 15.

C2C Crochet Landscape Rectangle
The graph below will create a rectangle “landscape” shape. You can see that I will begin decreasing after row 10 on the top edge of my work, while continuing to increase on the left edge until I reach row 15.

The landscape c2c rectangle written instructions will look like the following:
← Row 1 [RS]: Pink 1 (1 square)
→ Row 2 [WS]: Pink 2 (2 squares)
← Row 3 [RS]: Pink 3 (3 squares)
→ Row 4 [WS]: Pink 4 (4 squares)
← Row 5 [RS]: Pink 5 (5 squares)
→ Row 6 [WS]: Pink 6 (6 squares)
← Row 7 [RS]: Pink 7 (7 squares)
→ Row 8 [WS]: Pink 8 (8 squares)
← Row 9 [RS]: Pink 9 (9 squares)
→ Row 10 [WS]: Pink 10 (10 squares)
Corner (begin decreasing)
← Row 11 [RS]: Pink 10 (10 squares)
→ Row 12 [WS]: Pink 10 (10 squares)
← Row 13 [RS]: Pink 10 (10 squares)
→ Row 14 [WS]: Pink 10 (10 squares)
← Row 15 [RS]: Pink 10 (10 squares)
Corner (begin decreasing)
→ Row 16 [WS]: Pink 9 (9 squares)
← Row 17 [RS]: Pink 8 (8 squares)
→ Row 18 [WS]: Pink 7 (7 squares)
← Row 19 [RS]: Pink 6 (6 squares)
→ Row 20 [WS]: Pink 5 (5 squares)
← Row 21 [RS]: Pink 4 (4 squares)
→ Row 22 [WS]: Pink 3 (3 squares)
← Row 23 [RS]: Pink 2 (2 squares)
→ Row 24 [WS]: Pink 1 (1 square)
You will notice that you see corner instructions in two different places in your pattern – after row 10 and after row 15. You will increase on both sides through row 10 and after row 10 will increase on one side only through row 15. This is the same as the portrait shaped rectangle. However, the decreases are on the opposite sides of the graph from the “portrait” style.


I hope you now feel comfortable making c2c crochet rectangles! I can’t wait to see your creations – send me an email at nanascraftyhome@gmail.com or if you share on social media add #nanascraftyhome so I can see your work!
 Hi! Thank you so much for being here! I am Tonya the designer behind Nana's Crafty Home. As a wife, mother, Nana of 9 & with 2 fur babies, my days are filled with love, laughter, hugs and yarn! Here you will find colorful and creative crochet designs for yourself or loved ones. My hope is that you will be inspired to learn and create along with me!