This Corner to Corner Crochet Blanket is a beginner-friendly c2c crochet blanket pattern by Nana’s Crafty Home.

I have shared several corner to corner (c2c) graphgans including tutorials on how to work corner to corner including adding colorwork to c2c.
However, I really haven’t shared any basic corner to corner blanket pattern on the blog and I get a lot of questions from beginners about crocheting a basic throw in the c2c technique. And I am all about the newbie here! I want everyone to learn this fabulous crochet technique even if you never want to incorporate color work in your design. Although my hope is that you will fall in love with it and eventually want to expand your crochet skills to include this into your life!
If you are unfamiliar with the standard corner to corner crochet stitch it is basically a stitch that is worked from one bottom corner to the opposite top corner in diagonal rows or on the bias. Many different stitches can be worked from corner to corner on the bias but this blanket is the traditional c2c stitch using “blocks” of dc stitches.
For some this stitch can be very confusing and you might have trouble “getting” it in the first few tries. Don’t give up! I always recommend to people that if you don’t get it from a written pattern or photo tutorial check out a video tutorial as well. If you watch a video tutorial and you are still struggling try another video. Sometimes it may take watching a tutorial from multiple designers before it “clicks”. I will admit I had to watch a few and practiced a bunch before my brain finally accepted it. I have photo and video tutorials but if you watch it and it just doesn’t click try another designer – eventually it will come!
Ready to dig deeper into corner to corner crochet and master this versatile technique? Our Ultimate Guide to C2C Crochet: Techniques and Tips is the foundational c2c resource on the blog, packed with everything beginners and for those that need a c2c refresher! From standard DC and mini-HDC C2C basics to seamless color changes, efficient yarn carrying, custom graph design with Stitch Fiddle, and troubleshooting common issues, this comprehensive C2C crochet guide includes step-by-step tutorials, video links, and free pattern ideas to get you started. Whether you’re tackling your first C2C project or refining your skills, head over to the guide now for all the FREE essential C2C crochet tips and resources in one place!
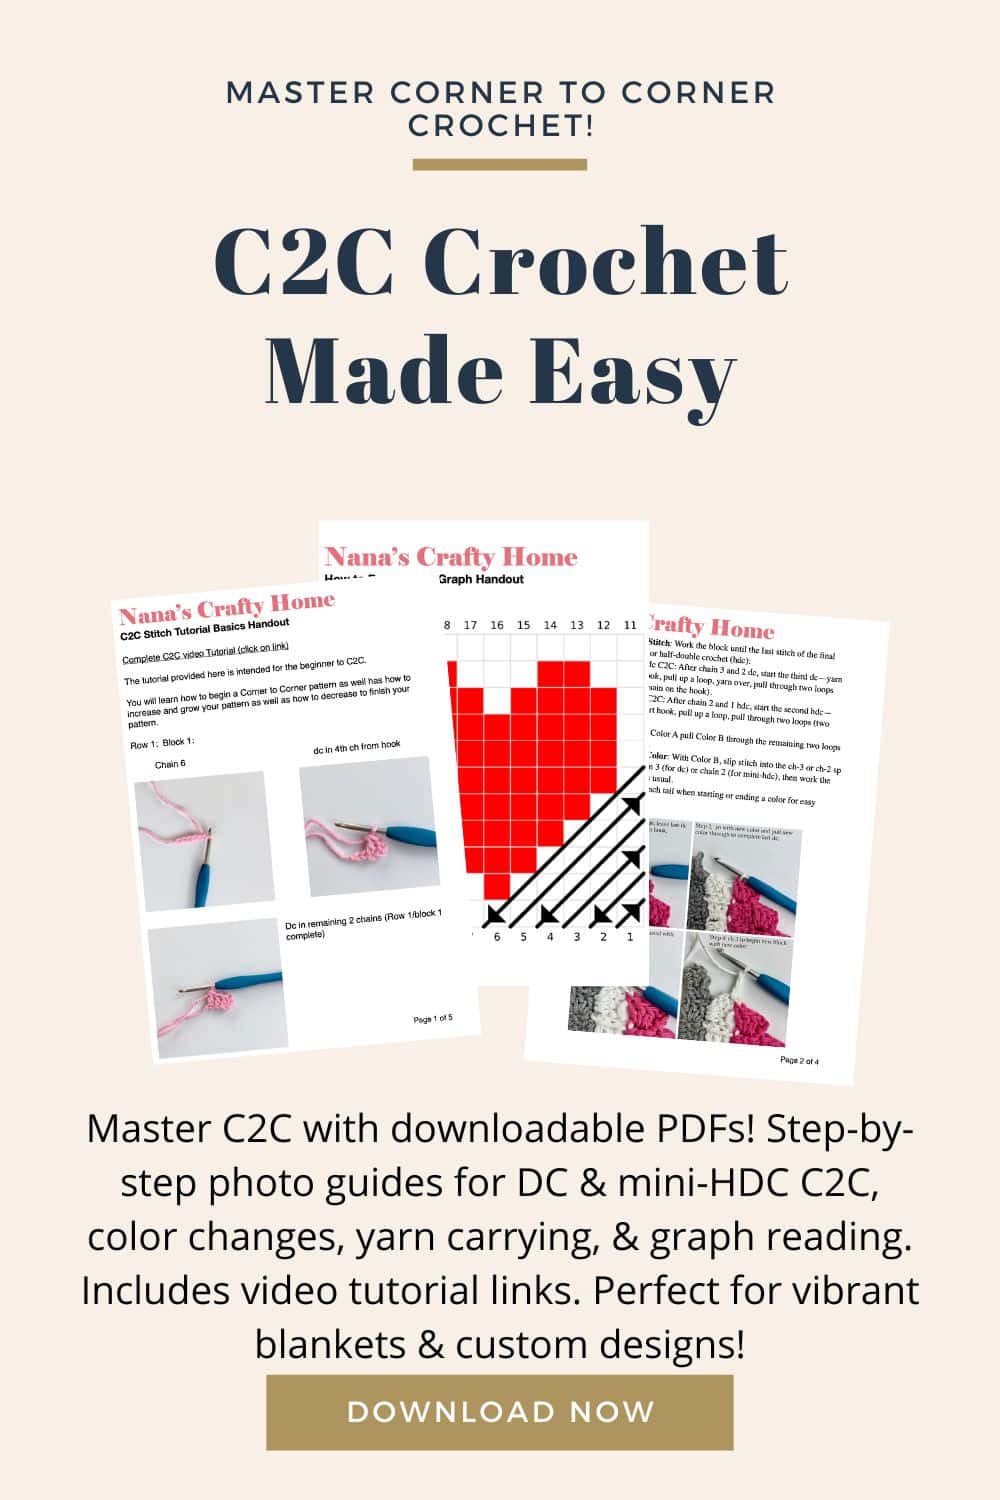
Elevate your C2C crochet skills with our C2C Crochet PDF Tutorial Bundle! This handy guide is a must-have for crocheters wanting to create stunning blankets and custom designs with ease. Packed with step-by-step photo tutorials for standard DC, mini-HDC, color changes, yarn carrying, graph reading, and making a rectangle shape in c2c, plus links to helpful videos, it’s perfect for beginners. Save time, avoid mistakes, and unlock your creativity—grab your downloadable PDFs now and start crocheting pixel-perfect projects! Includes beginner-friendly patterns to practice your new skills!

Spring Caron Big Cake Corner to Corner Crochet Blanket Pattern Details
Corner to corner (c2c) is one of my favorite ways to incorporate color work in your crochet. But, even without the addition of colorwork, the c2c stitch is a beautifully textured and visually interesting crochet stitch. Frankly, I think c2c is absolutely made for using self-striping yarn. The diagonal stripes really make for a beautiful blanket and disguises the color changes really well.
Let the color changes flow without any of the work with this throw made with Caron Big Cakes.* Caron Big Cakes are one of my very favorite self-striping yarns. Caron Big Cakes are a medium worsted weight #4 yarn and each cake contains a total of 603 yards so you only need 2 cakes for a crochet baby blanket! This yarn holds up really well with frequent washing without a lot of pilling. So many beautiful color options and it is so soft, too!

Disclosure: I only recommend products I would use myself. This post may contain affiliate links that if you make a purchase at no additional cost to you, I may earn a small commission.
I also get a lot of questions about how to resize a corner to corner crochet blanket. “When do I start decreasing?” “How big will my finished blanket be?”
I am sharing the instructions for how to resize and approximately how much yardage (and number of cakes) you will need for each of the most requested blanket sizes from Baby through Queen sizes.
I am providing the complete written pattern instructions as well as giving you the number of squares you would need for each size from baby blanket through Queen sizes.
And, if you struggle with the written pattern instructions for corner to corner the ad-free PDF includes the stitch diagram for c2c which you can purchase for a small fee as well!
I have all the photo and video tutorials you need to complete a corner to corner blanket as well. I am using the standard Double Crochet Stitch Corner to Corner method for my blanket and for the resizing instructions.
Corner to Corner (C2C) Tutorials
Basic C2C Stitch Photo & Video Tutorial
How to Make a Rectangle Shape in C2C (for Lapghan, Twin & Queen sizes)
How to Choose Self-Striping Yarn Cakes for a multi-cake project – shows you my tips for picking out self-striping cakes at the store for a large project.
How to use Stitch Fiddle’s free size calculator to resize any C2C project
I frequently get questions about other designer’s graphs – “How do I make this blanket bigger?” “How big will my finished blanket be with this many blocks?” I will show you how to figure how big your finished blanket will be based on your swatch!
If you want to change up your blanket to the mini hdc (half double crochet) method OR you want to change up the yarn weight for your blanket I have a complete video tutorial that shows you how to use Stitch Fiddle’s FREE size calculator to resize your blanket.
If you aren’t able to view the video here you can also find it on YouTube. Subscribe to my YouTube Channel so you never miss a new video!
And if you are interested in learning more about Stitch Fiddle you can watch my complete video tutorial on how to use Stitch Fiddle to create your own custom C2C colorwork designs! Stitch Fiddle has a free or paid option and most features that would benefit hobby crocheters is included in the free version. I use the paid plan since I use it so often and want to save all of my graphs. Even the paid plan is extremely affordable at just $23.00 per year. I use Stitch Fiddle for all of my color work designs – C2C and tapestry!
Purchase the Complete Pattern + Stitch Diagram
The Spring Caron Big Cake corner to corner crochet blanket pattern is also available as an ad-free, printable PDF! You can purchase the individual pattern, or if you love PDFs, you might want to check out my Lifetime Membership. It’s an awesome deal! Never pay for one of my PDFs again!! (Or, scroll down for the free version!)

Purchase the ad-free pdf of the Spring Caron Big Cake Corner to Corner Crochet Blanket pattern for a small fee. Thank you so much for supporting my work!
To get notified of my free crochet patterns and future giveaways, sign up for my newsletter. I never share or sell your information to third parties — it stays private!
If you would like daily crochet inspiration be sure to follow me on Facebook, Instagram, Pinterest, YouTube, Twitter and Tumblr!
You may also like the following free c2c crochet patterns at Nana’s Crafty Home:


- 1. Southwest Desert Sun Cactus C2C Blanket free pattern
- 2. Sunflower Daze Corner to Corner afghan free pattern
- 3. Sea Life Corner to Corner Crochet Patterns free graph patterns

Spring Caron Big Cake Corner to Corner Crochet Blanket free pattern instructions
Pattern written in US crochet terminology
Supplies:
- Caron Big Cakes, Weight 4 Medium (100% acrylic) 10.5 oz / 603 yards
- 2 (3, 3, 4, 8, 10) cakes in Color Boysenberry 1206 (1490, 1760, 2140, 4700, 5800) yards
Crochet hook size H (5.0 mm)
Scissors
Tapestry Needle
Approximate finished size:
Baby Blanket: 36” x 36” (45 x 45 blocks)
Toddler: 40” x 40” (50 x 50 blocks)
Lapghan: 40” x 48” (50 x 60 blocks)
Throw: 48” x 48” (60 x 60 blocks)
Twin: 70” x 90” (88 x 113 blocks)
Queen: 84” x 90” (105 x 113 blocks)
Gauge: 5 blocks = 4”
Abbreviations:
ch(s) = chain(s)
dc = double crochet
sp = space
st(s) = stitch(es)
sk = skip
sl st = slip stitch
Recommended Tutorials:
Basic C2C Stitch Photo & Video Tutorial
How to Make a Rectangle Shape in C2C (for Lapghan, Twin & Queen sizes)
How to Choose Self-Striping Yarn Cakes for a multi-cake project
How to use Sizing Calculator at Stitch Fiddle to adjust size of blanket
Pattern Notes:
- Blocks refer to group of (ch 3, 3 dc) worked together.
- Blanket is worked diagonally from corner to corner.
- Complete stitch diagrams are at bottom of PDF.
Pattern Instructions
Starting & Increase Block: Ch 6, dc in fourth ch from hook and next two chs (skipped chs counts as ch-3 sp).
Continuing block: sl st to ch-3 sp of next block, ch 3, work 3 dc in same ch-3 sp as sl st
Decrease: Sl st in top 3 sts of last block worked on previous row, sl st in ch-3 sp of next block and finish continuing blocks, stop working continuing blocks once you have reached the sl st edge.
Row 1: Work Starting Block
Row 2: Work 1 Increasing Block, work 1 Continuing Block.
Row 3: Work 1 Increasing Block, work Continuing Blocks across all blocks.
Repeat Row 3 to desired width.
Sizes & Blocks needed for each size:
Baby Blanket: 36” wide x 36” height (45 x 45 blocks)
Toddler: 40” x 40” (50 x 50 blocks)
Lapghan: 40” x 48” (50 x 60 blocks)
Throw: 48” x 48” (60 x 60 blocks)
Twin: 70” x 90” (88 x 113 blocks)
Queen: 84” x 90” (105 x 113 blocks)
To Stop Increasing: Work Decrease, work Continuing Blocks across all blocks.
To create a square: Work Decrease at beginning of each row, work Continuing Blocks all blocks.
To create a rectangle: Mark the side that will not be increasing. Alternate rows beginning with the Decrease or beginning with the Increasing block until the second side reaches desired length. Work Continuing blocks across each row after the appropriate beginning.
Fasten off. Weave in ends.
Add tassels or fringe, if desired.


Copyright 2022 Tonya Bush / Nana’s Crafty Home
Social Media links:
Facebook: https://www.facebook.com/nanascraftyhome
Instagram: https://www.instagram.com/nanascraftyhome/
Pinterest: https://www.pinterest.com/nanascraftyhome/
YouTube: https://www.youtube.com/c/TonyaBush
Twitter: https://twitter.com/nanascraftyhome
Facebook Group: https://www.facebook.com/groups/829792060522798
Sign up for my Newsletter: https://nanascraftyhome.com/sign-up-for-my-free-newsletter/
 Hi! Thank you so much for being here! I am Tonya the designer behind Nana's Crafty Home. As a wife, mother, Nana of 9 & with 2 fur babies, my days are filled with love, laughter, hugs and yarn! Here you will find colorful and creative crochet designs for yourself or loved ones. My hope is that you will be inspired to learn and create along with me!