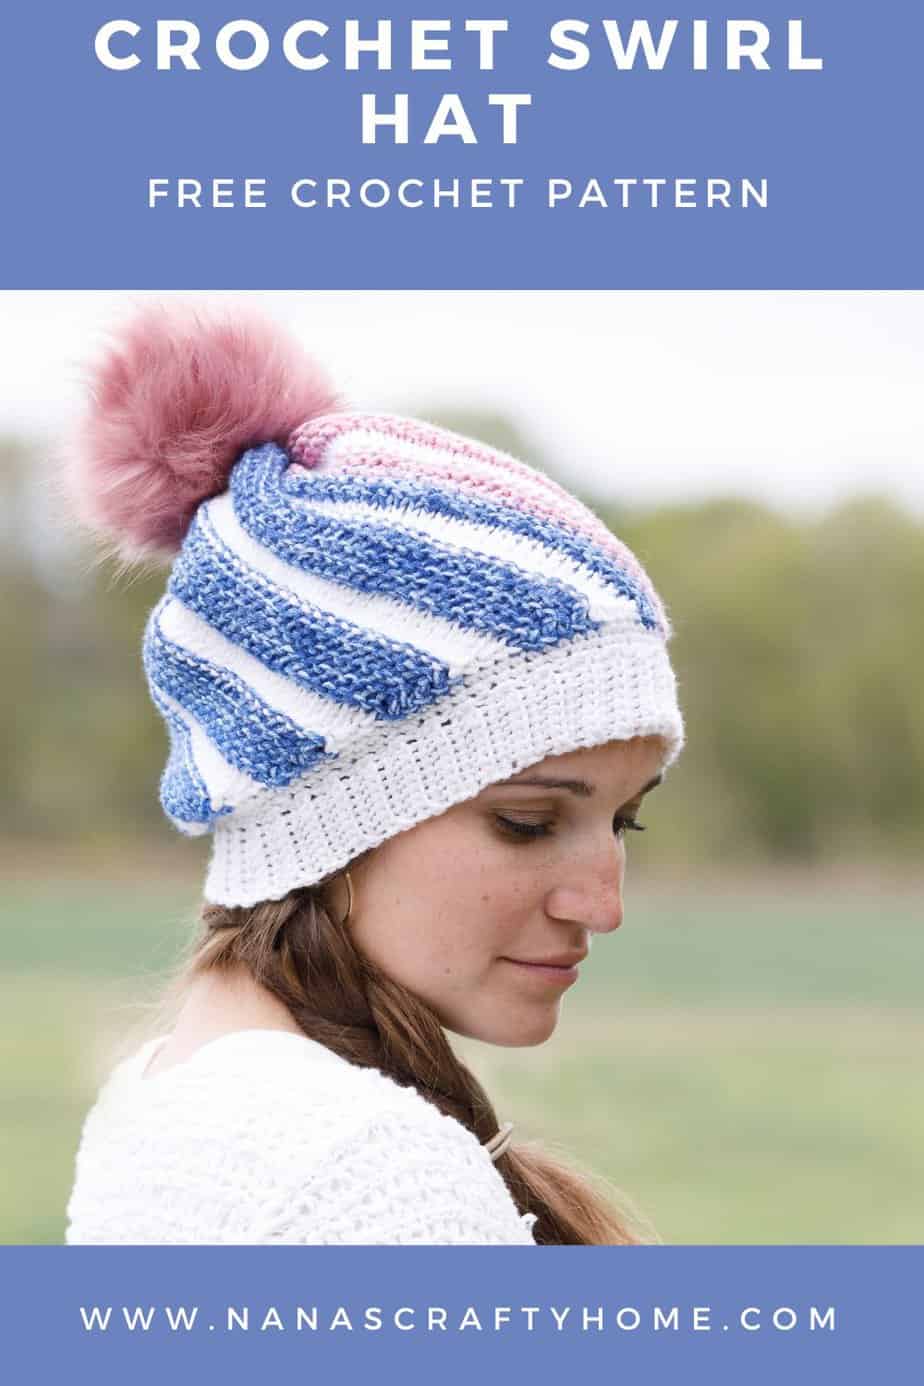
The Swirl Tunisian Crochet Hat is a free crochet pattern by Nana’s Crafty Home!
Tunisian crochet has a unique texture and appearance that can often be mistaken for knitting.
The hat features a ribbed brim that provides a snug fit, ensuring that it sits comfortably. This ribbing also adds a touch of classic knitwear design, further blurring the line between knitting and crochet.
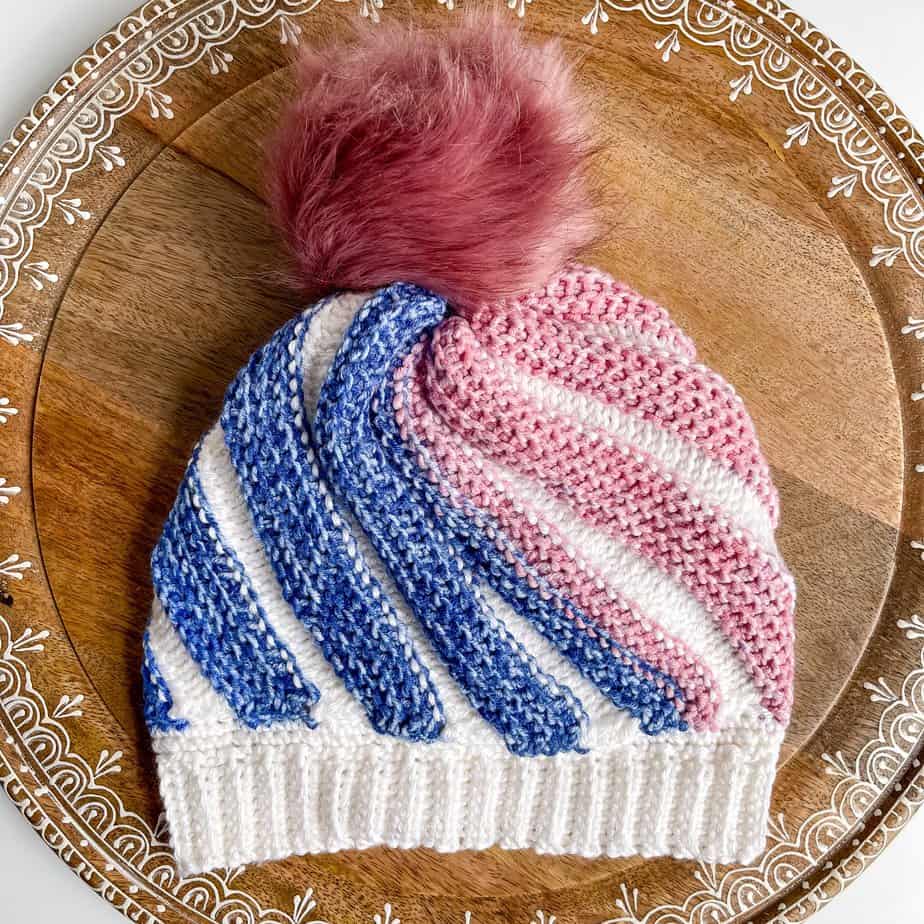
A fluffy, rose-colored faux fur pom-pom sits atop the hat, adding a playful and stylish finishing touch. The combination of the swirl pattern, the ribbed brim, and the pom-pom creates a harmonious and trendy design that would be a delightful addition to any winter wardrobe.
This free Tunisian crochet pattern has a fun twist – quite literally! The main body of the hat is made with a combination of just two stitches!
What is so fantastic about this hat is that you are making a simple parallelogram shape which is then seamed together at the end which creates the fun swirl shape.
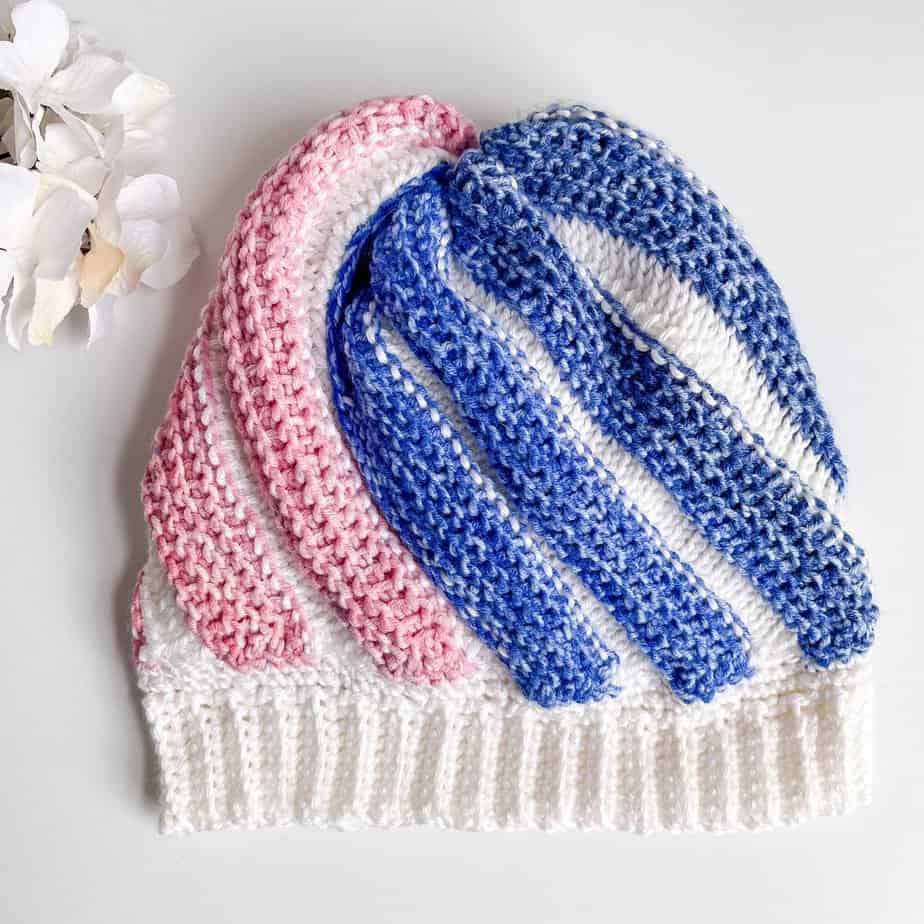
This stitch pattern may look familiar to you. I used a variation of these stitches together in my Marci Tunisian Hat. In the Marci Hat I worked from the bottom up which gave it a completely different look! By making a parallelogram shape we get this fun swirl effect which is so different from the Marci Hat! Isn’t it great that using different techniques in crochet can get you such different and unique results!
What is Tunisian crochet?
Tunisian crochet, also known as Afghan crochet, is a unique and versatile crochet technique that combines elements of both crochet and knitting. It creates a fabric that looks a bit like a blend of the two crafts, with a distinctive texture and appearance. Tunisian crochet allows you to create a dense fabric making it ideal for various projects like blankets, scarves, garments, and even hats like the Swirl Hat!
Tunisian crochet hooks are longer than traditional crochet hooks to accommodate the multiple loops that are held on the hook at once. There are different types of Tunisian crochet hooks, including regular hooks with a stopper on the end and hooks with a flexible cable attached, similar to circular knitting needles.
Overall, Tunisian crochet offers a creative and engaging way to produce beautiful and textured fabrics, making it a popular choice for crocheters who enjoy experimenting with different techniques.

Tunisian Crochet Hat pattern details
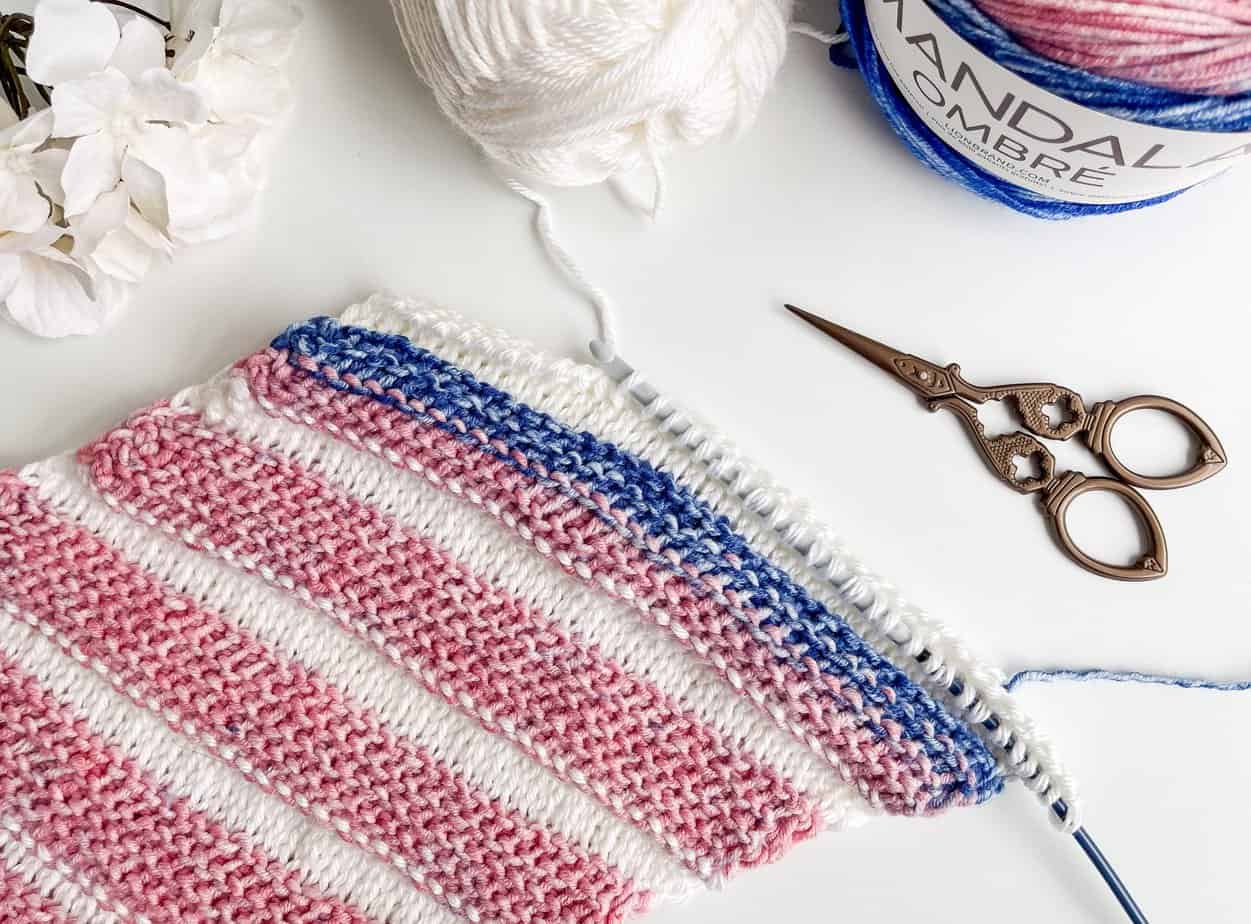
The main body of the Swirl Tunisian Crochet Hat is made with repeating rows of the Tunisian Purl and Knit stitches – 4 rows of knit and 5 rows of purl.
To create a parallelogram shape rather than a traditional rectangle you will be working increases every other row on the same side of your work and decreases on the other. This will result in a parallelogram shape once complete.
I love the knit and purl stitches together in combination as it allows the purl stitches to poof out slightly creating the distinct swirl effect. And by using two different colors it really highlights the swirl!
I am using Lion Brand’s Basic Stitch Anti-Pilling* for the knit stitch sections as well as the ribbing. For the contrasting color I used Lion Brand’s Mandala Ombre for the purl stitch sections of the hat. They really look wonderful together! The Mandala Ombre has a bit of white showing through the blue and pink colors so they pair beautifully.
*This post contains affiliate links. You can click on any yarn or material highlighted to purchase. I will receive a small commission if you purchase but it won’t cost you any extra! As an Amazon Associate I earn from qualifying purchases.
If you are new to either the Tunisian Purl or Knit stitches I have complete photo and video tutorials available for both stitches! Subscribe to my YouTube Channel to get notified whenever I post a new video.
Tunisian Purl Stitch Photo & Video Tutorial
Tunisian Knit Stitch Photo & Video Tutorial
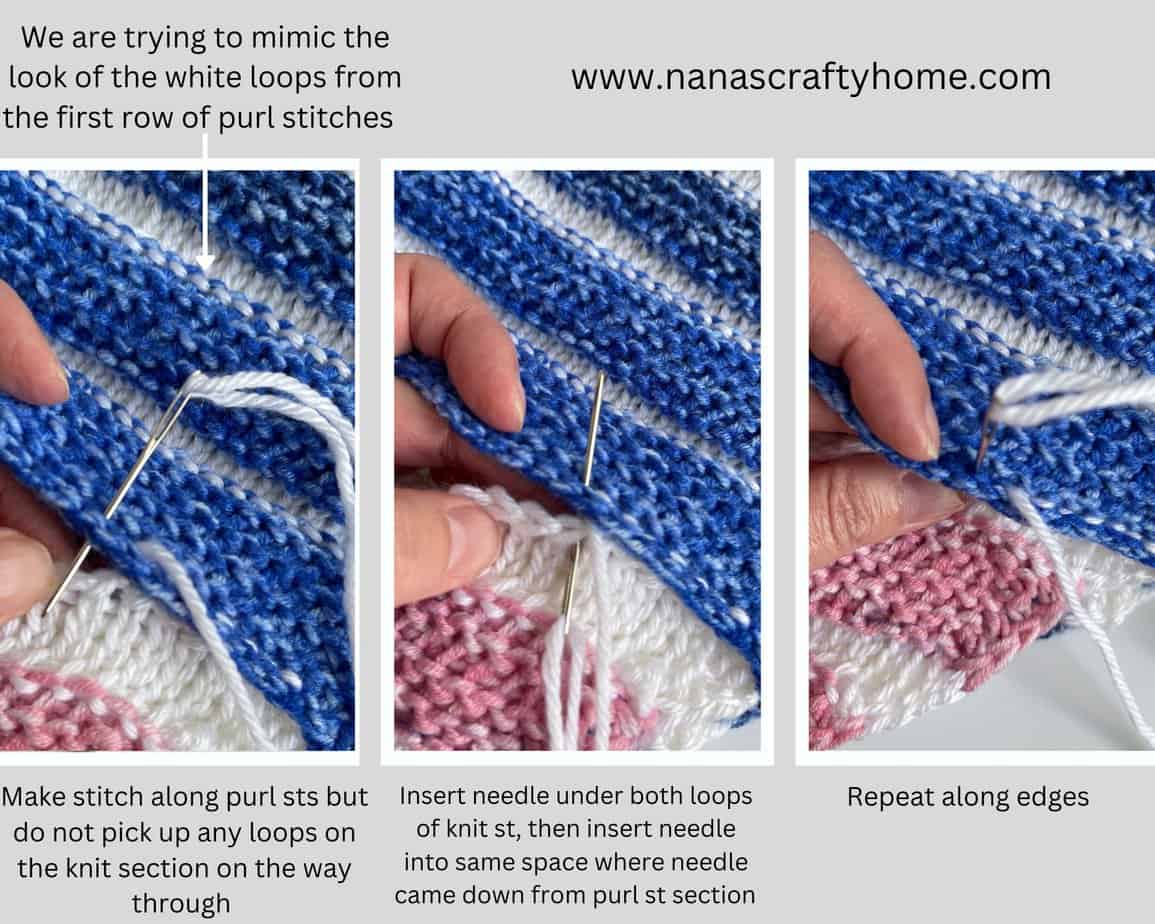
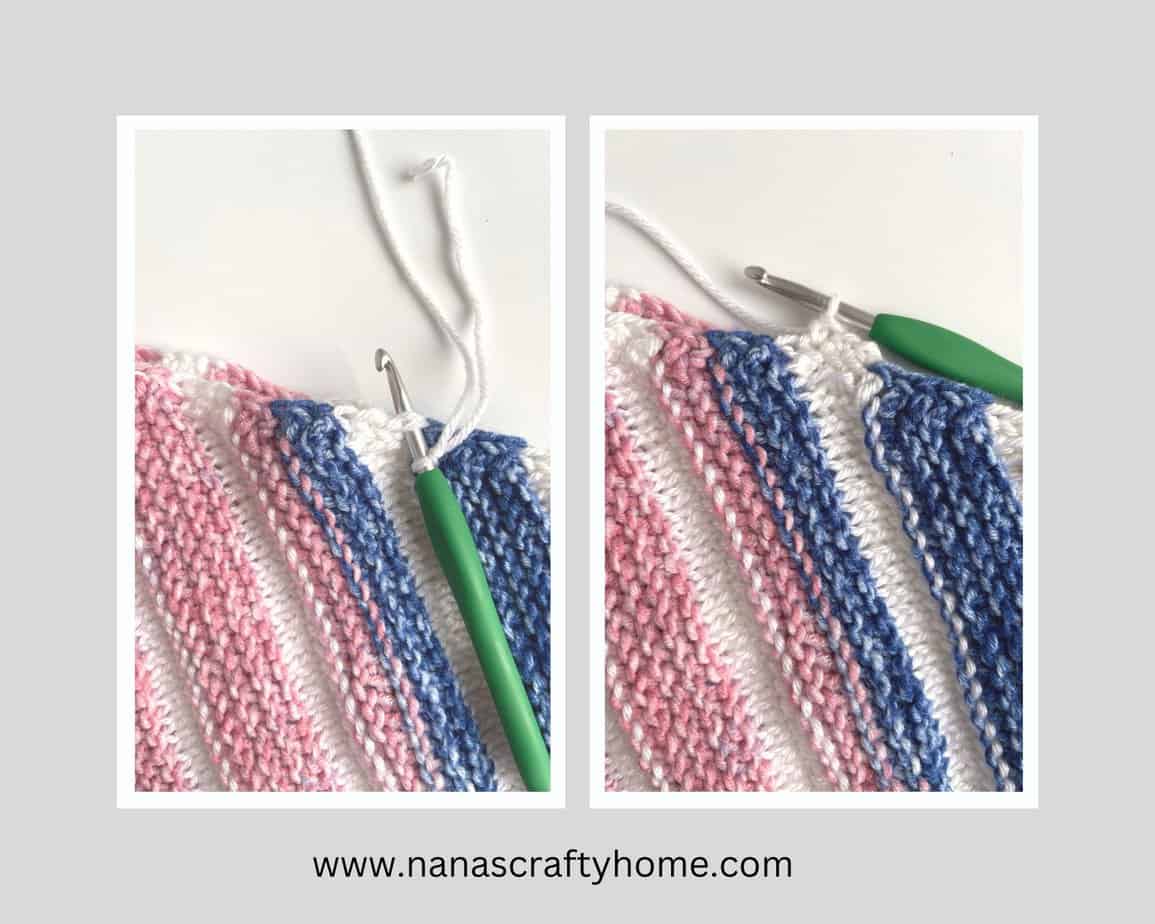
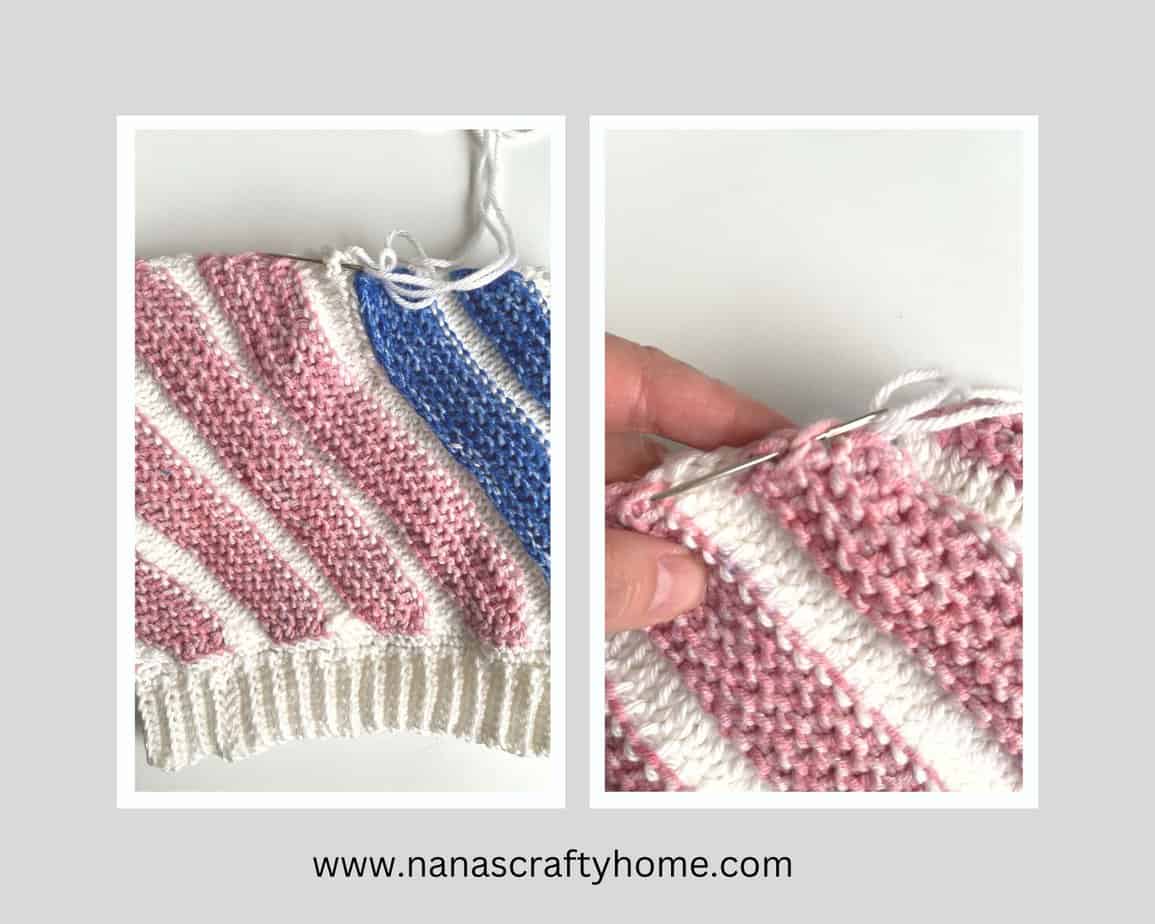
Once you have worked the parallelogram shape you will fold the ends together and seam. Then using standard crochet I added ribbing to the bottom edge of the hat and then seamed the top of the hat shut. Really very easy! I did work the seam a little differently than a traditional mattress seam stitch as I wanted to mimic the look of that first row of purl stitches where the white from the last row of knit stitches shows through. I have photos below but I also put together a quick video so you can see it in action.
Tunisian crochet stitches are known for issues with curling and the Tunisian knit stitch section at the beginning will curl. However, because we are seaming the edges together it is no problem at all – the seaming eliminates the curl!

If you are looking for visual help with adding the ribbing to the bottom of the hat I have a photo tutorial on my Remember Me Beanie that will help you.
For the gauge listed in the pattern this hat will fit an adult medium/large while maintaining a nice slouchy look. However, with the ribbing and the slouchy style it would fit most adults easily. However, it would be very easy to resize by simply changing up hook size or yarn weight. If you wanted to make the height of the hat a little shorter or taller simply adjust the foundation chain with less or more chains.
In order to adjust width, simply make fewer rows. However, keep in mind that in order to keep the pattern ending on 5 purl rows you will need to add 9 rows or subtract 9 rows at the end. For the gauge listed of 18 rows = 4″, each adjustment of 9 rows will add or subtract approximately 2″.
The pom pom is optional and I think it looks fantastic with or without the pom pom!

The Tunisian Swirl Hat is part of the Crochet Cancer Challenge for 2023. The Crochet Cancer Challenge is hosted annually by Christine of Sweet Potato 3 Designs. You can find all the details about the Crochet Cancer Challenge on her blog.
This is my fourth design for the Crochet Cancer Challenge and you can find all of my previous designs for free on my blog. This challenge is very special to me and my family has certainly felt the pain of loss from cancer. My dear sweet granddaughter Nina was diagnosed with Brain cancer in June of 2021 and passed away just 6 months later on December 8, 2021 at the age of 7.
I designed the Nina Bean Beanie with her in mind and she was able to model it for me. Every moment of that time with her is forever in my heart. Last year was the first year after her death and I designed the Remember Me Hat in her memory.
This year I am thinking about multiple family members and friends that have passed away or are currently suffering from some type of cancer. So this year I decided to focus on several colors pink for breast cancer, white for lung cancer and blue for prostate cancer.
If you would like to check out my previous Crochet Cancer Challenge designs I have links to each below.
Marci Tunisian Hat
Nina Bean Beanie
Remember Me Hat
The Tunisian Swirl Crochet Hat pattern is also available as an ad-free, printable PDF! You can purchase the individual pattern, or if you love PDFs, you might want to check out my Lifetime Membership. It’s an awesome deal! Never pay for one of my PDFs again!! (Or, scroll down for the free version!)

Purchase the ad-free pdf of the Tunisian Crochet Hat pattern for a small fee. Thank you so much for supporting my work!

If you would like daily crochet inspiration be sure to follow me on Facebook, Instagram, Pinterest, YouTube, Twitter and Tumblr!
To get notified of my free easy crochet patterns and future giveaways, sign up for my newsletter. I never share or sell your information to third parties — it stays private!
You may also like the following free Tunisian crochet patterns by Nana’s Crafty Home:


- 1. Marci Tunisian Hat free crochet pattern
- 2. Color Fusion Tunisian Hat free crochet pattern
- 3. Color Fusion Tunisian Infinity Scarf free crochet pattern

Tunisian Swirl Hat Pattern free pattern instructions
Pattern written in US crochet terminology
Supplies:
Lion Brand Basic Stitch Anti-Pilling, Weight 4/Medium (100% acrylic) 3.5 oz / 185 yards
- White 2.5 oz / 135 yards (Color A)
Lion Brand Mandala Ombre, Weight 4/Medium (100% acrylic) 5.3 oz / 344 yards
- Pure 2.0 oz / 130 yards (Color B)
Size I (5.5 mm) Tunisian crochet hook
Size I (5.5 mm) standard crochet hook
Tapestry Needle
Pom Pom (optional)
Scissors
Approximate finished size:
Adult Large 9.5” wide x 9” tall
Gauge: 4 rows tks / 5 rows tps pattern: 18 rows = 4” / 18 st = 4”
Abbreviations:
- ch = chain
- tps = Tunisian Purl Stitch (see special stitches section below)
- tks = Tunisian Knit Stitch (see special stitches section below)
- st(s) = stitch
- dec = decrease
- sk = skip
- yo = yarn over
- RS = right side
- sc = single crochet
- sl st = slip stitch
- BLO = back loop only
- sc2tog = single crochet 2 sts together (see special stitches section below)
- WS = wrong side
Special stitches:
Tunisian Purl Stitch (tps):
Forward: sk first vertical bar, *bring yarn forward to front of work, insert hook from right to left under next vertical bar, yo and pull up a loop,* repeat from * to * to last st.
Return: yo, pull through 1 loop, *yo, pull through 2 loops,* repeat from * to * to end (1 loop left on hook).
Tunisian Knit Stitch (tks):
Forward: sk first vertical bar, *insert hook from front to back between the front and back vertical bars of the next st, yo and pull up a loop,* repeat from * to * to last st.
Return: yo, pull through 1 loop, *yo, pull through 2 loops,* repeat from * to * to end (1 loop left on hook).
sc2tog = (insert hook in next st, yo and pull up a loop) twice, yo and pull through all 3 loops on hook.
Recommended Tutorials:
Tunisian Knit Stitch Photo & Video Tutorial
Tunisian Purl Stitch Photo & Video Tutorial
How to sew the top of hat together Tutorial
Pattern Notes:
- Resizing: To adjust height make more or fewer beginning chains. To adjust width make more or fewer rows. You can also resize by using a larger or smaller crochet hook.
- Hat is worked side to side as a parallelogram in rows and then seamed together at the end.
- Tks sections are worked in color A, tps sections are worked in color B.
- Increases and decreases are kept on the same side of the work to create a parallelogram shape. Increases and decreases are worked every other row.
- Once hat is seamed, hat is cinched at the top and ribbing is crocheted to the bottom of the hat.
Pattern Instructions
Note: Work all rows with RS of work facing.
Leaving a long tail for sewing and with color A, ch 36.
Row 1 (foundation row): (RS) pick up a loop from back bump in second ch from hook and in each ch to end, leaving all loops on hook. Return. (36)
Row 2: 2 tks in next st, tks in each st to last 2 sts, sk next st, work end st. Return.
Row 3: Tks in each st to end, work end st. Return.
Row 4: Repeat row 2.
Change to color B at end of return pass. Fasten off color A.
Row 5: 2 tps in next st, tps in each st to last 2 sts, sk next st, work end st. Return.
Row 6: Tps in each st to end, work end st. Return.
Rows 7 – 9: Repeat rows 5 – 6 – 5.
Change to color A at end of return pass for row 9. Fasten off color B.
Rows 10 – 13: Repeat rows 3 – 2 – 3 – 2.
Change to color B at end of return pass for row 13. Fasten off color A.
Rows 14 – 18: Repeat rows 6 – 5 – 6 – 5 – 6.
Change to color A.
Rows 19 – 22: Repeat rows 2 – 3 – 2 – 3.
Change to color B.
Rows 23 – 27: Repeat rows 5 – 6 – 5 – 6 – 5.
Change to color A.
Rows 28 – 90: Repeat rows 10 – 27 three times, then end with one more set of rows 10 – 18.
Bind off row: (With color B) sl st in each vertical bar to last st, work end st as sl st.
Fasten off, weave in ends.
With RS facing up, fold ends together and with length of yarn left for sewing from beginning, sew ends together. Do not fasten off. Leave length to cinch top of hat at end.
With standard crochet hook and RS of hat facing, join color A to bottom of hat (opposite side of length of yarn left for cinching hat closed) in any stitch.
Round 1: Ch 1, sc in same st and in each st around. (90) Do not sl st join.
Round 2: *Sc in next 3 sts, sc2tog,* repeat from * to * to end. (72)
Ribbing
Ch 9.
Row 1: Sc in second ch from hook and in each ch to end, now working in sc sts from last round of main body of hat, sl st in next two sts. Turn. (8)
Row 2: Sk 2 sl sts, working in BLO of sc sts from previous row of ribbing, sc in BLO of each st to end. Turn. (8)
Row 3: Ch 1, sc in BLO of each st to end, sl st in next two sts of main body of hat. Turn. (8)
Rows 4 – 72: Repeat rows 2 – 3.
Fasten off leaving a long tail for sewing ribbing edges of hat together.
With mattress seam stitch, sew ribbing edges together.
With long length of yarn left for sewing top of hat closed on tapestry needle, cinch top of hat closed. Weave in remaining ends.
Copyright 2023 Tonya Bush / Nana’s Crafty Home, LLC.
Social Media links:
Facebook: https://www.facebook.com/nanascraftyhome
Instagram: https://www.instagram.com/nanascraftyhome/
Pinterest: https://www.pinterest.com/nanascraftyhome/
YouTube: https://www.youtube.com/c/TonyaBush
Twitter: https://twitter.com/nanascraftyhome
Facebook Group: https://www.facebook.com/groups/829792060522798
Sign up for my Newsletter: https://nanascraftyhome.com/sign-up-for-my-free-newsletter/
 Hi! Thank you so much for being here! I am Tonya the designer behind Nana's Crafty Home. As a wife, mother, Nana of 9 & with 2 fur babies, my days are filled with love, laughter, hugs and yarn! Here you will find colorful and creative crochet designs for yourself or loved ones. My hope is that you will be inspired to learn and create along with me!