This Crochet Gnome Towel Topper is a free crochet pattern at Nana’s Crafty Home!

If you love Gnomes as much as I do you are going to love how simple, easy and fun this Gnome Towel Topper is to make!
Perfect for gift giving or to decorate your own kitchen, this pattern could be made for Christmas or any time of the year – just change up your colors.

This little item would be perfect for craft shows – quick and easy! Pair with the adorable crochet Girl Gnome Towel Topper to make a sweet and adorable Gnome Towel Topper couple!
Complete video tutorial is now available and you can find that HERE.
If you would like to see the tutorial for the bobble stitch edge you can find that HERE. Subscribe to my YouTube Channel so you never miss a video!
If you love my Christmas Gnome Towel Topper, you might want to also check out my series of Gnome Towel Toppers – Mushroom Gnome, Christmas Tree Gnome, Leprechaun Gnome, Patriotic Gnome, Viking Gnome, Pilgrim Gnomes as well as the Spring Girl Gnome with braids.
This pattern is also available as an ad-free, printable PDF! You can purchase the individual pattern, or if you love PDFs, you might want to check out my Lifetime Membership. It’s an awesome deal! Never pay for one of my PDFs again!! (Or, scroll down for the free version!)

Purchase the ad-free pdf of this pattern for a small fee at HERE. Thank you so much for supporting my work!
To get notified of free crochet patterns and get notified of future giveaways, sign up for my newsletter. I never share or sell your information to third parties — it stays private!
I made my towel topper with cotton yarn for stitch definition but you may be happier with acrylic as it tends to be much more color fast than cotton. And since this isn’t going to be used for a pot holder you won’t need to worry about melting it.

The best part of this towel topper – the towel is removable for easy washing. You will work a ring into the hat which is what the towel hangs on. So awesome – and a complete towel topper game changer!
I get LOTS of questions about where I get my 3″ plastic rings. I purchase my 3″ craft rings from Amazon* and they are just perfect. However, they do sell out frequently and I have heard from many people that substitute with inexpensive plastic shower rings or with elastic hair ties.
I also get asked about the white flour sack towels which I also purchase on Amazon. I love flour sack towels and use them frequently as they don’t pill and shed like standard kitchen towels. Great for bread baking!
*Disclosure: I only recommend products I would use myself. This post may contain affiliate links that if you make a purchase at no additional cost to you, I may earn a small commission.

If you would like to add braids to your Gnome Towel Topper to make a matching Girl Gnome you can find that free pattern and tutorial on the blog as well!
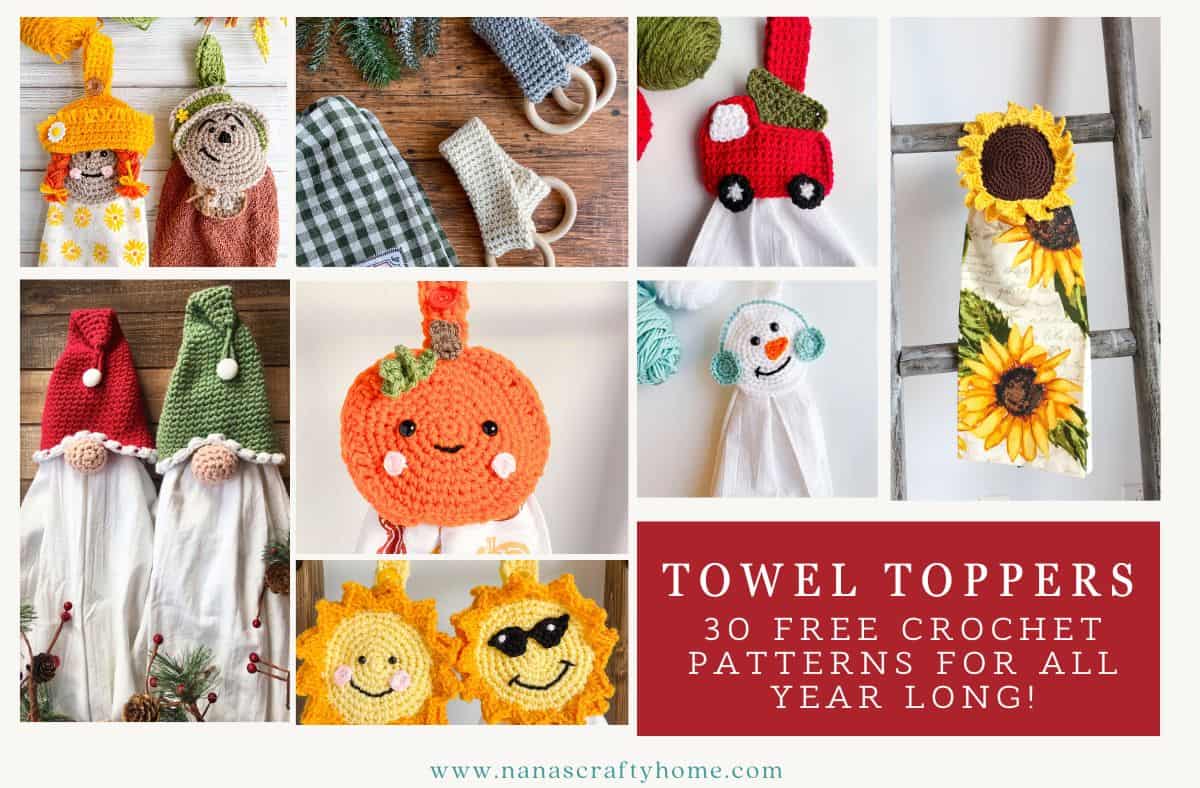
Get set to jazz up your kitchen with my FREE crochet towel topper patterns that bring the wow factor all year round! These show-stealing designs pack a clever 3″ hidden ring for effortless towel swaps and washing, bursting with festive Christmas magic, lively spring blossoms, hot summer flair, and oh-so-adorable gnome charm. They’ll make your kitchen the coziest hotspot in town. Check out the full roundup and start stitching your new faves now!
You may also like the following free crochet patterns at Nana’s Crafty Home:


If you would like daily crochet inspiration be sure to follow me on Facebook, Instagram, Pinterest, YouTube, Twitter and Tumblr!

*This post contains affiliate links. You can click on any yarn or material highlighted to purchase. I will receive a small commission if you purchase but it won’t cost you any extra!
Gnome Towel Topper free crochet pattern
Pattern written in US crochet terminology
Supplies:
I Love This Cotton! Red (Color A)
I Love This Cotton! White (B)
I Love This Cotton! Warm Blush (C)
Size H (5.0 mm) crochet hook
1 White Flour Sack Towel 27” x 27”
Small amount of polyfill stuffing
1 – 3” Plastic Ring
3/4” round white button
Red embroidery thread for sewing on button
Tapestry Needle
Approximate finished size: approx 8” tall (not including towel) x 5” wide
Gauge: 20 rows = 4” / 17 sc st = 4”
Abbreviations:
MC = magic circle
ch = chain
sc = single crochet
st = stitch
sk = skip
SP-2 = spike stitch two rows below (see special stitch section below)
sc2tog = single crochet 2 st together (see special stitches section below)
WS = wrong side
Bobble = Bobble Stitch (see special stitches section below)
Special Stitches:
SP-2: Insert hook below sc from 2 rows below your hook (current row counts as row 1), yo, draw up a loop even with the loop on your hook (2 loops on hook), yo, pull through all 2 loops on hook.
sc2tog = (insert hook into next st, yo and pull up a loop) twice, yo and pull through all 3 loops on hook.
Bobble = yo, insert hook into indicated st, yo, pull up a loop, (3 loops on hook), yo, pull through 2 loops on hook (2 loops left on hook), yo, insert hook into same st, yo, pull up a loop, (4 loops on hook), yo and pull through all 4 loops.
Notes about pattern:
- Hat and nose are worked in seamless rounds
Hat (worked in seamless rounds)
Round 1: With Color A, 6 sc st in MC, place a stitch marker in the 1st sc made. Do not join with sl st to 1st st after last sc st. (6)
Note: Continue moving up your stitch marker to the 1st st of each round.
Round 2: 1 sc in each st around. (6)
Round 3: 2 sc in 1st st, sc in remaining st. (7)
Round 4 – 22: repeat round 3. (st count = 26 at the end of round 22)
Round 23: 2 sc in 1st st, sc in next 20 st, sc next 5 st over plastic ring. (27)
Round 24: 2 sc in 1st st, sc in next 21 st, SP-2 over next 5 st. (28)
Round 25 – 38: repeat round 3. (42)
Round 39: With Color B, TURN, (now working on the WS of hat), ch 3, dc in same st, sl st in next st, *bobble in next st, sl st in next st* repeat between * * to end, sl st to base of 1st st from beginning of round.
Fasten off. Weave in ends.
Hat Loop
With Color A, ch 10, sl st to 1st ch to form a loop. Fasten off. Leave a long tail for sewing. Sew loop securely to top of hat.
Sew button to middle front of hat approximately 4 1/2” down from top tip of hat.

Nose (worked in seamless rounds)
Round 1: With Color C, 6 sc st in MC, place a stitch marker in the 1st sc made. Do not join with sl st to 1st st after last sc st. (6)
Note: Continue moving up your stitch marker to the 1st st of each round.
Round 2: 2 sc in each st. (12)
Round 3: *1 sc in next 3 st, 2 sc in next st* repeat between * * to end. (15)
Round 4: 1 sc in each st. (15)
Round 5: *1 sc in next 3 st, 1 sc2tog* repeat between * * to end. (12)
Stuff nose
Round 6: sc2tog 6 times. Join with sl st to first st. (6). Fasten off. Pull yarn through last st, sew yarn end through front loop of each of the 6 st, pull tight to close the circle. Note: I recommend stuffing the nose right before the last sc2tog.

With a long length of Color A, sew nose to inside bottom edge of hat in the middle of towel. Fasten off. Weave in end.


 Hi! Thank you so much for being here! I am Tonya the designer behind Nana's Crafty Home. As a wife, mother, Nana of 9 & with 2 fur babies, my days are filled with love, laughter, hugs and yarn! Here you will find colorful and creative crochet designs for yourself or loved ones. My hope is that you will be inspired to learn and create along with me!