This Leprechaun Gnome Towel Topper is a free crochet pattern by Nana’s Crafty Home!

The Leprechaun Gnome Towel Topper is a great addition to your St. Patrick’s Day home decor or any time of the year. So cute and fun to make, too. A great project for your scrap yarn – make in any color for a different look.
My original Gnome Towel Topper was such a big hit that I recently added in the Girl Gnome and now we have the Leprechaun Gnome to add to the gnome fun. The green hat and orange towel really accentuate the Irish theme, but with a brown beard and different colored hat you would hav a completely different look! My Leprechaun Gnome also joins Mushroom Gnome, Christmas Tree Gnome, Patriotic Gnome, Viking Gnome, Pilgrim Gnomes as well as the Spring Girl Gnome with braids.

I used Hobby Lobby’s I Love This Yarn! which is an affordable acrylic worsted weight yarn but you could certainly use any medium worsted weight yarn you have on hand – acrylic or cotton! A great project to use up your scraps!
One of my favorite things about all of these patterns is the 3″ ring that is crocheted to the inside of the hat. That allows the towel to be removable for easy washing.

*This post contains affiliate links. You can click on any yarn or material highlighted to purchase. I will receive a small commission if you purchase but it won’t cost you any extra!

These little guys would be great for craft fairs or bazaars and fantastic for gifts!
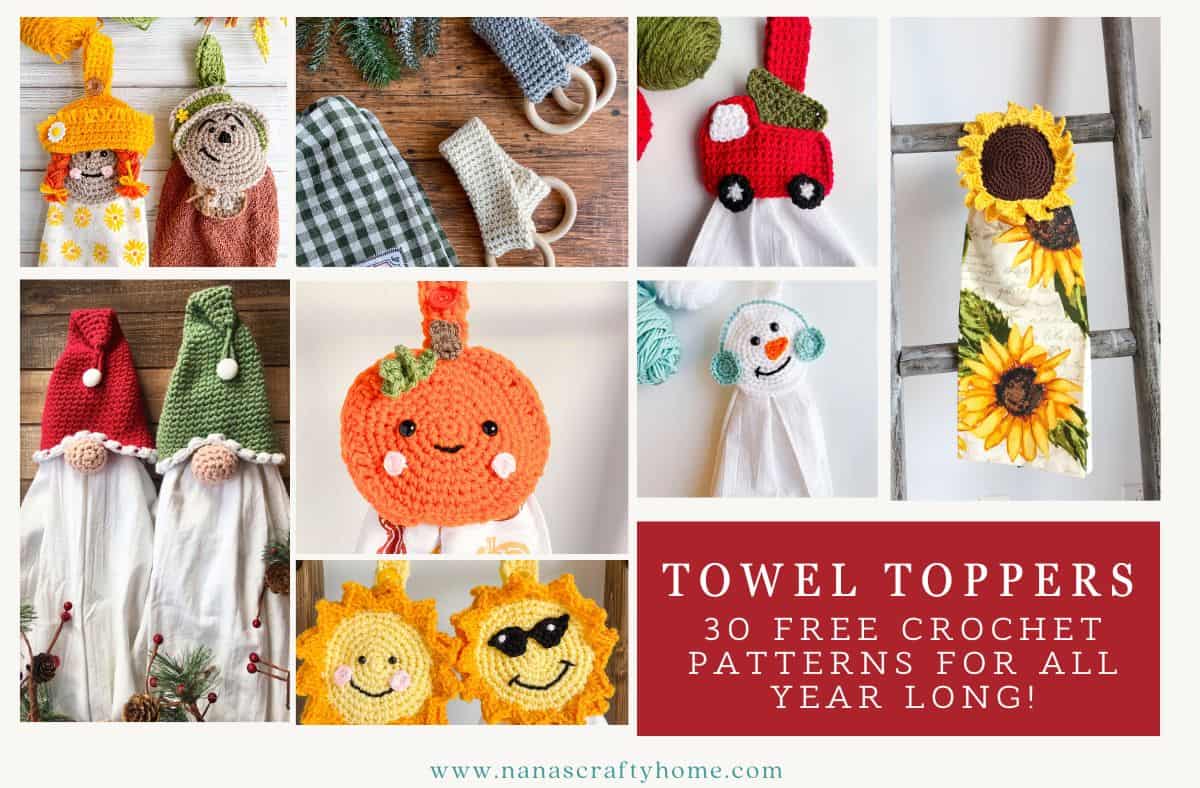
Prepare for a kitchen glow-up with my FREE crochet towel topper patterns that scream style for every season! These jaw-dropping designs boast a sneaky 3″ ring for super-easy towel swaps and washing, packed with festive Christmas sparkle, fresh spring blooms, sizzling summer vibes, and downright adorable gnome charm. Perfect for crocheters of all levels, they’ll turn your kitchen into a cozy masterpiece. Jump into the full crochet pattern roundup and start hooking your new obsession now!
This pattern is also available as an ad-free, printable PDF! You can purchase the individual pattern, or if you love PDFs, you might want to check out my Lifetime Membership. It’s an awesome deal! Never pay for one of my PDFs again!! (Or, scroll down for the free version!)

Purchase the ad-free pdf of this pattern for a small fee. Thank you so much for supporting my work!
If you would like daily crochet inspiration be sure to follow me on Facebook, Instagram, Pinterest, YouTube, Twitter and Tumblr!
To get notified of my free crochet patterns and future giveaways, sign up for my newsletter. I never share or sell your information to third parties — it stays private!
You may also like the following free crochet patterns at Nana’s Crafty Home:


Leprechaun Gnome Towel Topper free crochet pattern
Pattern written in US crochet terminology
Supplies:
- Hobby Lobby I Love This Yarn! Weight 4/Medium (100% acrylic) 7 oz/355 yds
- Jelly Bean 1.0 oz / 50 yards (Color A)
- Black 0.2 oz / 10 yards (Color B)
- Buttercup 0.1 oz / 5 yards (Color C)
- Ivory 0.2 oz / 10 yards (Color D)
Size I (5.5 mm) crochet hook
1 kitchen towel (any color)
Small amount of polyfill stuffing for filling nose
1 – 3” plastic ring
1 – 3/4” button
embroidery thread for sewing on button
1 stitch marker
Scissors
Tapestry needle
Approximate finished size: 4.5” wide x 3.5” tall (not including hanging tab)
Gauge: 5 rows = 1” / 4 sc st = 1”
Abbreviations:
MC = magic circle
ch = chain
sc = single crochet
st(s) = stitch(es)
sk = skip
sc2tog = single crochet 2 st together (see special stitches section below)
WS = wrong side
RS = right side
Special Stitches:
sc2tog = (insert hook into next st, yo and pull up a loop) twice, yo and pull through all 3 loops on hook.
Pattern Notes:
- Nose is worked in seamless rounds – do not slip stitch join at the end of rounds.
- Ring is crocheted into the inside of the hat on the back panel of the hat.
Hat Front Panel
With Color A, ch 18.
Row 1: (RS) sc in second ch from hook and in each ch to end. Turn. (17)
Row 2: ch 1, 1 sc in each st across. Turn.
Row 3: repeat row 2.
Fasten off Color A.
Row 4: With RS facing, skip first 2 stitches of row 3 and join Color B to 3rd sc st with sc, sc in next 12 sts, leave remaining 2 sts unworked. Turn. (13)

Row 5: ch 1, sc in each st across. Turn.
Fasten off Color B.
With RS facing, Join Color A to first st with sl st.
Row 6: ch 1, sc in each st across. Turn.
Row 7 – 16: repeat row 6.
Fasten off. Weave in ends.
Hat Back Panel
Repeat Rows 1 – 13 of Hat Front Panel.
Row 14: ch 1, sc in first 4 sts, sc in next 5 sts over plastic ring keeping ring behind the piece when making stitches, sc in last 4 sts. Turn.
Row 15: ch 1, sc in first 4 sts, next 5 sts are worked over previous sts and around ring by inserting hook into same stitch location from row 13, sc in last 4 sts. Turn.
Row 16: ch 1, sc in each st across.
Fasten off. Weave in ends.
Hat Band Buckle
With Color C, ch 6, sl st in 6th ch from hook to form a loop.
Round 1: ch 1, (2 sc, ch 2) x 4 in loop, sl st to first sc.
Fasten off, leaving a long tail for sewing.
Attach long tail left for sewing to tapestry needle, sew buckle to RS of hat front panel on black hat band where desired.

Nose
Round 1: With Color D, 6 sc st in MC, place a stitch marker in the first sc made. Do not join with sl st to first st after last sc st. (6)
Note: Continue moving up your stitch marker to the first st of each round.
Round 2: 2 sc in each st. (12)
Round 3: *1 sc in next 3 st, 2 sc in next st* repeat from * to * to end. (15)
Round 4: 1 sc in each st. (15)
Round 5: *1 sc in next 3 st, 1 sc2tog* repeat from * to * to end. (12)
Stuff nose

Round 6: sc2tog 6 times. Join with sl st to first st. (6). Fasten off. Pull yarn through last st, sew yarn end through front loop of each of the 6 st, pull tight to close the circle. Note: I recommend stuffing the nose right before the last sc2tog.
With a long length of Color A and RS of hat facing, sew nose to the inside of the bottom edge of hat in the middle.

Fasten off. Weave in end.
Sew Hat together
With RS of hat panels facing, attach a long length of Color A yarn to tapestry needle. Sew around outside edge of hat from bottom right corner to bottom left corner, leaving bottom of hat open.
Turn RS out to finish.
Hanging Tab
With Color A (leaving a long tail for sewing), ch 5.
Row 1: sc in 2nd ch from hook and in each ch to end. Turn. (4)
Row 2 – 20: ch 1, sc in each st, turn. (4)
Row 21 (button hole row): ch 1, sc in first st, ch 2, sk next 2 st, sc in last st. Turn. (2 st + 2 ch)
Row 22: ch 1, sc in first st, 2 sc in ch-2 sp, 1 sc in last st. Turn.
Row 23: ch 1, sc in each st.
Fasten off. Weave in end not left for sewing.
With embroidery thread, sew button to non-button hole end of tab.
Sew non-button hole side of hanging tab to middle top RS of hat securely.
Weave in end.


 Hi! Thank you so much for being here! I am Tonya the designer behind Nana's Crafty Home. As a wife, mother, Nana of 9 & with 2 fur babies, my days are filled with love, laughter, hugs and yarn! Here you will find colorful and creative crochet designs for yourself or loved ones. My hope is that you will be inspired to learn and create along with me!