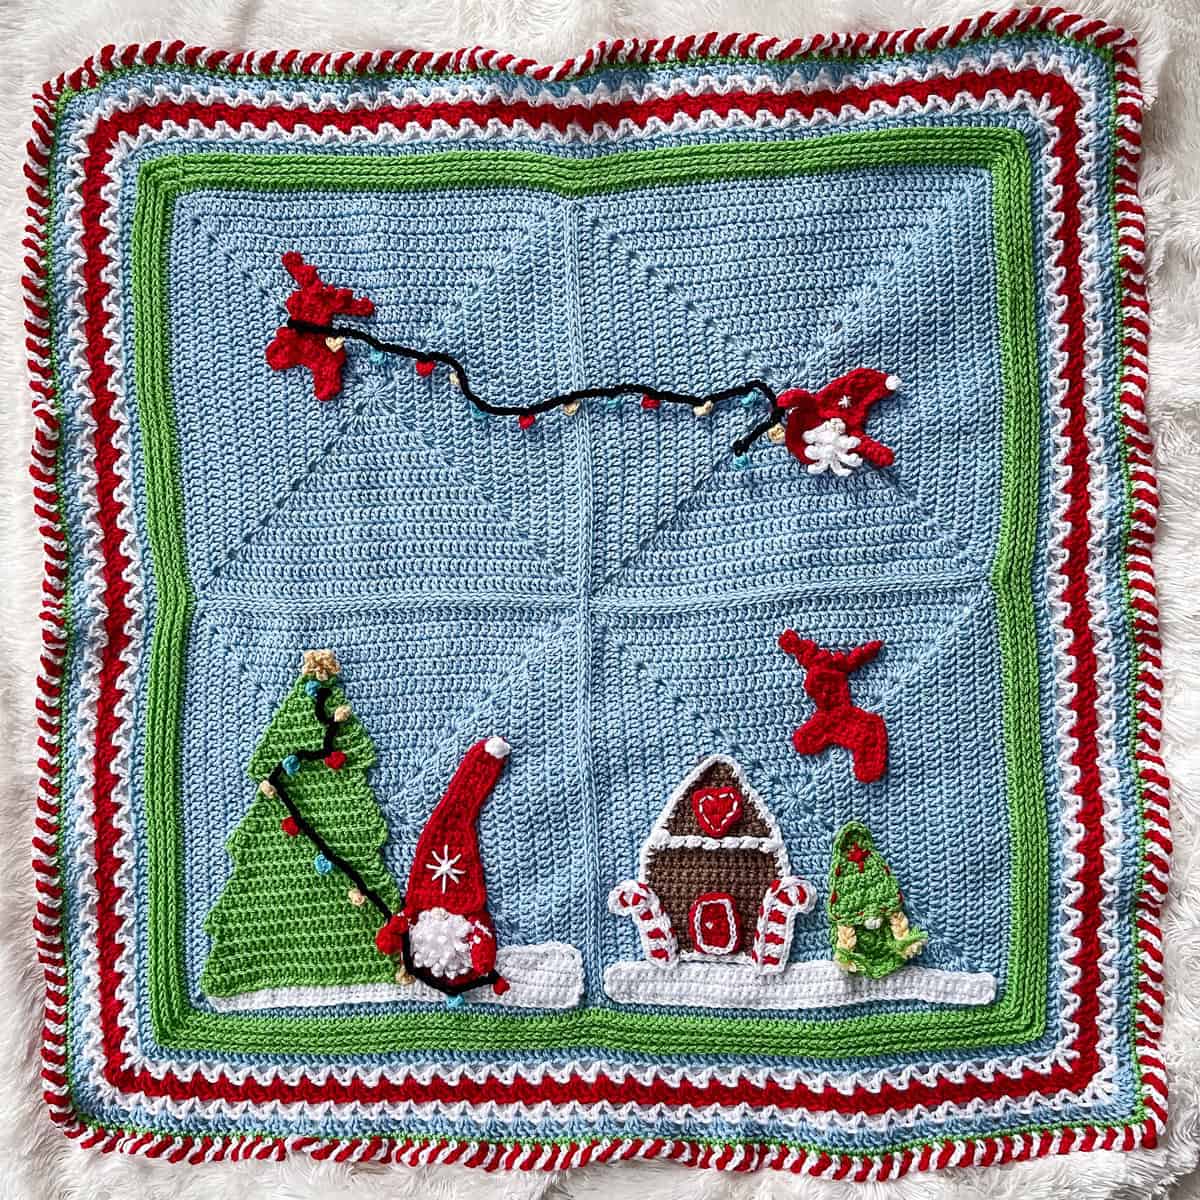
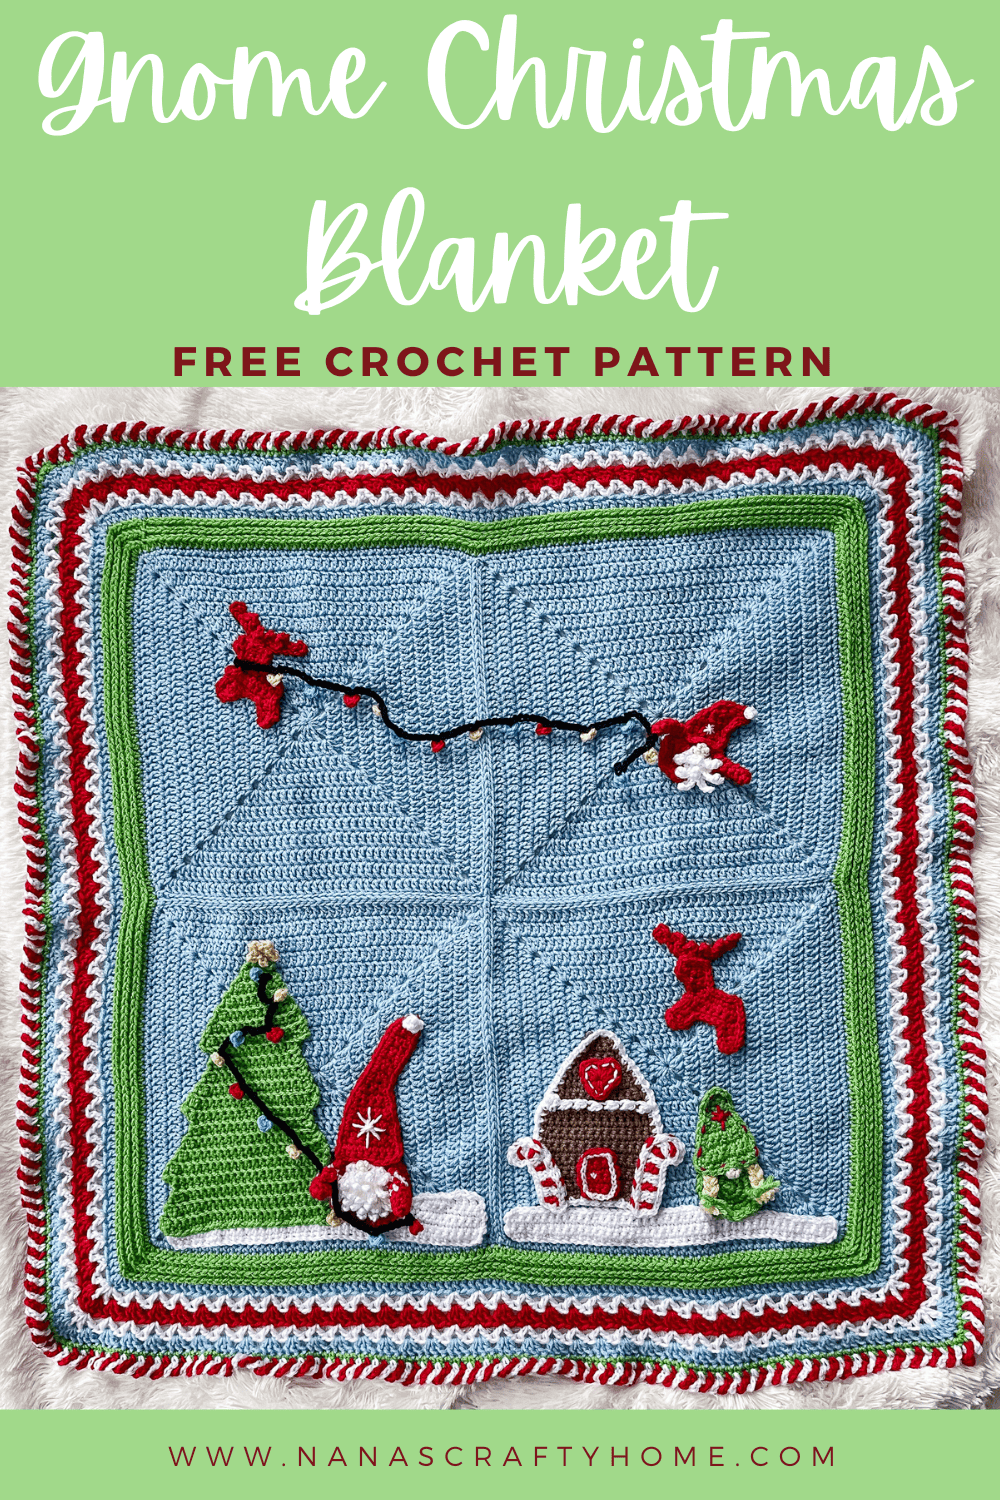
This Christmas Gnome Crochet Blanket Pattern is a delightful and whimsical Christmas Gnome Scene perfect for holiday snuggles!
A couple of weeks ago I started working on a tutorial for how to sew appliques on crochet invisibly for my Wildlife Animal Squares and while working on the tutorial I came up with an idea for a Christmas Gnome Square. One thing led to another and suddenly I have a new project to complete before Christmas!
Once the first square was complete I started expanding from one square to multiple squares to now a complete blanket. I am so excited to see it come to life!
All 4 squares, joining and border instructions are now available at the bottom of this post.

How to Make the Christmas Gnome Crochet Pattern
For the full written pattern instructions for this Christmas Gnome Crochet Blanket Pattern, scroll down below. You can purchase each individual square (Part 1 is now available in my shop, Part 2 is also available in my shop! and Squares 3 & 4 are in my shop for a small fee. I now have the complete blanket available in one PDF for a small fee! Or, become a Lifetime Member and never pay for a PDF again!
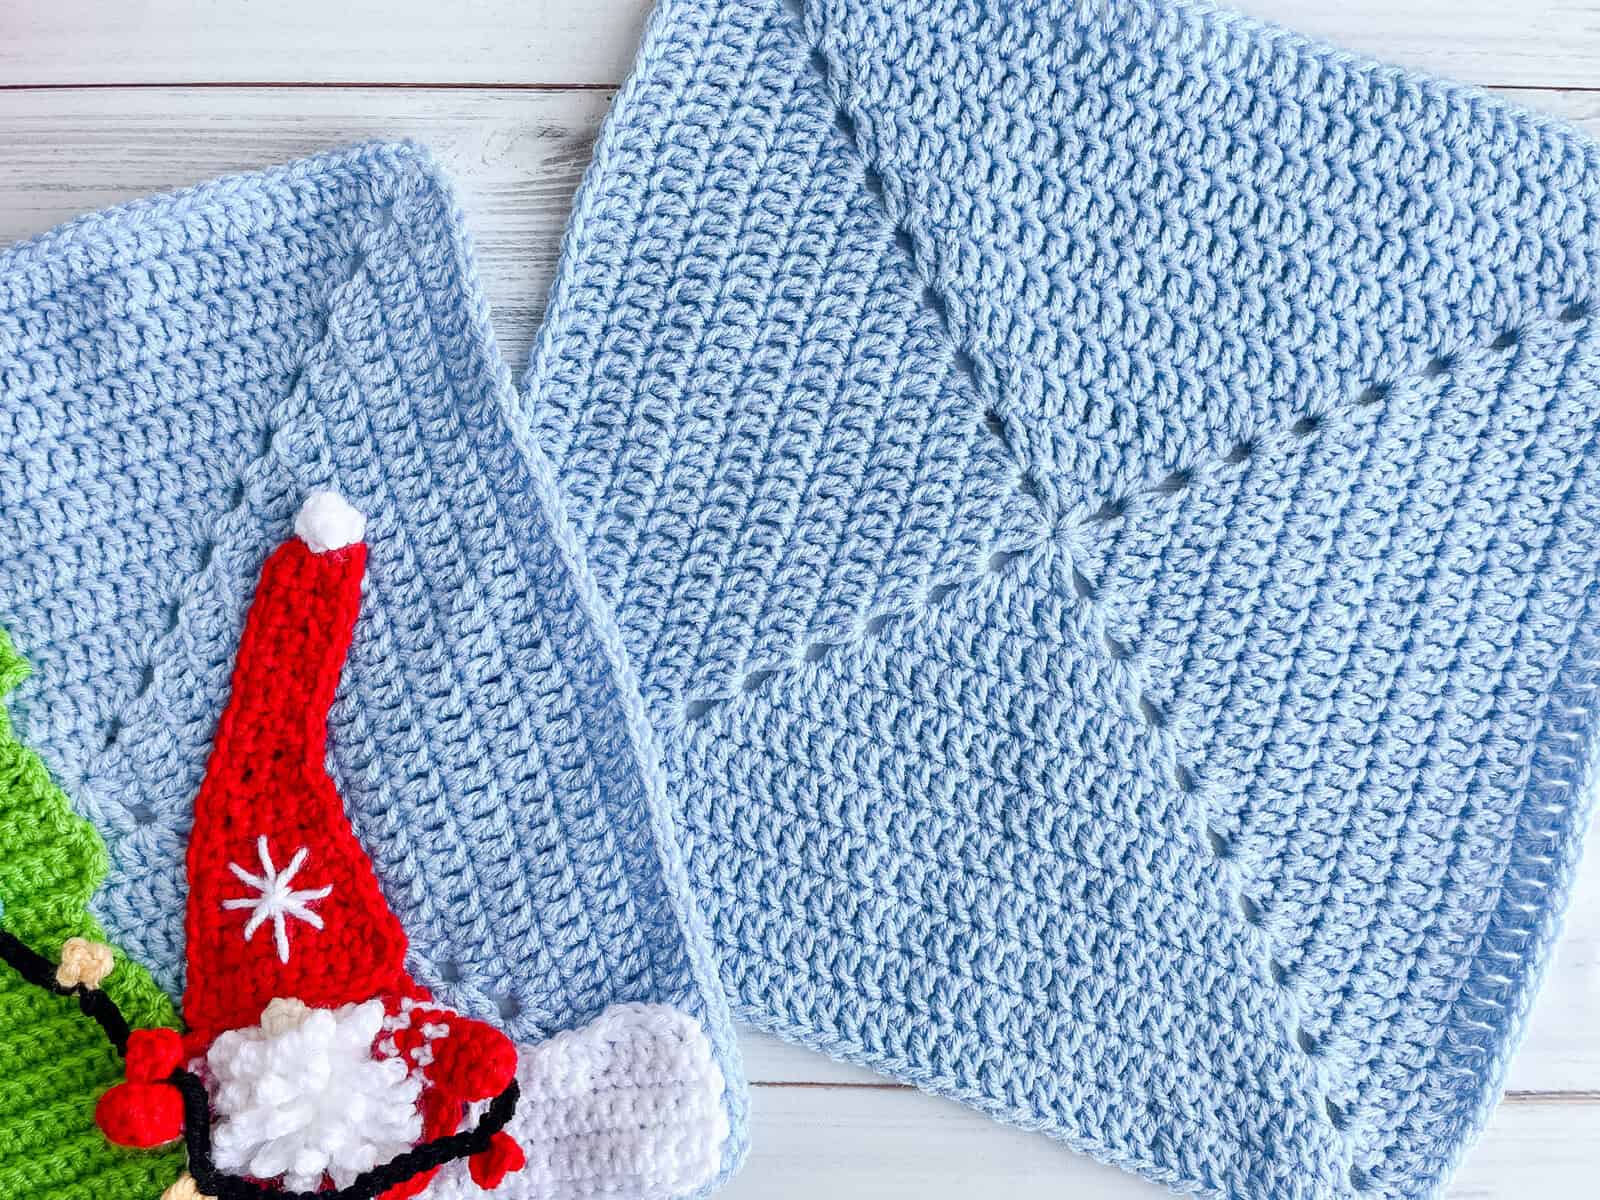
1. Each of the center squares are a solid all DC beginner-friendly square. I have a complete photo and video tutorial for the Solid DC Square to help you make your squares.
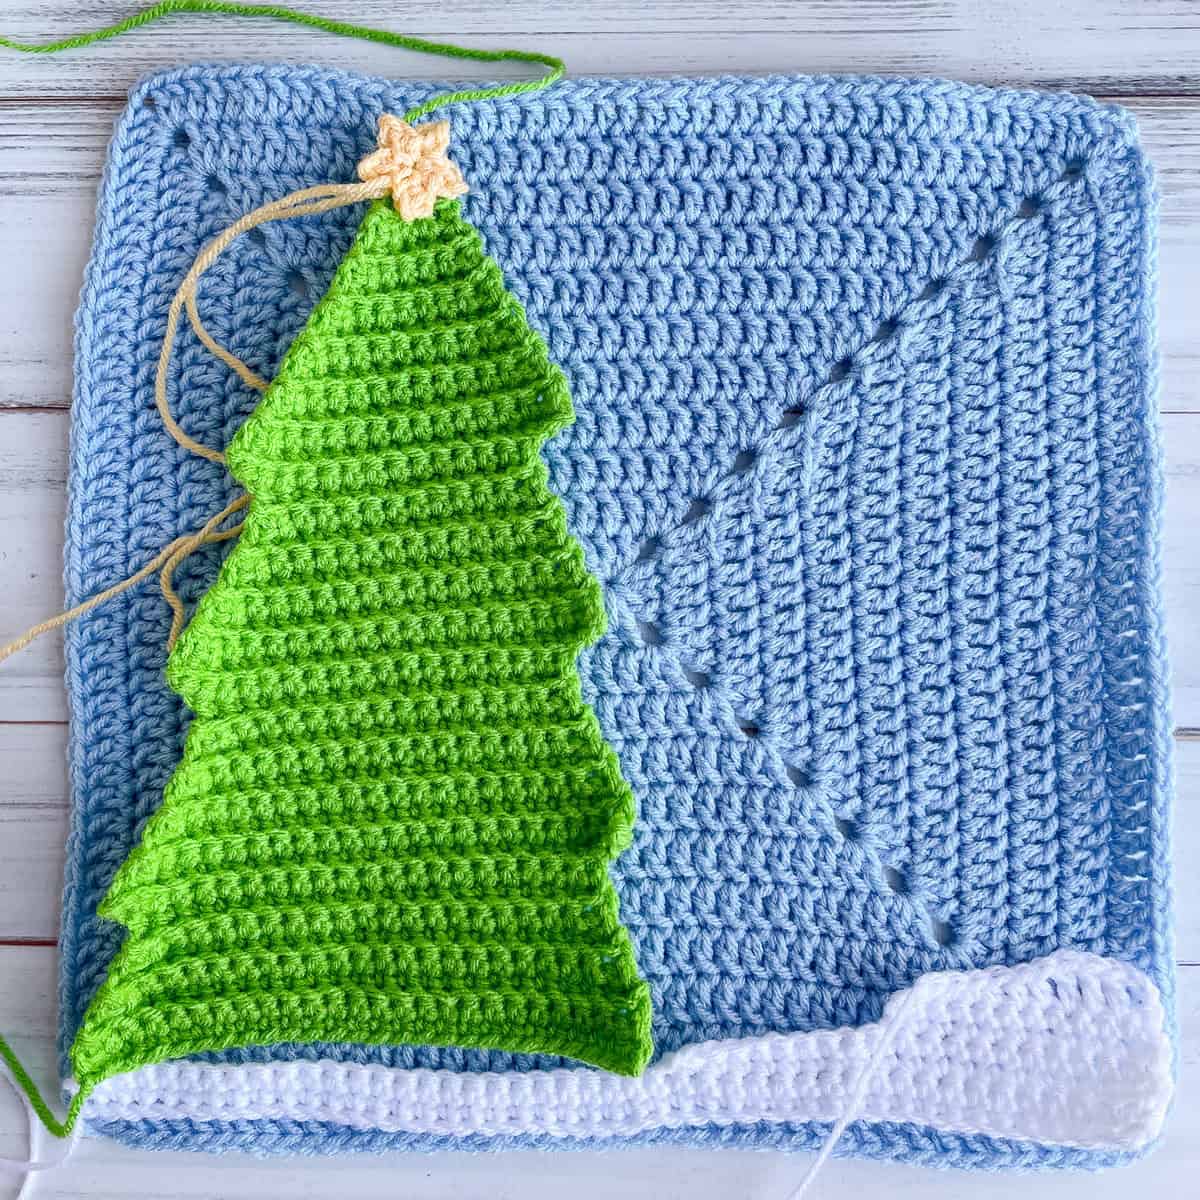
2. Once the square is complete you will crochet various applique pieces which will be sewn to the front of the square.
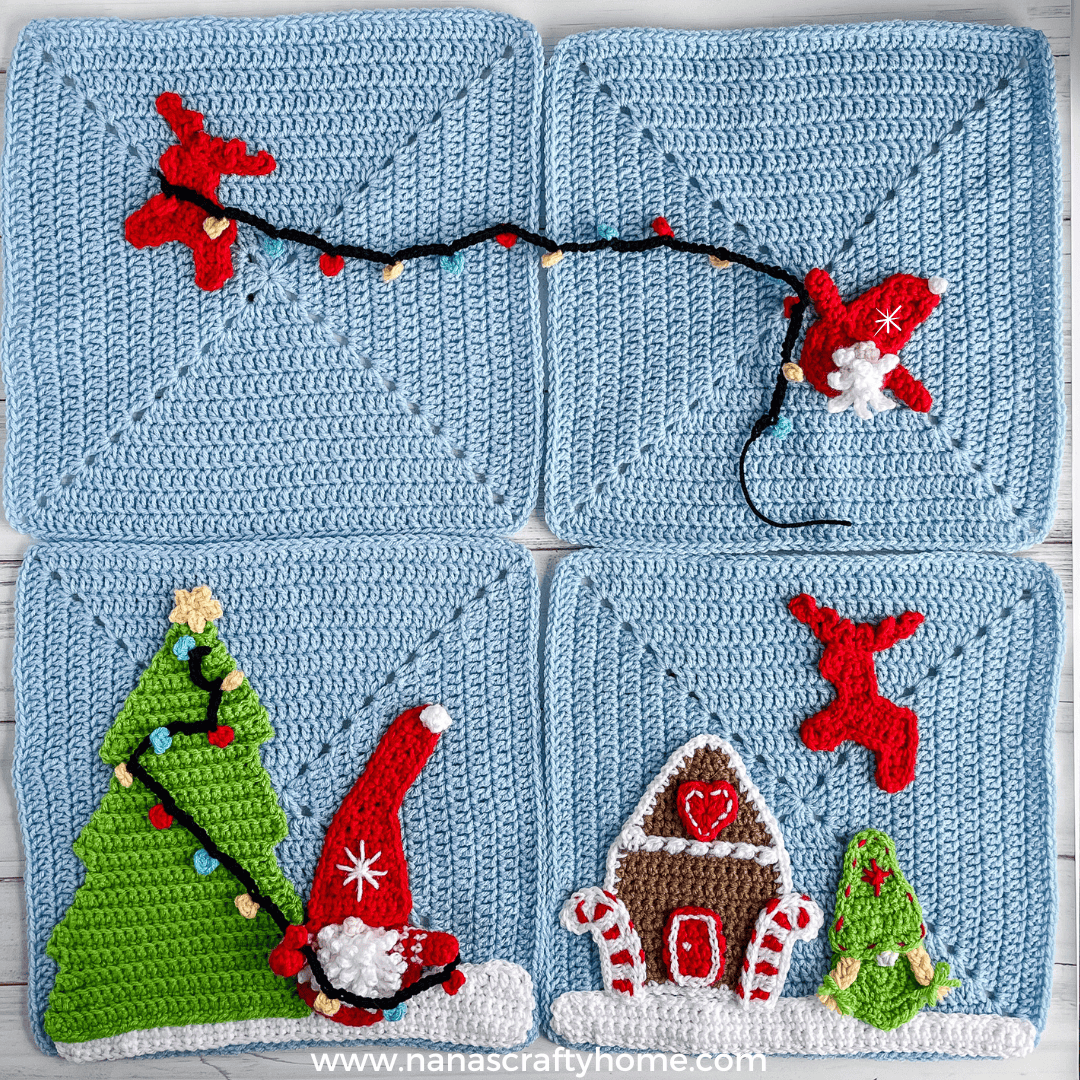
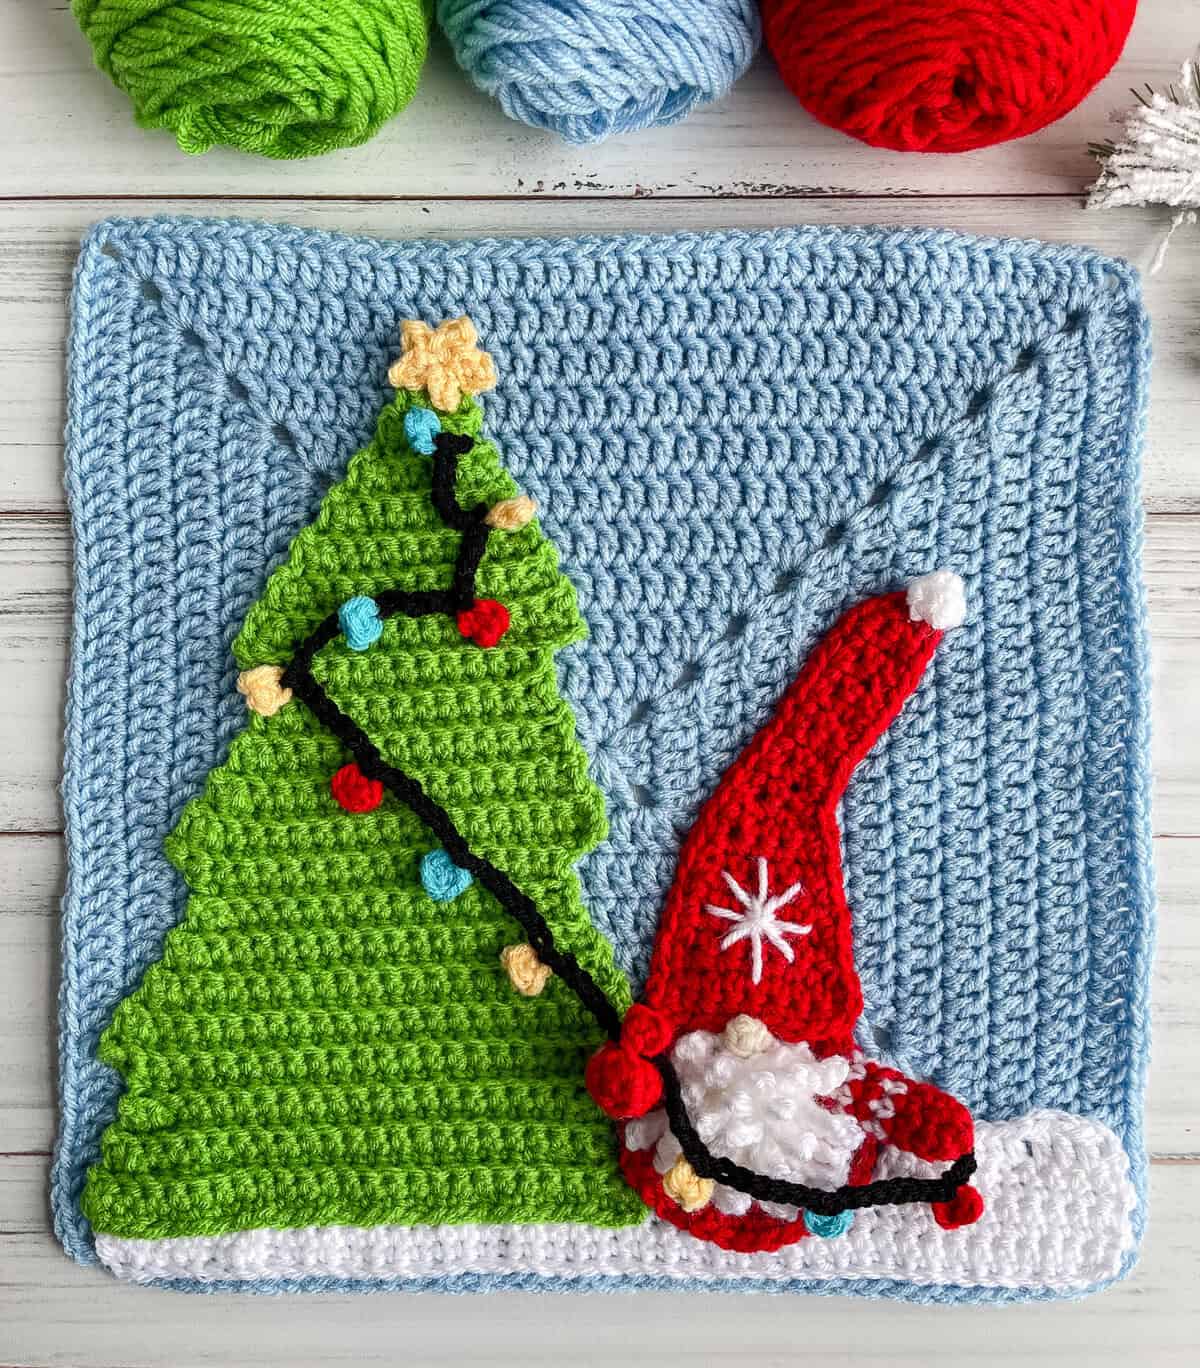
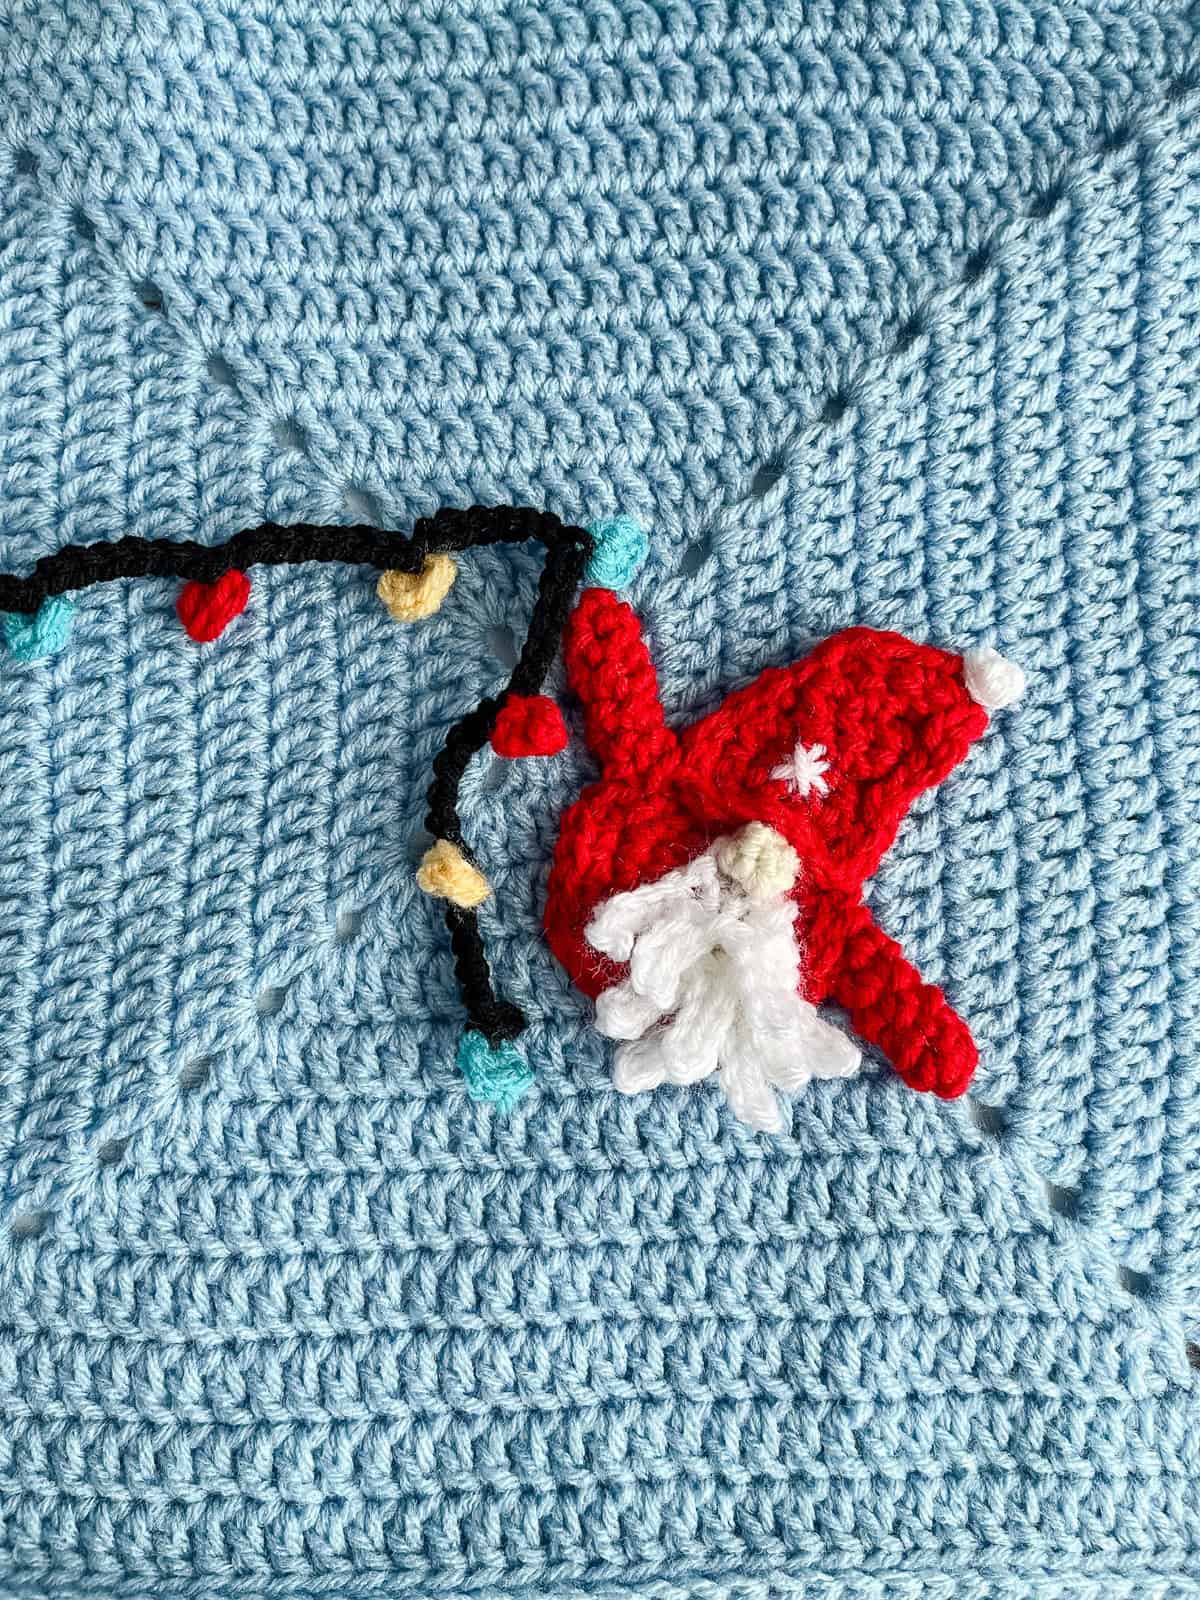
3. Mr. Gnome is the first square and it features a textured Christmas tree, a cute gentleman gnome, snow and Christmas lights for the tree!
Mrs. Gnome is the second square and it features a Gingerbread House, a sweet lady gnome, snow, candy canes and a festive reindeer! If you need some help making her braids I have a photo and video tutorial for how to make yarn braids – simply adjust to smaller size as indicated in pattern.
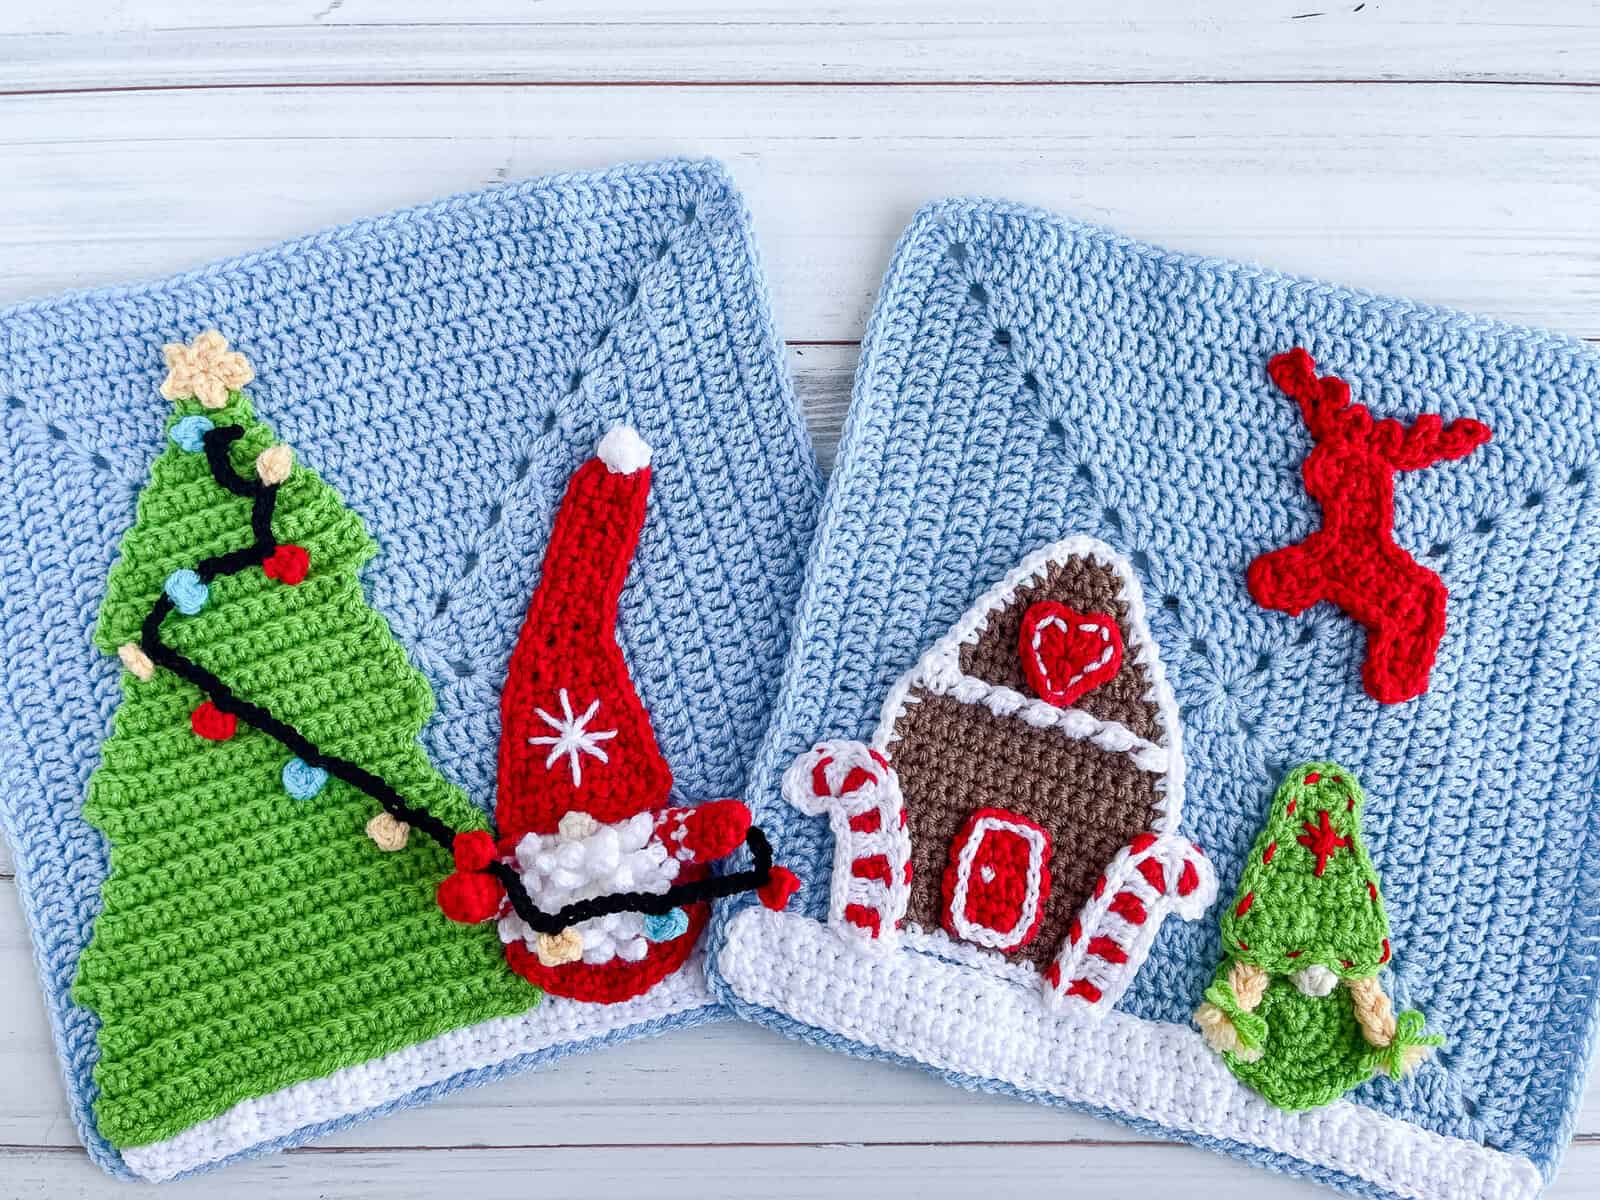
Squares 4 & 5 are really quick and easy! Square 3 features a gnome hanging on for “deer” life to the end of another Christmas lights strand which leads to Square – a flying reindeer!
4. If you haven’t sewn applique pieces on to crochet before, I have all of my tips and tricks in a brand new tutorial!
5. This blanket will feature a total of 4 center squares made as a solid DC square and all will be the same color blue for the base. So if you get the first square completed and want to work ahead you can make a total of 4 identical blue squares and you will be all set to go when the next patterns come out.
6. Once the squares are all complete we will join the squares and add a border! If you want to get a head start on the border, I used my flat zipper slip stitch to join the squares!
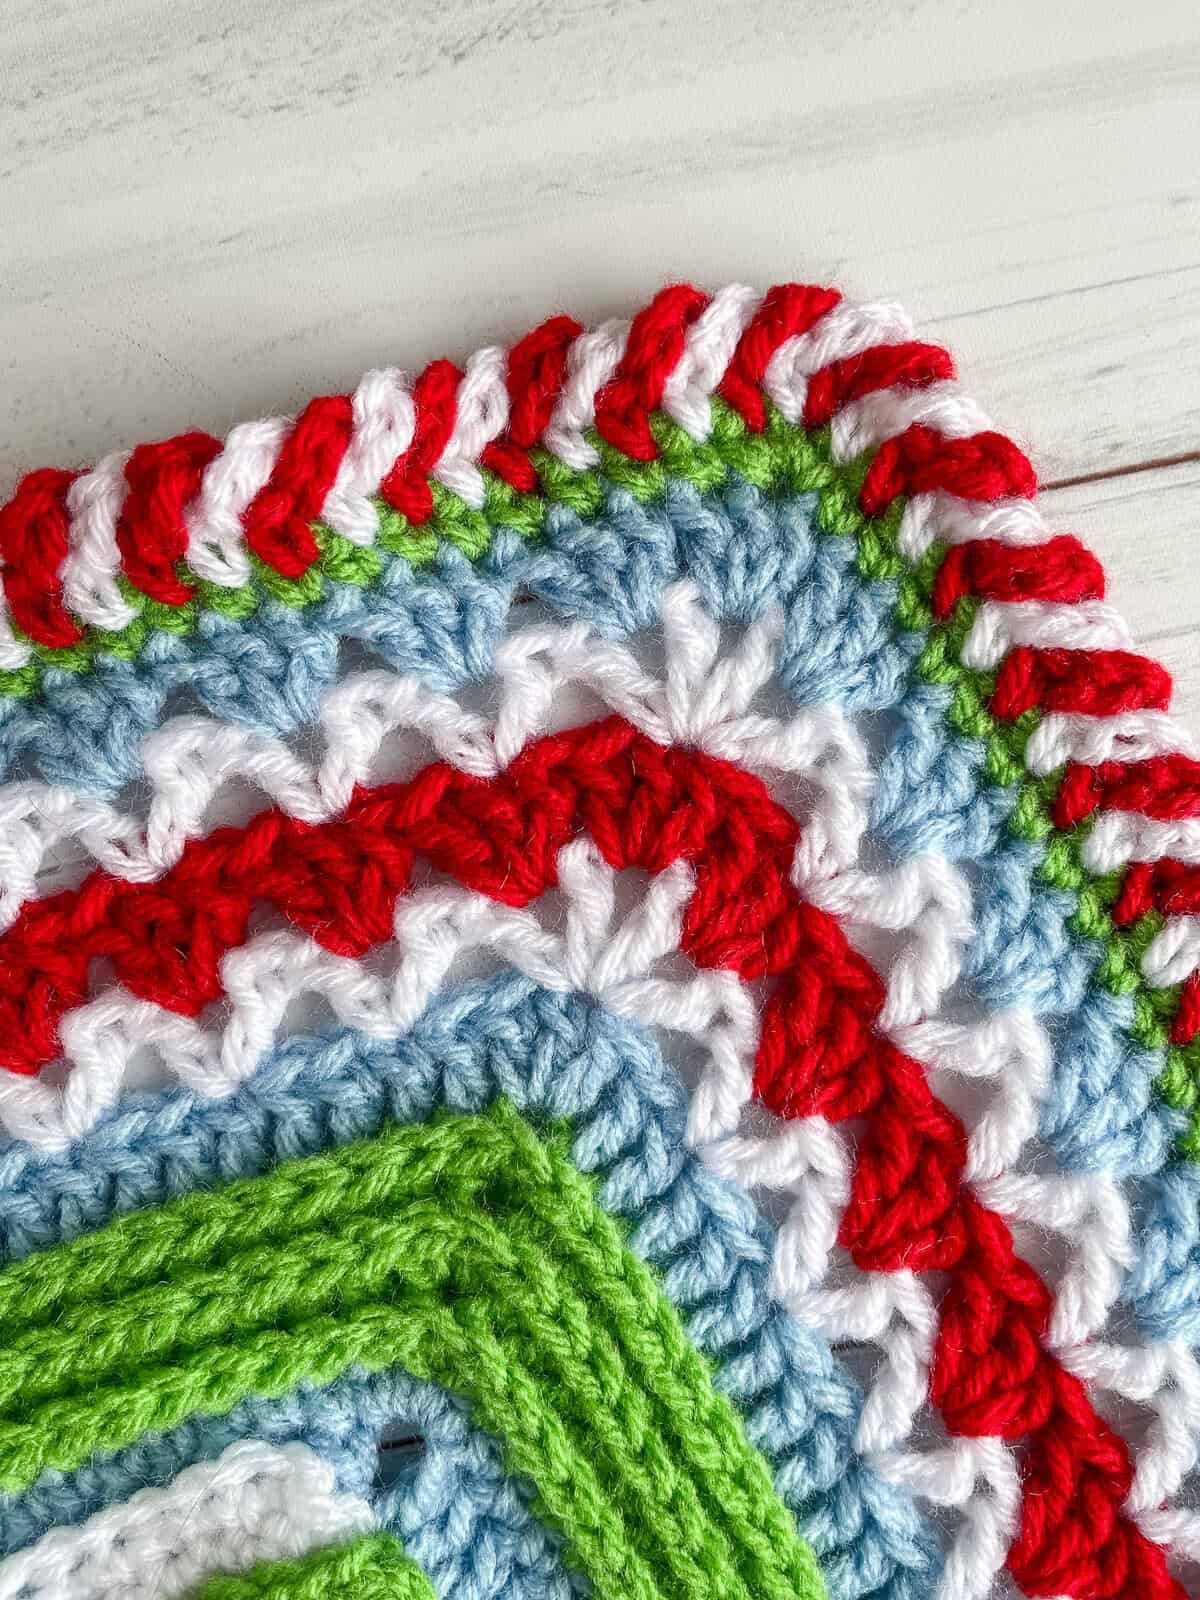
7. After joining the blanket measured on the smaller side – 28″ x 28″ so I decided to add a large festive border featuring several different stitch patterns. After working a round of single crochet around the outside edge I started with several rounds of hdc stitches worked in the third loop in green which mimics the Christmas tree from Square 1, then i did several rounds of Ric Rac border which is such a festive addition and then finally a round of Candy Cane edge for the last round to mimic the candy canes from Square #2.
I have tutorials for both the Ric Rac Border and Candy Cane edge. However, take into account that the Candy Cane edge tutorial was originally for 3 colors and I am only using 2 colors for this blanket so I adjusted the chains to 4.
After the border my Christmas Gnome Blanket measures approximately 39″ x 39″ – a good sized throw blanket!
This festive Christmas Gnome Blanket will be a lot of fun to work on, be a great stash busting project and perfect for the holidays!
Supplies for the Christmas Gnome Squares Blanket
*This post contains affiliate links. You can click on any yarn or material highlighted to purchase. I will receive a small commission if you purchase but it won’t cost you any extra! As an Amazon Associate I earn from qualifying purchases.
I am using Red Heart Super Saver* yarn for my squares and blanket which is a medium worsted weight acrylic yarn. Very economical and with plentiful color options! You can certainly substitute your favorite worsted weight yarn – Hobby Lobby’s I Love This Yarn!, Red Heart With Love, Paintbox Simply Aran, Vanna’s Choice, Big Twist Value, Caron Simply Soft, Caron One Pound and so many more! Raid your yarn stash – even mix and match.
This is a fantastic stash busting project – the color you are using for the squares is the only one you will need more than 1 skein. Raid your stash for your favorite!
If you choose to make the blanket as shown in my pattern you will need the following yarn supplies:
Red Heart Super Saver Weight 4 Medium (100% acrylic)
- (3) Light Blue 15.0 oz / 780 yards (Blue)
- (1) Spring Green 4.3 oz / 240 yards (Green)
- (1) Cherry Red 4.4 oz / 230 yards (Red)
- (1) White 4.8 oz / 260 yards (White)
- (1) Cafe Latte 0.6 oz / 32 yards (Brown)
- (1) Aran 0.03 oz / 2 yards (Cream)
- (1) Cornmeal 0.2 oz / 11 yards (Yellow)
- (1) Torqua 0.04 oz / 3 yards (Teal)
- (1) Black 0.04 oz / 3 yards (Black)
Totals: 29.41 oz / 1561 yards
Approximate Finished Size: 39” x 39”
You could certainly use just one of the squares in order to make pillows or wall hangings for decoration if you didn’t want to make the complete blanket. I will be offering each of the squares as a separate pattern in my shop so if you have a particular favorite and don’t want the entire pattern you could choose to purchase one or more of those individually as well.
The complete blanket with all 4 squares + joining and border instructions is now available in my shop for one low price!


This pattern is also available as an ad-free, printable PDF! You can purchase the individual pattern for Square #1 or purchase the individual pattern for Square #2), NOTE: Purchasing the individual squares will not include the other squares or the final project details! If you love PDFs, you might want to check out my Lifetime Membership. It’s an awesome deal! Never pay for one of my PDFs again!! (Or, scroll down for the free version!)


For more Christmas Gnome crochet inspiration, check out this crochet pattern roundup with 20+ free Gnome for Christmas patterns!
You may also love the following free crochet patterns by Nana’s Crafty Home:


- Christmas Granny Square Blanket free crochet pattern
- Easter Granny Square Blanket free crochet pattern
- Fall Squares Blanket free crochet pattern
Christmas Gnome Blanket Crochet Pattern Instructions
Pattern written in US crochet terminology
Supplies:
Red Heart Super Saver Weight 4 Medium (100% acrylic)
- (3) Light Blue 15.0 oz / 780 yards (Blue)
- (1) Spring Green 4.3 oz / 240 yards (Green)
- (1) Cherry Red 4.4 oz / 230 yards (Red)
- (1) White 4.8 oz / 260 yards (White)
- (1) Cafe Latte 0.6 oz / 32 yards (Brown)
- (1) Aran 0.03 oz / 2 yards (Cream)
- (1) Cornmeal 0.2 oz / 11 yards (Yellow)
- (1) Torqua 0.04 oz / 3 yards (Teal)
- (1) Black 0.04 oz / 3 yards (Black)
Size I (5.5 mm) crochet hook
Scissors
Tapestry Needle
Approximate finished size: 14” x 14” for each square
Blanket finished size: 39″ x 39″
Abbreviations:
- RS = right side
- sl st = slip stitch
- ch(s) = chain(s)
- st(s) = stitch(es)
- dc = double crochet
- sp(s) = space(s)
- sc2tog = single crochet 2 sts together (see special stitches section below)
- FLO = front loop only
- BLO = back loop only
- MC = magic circle
- hdc = half double crochet
Special Stitches:
sc2tog = (Insert hook in next st, yo and pull up a loop) twice, yo and pull through all 3 loops on hook.
Pattern Notes:
- Ch 3 at beginning of each round or row counts as first st.
- Stitch count increases by 16 sts each round for square.
- When fastening off for sewing, measure length by wrapping around outside edge of piece three times for a length long enough for sewing.
Recommended Tutorials:
Solid DC Granny Square
Mini Star Applique Tutorial
How to Sew Appliques Tips & Tricks
How to Make Braids
Flat Zipper Slip Stitch Join Tutorial
Ric Rac Border Tutorial
Candy Cane Edge Tutorial (note that the tutorial shows 3 colors instead of 2 – adjust to 4 chains for this edge)
Pattern Instructions
Squares (Make 4)
With blue, ch 4.
Round 1: (RS) Dc in fourth ch from hook (skipped chs count as first st), ch 2, *(3 dc, ch 2) in same sp,* repeat from * to * twice, dc in same sp, sl st in top of ch-3. (12 sts + 4 ch-2 sps)
Round 2: Sl st in next st, sl st in ch-2 sp, (ch 3, dc, ch 2, 2 dc) in same sp, *dc in each st to next ch-2 sp, (2 dc, ch 2, 2 dc) in next ch-2 sp,* repeat from * to * twice, dc in each st to end, sl st in top of ch-3. (28 sts + 4 ch-2 sps)
Rounds 3 – 11: Repeat round 2. (140 sts + 4 ch-2 sps after round 11)
Fasten off. Weave in ends.
Square #1 Instructions
Tree
With green, ch 27.
Row 1: (RS) Sc in second ch from hook and in each ch across. Turn. (26)
Row 2: Working in both loops, ch 1, sc2tog, sc in each st to last 2 sts, sc2tog. Turn. (24)
Row 3: Working in BLO, ch 1, sc in each st. Turn.
Row 4: Repeat row 2. (22)
Row 5: Repeat row 3.
Row 6: Repeat row 2. (20)
Row 7: Working in BLO, ch 1, sc in each st to end, ch 3. Turn. (20 + 3 chs)
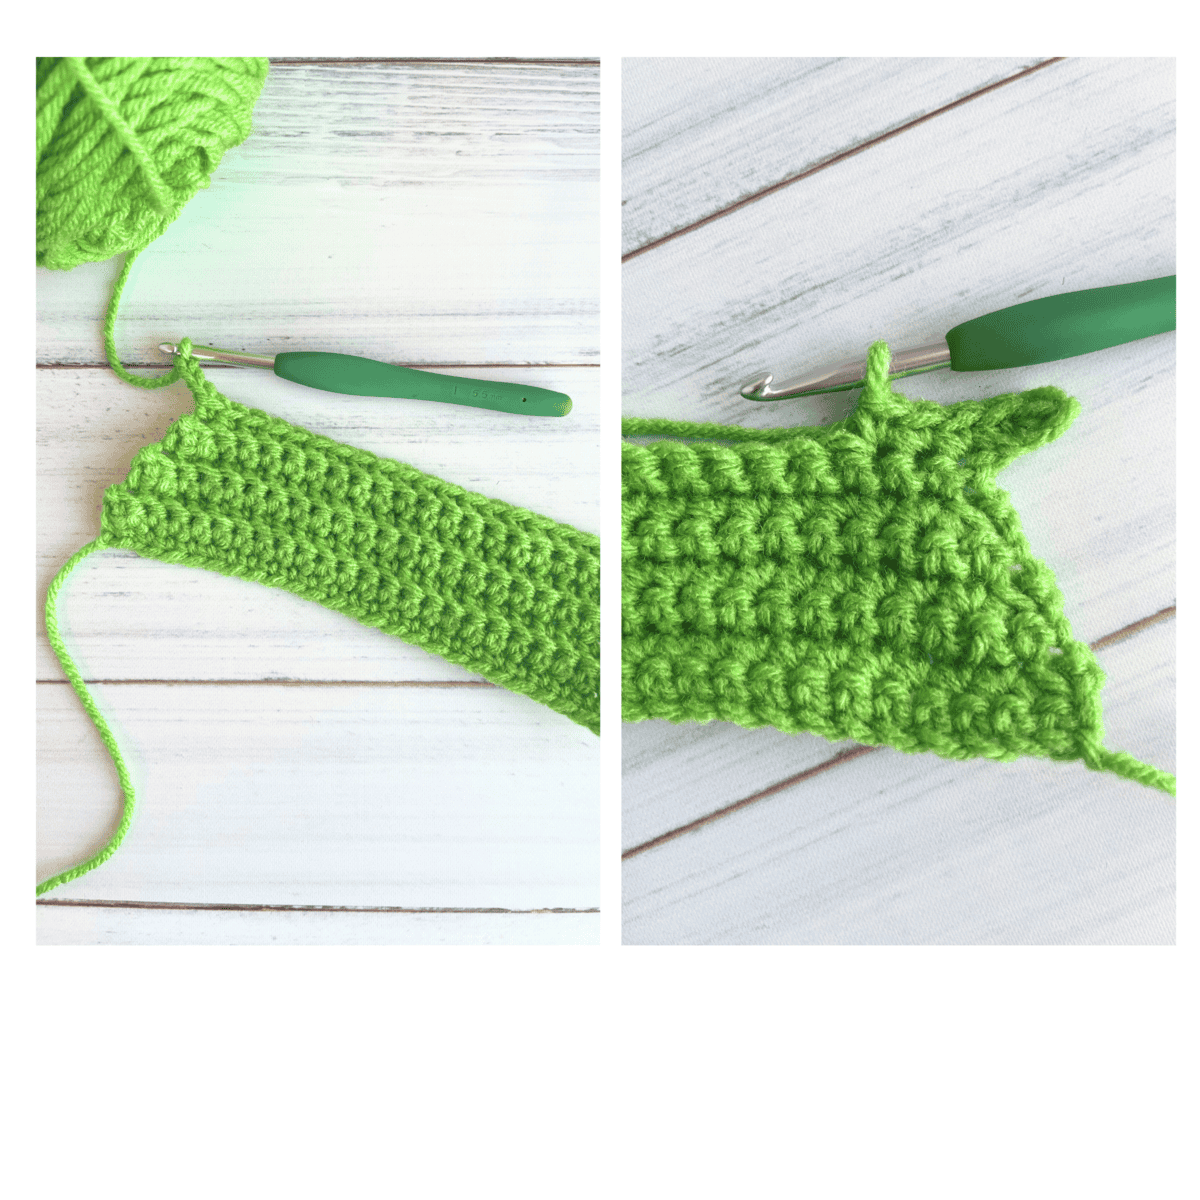
Row 8: Sc in second ch from hook and in next ch, working in both loops, sc in each st to end, ch 3. Turn. (22 + 3 chs)
Row 9: Sc in second ch from hook and in next ch, working in BLO, sc in each st to end. Turn. (24)
Rows 10 – 15: Repeat rows 2 – 3. (Stitch count = 18 after row 15)
Row 16: Repeat row 2. (16)
Row 17: Repeat row 7. (16 + 3 chs)
Row 18: Repeat row 8. (18 + 3 chs)
Row 19: Repeat row 9. (20)
Rows 20 – 25: Repeat rows 2 – 3. (Stitch count = 14 after row 25)
Row 26: Repeat row 2. (12)
Row 27: Repeat row 7. (12 + 3 chs)
Row 28: Repeat row 8. (14 + 3 chs)
Row 29: Repeat row 9. (16)
Rows 30 – 43: Repeat rows 2 – 3. (Stitch count = 2 at the end of row 43)
Fasten off, leaving a long tail for sewing.
Star
With Yellow, make a MC (or as an alternative ch 4 and sl st to form a ring), (ch 2, sc in second ch from hook, sl st in ring) 5 times.
Fasten off, leaving a long tail for sewing to tree.
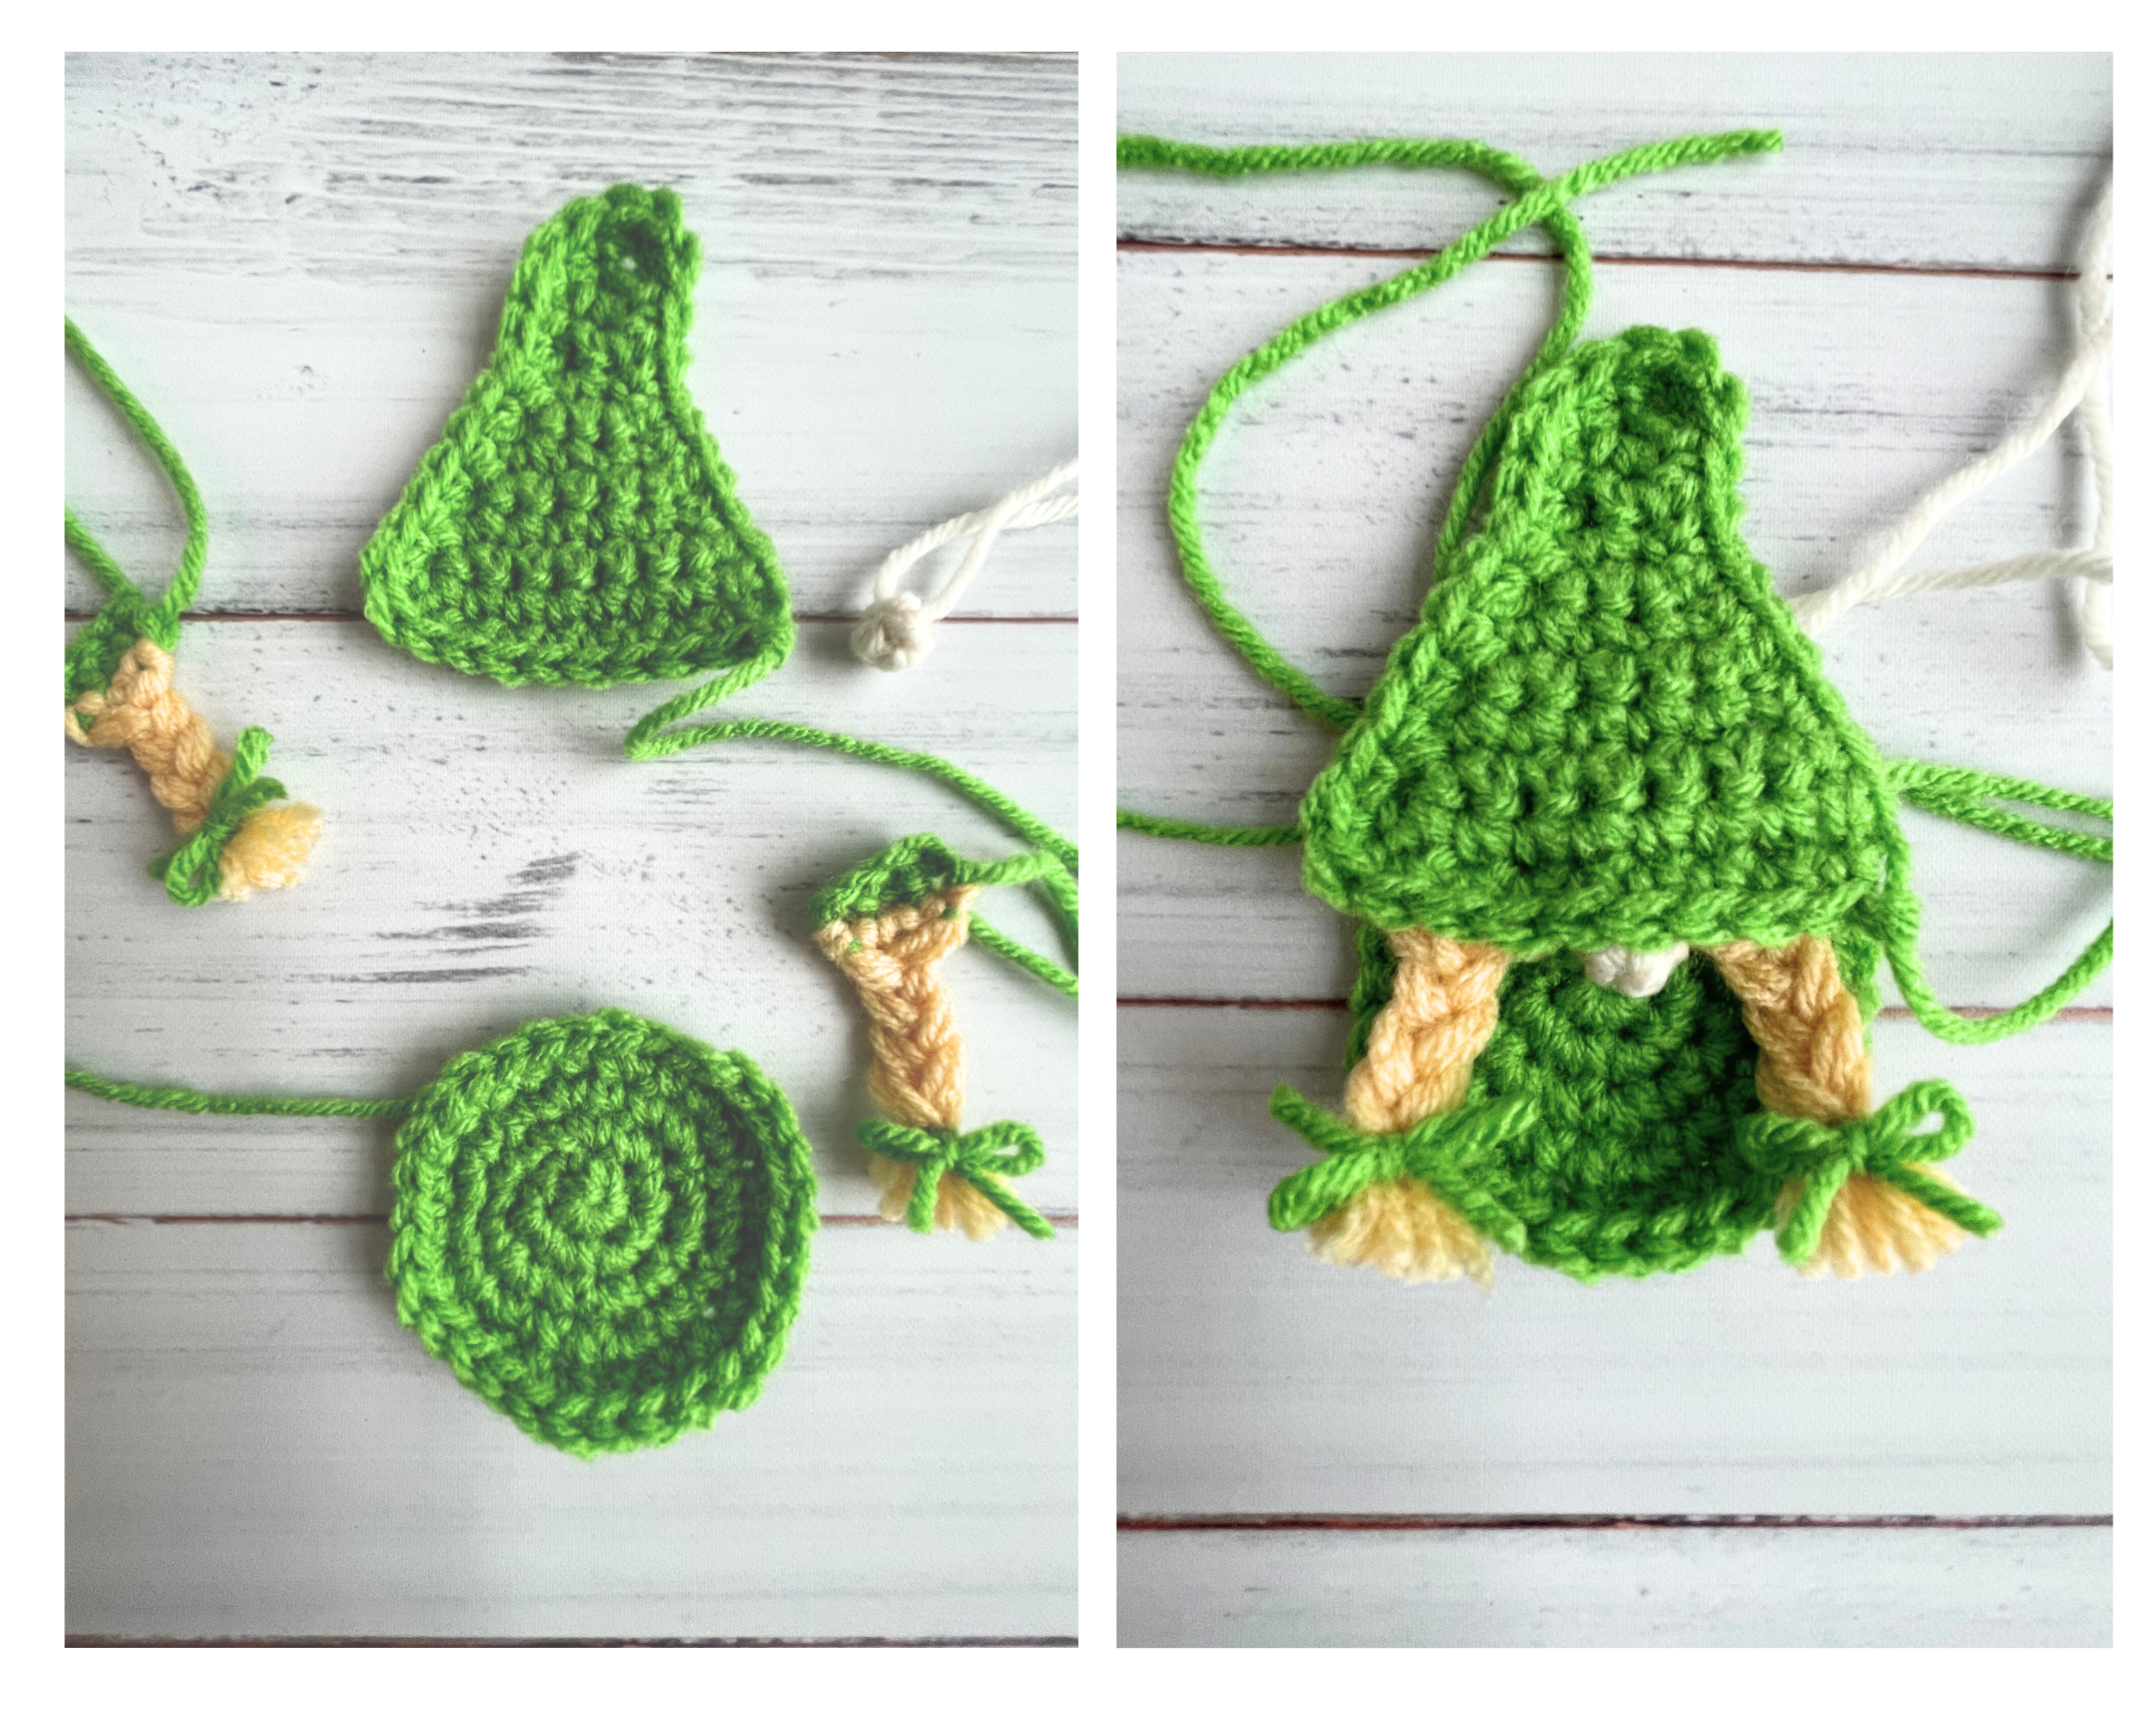
Gnome
Hat
With red, ch 2.
Row 1: Sc in second ch from hook. Turn. (1)
Row 2: Ch 1, 2 sc in same st. Turn. (2)
Rows 3 – 12: Ch 1, 1 sc in each st. Turn.
Row 13: Ch 1, 2 sc in each st. Turn. (4)
Rows 14 – 16: Ch 1, 1 sc in each st. Turn.
Row 17: Ch 1, 2 sc in same st, sc in each st to last st, 2 sc in last st. Turn. (6)
Rows 18 – 20: Ch 1, 1 sc in each st. Turn.
Row 21: Repeat row 17. (8)
Rows 22 – 24: Ch 1, 1 sc in each st. Turn.
Fasten off, leaving a long tail for sewing.
With a long length of white, embroider star on hat. Weave in ends.
Hat pom pom
With white, make a MC.
Round 1: Ch 1, 6 sc in MC. (6)
Round 2: Sc2tog x 3, sl st to first st. (3)
Fasten off.
Body
With red, make a MC.
Round 1: (RS) Ch 1, 6 sc in MC. (6)
Round 2: 2 sc in each st. (12)
Round 3: *2 sc in next st, 1 sc in next st,* repeat from * to * to end. (18)
Round 4: 1 sc in next st, 2 sc in next st, *1 sc in next 2 sts, 2 sc in next st* repeat from * to * to last st, 1 sc in last st. (24)
Round 5: *2 sc in next st, 1 sc in next 3 sts,* repeat from * to * to end. (30)
Round 6: 1 sc in next 2 sts, 2 sc in next st, *1 sc in next 4 sts, 2 sc in next st,* repeat from * to * to last 2 sts, 1 sc in last 2 sts. (36)
Fasten off, leaving a long tail for sewing.
Beard
With white, ch 7.
Row 1: Sc in second ch from hook and in each ch across. Turn. (6)
Row 2: Working in FLO, *(ch 5, sl st in second ch from hook and in each ch), sl st in next st,* repeat from * to * four times. Turn. (5 whiskers)
Row 3: Working in unused BLO from previous row, ch 1, sc in each st. Turn. (6)
Rows 4 – 6: Repeat rows 2 – 3 ending after row 2.
Row 7: Working in unused BLO from previous row, sc2tog, sc in remaining sts. Turn. (5)
Row 8: Working in FLO, *(ch 5, sl st in second ch from hook and in each ch), sl st in next st,* repeat from * to * three times. Turn. (4 whiskers)
Row 9: Repeat row 3.
Row 10: Repeat row 8. Turn.
Row 11: Repeat row 7. (4)
Row 12: Working in FLO, *(ch 5, sl st in second ch from hook and in each ch), sl st in next st,* repeat from * to * twice. Turn. (3 whiskers)
Fasten off, leaving a long tail for sewing.
Nose
With cream, make MC, ch 1, 6 sc in MC, sl st in first st.
Fasten off, sew nose together by weaving end through the top of the three stitches and tightening end.
Arms (Make 2)
With red, make MC.
Round 1: Ch 1, 6 sc in MC. (6)
Rounds 2 – 3: 1 sc in each st. Switch to white.
Round 4: 1 sc in each st. Switch to red.
Round 5: 1 sc in each st. Switch to white.
Round 6: 1 sc in each st. Switch to red.
Round 7: 1 sc in each st.
Fasten off, leaving a long tail for sewing.
Snow
With white, ch 46.
Row 1: (RS) Sc in second ch from hook and in each ch across. Turn. (45)
Row 2: Ch 1, sc in each st. Turn.
Row 3: Ch 1, sc in same st and in next 19 sts, leaving remaining sts unworked. Turn. (20)
Row 4: Ch 1, sc in each st. Turn.
Row 5: Ch 1, sc in same st and in next 10 sts, leaving remaining sts unworked. Turn. (11)
Row 6: Ch 1, sc in each st. Turn.
Row 7: Ch 3, dc in next 3 sts, hdc next 3 sts, sc next 3 sts, sl st in last st.
Fasten off, leaving a long length of yarn for sewing.
Christmas Light Garland
Bulbs (Make 12 total: 4 in each color red, yellow & teal)
Make a MC, ch 1, 3 sc in MC, sl st to first st.
Fasten off.
With black, ch 3, sl st in any st of a bulb, *ch 6, sl st in any st of next bulb,* repeat from * to * to last bulb, ch 3 after attaching last bulb.
Fasten off, leaving a long tail for attaching to tree.
Assembly
With long lengths of yarn left for sewing sew following pieces:
Sew beard to gnome’s body, sew nose above beard, sew pom pom to top of hat, sew hat to gnome’s body above nose, sew arms to sides of body.
Sew star to top of tree.
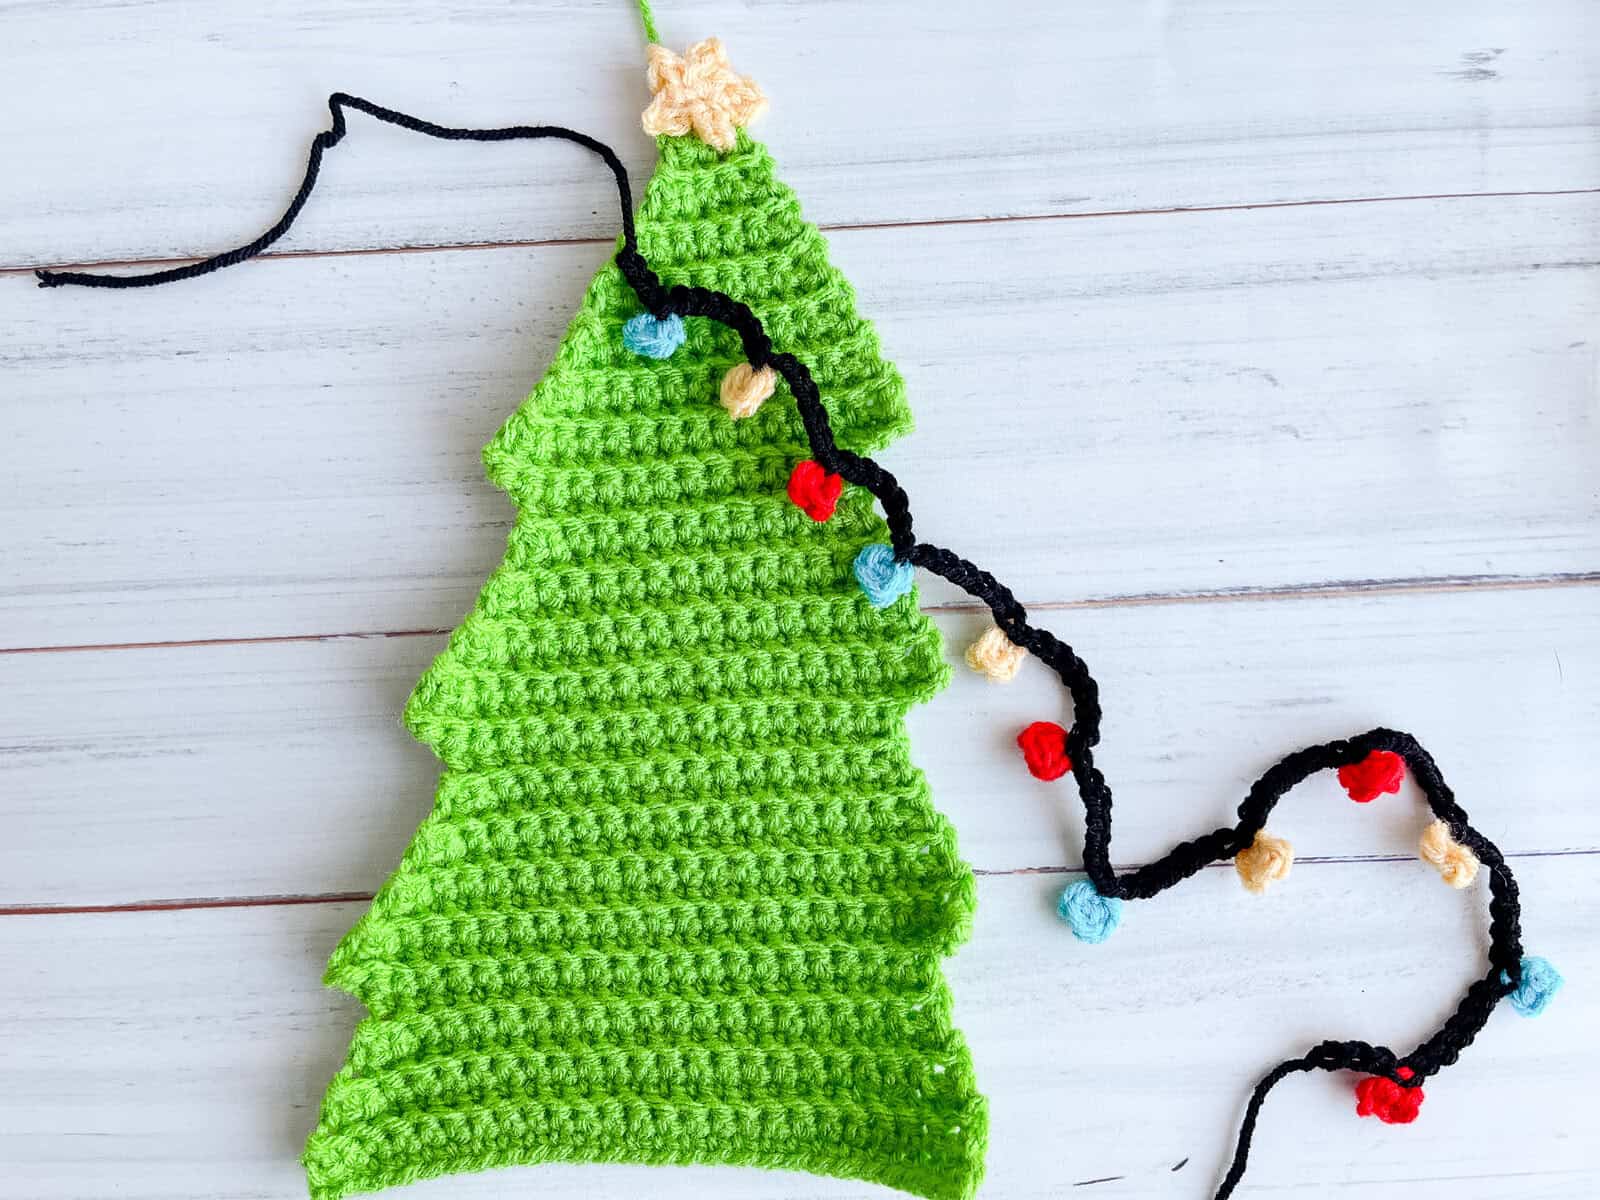
Attach light garland to RS of tree leaving a long length for sewing to gnome’s arms.
Begin sewing pieces to RS of square:
Sew snow along bottom edge of square.
Sew tree above snow.
Sew gnome above snow next to tree.
Sew end of light garland to end of gnome’s arms.
Weave in remaining ends.
Square #2 Instructions
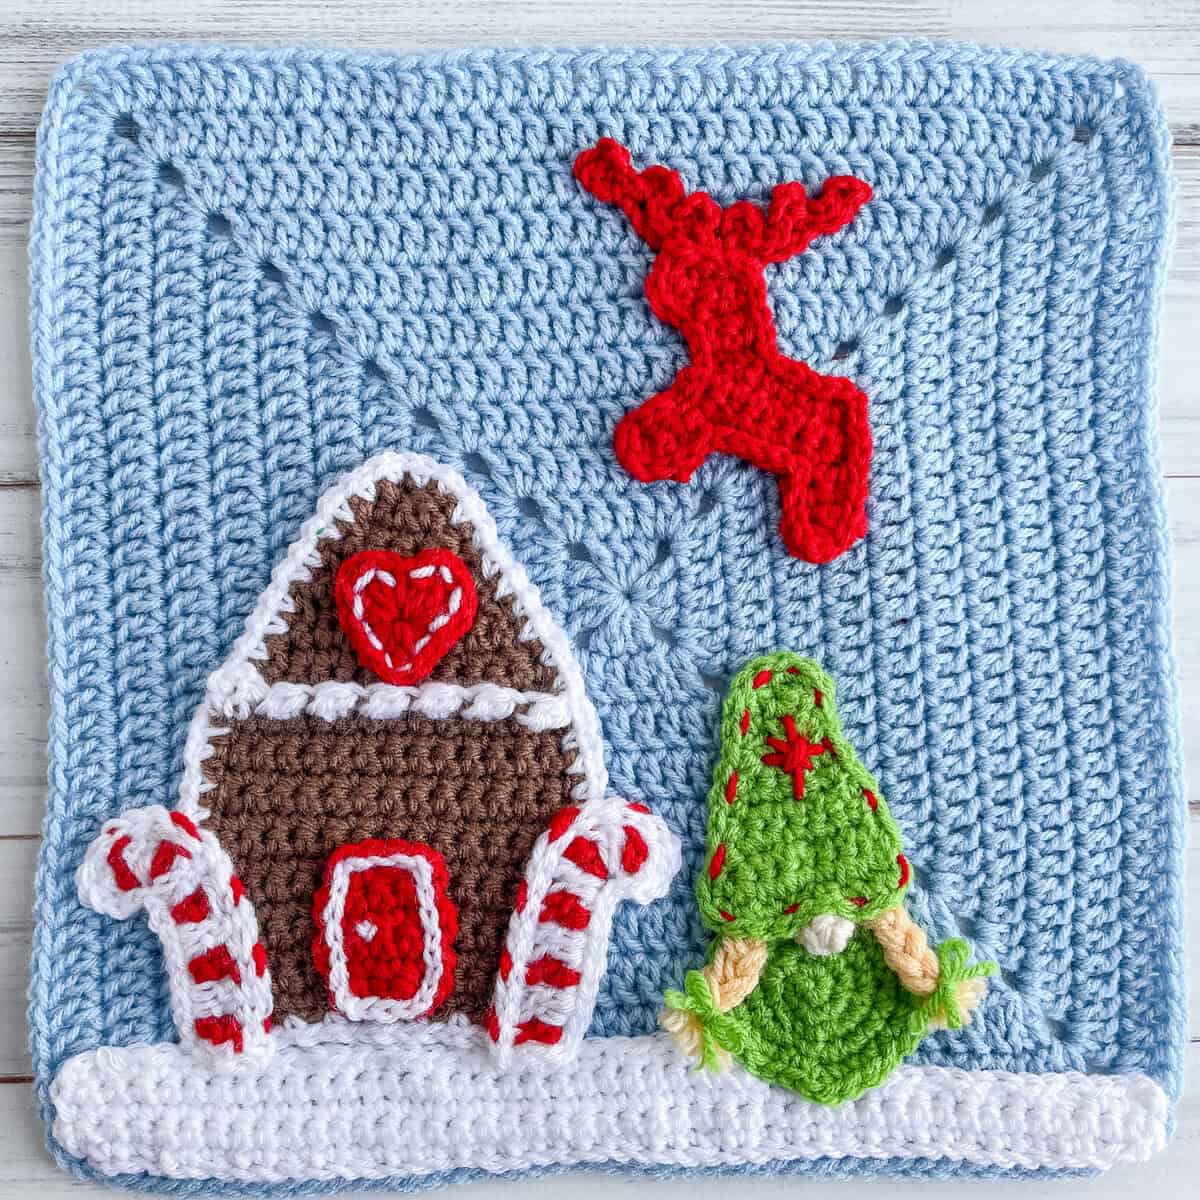
Gingerbread House
With brown, ch 15.
Row 1: (RS) Sc in second ch from hook and in each ch across. Turn. (14)
Rows 2 – 14: Ch 1, sc in each st. Turn.
Row 15: Working in BLO, ch 1, sc2tog, sc in each st to last 2 sts, sc2tog. Turn. (12)
Rows 16: Ch 1, sc in each st. Turn.
17 – 24: Working in both loops, repeat rows 15 – 16. (4 sts after row 23)
Row 25: Ch 1, sc2tog x 2. (2)
Fasten off brown leaving a long tail for sewing and switch to white, work (sc, ch 1) evenly around outside edge of house with (sc, ch 1, sc) in each corner, sl st to first st.
With RS facing, attach white to first unused front loop from top of row 14, ch 3, dc in same loop, *sl st in next loop, bobble st in next loop,* repeat from * to * in each FLO across, sl st in last loop.
Fasten off. Weave in ends not left for sewing.
Door
With red, ch 5.
Row 1: (RS) Sc in second ch from hook and in each ch across. Turn. (4)
Rows 2 – 6: Ch 1, sc in each st. Turn.
Fasten off, leaving a long tail for sewing.
Attach white to outside edge, sl st around outside edge of door.
Fasten off, leaving a long tail for embroidery of door knob.
Embroider door knob then weave in remaining end.
Heart
With red, make a MC, (ch 3, tr, dc, sl st, dc, tr, dc, sc x 3, tr, sc x 3) in MC, sl st in top of ch-3 to join. Tighten MC.
Fasten off, leaving a long tail for sewing.
With a long length of white, embroider under top of each st around. Weave in end.
With long length of yarn, sew heart to RS of gingerbread house.
With long length of yarn, sew door to RS of gingerbread house.
Girl Gnome
Hat
With green, ch 2.
Row 1: Sc in second ch from hook. Turn. (1)
Row 2: (RS) Ch 1, 2 sc in same st. Turn. (2)
Rows 3 – 4: Ch 1, 1 sc in each st. Turn.
Row 5: Ch 1, 2 sc in each st. Turn. (4)
Row 6: Ch 1, 1 sc in each st. Turn.
Row 7: Ch 1, 2 sc in same st, 1 sc in each st to last st, 2 sc in last st. Turn. (6)
Row 8: Ch 1, 1 sc in each st. Turn.
Row 9: Repeat row 7. (8)
Row 10: Ch 1, 1 sc in each st.
Without turning, sc evenly around outside edge of hat, working 2 sc sts in each corner, sl st to first st.
Fasten off and weave in ends.
With a long length of red, embroider star snowflake on hat and embroider around outside edges of hat. Weave in ends.
Braids (Make 2)
Braid base
With green (hat color), ch 4.
Row 1: 1 sc in second ch from hook and in each ch to end. (3)
Fasten off, leaving a long tail for sewing to hat. Weave in remaining end.
Braid
Cut 12 long pieces of yellow (braid color) approximately 6” long. Take 2 strands of yarn and add to each stitch of base as fringe. To form fringe, insert hook into first sc stitch of base, fold 2 strands of yarn in half, place fold of strands on hook, pull through stitch to form a loop, pull ends of fringe through loop and gently tighten to form fringe. Repeat for each of the 3 stitches of base.
To braid, separate yarn fringe into 3 sections of 4 strands of yarn per section. Braid sections. Use green (hat color) to tie a knot at the bottom of the braid and form a bow.
Trim braid as desired. Repeat instructions for second braid. Trim braids to match.
Body
With green, make a MC.
Round 1: (RS) Ch 1, 6 sc in MC. (6)
Round 2: 2 sc in each st. (12)
Round 3: *2 sc in next st, 1 sc in next st,* repeat from * to * to end. (18)
Round 4: 1 sc in next st, 2 sc in next st, *1 sc in next 2 sts, 2 sc in next st* repeat from * to * to last st, 1 sc in last st. (24)
Round 5: *2 sc in next st, 1 sc in next 3 sts,* repeat from * to * to end. (30)
Fasten off, leaving a long tail for sewing.
Nose
With cream, make MC, ch 1, 6 sc in MC, sl st in first st.
Fasten off, sew nose together by weaving end through the top of the three stitches and tightening end. Weave in ends.
Reindeer
With red, ch 8.
Row 1: Sc in second ch from hook and in each ch across. Turn. (7)
Rows 2 – 3: Ch 1, sc in each st. Turn.

Leg
Row 4: Ch 1, sc in same st, sc in next st. Turn, leaving remains sts unworked. (2)
Rows 5 – 7: Ch 1, sc in each st. Turn.
Fasten off.
Count over 3 sts from last st worked in row 4, join with sl st in next st, ch 1, sc in same st, sc in next st. Turn.
Repeat rows 5-7 for second leg.
Fasten off. Weave in ends.
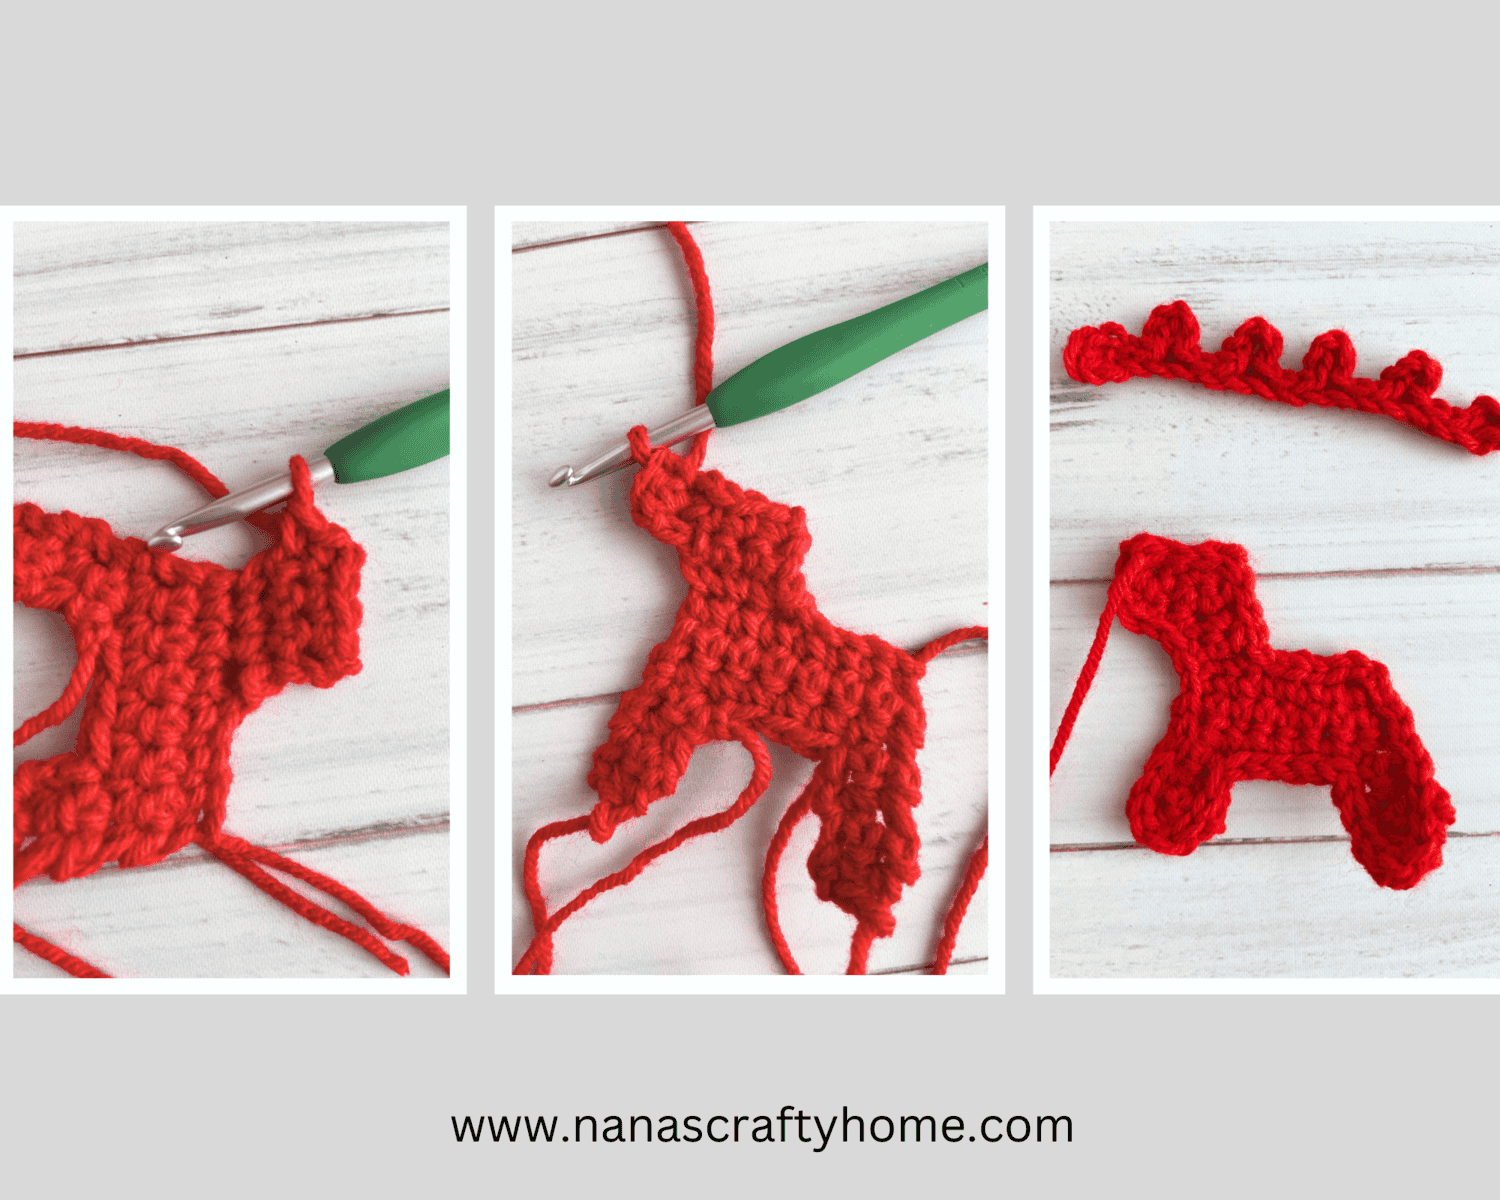
Head
Row 1: With RS facing and working in unused foundation loops from ch, count over 4 loops, join red in next unused loop, ch 1, sc in same st, sc in next 2 unused loops. Turn. (3)
Row 2: Ch 1, sc in each st. Turn.
Row 3: Ch 1, sc in each st. Do not turn.
Row 4: Rotate slightly to begin working along edge of rows just worked, ch 1, sc in same sp, 1 sc in end of row 2 of head. Turn. (2)
Row 5: Ch 1, sc in each st. Turn.
Now work sl sts evenly around entire outside edge of reindeer.
Fasten off leaving a long tail for sewing. Weave in remaining ends.
Antlers
With red, ch 22, sl st in fourth ch from hook, *sl st in next 2 chs, (sl st, ch 4, sl st) in next ch,* repeat from * to * to last 6 chs, sl st in next 2 chs, sk next 2 chs, sl st in last ch.
Fasten off. Sew to top of reindeer’s head.
Weave in remaining ends.
Candy Cane (Make 2)
With White, ch 15.
Note: When changing colors do not fasten off, drop and work over unused color.
Row 1: Dc in fourth ch from hook, switch to red, dc in next ch, switch to white, (2 dc, switch to red, 1 dc, switch to white, 1 dc) in next ch, 1 dc in next ch, *switch to red, 1 dc in next ch, switch to white, 1 dc in next 2 chs,* repeat from * to * once, switch to red, 1 dc in next ch, switch to white, 1 dc in last ch. Turn. (Note: Turn for one candy cane before working sl sts, do not turn for second candy cane. The RS of the candy cane will be the side with the sl sts.)
Work a round of slip sts evenly around outside edge of candy cane.
Fasten off leaving a long tail for sewing. Weave in remaining ends.
Snow
With white, ch 46.
Row 1: (RS) Sc in second ch from hook and in each ch across. Turn. (45)
Rows 2 – 3: Ch 1, sc in each st. Turn.
Row 4: Ch 1, sc in same st and in next 27 sts, leaving remaining sts unworked. Turn. (28)
Row 5: Ch 1, sc in each st. Turn.
Fasten off, leaving a long length of yarn for sewing.
Assembly
With long lengths of yarn left for sewing:
Sew braids and nose to bottom of gnome hat. Sew hat to top of body.
Begin sewing pieces to RS of square:
Sew snow along bottom edge of square.
Sew gingerbread house above snow.
Sew Candy Canes to each side of house.
Sew Gnome next to house on snow.
Sew reindeer above house and gnome.
Weave in remaining ends.
Square # 3 Instructions
Gnome
Hat
With red, ch 6.
Row 1: (RS) Sc in second ch from hook and in each ch across. Turn. (5)
Row 2: Ch 1, sc in each st. Turn.
Row 3: Ch 1, 1 sc in each st to last 2 sts, sc2tog. Turn. (4)
Row 4: Ch 1, sc in each st. Turn.
Row 5: Ch 1, 2 sc in same st, sc in next st, sc2tog. Turn.
Row 6: Ch 1, sc2tog, sc in next st, 2 sc in last st. Turn.
Row 7: Ch 1, 2 sc in same st, sc in next st, sc2tog. Turn.
Without turning working a round of sl sts around outside edge of hat.
Fasten off, leaving a long tail for sewing.
With a long length of white, embroider snowflake on RS of hat. Weave in ends.
Pom Pom
With white, make a MC, ch 1, 3 sc in MC, sl st in first st.
Fasten off, sew pom pom together by weaving end through the top of the three stitches and tightening end.
Body
With red, make a MC.
Round 1: (RS) Ch 1, 6 sc in MC. (6)
Round 2: 2 sc in each st. (12)
Round 3: *2 sc in next st, 1 sc in next st,* repeat from * to * to end. (18)
Round 4: 1 sc in next st, 2 sc in next st, *1 sc in next 2 sts, 2 sc in next st* repeat from * to * to last st, 1 sc in last st. (24)
Fasten off, leaving a long tail for sewing.
Beard
With white, ch 5.
Row 1: Sc in second ch from hook and in each ch across. Turn. (4)
Row 2: Working in FLO, *(ch 5, sl st in second ch from hook and in each ch), sl st in next st,* repeat from * to * twice. Turn. (3 whiskers)
Row 3: Working in unused BLO from previous row, ch 1, sc in each st. Turn. (4)
Rows 4 – 5: Repeat rows 2 – 3 ending after row 2.
Fasten off, leaving a long tail for sewing.
Nose
With cream, make MC, ch 1, 6 sc in MC, sl st in first st.
Fasten off, sew nose together by weaving end through the top of the six stitches and tightening end.
Arms (Make 2)
With red, make MC.
Round 1: Ch 1, 4 sc in MC. (4)
Rounds 2 – 5: 1 sc in each st.
Fasten off, leaving a long tail for sewing.
Assembly
With long lengths of yarn left for sewing sew following pieces:
Sew beard to gnome’s body, sew nose above beard, sew pom pom to top of hat, sew hat to gnome’s body above nose, sew arms to sides of body.
Sew gnome to RS of Square 3.
Weave in remaining ends.
Square 4 Instructions

Reindeer
With red, ch 8.
Row 1: Sc in second ch from hook and in each ch across. Turn. (7)
Rows 2 – 3: Ch 1, sc in each st. Turn.
Leg
Row 4: Ch 1, sc in same st, sc in next st. Turn, leaving remains sts unworked. (2)
Rows 5 – 7: Ch 1, sc in each st. Turn.
Fasten off.
Count over 3 sts from last st worked in row 4, join with sl st in next st, ch 1, sc in same st, sc in next st. Turn.
Repeat rows 5-7 for second leg.
Fasten off. Weave in ends.
Head
Row 1: With RS facing and working in unused foundation loops from ch, count over 4 loops, join red in next unused loop, ch 1, sc in same st, sc in next 2 unused loops. Turn. (3)
Row 2: Ch 1, sc in each st. Turn.
Row 3: Ch 1, sc in each st. Do not turn.
Row 4: Rotate slightly to begin working along edge of rows just worked, ch 1, sc in same sp, 1 sc in end of row 2 of head. Turn. (2)
Row 5: Ch 1, sc in each st. Turn.
Now work sl sts evenly around entire outside edge of reindeer.
Fasten off leaving a long tail for sewing. Weave in remaining ends.
Antlers
With red, ch 22, sl st in fourth ch from hook, *sl st in next 2 chs, (sl st, ch 4, sl st) in next ch,* repeat from * to * to last 6 chs, sl st in next 2 chs, sk next 2 chs, sl st in last ch.
Fasten off. Sew to top of reindeer’s head.
Weave in remaining ends.
Christmas Light Garland
Bulbs (Make 15 total: 5 in each color red, yellow & teal)
Make a MC, ch 1, 3 sc in MC, sl st to first st.
Fasten off.
With black, ch 3, sl st in any st of a bulb, *ch 6, sl st in any st of next bulb,* repeat from * to * to last bulb, ch 3 after attaching last bulb.
Fasten off, leaving a long tail for attaching reindeer.
Assembly
Sew Reindeer to RS of Square 4.
Attach end of Christmas Light Garland to neck of reindeer. Leave remaining length of light garland free. The other end of the lights will be attached to Square #3 once squares are joined together.
Christmas Gnome Squares Blanket Border
Pattern written in US crochet terminology
Red Heart Super Saver Weight 4 Medium (100% acrylic)
- Light Blue 3.0 oz / 156 yards (Blue)
- Spring Green 2.8 oz / 150 yards (Green)
- Cherry Red 2.5 oz / 130 yards (Red)
- White 3.5 oz / 182 yards (White)
Size I (5.5 mm) crochet hook
Scissors
Stitch marker (optional)
Tapestry needle
Abbreviations:
- ch(s) = chain(s)
- sl st = slip stitch
- sc = single crochet
- hdc = half double crochet
- dc = double crochet
- sp = space
- st(s) = stitch(es)
- sk = skip
- sl st = slip stitch
- RS = right side
- V-st = v-stitch(see special stitches section below)
Special Stitches:
V-st = (Dc, ch 1, dc) worked in the same st.
Recommended Tutorials:
Flat Zipper Slip Stitch Join Tutorial
Ric Rac Border Tutorial
Candy Cane Edge Tutorial (note that the tutorial shows 3 colors instead of 2 – adjust to 4 chains for this edge)
Joining Instructions
Assemblethe 4 squares.
Join squares by rows then by columns.
Place your squares RS facing up.
Begin by joining squares 1 & 3. The squares are joined using a surface slip stitch seam and blue yarn. This join is worked from front to back by inserting hook through back loops of matching sts on adjoining squares, draw up loop from behind to front and through loop on hook. The slip stitch will be visible on the RS of your work.
Continue working a slip stitch in the back loops of both squares to opposite corner space.
At the corner space, insert hook through back loops of chains from both squares, yo, and pull through loops to complete sl st.
With RS of Squares 2 & 4 facing up, insert hook in the back loops of chains from both squares, yo, pull through loops to complete sl st.
Continue working surface slip stitch join through squares 2 & 4.
Fasten off.
You will now join the columns.
Begin working slip stitch join for Squares 3 & 4 to first corner. At the corner, insert hook in the BLO of the chain st closest to the stitch on the side you are joining from Square 3 and then insert your hook in the chain stitch closest to the last stitch you worked on Square 4 and under the join from the columns that joined squares 1 & 2, yarn over and pull through to complete the slip stitch, ch 1.
Continue working surface slip stitch join through squares 1 & 2.
Fasten off. Weave in ends.
Border Instructions
Attach blue to any ch-2 corner space.
Round 1: Ch 1, 3 sc in ch-2 space, *1 sc in each stitch to next ch-sp at join between squares, 1 sc in ch-sp, 1 sc in join between squares, 1 sc in ch-sp after join, 1 sc in each st to ch-2 corner sp, 3 sc in ch-2 sp,* repeat from * to * 3 times, omitting final corner, sl st in first st with green.
Fasten off blue.
Round 2: Ch 1, hdc in each st around working 3 hdc stitches in middle sc of each 3 sc corner.
Rounds 3 – 4: Work stitches in third loop of hdc from previous round, hdc in each st around working 3 hdc stitches in third loop of middle hdc of each 3 hdc corner, sl st to first st with blue after round 4.
Fasten off green.
Round 5: Work stitches in third loop of hdc from previous round, ch 3, dc in each st around working 3 dc stitches in third loop of middle hdc of each 3 hdc corner, sl st in top of ch-3.
Fasten off blue.
Round 6: Join white with sl st to middle dc of any corner, (ch 4, dc, ch 1, V-st) in same st, [*sk next 2 sts, V-st in next st,* repeat from * to * to middle sc of next corner, (V-st, ch 1, V-st) in next st] 3 times omitting final corner, sl st in top of ch-3 from beginning ch-4.
Fasten off White.
Round 7: Join red with sl st to ch-1 sp in middle of V-st corner, ch 3, 2 dc in same sp, 3 dc in each ch-1 sp around to end, sl st in top of ch-3.
Fasten off red.
Round 8: Join white with sl st to middle dc of any corner 3 dc cluster, (ch 4, dc, ch 1, V-st) in same st, [*sk next 2 sts, V-st in next st,* repeat from * to * to middle dc of next corner, (V-st, ch 1, V-st) in next st] 3 times omitting final corner, sl st in top of ch-3 from beginning ch-4.
Fasten off white.
Round 9: Join blue, with sl st to ch-1 sp in middle of V-st corner, ch 3, 2 dc in same sp, 3 dc in each ch-1 sp around to end, sl st in top of ch-3 with green.
Fasten off blue.
Round 10: Ch 1, sc in each st around working 3 sc sts in middle dc of each 3 dc corner, sl st to first st.
Fasten off green.
Round 11: Attach white to middle sc st of any corner with sl st, ch 4, remove hook from loop, attach red to next st with sl st, ch 4, remove hook from loop, *insert hook back into loop of white, sc in next open st, ch 4, remove hook from loop, insert hook back into loop of red, sc into next open st, ch 4,* repeat from * to * around to end; at the end of the round, sl st white to bottom of beginning white ch-4, sl st red to the bottom of the beginning red ch-4. Note: You may need to skip a stitch at the end to keep colors in order.
Fasten off. Weave in ends.
Copyright 2024 Tonya Bush / Nana’s Crafty Home, LLC.
Social Media links:
Facebook: https://www.facebook.com/nanascraftyhome
Instagram: https://www.instagram.com/nanascraftyhome/
Pinterest: https://www.pinterest.com/nanascraftyhome/
YouTube: https://www.youtube.com/c/TonyaBush
Twitter: https://twitter.com/nanascraftyhome
Facebook Group: https://www.facebook.com/groups/829792060522798
Sign up for my Newsletter: https://nanascraftyhome.com/sign-up-for-my-free-newsletter/
 Hi! Thank you so much for being here! I am Tonya the designer behind Nana's Crafty Home. As a wife, mother, Nana of 9 & with 2 fur babies, my days are filled with love, laughter, hugs and yarn! Here you will find colorful and creative crochet designs for yourself or loved ones. My hope is that you will be inspired to learn and create along with me!