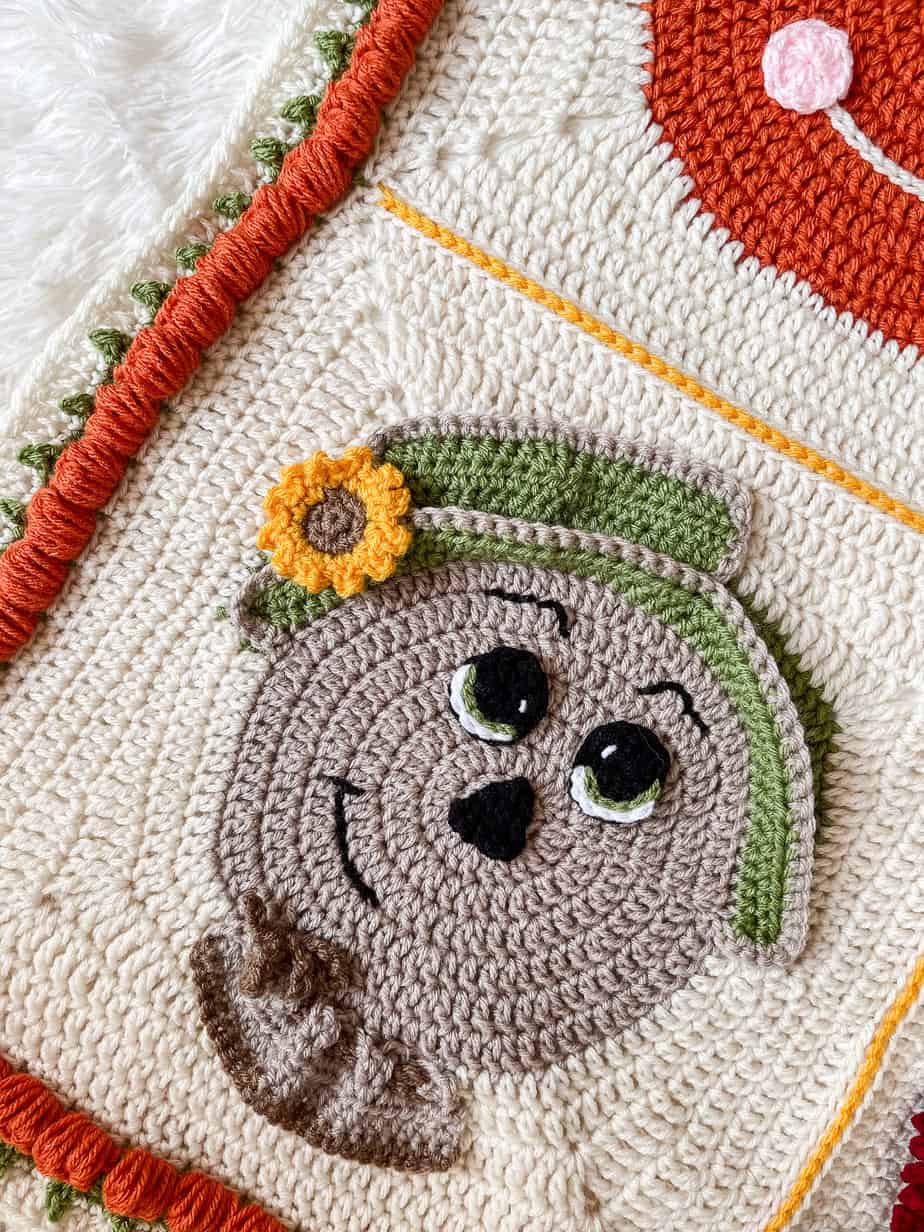
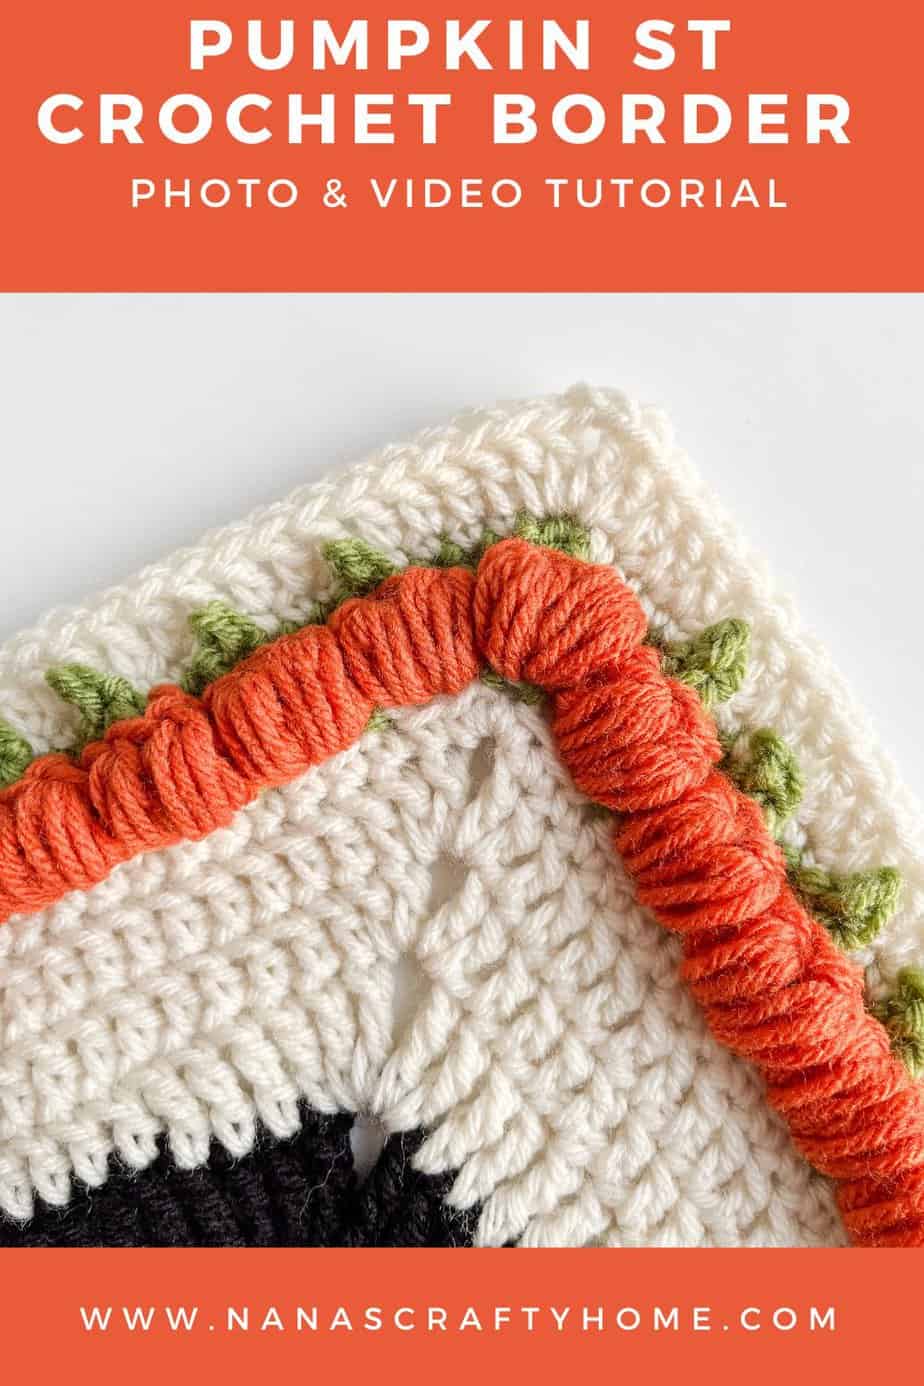
A blanket border crochet pattern featuring pumpkins is a free crochet pattern and tutorial by Nana’s Crafty Home!
This fun textured pumpkin border is the perfect addition to any fall themed project! Beautiful puff stitch pumpkins simply pop out and create lovely texture! Perfect simple border provides the perfect finishing touch to blankets, scarves, baskets and more!
The most striking element in this crochet blanket border is the series of bright orange pumpkin shapes. Each pumpkin has a textured, ribbed appearance, resembling the segments seen on a real pumpkin. This ribbed design is achieved using puff stitches worked together in the same space to provide that three-dimensional look.
Atop each pumpkin, there’s a small green stalk made up of picots to give them that delicate appearance.

This Pumpkin Crochet Border exudes a warm, autumnal feel, ideal for adorning blankets, table runners, or even garments. The use of contrasting colors provides additional visual appeal, ensuring that it becomes the focal point of any item it graces.
Pumpkin Border Details
This blanket border crochet pattern is made with just 6 rounds. You will start with a base of single crochet stitches. However, depending on the project you are adding this border to may not be necessary. Since I am joining granny squares together it was a good idea to work a round of single crochet stitches to even out the blanket edge.
The instructions for the border below are specific to my blanket project. However, you can skip over round 1 for a different project.
The next round is a round of single crochet stitches with chains and skipped stitches between. These ch-2 spaces are where you will work your puff stitches in the next round.

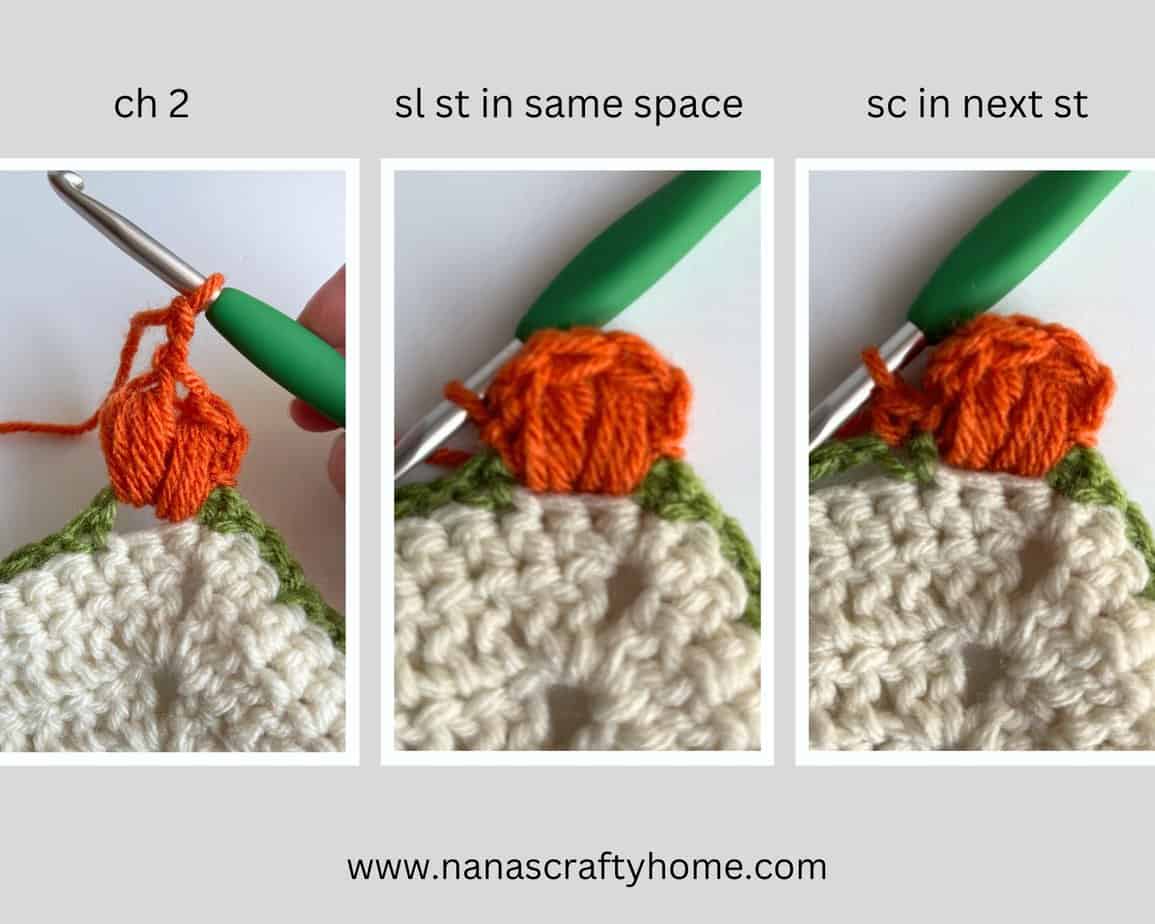
The pumpkin stitch round is basically working large puff stitches around the outside edge. The pumpkin shape will be more evident after completing round 4 as you are working single crochet stitches together which will create the tops of the pumpkin as well as push your puff out. While working your sc2tog stitches you will add in a picot to the top of each pumpkin to create a stem. Definitely easier than it may look!
After working the tops of your pumpkin, round 6 will push your picot stems forward as well as creating a base round if you want to continue on with additional rounds for your border.
I have a complete video tutorial available if you need additional help with any step of this pumpkin stitch border. You can find the tutorial below or on YouTube. Subscribe to my YouTube Channel to get notified whenever I post a new video.
The stitch multiples for this border is 3 + 2 from corner to corner. However, one of the best things about using this stitch for your border is you can make adjustments based on the number of stitches you have. When you get to a corner you can skip just 1 stitch instead of 2 if necessary. No need to have a specific stitch count to use this border!

My Fall Squares Blanket uses Red Heart Super Saver* which is a medium worsted weight acrylic yarn. Very economical and with plentiful color options! You can certainly substitute your favorite worsted weight yarn – Hobby Lobby’s I Love This Yarn!, Red Heart With Love, Paintbox Simply Aran, Vanna’s Choice, Big Twist Value, Caron Simply Soft, Caron One Pound and so many more! Raid your yarn stash – even mix and match to get your favorite fall colors!
*This post contains affiliate links. You can click on any yarn or material highlighted to purchase. I will receive a small commission if you purchase but it won’t cost you any extra! As an Amazon Associate I earn from qualifying purchases.
I have released all the squares for the Fall Squares Blanket as well as the slip stitch flat zipper join tutorial. You can find links to each individual square’s free pattern details on the supply and announcement blog post.
This Fall Granny Square Blanket pattern is also available as an ad-free, printable PDF! This PDF includes all 9 individual square patterns + the joining and border instructions! You can purchase the individual pattern, or if you love PDFs, you might want to check out my Lifetime Membership. It’s an awesome deal! Never pay for one of my PDFs again!!
Purchase the ad-free pdf of my Fall Granny Square Blanket for a small fee. Thank you so much for supporting my work!

If you would like daily crochet inspiration be sure to follow me on Facebook, Instagram, Pinterest, YouTube, Twitter and Tumblr!
To get notified of my free crochet patterns and future giveaways, sign up for my newsletter. I never share or sell your information to third parties — it stays private!
You may also like the following free crochet border patterns by Nana’s Crafty Home:


- 1. Granny Block Stitch Border Tutorial
- 2. Bobble Shell Stitch Border Tutorial
- 3. Puff Edge Border Tutorial
Pumpkin Crochet Blanket Border Instructions
Pattern written in US crochet terminology
Border Supplies:
Red Heart Super Saver Weight 4 / Medium (100% acrylic)
- Saffron 0.5 oz / 30 yds (Gold)
- Tea Leaf 2.3 oz / 125 yds (Green)
- Carrot 2.9 oz / 155 yds (Orange)
- Aran 1.5 oz / 130 yds (Cream)
Size I (5.5 mm) crochet hook
Scissors
Stitch marker (optional)
Tapestry needle
Approximate finished size: 48” x 48”
Supplies for blanket – all 9 squares + border:
Red Heart Super Saver Weight 4 / Medium (100% acrylic, 7 oz / 364 yds)
- Aran 17.5 oz / 910 yds (Cream)
- Cafe Latte 8.2 oz / 430 yds (Brown)
- Saffron 3.5 oz /185 yds (Gold)
- Tea Leaf 3.8 oz / 200 yds (Green)
- Black 4.1 oz / 215 yds (Black)
- White 0.6 oz / 315 yds (White)
- Baby Pink 0.5 oz / 26 yds (Pink)
- Carrot 7.8 oz / 410 yds (Orange)
- Burgundy 3.8 oz / 200 yds (Red)
- Oatmeal 4.0 oz / 210 yds (Tan)
Total yardage: 3,101 yards
Abbreviations:
- ch = chain
- sl st = slip stitch
- sc = single crochet
- dc = double crochet
- sp = space
- st(s) = stitch(es)
- sk = skip
- WS = wrong side
- RS = right side
- sc2tog = single crochet 2 sts together (see special stitches section below)
- yo = yarn over
Special Stitches:
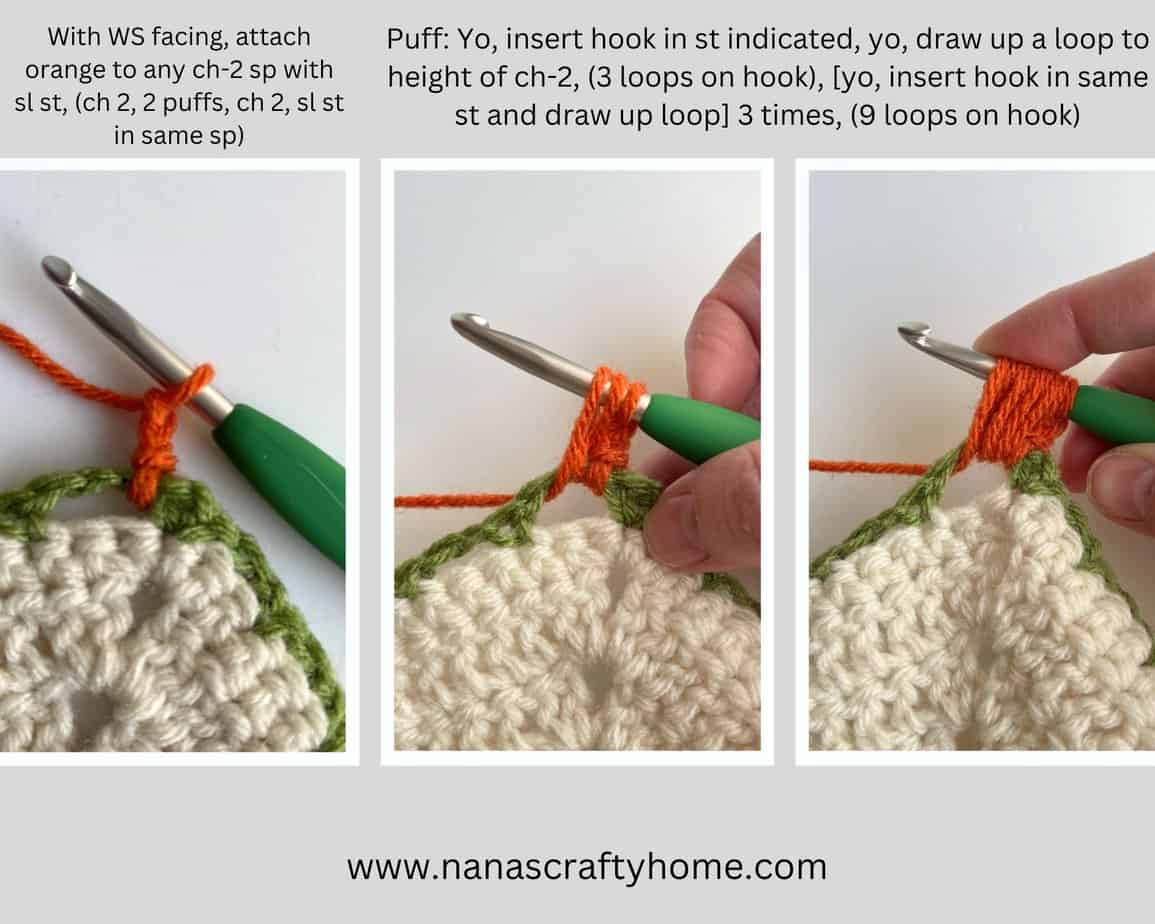
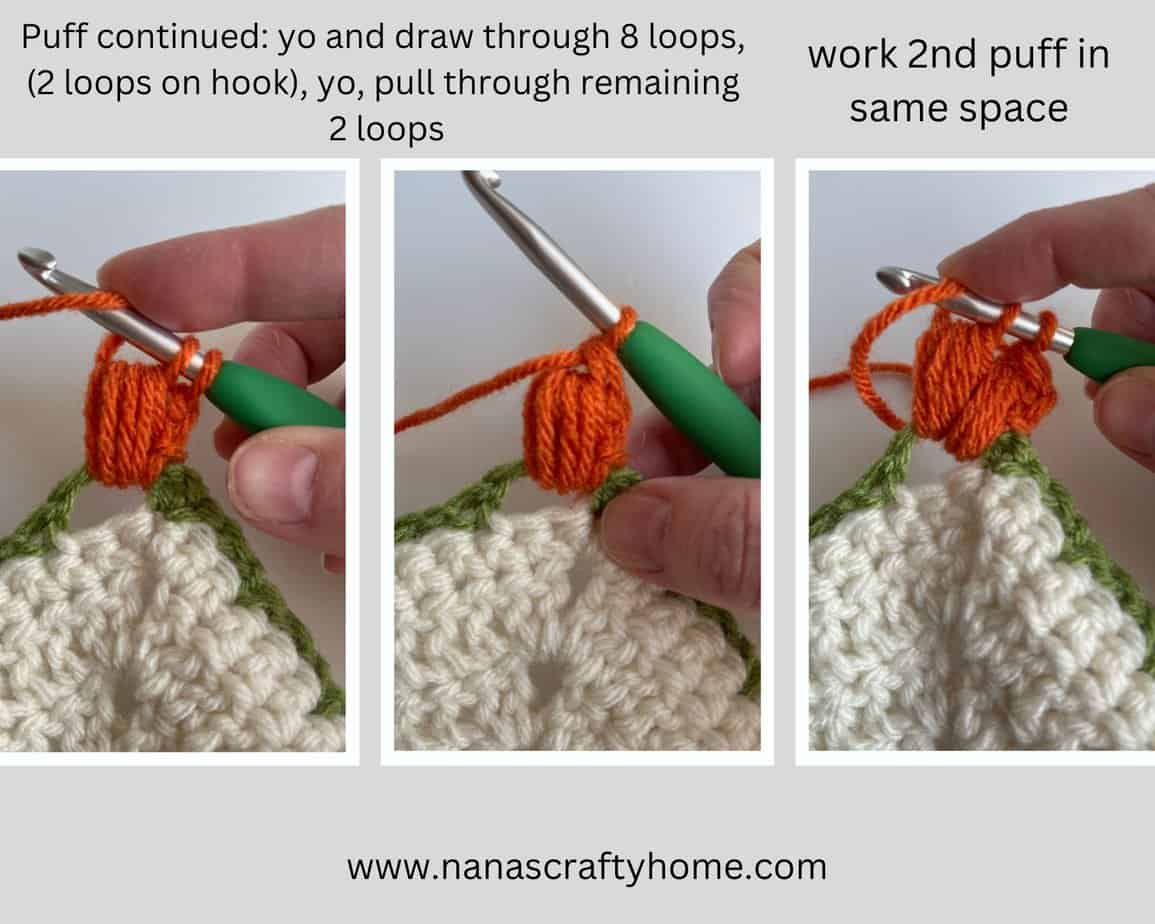
Puff: Yo, insert hook in st indicated, yo, draw up a loop to height of ch-2, (3 loops on hook), [yo, insert hook in same st and draw up loop] 3 times, (9 loops on hook) yo and draw through 8 loops, (2 loops on hook), yo, pull through remaining 2 loops.
Picot: ch 2, sl st in second ch from hook.
sc2tog = (insert hook in next st, yo and pull up a loop) twice, yo and pull through all 3 loops on hook.
Recommended Tutorials:
Attach cream to any ch-2 corner space.
Round 1: Ch 1, 3 sc in ch-2 space, [*1 sc in each stitch to next ch-sp at join between squares, 1 sc in ch-sp, 1 sc in join between squares, 1 sc in ch-sp after join,* repeat from * to * 1 time, 1 sc in each st to ch-2 corner sp, 3 sc in ch-2 sp] 4 times omitting final corner, sl st to first st.
Fasten off cream.
Note: For round 2 depending on stitch count, sk 1 or 2 stitches as needed before working the corners.
Round 2: Join green yarn with sl st in middle sc of any corner, ch 1, (sc, ch 2, sc) in same st, [*ch 2, sk next 2 sts, sc in next st,* repeat from * to * to 3-sc corner, (sc, ch 2, sc) in corner st] 4 times omitting final corner, sl st in top of first st. (184 ch-sps)
Fasten off green.
Round 3: With WS facing, attach orange to any ch-2 sp with sl st, (ch 2, 2 puffs, ch 2, sl st) in same ch-2 sp, *sc in next st, (sl st, ch 2, 2 puffs, ch 2, sl st) in next ch-2 sp,* repeat from * to * to last st, sc in last st, sl st into same ch-2 sp as first puff. (184 “pumpkins”)
Fasten off orange.
Round 4: With RS facing, attach green with sl st to any sc of previous round, ch 3, dc in same st, *sc2tog over 2 puff sts, picot, ch 1, sl st in last st of sc2tog, 2 dc in next sc st from previous round,* repeat from * to * around exception for corner stitches – place 3 dc sts before and after the puff stitches instead of 2 dc sts, fasten off green, change to cream, sl st top of ch-3 from beginning. (560 st count excludes picots and sl sts)
Round 5: Ch 1, sc in same st, sc in next st, [*sc in next st (sc2tog from previous round), sk picot and sl st from previous round, sc in next 2 sts behind picot,* repeat from * to * to corner, (sc in 3 dc sts from previous round, sc in next st, ch 2 (will be behind picot), sc in 3 dc sts from previous round) in corner] four times, continue repeating from * to * to end, sl st to first st. (560 + 4 ch-2 sps)
Round 6: Ch 3, *dc in each st to ch-2 corner sp, (2 dc, ch 2, 2 dc) in corner sp,* repeat from * to * to end, sl st to top of ch-3 from beginning. (576 + 4 ch-2 sps)
Fasten off and weave in ends.
Copyright 2023 Tonya Bush/Nana’s Crafty Home
Social Media links:
Facebook: https://www.facebook.com/nanascraftyhome
Instagram: https://www.instagram.com/nanascraftyhome/
Pinterest: https://www.pinterest.com/nanascraftyhome/
YouTube: https://www.youtube.com/c/TonyaBush
Twitter: https://twitter.com/nanascraftyhome
Facebook Group: https://www.facebook.com/groups/829792060522798
Sign up for my Newsletter: https://nanascraftyhome.com/sign-up-for-my-free-newsletter/
 Hi! Thank you so much for being here! I am Tonya the designer behind Nana's Crafty Home. As a wife, mother, Nana of 9 & with 2 fur babies, my days are filled with love, laughter, hugs and yarn! Here you will find colorful and creative crochet designs for yourself or loved ones. My hope is that you will be inspired to learn and create along with me!