Border granny square blanket with the modern Granny Block Stitch with this complete photo and video tutorial by Nana’s Crafty Home!

I recently designed the Easter Blanket blanket that includes 9 total crochet squares and I wanted to add the perfect border. Being more of a patchwork style with different colors for each square I wanted a crochet border that would look great in a different color for each row.
This fun border granny square blanket border was the perfect answer! Easy and fun and adds the perfect finishing touch to so many different blanket projects including baby blankets!
You could use this border for large square or rectangle crochet blankets made with any crochet stitch you like. Once you add one round of single crochet stitches as a base you can easily use this border!
Block Granny Stitch Border Details
The modern Block Granny Stitch is such an easy to learn stitch! This is a two row repeat so very easy to memorize as well.
The first row is a row of single crochet stitches with chains and skipped stitches between. These ch-2 spaces is where you will work your cluster of 3 double crochet stitches in the next row.
The second row is simple 3 double crochet stitches worked in each ch-2 space from the previous row. The only change to that is the corner ch-2 spaces in which you will work 2 sets of clusters with a ch-2 space between.
A very simple border with a lot of visual impact!

The stitch multiples for this border is 3 + 2 from corner to corner. However, one of the best things about using this stitch for your border is you can make adjustments based on the number of stitches you have. When you get to a corner you can skip just 1 stitch instead of 2 if necessary. No need to have a specific stitch count to use this border!
I have a complete photo tutorial below plus a step by step video tutorial as well. Subscribe to my YouTube Channel to get notified whenever I post a new video.
If you are making the Easter Squares Blankets I am using Red Heart With Love* yarn for my squares and for the border. Red Heart With Love yarn is a medium weight #4 acrylic worsted weight yarn. You could certainly use this join method with any squares – just use the same weight yarn you are using in your squares.
*This post contains affiliate links. You can click on any yarn or material highlighted to purchase. I will receive a small commission if you purchase but it won’t cost you any extra! As an Amazon Associate I earn from qualifying purchases.
If you would like daily crochet inspiration be sure to follow me on Facebook, Instagram, Pinterest, YouTube, Twitter and Tumblr!
To get notified of my free easy crochet patterns and future giveaways, sign up for my newsletter. I never share or sell your information to third parties — it stays private!
You may also like the following free patterns and tutorials at Nana’s Crafty Home:


- 1. Happy Flower Easter Square free crochet pattern
- 2. Joining Squares with single crochet tutorial
- 3. Crochet Star Border free crochet pattern & tutorial

Border Granny Square Blanket – Granny Block Stitch Border Instructions
Supplies shown:
Paintbox Cotton Aran Weight 4 / Medium (100% cotton)
Size 7 (4.5 mm) crochet hook
Scissors
Tapestry needle
Abbreviations:
- ch = chain
- sc = single crochet
- dc = double crochet
- sp = space
- st(s) = stitch(es)
- sk = skip
- sl st = slip stitch
- WS = wrong side
- RS = right side
Recommended Tutorial
Block Granny Stitch Border Tutorial
Border Pattern Instructions
Attach Color A yarn to any ch-2 corner space.
Note: If you are adding this border to a solid square or rectangle without corner spaces, attach your yarn to any corner and work single crochet stitches evenly across each side working 3 sc stitches in each corner. Then continue to round 2.

Round 1: ch 1, 3 sc in ch-2 space, [*1 sc in each stitch to next ch-sp at join between squares, 1 sc in ch-sp, 1 sc in join between squares, 1 sc in next ch-sp of next square,* repeat from * to * 1 time, 1 sc in each st to ch-2 corner sp, 3 sc in ch-2 sp,] 4 times omitting final corner, sl st to first st.
Round 2: sl st in next st (middle sc of next corner), ch 1, (sc, ch 2, sc) in same st, [*ch 2, sk next 2 sts, sc in next st,* repeat from * to * to last st before 3-sc corner, (sc, ch 2, sc) in corner st] 4 times omitting final corner, sl st in top of first st.

Fasten off color A.
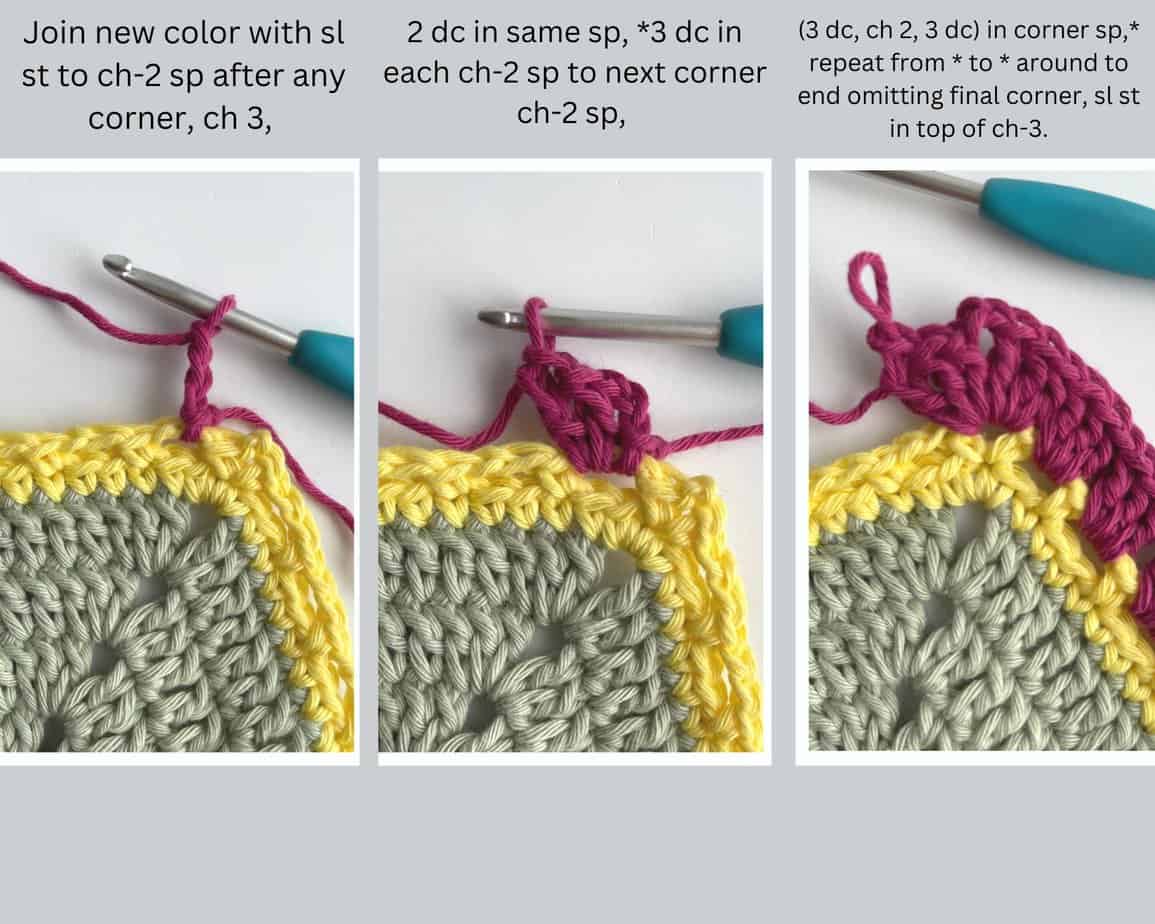
Round 3: Join color B with sl st to ch-2 sp after any corner, ch 3, 2 dc in same sp, *3 dc in each ch-2 sp to next corner ch-2 sp, (3 dc, ch 2, 3 dc) in corner sp,* repeat from * to * around to end, sl st in top of ch-3. Note: in the photo below it states to omit the final corner which is incorrect.
Fasten off color B.
Round 4: Join color A with sl st in between set of 3 dc clusters after any ch-2 corner sp, sc, [*ch 2, sk next 3 dc cluster, sc after next cluster,* repeat from * to * to ch-2 corner sp, (sc, ch 2, sc) in corner sp] 4 times, sl st in top of first st.

Continue repeating rows 3 – 4 to width desired for border using a contrasting color each row.
To finish border, end after round 4 using same color as previous round.
Social Media links:
Facebook: https://www.facebook.com/nanascraftyhome
Instagram: https://www.instagram.com/nanascraftyhome/
Pinterest: https://www.pinterest.com/nanascraftyhome/
YouTube: https://www.youtube.com/c/TonyaBush
Twitter: https://twitter.com/nanascraftyhome
Facebook Group: https://www.facebook.com/groups/829792060522798
Sign up for my Newsletter: https://nanascraftyhome.com/sign-up-for-my-free-newsletter/

 Hi! Thank you so much for being here! I am Tonya the designer behind Nana's Crafty Home. As a wife, mother, Nana of 9 & with 2 fur babies, my days are filled with love, laughter, hugs and yarn! Here you will find colorful and creative crochet designs for yourself or loved ones. My hope is that you will be inspired to learn and create along with me!