Learn how to crochet the Puff Edge Border crochet stitch with this tutorial at Nana’s Crafty Home!

The Puff Edge Border Crochet Stitch tutorial is part of the Spring Rhapsody Blanket CAL Stitch series by Nana’s Crafty Home.
If you would like more details about the Spring Rhapsody Blanket you can find all the details here as well as links to Part 1, Part 2 and Part 3 of the blanket which are free on the blog!
The Puff Edge Border is so textured, dramatic & bold! This border would be lovely on baby blankets as it adds just the right dramatic touch without being too frilly or fussy.
And if you are enamored of all things Puff Stitch (like me!) this stitch will be just right for you!
This Puff Edge Stitch is created by working a half double crochet 3 together (hdc3tog) over a hdc stitch just made. Essentially you are working the Puff Stitch sideways over a post stitch. It may seem a little awkward at first but easy once you get the hang of it.
See the complete video tutorial below. Subscribe to my YouTube Channel to get notified whenever I post a new video.
To get free crochet patterns and get notified of future giveaways, sign up for my newsletter. I never share or sell your information to third parties — it stays private!
If you would like daily crochet inspiration be sure to follow me on Facebook, Instagram, Pinterest, YouTube, Twitter and Tumblr.
If you make any of my designs and share on Social media be sure to add #nanascraftyhome so I can see your amazing creations!
You may also like the following free stitch tutorials at Nana’s Crafty Home:


Puff Edge Border Crochet Stitch Written Instructions & Photo Tutorial
Supplies:
I Love This Cotton! in Print Pink/Green/Purple & Pale Denim for border
Size H (5.0 mm) crochet hook
Abbreviations:
ch = chain
sc = single crochet
hdc = half double crochet
hdc3tog = half double crochet 3 together (see special stitches section below)
sl st = slip stitch
sk = skip
Special Stitches:
hdc3tog: *yo, insert hook where indicated, yo, pull up a loop,* repeat between * * 2 more times (7 loops on hook), yo, pull through all loops on hook.
Note: If you find that your corners are curling in, working 2 hdc & hdc3tog stitches in each corner.
If you would like to make the dish cloth in the photos, I used the Wattle Stitch tutorial for the main body of the dish cloth with a beginning chain of 27 for a total of 16 rows. I then worked 1 round of sc stitches evenly around the outside edge with (1 sc, ch 1, 1 sc) in each corner, then followed the border instructions below to finish.
Time needed: 1 hour
Puff Edge Border Crochet Stitch
- Round 1:
ch 2, 1 hdc in same st, *sk next st, 1 hdc in next st, hdc3tog around hdc post just made,* repeat between * * around to end, sl st to top of 1st hdc, hdc3tog around 1st st.
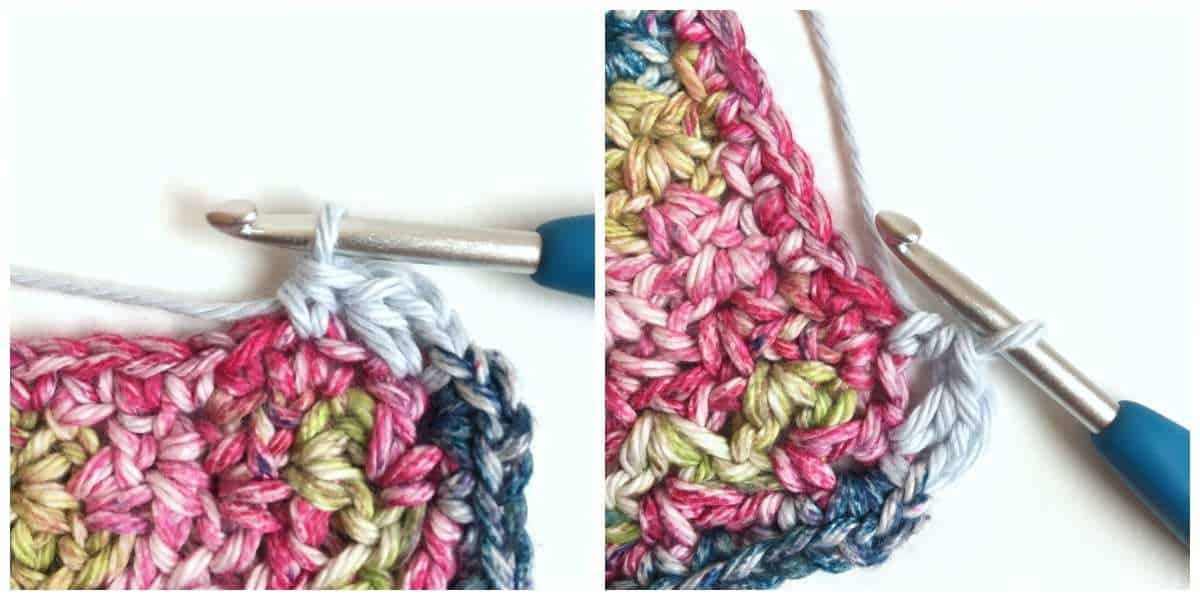
- Begin Puff Stitch: *yo, insert hook where indicated, yo, pull up a loop,* repeat between * * 2 more times (7 loops on hook),
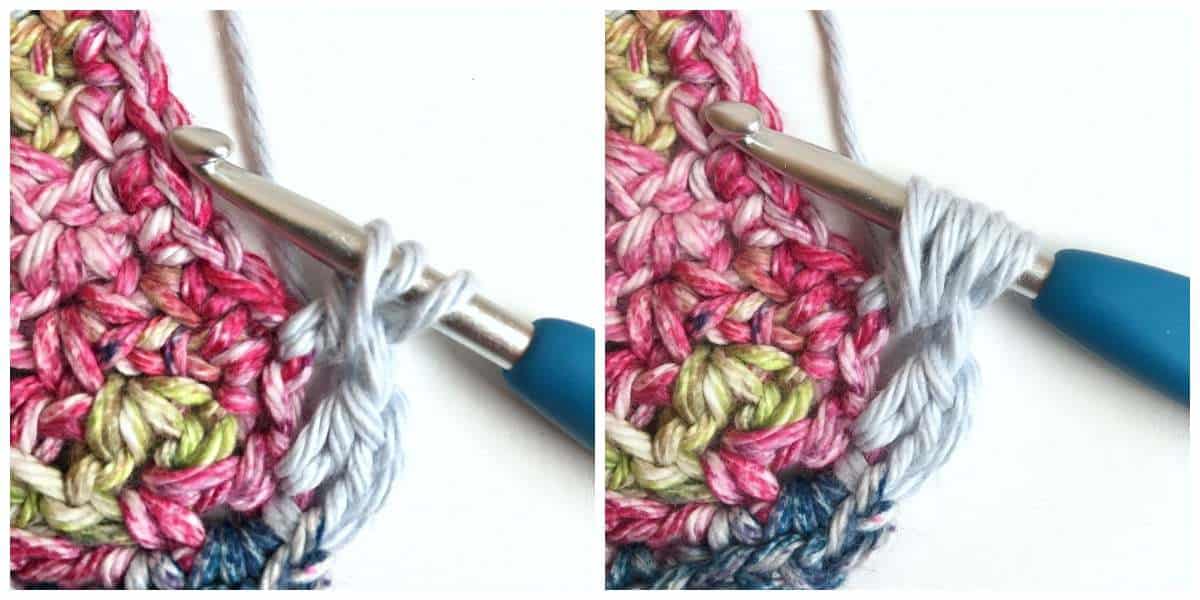
- yo, pull through all loops on hook.

- Round 2:
sl st to next st, ch 1, *1 sc in each st to corner, (1 sc, ch 1, 1 sc) in corner,* repeat between * * to end, sl st to 1st st


 Hi! Thank you so much for being here! I am Tonya the designer behind Nana's Crafty Home. As a wife, mother, Nana of 9 & with 2 fur babies, my days are filled with love, laughter, hugs and yarn! Here you will find colorful and creative crochet designs for yourself or loved ones. My hope is that you will be inspired to learn and create along with me!