Learn how to change colors in C2C corner to corner crochet with this complete guide. Everything you need to know to work color Corner to Corner color graphgans!

If you have never worked the Corner to Corner (C2C) technique head on over to my Basic Corner to Corner (C2C) photo and video tutorial.
Ready to dig deeper into corner to corner crochet and master this versatile technique? Our Ultimate Guide to C2C Crochet: Techniques and Tips is the foundational c2c resource on the blog, packed with everything beginners and for those that need a c2c refresher! From standard DC and mini-HDC C2C basics to seamless color changes, efficient yarn carrying, custom graph design with Stitch Fiddle, and troubleshooting common issues, this comprehensive C2C crochet guide includes step-by-step tutorials, video links, and free pattern ideas to get you started. Whether you’re tackling your first C2C project or refining your skills, head over to the guide now for all the FREE essential C2C crochet tips and resources in one place!
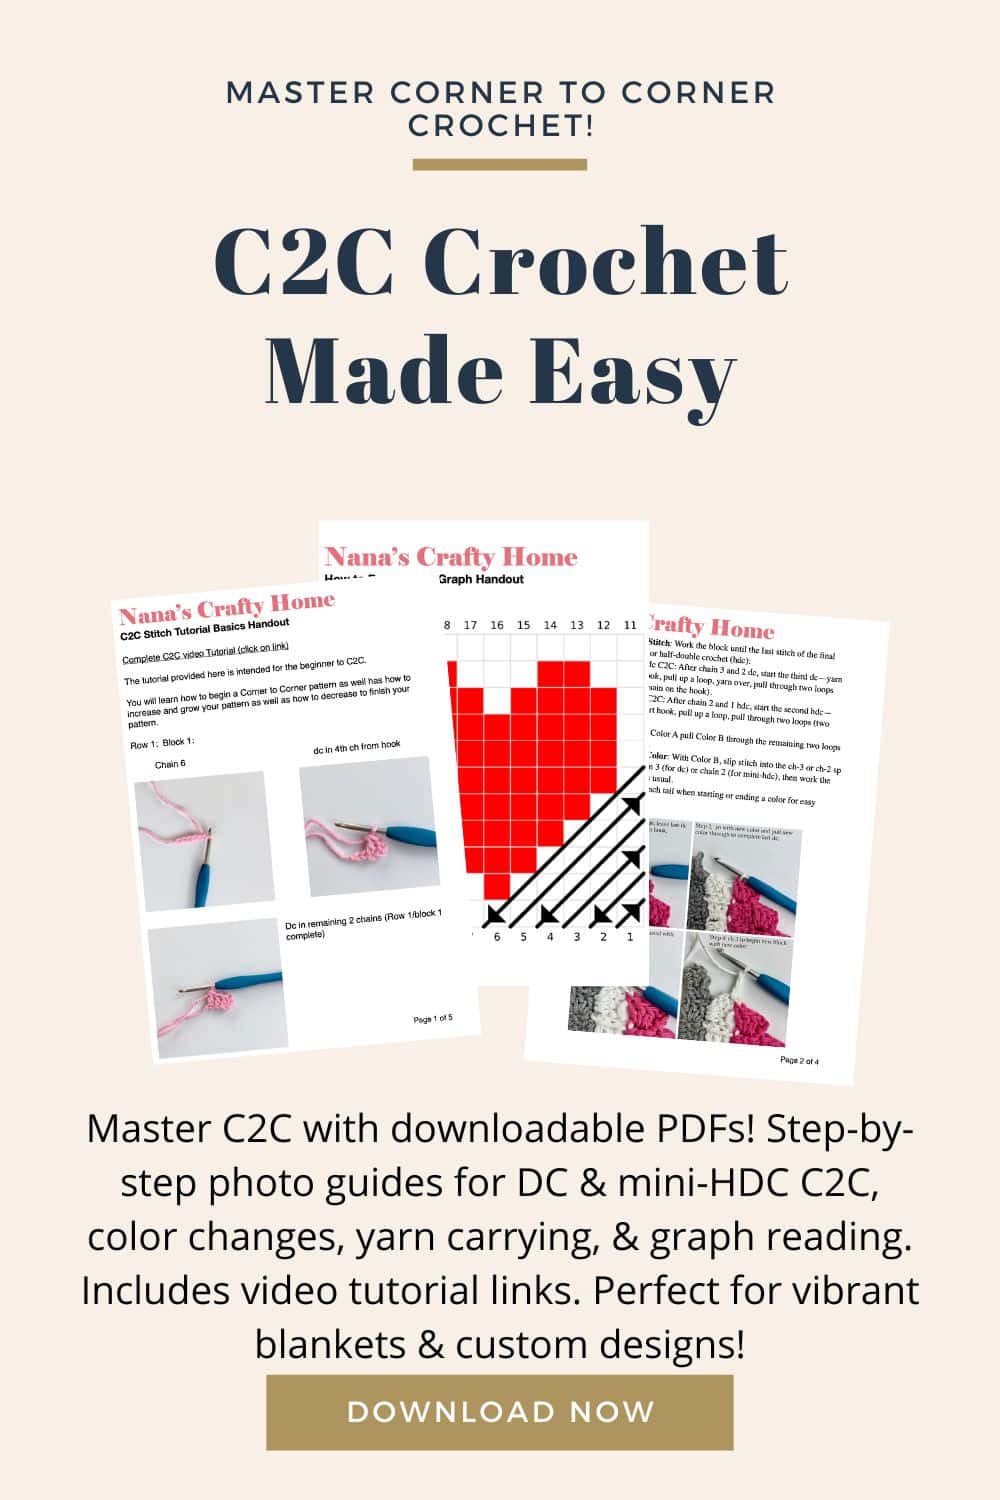
Elevate your C2C crochet skills with our C2C Crochet PDF Tutorial Bundle! This handy guide is a must-have for crocheters wanting to create stunning blankets and custom designs with ease. Packed with step-by-step photo tutorials for standard DC, mini-HDC, color changes, yarn carrying, graph reading, and making a rectangle shape in c2c, plus links to helpful videos, it’s perfect for beginners. Save time, avoid mistakes, and unlock your creativity—grab your downloadable PDFs now and start crocheting pixel-perfect projects! Includes beginner-friendly patterns to practice your new skills!
The tutorial provided here is intended to build upon your basic C2C knowledge and help you work color changes and follow a graph.
I will show you two different techniques in color changes. I use both in different situations but primarily tend to use technique 2. Use the technique that works best for you — either one works well depending upon the situation.
How to Change Colors in C2C (Corner to Corner) Photo Tutorial
Technique 1:

Technique 2:

*This post contains affiliate links. You can click on any yarn or material highlighted to purchase. I will receive a small commission if you purchase but it won’t cost you any extra! As an Amazon Associate I earn from qualifying purchases.
Tools I recommend shown in video:
Another great option to use as yarn bobbins are these utility clips as they will clip onto your work as you go and at 2″ size are smaller than the snack clip shown in the video:
You may also like the following free Corner to Corner patterns at Nana’s Crafty Home:


- Heart C2C Scarf free crochet pattern
- Heart C2C Hat free crochet pattern
- Unicorn C2C Scarf free crochet pattern
If you want to print the ad-free PDF for the Heart Dishcloth, subscribe to my newsletter and get access to my FREE Resource Library with so many freebies – including the Heart C2C Dishcloth pattern!

Heart C2C Dishcloth Pattern free pattern
Supplies:
Lily Sugar’n Cream, Weight 4 Medium (100% cotton)
- Overcast (Grey)
- Hot Pink (Pink)
- White (White)
Crochet Hook Size H (5.0 mm)
Yarn Bobbins
Tapestry Needle
Scissors
Abbreviations:
- WS = wrong side
- RS = right side
- ch(s) = chain(s)
- dc = double crochet
- sp = space
- st(s) = stitch(es)
- sk = skip
- sl st = slip stitch
Approximate finished size: 10 1/2″ wide x 9 1/2″ tall
Recommended Tutorials:
Basic C2C Stitch Photo & Video Tutorial
Tips & Tricks for Carrying Colors in C2C
How to make a Rectangle Shape in C2C
Work Base of SC Border outside edge
Pattern Notes:
- Blocks refer to group of (ch 3, 3 dc) worked together.
- Worked diagonally from corner to corner.
- Complete stitch diagram is at bottom of PDF.
Pattern Instructions
Starting & Increase Block: Ch 6, dc in fourth ch from hook and next two chs (skipped chs counts as ch-3 sp).
Increase Block: Same as starting block, then sl st to ch-3 sp of next block.
Continuing block: sl st to ch-3 sp of next block, ch 3, work 3 dc in same ch-3 sp as sl st
Decrease: Sl st in top 3 sts of last block worked on previous row, sl st in ch-3 sp of same block and finish continuing blocks, stop working continuing blocks once you have reached the sl st edge.
Row 1: Work Starting Block
Row 2: Work 1 Increasing Block, work 1 Continuing Block.
Row 3: Work 1 Increasing Block, work Continuing Blocks across all blocks.
Repeat Row 3 to desired width.
To Stop Increasing: Work Decrease, work Continuing Blocks across all blocks.
To create a square: Work Decrease at beginning of each row, work Continuing Blocks all blocks to last block, sl st into ch-3 sp of edge.
Color Changes row by row written instructions
→ Row 1 [WS]: (Grey) x 1
← Row 2 [RS]: (Grey) x 2
→ Row 3 [WS]: (Grey) x 3
← Row 4 [RS]: (Grey) x 4
→ Row 5 [WS]: (Grey) x 5
← Row 6 [RS]: (Grey) x 6
→ Row 7 [WS]: (Grey) x 7
← Row 8 [RS]: (Grey) x 1, (White) x 6, (Grey) x 1
→ Row 9 [WS]: (Grey) x 2, (Pink) x 5, (White) x 1, (Grey) x 1
← Row 10 [RS]: (Grey) x 1, (White) x 1, (Pink) x 5, (White) x 1, (Grey) x 2
→ Row 11 [WS]: (Grey) x 3, (Pink) x 6, (Grey) x 2
← Row 12 [RS]: (Grey) x 2, (White) x 1, (Pink) x 5, (White) x 1, (Grey) x 3
Corner: Start decreasing on RS
→ Row 13 [WS]: (Grey) x 4, (Pink) x 6, (Grey) x 2
Corner: Start decreasing on WS
← Row 14 [RS]: (Grey) x 1, (White) x 1, (Pink) x 5, (White) x 1, (Grey) x 3
→ Row 15 [WS]: (Grey) x 3, (Pink) x 3, (White) x 3, (Grey) x 1
← Row 16 [RS]: (Grey) x 3, (Pink) x 3, (White) x 1, (Grey) x 2
→ Row 17 [WS]: (Grey) x 2, (Pink) x 3, (White) x 1, (Grey) x 2
← Row 18 [RS]: (Grey) x 2, (Pink) x 3, (White) x 1, (Grey) x 1
→ Row 19 [WS]: (Grey) x 1, (White) x 1, (Pink) x 2, (White) x 1, (Grey) x 1
← Row 20 [RS]: (Grey) x 1, (White) x 3, (Grey) x 1
→ Row 21 [WS]: (Grey) x 4
← Row 22 [RS]: (Grey) x 3
→ Row 23 [WS]: (Grey) x 2
← Row 24 [RS]: (Grey) x 1
Once complete, with grey, sc evenly around outside edge of dischcloth.
Fasten off and weave in ends.


 Hi! Thank you so much for being here! I am Tonya the designer behind Nana's Crafty Home. As a wife, mother, Nana of 9 & with 2 fur babies, my days are filled with love, laughter, hugs and yarn! Here you will find colorful and creative crochet designs for yourself or loved ones. My hope is that you will be inspired to learn and create along with me!