A crochet scarf with fringe is a free crochet pattern by Nana’s Crafty Home!

The Diamond Tessera Fringe Scarf is crocheted with the Nesting V-stitch which I first used in my Winter’s Night Rhapsody Stitch Sampler Blanket I released earlier this year.
I fell so much in love with the Nesting V-Stitch I had to see how it would look in a project and came up with this fun crochet scarf with fringe!
Crochet Scarf with Fringe Pattern Details
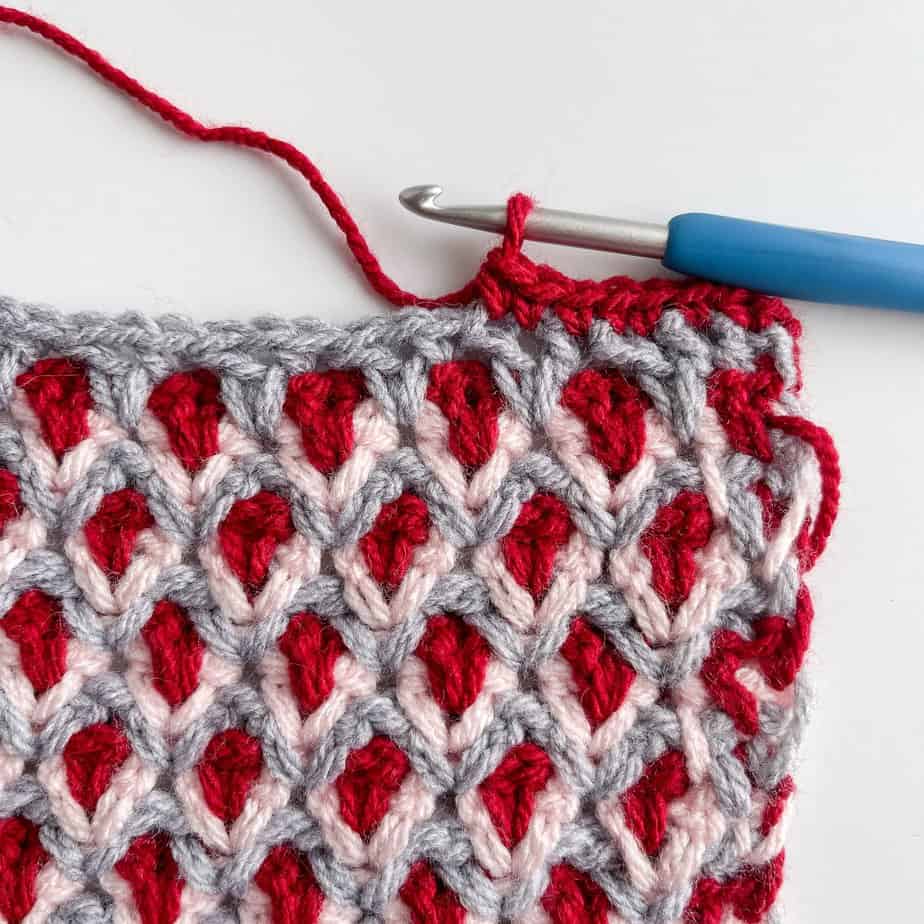
This Nesting V-stitch reminds me so much of a geometric diamond mosaic tile pattern! The V-stitches are worked on top of one another in rows below which creates a really interesting appearance and a dense, warm fabric – perfect for scarves.
I have a complete stitch tutorial for the Nesting V-Stitch which you can check out on the blog.
Subscribe to my YouTube Channel to get notified whenever I post a new video.

By working this stitch pattern in three colors changing colors each row you can drop your yarn and pull the new color into your work without adding ends to weave in. Then by working a round of single crochet stitches around the outside edge you can cover those yarn jogs from pulling your yarn back into your work! Yay!
I wanted to add a fun and unique fringe to the bottom edges of the scarf which would mimic the appearance of the V-stitches in the scarf and decided to add Knotted Fringe.

The knotted fringe starts out with a standard fringe along the edge of your project. If you need to learn how to add fringe you can check out my complete photo and video tutorial for this technique. Once you have added your standard fringe you can then knot the fringes together. I have a complete photo and video tutorial to help you with knotting fringe.
How to Add Fringe to Any Project Tutorial
I had some Lion Brand Basic Stitch premium yarn I had snagged on clearance lying around begging to be used together in a project – just one skein of each color! Unfortunately, this yarn is now discontinued but a wonderful substitution would be Lion Brand Basic Stitch Anti-Pilling yarn.* A medium worsted weight yarn that resists pilling and is perfect for use in projects that will be getting a lot of wear – perfect for scarves! And so many different colors available, too!
The Diamond Tessera Crochet Scarf with fringe Pattern includes the PDF for the Nesting V-stitch Crochet Stitch pattern both available as an ad-free, printable PDF! You can purchase the individual pattern for the Diamond Tassera Scarf + crochet nesting V-stitch, or if you love PDFs, you might want to check out my Lifetime Membership. It’s an awesome deal! Never pay for one of my PDFs again!! (Or, scroll down for the free version!)
The ad-free PDF includes a complete stitch diagram for an added bonus for those that purchase the ad-free PDF and enjoy working from stitch diagrams rather than written row by row instructions.


Purchase the ad-free pdf of the crochet Nesting V-stitch Crochet Pattern + Diamond Tessera crochet Scarf with fringe for a small fee. Thank you so much for supporting my work!
If you would like daily crochet inspiration be sure to follow me on Facebook, Instagram, Pinterest, YouTube, Twitter and Tumblr!
To get notified of my free easy crochet patterns and future giveaways, sign up for my newsletter. I never share or sell your information to third parties — it stays private!
*This post contains affiliate links. You can click on any yarn or material highlighted to purchase. I will receive a small commission if you purchase but it won’t cost you any extra! As an Amazon Associate I earn from qualifying purchases.
You may also like the following free crochet scarf patterns by Nana’s Crafty Home:


- 1. Wrap Me in Sunshine Shawl free crochet pattern
- 2. Macchiato Infinity Scarf free crochet pattern
- 3. Blushing Moon C2C Scarf free crochet pattern

Diamond Tessera Crochet Scarf with Fringe Pattern Instructions
Pattern written in US crochet terminology
Supplies:
Lion Brand Basic Stitch Premium, Weight 4 Medium (100% acrylic) 219 yd / 3.5 oz
- Color A: Slate 219 yd / 3.5 oz
- Color B: Opal 219 yd / 3.5 oz
- Color C: Garnet 219 / 3.5 oz
Yarn Substitute: Lion Brand Basic Stitch Anti-Pilling
Crochet hook size H (5 mm)|
Scissors
Tapestry Needle
Approximate finished size: 8” wide x 64 1/2” long
Gauge: 6 V-sts = 4” / 17 rows = 4”
Abbreviations:
- RS = right side
- ch(s) = chain(s)
- st(s) = stitch(es)
- dc = double crochet
- hdc = half double crochet
- sp(s) = space(s)
- sk = skip
- V-st = v stitch (see special stitches section below)
Special Stitches:
V-st (v stitch): (1 dc, ch 1, 1 dc) worked in the same stitch or space.
Recommended Tutorials:
Nesting V-Stitch Video Tutorial
How to Add Fringe to Any Project Tutorial
Pattern Notes:
- To resize, chain multiples of 3 + 1 for foundation chain.
V-stitch placement cheat sheet by row
Row 1: standard V-st
Row 2: V-st in same location as V-st from row 1.
All the following rows will have the V-st placement two rows below the current row.
Row 3: V-st in ch-1 sp of V-st from row 1
Row 4: V-st in sp between V-sts from row 2
Row 5: V-st in sp between V-sts from row 3
Row 6: V-st in ch-1 sp of V-st from row 4
Row 7: V-st in sp between V-sts from row 5
Row 8: V-st in sp between V-sts from row 6
Pattern Instructions
With Color A, ch 31.
Row 1: (RS) (Dc, ch 1, dc) in fifth ch from hook (skipped chs count as first st), *sk 2 chs, V-st in next ch,* repeat from * to * to last 2 chs, sk next ch, 1 dc in last ch. Drop Color A, join Color B. Turn. (9 V-sts + 2 sts)
Row 2: Ch 1, hdc in same st, *while working over the ch-1 sp make a V-st in the same ch as next V-st from previous row,* repeat from * to * to last st, hdc in last st. Drop Color B, join Color C. Turn. (9 V-sts + 2 sts)
Row 3: Ch 1, hdc in same st, *working in the ch-1 sp of the V-st from 2 rows below V-st in the next ch-1 sp,* repeat from * to * to last st, hdc in last st. Drop Color C, pull in dropped color A. Turn. (9 V-sts + 2 sts)
Row 4: Ch 1, hdc in same st, dc in between the first hdc st and the next dc 2 rows below, *working in between the next 2 V-sts from 2 rows below V-st in the next sp,* repeat from * to * to last V-st, sk over last V-st and dc in between last V-st and hdc from 2 rows below, hdc in last st. Drop Color A, pull in dropped color B. Turn. (8 V-sts + 4 sts)
Row 5: Ch 1, hdc in same st, dc in between the hdc and the next dc 2 rows below, *working over the ch-1 sp of the V-st from the row below V-st in the sp between the next 2 V-sts from 2 rows below,* repeat from * to * to last 2 sts, dc in between last dc and hdc from 2 rows below, hdc in last st. Drop Color B, pull in dropped Color C. Turn. (8 V-sts + 4 sts)
Row 6: Ch 1, hdc in same st, dc in between the hdc and the next dc 2 rows below, *working in the ch-1 sp of the V-st from 2 rows below V-st in the next ch-1 sp,* repeat from * to * last 2 sts, dc in between last dc and hdc from 2 rows below, hdc in last st. Drop Color C, pull in dropped Color A. Turn. (8 V-sts + 4 sts)
Row 7: Ch 1, hdc in same st, V-st in the sp between the next dc and the V-st 2 rows below, *working in between the next 2 V-sts from 2 rows below V-st in the next sp,* repeat from * to * to last st, hdc in last st. Drop Color A, pull in Color B. Turn. (9 V-sts + 2 sts)
Row 8: Ch 1, hdc in same st, V-st in the sp between the next dc and the next V-st from 2 rows below, *working over the ch-1 sp of the V-st below and in the sp between the next two V-sts; V-st in the sp between V-sts 2 rows below,* repeat from * to * to last st, hdc in last st. Fasten off Color B, pull in dropped Color C. Turn. (9 V-sts + 2 sts)
Continue repeating rows 3 – 8 to size desired pulling in dropped colors each row.
To achieve a length of 64” continue through row 271.
Fasten off. Weave in ends.
With RS facing, Attach Color C (or you can pull up the red from where you previously dropped) to any corner with slip stitch. Work sc stitches evenly around outside edge of scarf, placing 3 sc stitches in each corner, sl st to first st. Note: Work sc stitches over the yarn jogs along the edges.
Fasten off. Weave in ends.
Fringe

Cut approximately 72 pieces of 12” fringe – 36 pieces of Color B & 36 pieces of Color C. With RS of scarf facing up, insert hook from the top down and grab four strands of fringe. Pull up loop, insert fingers through loop just made and pull fringe tails through the loop. Gently tighten.
Attach fringe approximately 1” apart along bottom edges of scarf.

Knotted Fringe
Wrap 8 strands from R corner fringe over 4 strands of L fringe, behind fingers in loop made. Wrap end of R fringe around and down into loop, pull gently until knot made. Continue working double knots along fringe, using 4 strands from each fringe to knot together. Last corner end fringe will be worked with all 8 knotted to 4 strands of fringe next to it.

Copyright 2023 Tonya Bush / Nana’s Crafty Home
Social Media links:
Facebook: https://www.facebook.com/nanascraftyhome
Instagram: https://www.instagram.com/nanascraftyhome/
Pinterest: https://www.pinterest.com/nanascraftyhome/
YouTube: https://www.youtube.com/c/TonyaBush
Twitter: https://twitter.com/nanascraftyhome
Facebook Group: https://www.facebook.com/groups/829792060522798
Sign up for my Newsletter: https://nanascraftyhome.com/sign-up-for-my-free-newsletter/

 Hi! Thank you so much for being here! I am Tonya the designer behind Nana's Crafty Home. As a wife, mother, Nana of 9 & with 2 fur babies, my days are filled with love, laughter, hugs and yarn! Here you will find colorful and creative crochet designs for yourself or loved ones. My hope is that you will be inspired to learn and create along with me!