A Christmas Gnome Crochet Pattern perfect for fireside snuggles this Christmas! This free Scandinavian gnome inspired crochet Christmas blanket is adorable and sweet!
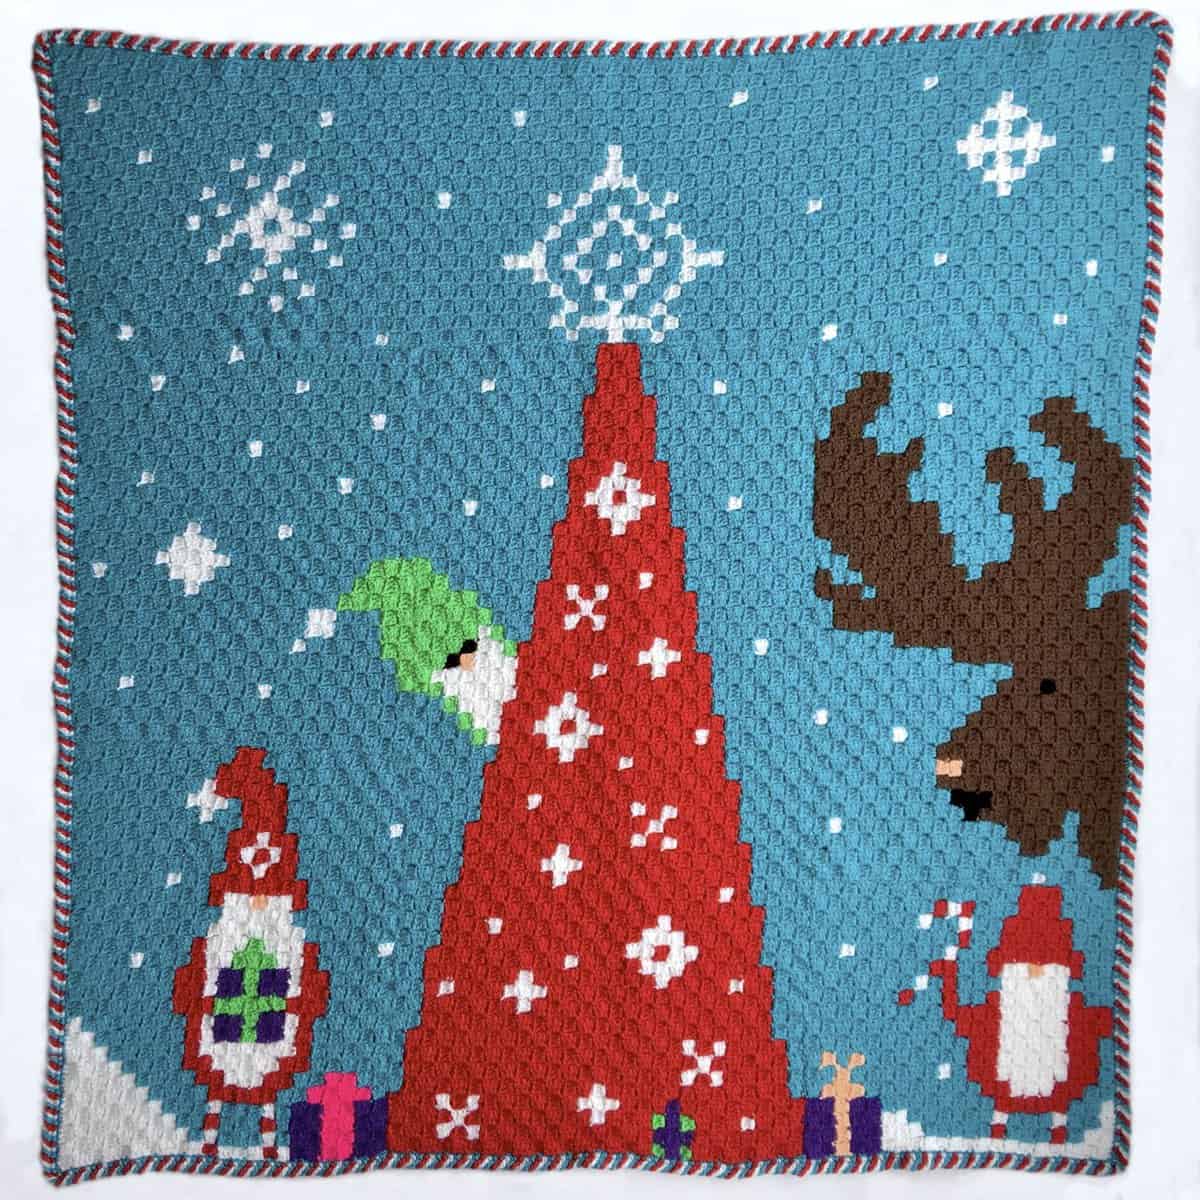
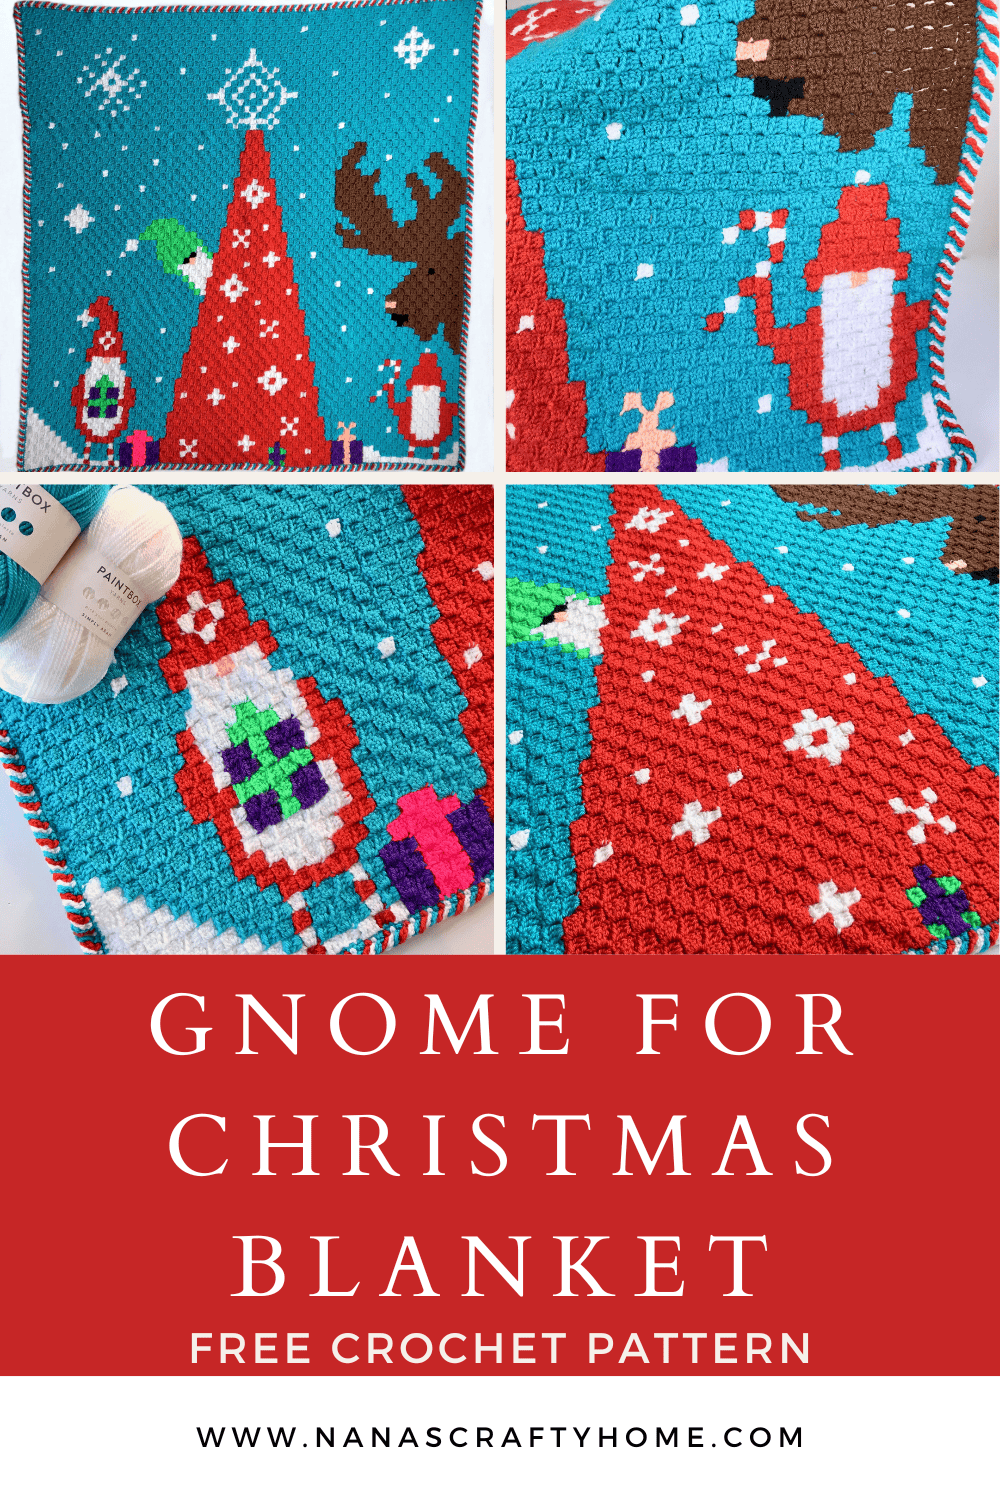
The “Gnome for Christmas” C2C (corner-to-corner) crochet blanket is a festive, playful design perfect for the holiday season. This delightful blanket features several charming Christmas gnome characters, coming to life with vibrant colors. The scandinavian design showcases a tall, red Christmas tree in the center adorned with snowflake motifs, providing a cozy winter vibe. Peeking out from behind the tree is a fun gnome adding a touch of whimsy to the wintery scene.
A large friendly moose adds to the playful scene. The snowflakes falling against the blue sky background and scattered stars add to the frosty, magical winter scene. The festive wrapped presents hint at Christmas surprises. The other two gnomes are bearing gifts and a candy cane to the Christmas party.
The border of the blanket is finished with a candy cane-inspired red and white twist, framing the scene beautifully and enhancing the holiday theme. This modern gnome crochet blanket has a nostalgic feel of Christmas.
This free pattern is a fun corner to corner project for those who love holiday decor and whimsical designs.
If you love gnomes as much as I do, this fun crochet Christmas blanket is perfect for you! We have a wooden bridge that goes over a small creek in our back yard. When we moved to our current home my husband placed an outdoor gnome under the bridge. The grandkids would start to run across the bridge and then suddenly remember to stop and ask the gnome for permission to cross…..so cute!

How to Make the Christmas Gnome Crochet Pattern
For the full written pattern instructions for Gnome for Christmas blanket scroll down below. The ad-free PDF is available for the Christmas Gnome Crochet Pattern in my shop. The ad-free PDF is also available for FREE to my Lifetime Members as well!
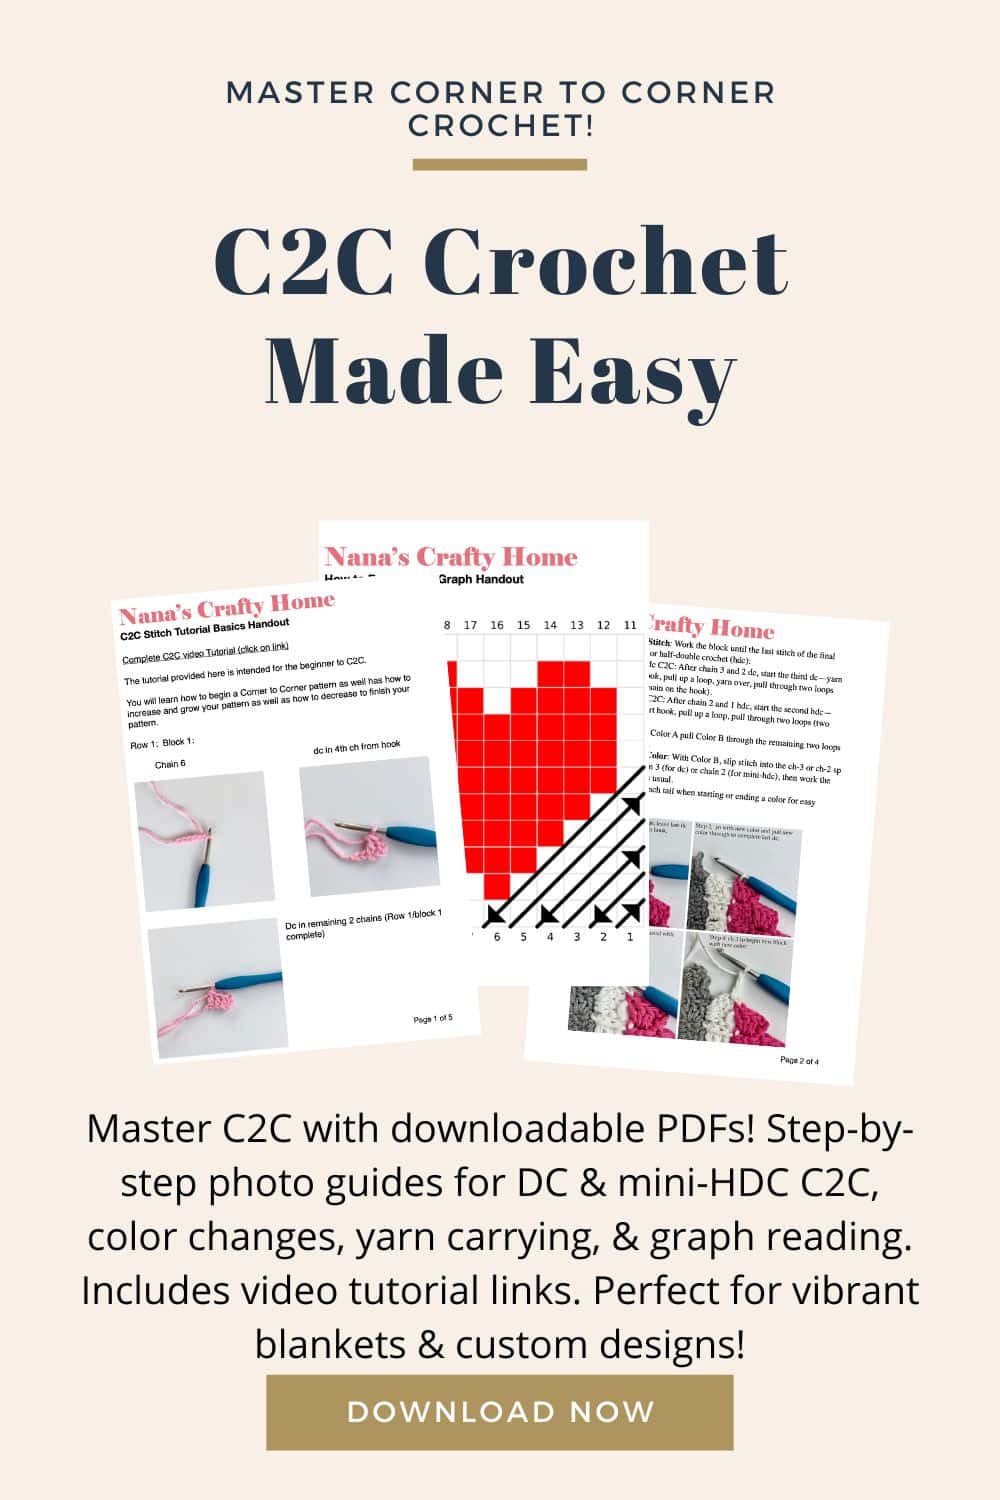
The Gnome for Christmas Throw uses the Double Crochet C2C color work stitch. If you are not familiar with the Corner to Corner (C2C) technique I have several photo and video tutorials which will help you get up to speed quickly. So you too can make this adorable blanket! Just click on any of the links provided below to head on over to the tutorials.
Ready to dig deeper into corner to corner crochet and master this versatile technique? Our Ultimate Guide to C2C Crochet: Techniques and Tips is the foundational c2c resource on the blog, packed with everything beginners and for those that need a c2c refresher! From standard DC and mini-HDC C2C basics to seamless color changes, efficient yarn carrying, custom graph design with Stitch Fiddle, and troubleshooting common issues, this comprehensive C2C crochet guide includes step-by-step tutorials, video links, and free pattern ideas to get you started. Whether you’re tackling your first C2C project or refining your skills, head over to the guide now for all the FREE essential C2C crochet tips and resources in one place!
New to corner to corner crochet? Check out my Ultimate Guide to C2C Crochet with all the resources you need to get started with this amazing crochet technique! Or, grab the bundle with all the printables, photo tutorials, video tutorials and instructions to master this crochet color work technique!
My finished blanket using double crochet c2c stitch ended up at approximately 50″ x 50″. If you wanted a smaller blanket I would recommend using the mini hdc c2c stitch instead.
Once I had the blanket complete I added a single crochet edge to smooth out the border before adding the Candy Cane Border. For my variation I am using 3 colors instead of 2 so I adjusted the number of chains you will make for each color. I have a complete photo and video tutorial for this border to help as well.
I hope you enjoy making your very own Gnome for Christmas throw!
Tonya 💕

Supplies for the Gnome for Christmas Crochet Blanket Pattern
*This post contains affiliate links. You can click on any yarn or material highlighted to purchase. I will receive a small commission if you purchase but it won’t cost you any extra! As an Amazon Associate I earn from qualifying purchases.
For the yarn I used Paintbox Simply Aran from Love Crafts.* This was my first experience with this yarn and I am so pleased with the results — beautifully soft and the colors are so bright and vibrant! Thank you to Love Crafts for yarn support for this project!
You could easily substitute your favorite medium worsted weight yarn for this blanket. Hobby Lobby’s I Love This Yarn!, Red Heart With Love, Vanna’s Choice, Big Twist Value, Caron Simply Soft, Caron One Pound and so many more! Raid your yarn stash – even mix and match.

Purchase the ad-free pdf of the Gnome for Christmas Throw for a small fee in my shop. Thank you so much for supporting my work! PDF includes written row by row instructions + full color graph.
The ad-free PDF also includes the complete color block chart!


To get free crochet patterns and get notified of future giveaways, sign up for my newsletter. I never share or sell your information to third parties — it stays private!
If you would like daily crochet inspiration be sure to follow me on Facebook, Instagram, Pinterest, YouTube, Twitter and Tumblr!
You may also like the following free crochet gnome patterns at Nana’s Crafty Home:


Gnome for Christmas Blanket free crochet pattern:
Gnome for Christmas Blanket
Pattern written in US crochet terminology
Supplies:
Paintbox Simply Aran, Weight 4/Medium (100% acrylic, 3.5 oz / 201 yd)
- Paintbox Simply Aran Marine Blue 26.5 oz / 1530 yds (b) (Color A)
- Paintbox Simply Aran Paper White 4.59 oz / 265 yds (w) (Color B)
- Paintbox Simply Aran Rose Red 8.1 oz / 470 yds (r) (Color C)
- Paintbox Simply Aran Coffee Bean 3 oz / 175 yds (br)
- Paintbox Simply Aran Neon Green 0.62 oz / 37 yds (g)
- Paintbox Simply Aran Pansy Purple 0.55 oz / 30 yds (pu)
- Paintbox Simply Aran Neon Pink 0.15 oz / 9 yds (pi)
- Paintbox Simply Aran Peach Orange 0.14 oz / 8 yds (pe)
- Paintbox Simply Aran Pure Black .06 oz / 4 yds (bl)
Size H/8 (5.0 mm) crochet hook
Tapestry needle
Scissors
Approximate finished size: 50” x 50” square
Gauge: 6 blocks = 4”
Abbreviations:
- b = blue
- w = white
- r = red
- br = brown
- g = green
- pu = purple
- pi = pink
- pe = peach
- bl = black
- WS = wrong side
- RS = right side
- ch = chain
- sc = single crochet
- dc = double crochet
- sl st = slip stitch
Recommended Tutorials:
Tips for Carrying Colors in C2C
How to add a border for C2C projects
Pattern Notes:
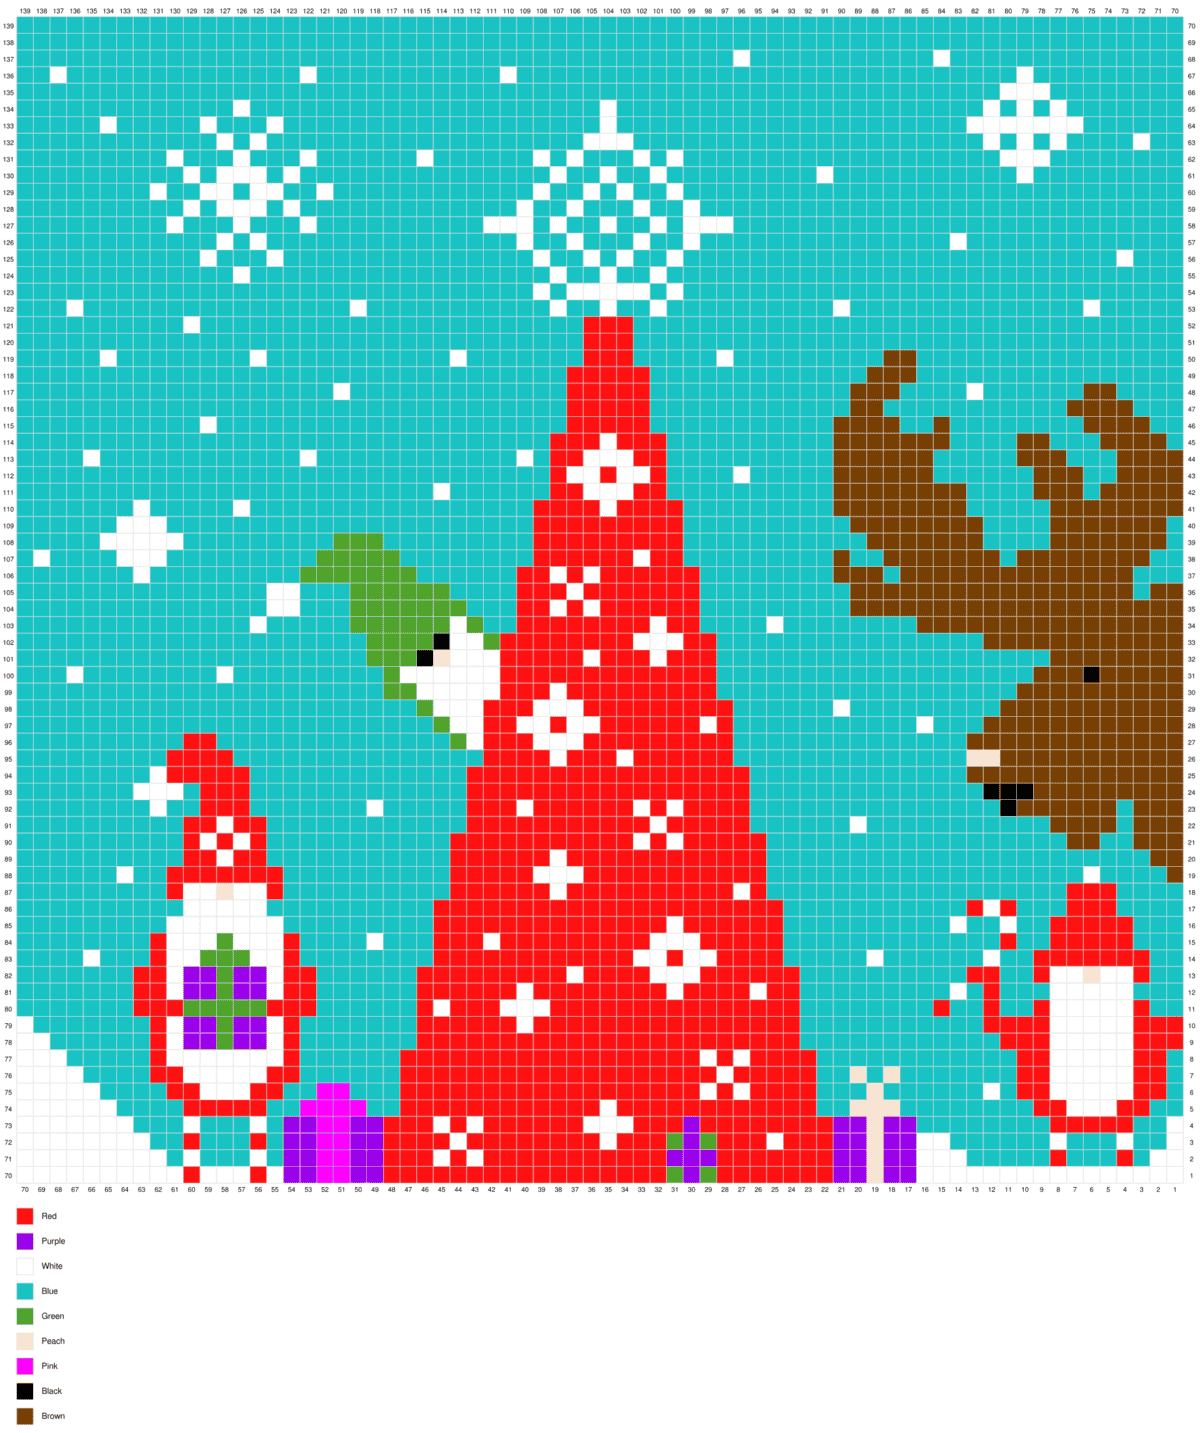
Pattern is worked in Double Crochet Corner to Corner (C2C) Crochet technique. Written row by row instructions follow with pixel graph on last page of pdf.
Pattern Notes:
- Blocks refer to group of (ch 3, 3 dc) worked together.
- Blanket is worked diagonally from corner to corner.
- Worked in Double Crochet Corner to Corner (C2C) Crochet technique. Written row by row instructions follow with pixel graph on last page of pdf.
Pattern Instructions
Starting & Increase Block: Ch 6, dc in fourth ch from hook and next two chs (skipped chs counts as ch-3 sp).
Continuing block: sl st to ch-3 sp of next block, ch 3, work 3 dc in same ch-3 sp as sl st.
Decrease: Sl st in top 3 sts of last block worked on previous row, sl st in ch-3 sp of next block and finish continuing blocks, stop working continuing blocks once you have reached the sl st edge.
Row 1: Work Starting Block
Row 2: Work 1 Increasing Block, work 1 Continuing Block.
Row 3: Work 1 Increasing Block, work Continuing Blocks across all blocks.
Repeat Row 3 to desired width.
To Stop Increasing: Work Decrease, work Continuing Blocks across all blocks.
To create a square: Work Decrease at beginning of each row, work Continuing Blocks across all blocks.
r: Red / pu: Purple / w: White / b: Blue / g: Green / pe: Peach / pi: Pink /
bl: Black / br: Brown
Row by Row Written Color Pattern Instructions
→ Row 1 [WS]: (w) x 1 (1 square)
← Row 2 [RS]: (w) x 2 (2 squares)
→ Row 3 [WS]: (w) x 3 (3 squares)
← Row 4 [RS]: (w) x 1, (b) x 2, (w) x 1 (4 squares)
→ Row 5 [WS]: (w) x 1, (r) x 1, (b) x 3 (5 squares)
← Row 6 [RS]: (b) x 3, (w) x 1, (b) x 1, (w) x 1 (6 squares)
→ Row 7 [WS]: (w) x 1, (b) x 2, (r) x 3, (b) x 1 (7 squares)
← Row 8 [RS]: (b) x 1, (r) x 4, (b) x 2, (w) x 1 (8 squares)
→ Row 9 [WS]: (w) x 1, (r) x 1, (b) x 1, (r) x 1, (w) x 2, (r) x 3 (9 squares)
← Row 10 [RS]: (r) x 3, (w) x 3, (r) x 1, (w) x 1, (b) x 1, (w) x 1 (10 squares)
→ Row 11 [WS]: (w) x 1, (b) x 2, (r) x 1, (w) x 4, (r) x 2, (b) x 1 (11 squares)
← Row 12 [RS]: (b) x 2, (r) x 1, (w) x 4, (r) x 1, (b) x 3, (w) x 1 (12 squares)
→ Row 13 [WS]: (w) x 1, (b) x 3, (r) x 1, (w) x 5, (r) x 1, (b) x 2 (13 squares)
← Row 14 [RS]: (b) x 3, (w) x 5, (r) x 1, (b) x 4, (w) x 1 (14 squares)
→ Row 15 [WS]: (w) x 2, (b) x 3, (r) x 2, (w) x 5, (r) x 1, (b) x 2 (15 squares)
← Row 16 [RS]: (b) x 2, (r) x 1, (w) x 5, (r) x 2, (b) x 4, (w) x 2 (16 squares)
→ Row 17 [WS]: (pu) x 1, (w) x 2, (b) x 2, (w) x 1, (b) x 1, (r) x 2, (w) x 4, (r) x 1, (b) x 3 (17 squares)
← Row 18 [RS]: (b) x 3, (r) x 2, (pe) x 1, (w) x 2, (r) x 2, (b) x 5, (w) x 1, (pu) x 2 (18 squares)
→ Row 19 [WS]: (pe) x 1, (pu) x 2, (b) x 5, (r) x 3, (w) x 2, (r) x 3, (b) x 2, (br) x 1 (19 squares)
← Row 20 [RS]: (br) x 1, (b) x 3, (r) x 3, (w) x 1, (b) x 2, (r) x 1, (b) x 5, (pu) x 2, (pe) x 1, (pu) x 1 (20 squares)
→ Row 21 [WS]: (pu) x 2, (pe) x 1, (pu) x 1, (b) x 5, (r) x 1, (b) x 2, (r) x 5, (b) x 2, (br) x 2 (21 squares)
← Row 22 [RS]: (br) x 2, (b) x 2, (r) x 5, (b) x 2, (r) x 1, (b) x 5, (pe) x 2, (pu) x 2, (r) x 1 (22 squares)
→ Row 23 [WS]: (r) x 2, (pu) x 2, (pe) x 1, (b) x 6, (r) x 1, (b) x 3, (r) x 3, (b) x 2, (br) x 3 (23 squares)
← Row 24 [RS]: (br) x 3, (b) x 2, (w) x 1, (r) x 1, (b) x 4, (r) x 1, (b) x 5, (pe) x 3, (pu) x 1, (r) x 3 (24 squares)
→ Row 25 [WS]: (r) x 4, (b) x 6, (r) x 1, (w) x 1, (r) x 1, (w) x 1, (r) x 1, (b) x 7, (br) x 3 (25 squares)
← Row 26 [RS]: (br) x 3, (b) x 1, (br) x 2, (b) x 4, (w) x 1, (b) x 8, (pe) x 1, (b) x 2, (r) x 4 (26 squares)
→ Row 27 [WS]: (r) x 2, (w) x 1, (r) x 2, (b) x 11, (r) x 1, (b) x 3, (br) x 7 (27 squares)
← Row 28 [RS]: (br) x 7, (b) x 4, (w) x 1, (b) x 10, (r) x 6 (28 squares)
→ Row 29 [WS]: (g) x 1, (r) x 6, (b) x 8, (w) x 1, (r) x 1, (b) x 4, (br) x 8 (29 squares)
← Row 30 [RS]: (br) x 8, (b) x 14, (r) x 6, (pu) x 2 (30 squares)
→ Row 31 [WS]: (g) x 1, (pu) x 1, (g) x 1, (r) x 5, (b) x 14, (br) x 9 (31 squares)
← Row 32 [RS]: (br) x 10, (b) x 8, (w) x 1, (b) x 4, (r) x 3, (w) x 1, (r) x 2, (pu) x 2, (r) x 1 (32 squares)
→ Row 33 [WS]: (r) x 2, (g) x 1, (pu) x 1, (r) x 6, (b) x 12, (bl) x 2, (br) x 9 (33 squares)
← Row 34 [RS]: (br) x 10, (bl) x 1, (b) x 12, (r) x 3, (w) x 3, (r) x 5 (34 squares)
→ Row 35 [WS]: (r) x 12, (b) x 11, (bl) x 1, (br) x 11 (35 squares)
← Row 36 [RS]: (br) x 5, (bl) x 1, (br) x 6, (b) x 11, (r) x 5, (w) x 1, (r) x 7 (36 squares)
→ Row 37 [WS]: (r) x 2, (w) x 2, (r) x 7, (w) x 1, (r) x 1, (b) x 11, (br) x 1, (pe) x 1, (br) x 10, (b) x 1 (37 squares)
← Row 38 [RS]: (b) x 3, (br) x 9, (pe) x 1, (b) x 11, (r) x 10, (w) x 1, (r) x 3 (38 squares)
→ Row 39 [WS]: (r) x 3, (w) x 2, (r) x 10, (b) x 11, (br) x 10, (b) x 3 (39 squares)
← Row 40 [RS]: (b) x 1, (br) x 7, (b) x 16, (r) x 16 (40 squares)
→ Row 41 [WS]: (r) x 17, (b) x 4, (w) x 1, (b) x 10, (br) x 9 (41 squares)
← Row 42 [RS]: (br) x 10, (b) x 15, (r) x 3, (w) x 3, (r) x 11 (42 squares)
→ Row 43 [WS]: (r) x 12, (w) x 2, (r) x 4, (b) x 9, (w) x 1, (b) x 4, (br) x 11 (43 squares)
← Row 44 [RS]: (br) x 12, (b) x 13, (r) x 1, (w) x 1, (r) x 2, (w) x 1, (r) x 1, (w) x 1, (r) x 10, (w) x 1, (r) x 1 (44 squares)
→ Row 45 [WS]: (r) x 13, (w) x 2, (r) x 5, (b) x 13, (br) x 11, (b) x 1 (45 squares)
← Row 46 [RS]: (b) x 1, (br) x 12, (b) x 12, (r) x 5, (w) x 3, (r) x 9, (w) x 3, (r) x 1 (46 squares)
→ Row 47 [WS]: (r) x 21, (b) x 12, (br) x 5, (b) x 1, (br) x 2, (b) x 2, (br) x 2, (b) x 2 (47 squares)
← Row 48 [RS]: (b) x 2, (br) x 2, (b) x 2, (br) x 2, (b) x 3, (br) x 4, (b) x 11, (r) x 18, (w) x 1, (r) x 3 (48 squares)
→ Row 49 [WS]: (pu) x 1, (r) x 8, (w) x 2, (r) x 1, (w) x 1, (r) x 10, (b) x 5, (w) x 1, (b) x 4, (br) x 5, (b) x 3, (br) x 2, (b) x 1, (br) x 2, (b) x 3 (49 squares)
← Row 50 [RS]: (b) x 3, (br) x 2, (b) x 2, (br) x 2, (b) x 3, (br) x 4, (b) x 10, (r) x 13, (w) x 1, (r) x 8, (pu) x 2 (50 squares)
→ Row 51 [WS]: (pi) x 1, (pu) x 2, (r) x 7, (w) x 2, (r) x 8, (w) x 1, (r) x 4, (b) x 9, (br) x 5, (b) x 3, (br) x 2, (b) x 1, (br) x 2, (b) x 4 (51 squares)
← Row 52 [RS]: (b) x 4, (br) x 2, (b) x 2, (br) x 1, (b) x 3, (br) x 6, (b) x 9, (r) x 20, (b) x 1, (pu) x 2, (pi) x 2 (52 squares)
→ Row 53 [WS]: (pu) x 1, (pi) x 2, (pu) x 1, (b) x 2, (r) x 14, (w) x 3, (r) x 3, (b) x 8, (br) x 6, (b) x 3, (br) x 2, (b) x 1, (br) x 2, (b) x 5 (53 squares)
← Row 54 [RS]: (b) x 9, (br) x 1, (b) x 3, (br) x 4, (b) x 1, (br) x 2, (b) x 7, (r) x 20, (b) x 2, (pi) x 3, (pu) x 2 (54 squares)
→ Row 55 [WS]: (w) x 1, (pu) x 2, (pi) x 2, (b) x 4, (r) x 1, (w) x 1, (r) x 6, (w) x 2, (r) x 3, (w) x 1, (r) x 5, (b) x 7, (br) x 7, (b) x 13 (55 squares)
← Row 56 [RS]: (b) x 14, (br) x 4, (b) x 1, (br) x 1, (b) x 7, (r) x 1, (w) x 1, (r) x 8, (w) x 1, (r) x 3, (w) x 1, (r) x 4, (b) x 4, (pi) x 2, (pu) x 2, (b) x 1, (r) x 1 (56 squares)
→ Row 57 [WS]: (w) x 2, (b) x 1, (pu) x 1, (pi) x 2, (b) x 5, (r) x 7, (w) x 2, (r) x 9, (b) x 7, (br) x 1, (b) x 1, (br) x 4, (b) x 15 (57 squares)
← Row 58 [RS]: (b) x 5, (w) x 1, (b) x 9, (br) x 4, (b) x 1, (br) x 1, (b) x 3, (w) x 1, (b) x 3, (r) x 18, (b) x 9, (r) x 1, (b) x 1, (w) x 1 (58 squares)
→ Row 59 [WS]: (w) x 1, (b) x 2, (w) x 1, (b) x 10, (r) x 11, (w) x 1, (r) x 5, (b) x 8, (br) x 6, (b) x 10, (w) x 1, (b) x 3 (59 squares)
← Row 60 [RS]: (b) x 12, (w) x 1, (b) x 1, (br) x 6, (b) x 8, (r) x 17, (b) x 8, (r) x 3, (b) x 3, (r) x 1 (60 squares)
→ Row 61 [WS]: (w) x 2, (b) x 2, (r) x 4, (b) x 8, (r) x 17, (b) x 7, (br) x 5, (b) x 16 (61 squares)
← Row 62 [RS]: (b) x 17, (br) x 4, (b) x 8, (r) x 10, (w) x 1, (r) x 4, (b) x 9, (r) x 1, (w) x 3, (r) x 1, (b) x 1, (r) x 1, (b) x 1, (w) x 1 (62 squares)
→ Row 63 [WS]: (w) x 2, (b) x 1, (w) x 1, (r) x 1, (w) x 4, (r) x 2, (b) x 3, (w) x 1, (b) x 4, (r) x 6, (w) x 3, (r) x 3, (w) x 2, (r) x 1, (b) x 8, (br) x 4, (b) x 17 (63 squares)
← Row 64 [RS]: (b) x 18, (br) x 3, (b) x 8, (r) x 2, (w) x 1, (r) x 4, (w) x 2, (r) x 6, (b) x 8, (r) x 2, (w) x 1, (pu) x 1, (w) x 3, (r) x 1, (b) x 2, (w) x 2 (64 squares)
→ Row 65 [WS]: (w) x 3, (b) x 2, (r) x 1, (w) x 2, (pu) x 2, (r) x 3, (b) x 9, (r) x 4, (w) x 1, (r) x 1, (w) x 1, (r) x 3, (w) x 2, (r) x 2, (b) x 8, (br) x 5, (b) x 13, (w) x 1, (b) x 2 (65 squares)
← Row 66 [RS]: (b) x 16, (br) x 5, (b) x 8, (r) x 8, (w) x 2, (r) x 4, (b) x 10, (r) x 1, (w) x 1, (g) x 1, (pu) x 1, (g) x 1, (w) x 2, (r) x 1, (b) x 2, (w) x 3 (66 squares)
→ Row 67 [WS]: (w) x 4, (b) x 2, (r) x 1, (w) x 1, (pu) x 1, (g) x 2, (pu) x 1, (w) x 1, (r) x 1, (b) x 10, (r) x 3, (w) x 3, (r) x 1, (w) x 1, (r) x 5, (b) x 10, (br) x 3, (b) x 17 (67 squares)
← Row 68 [RS]: (b) x 30, (r) x 12, (b) x 11, (r) x 1, (w) x 1, (pu) x 2, (g) x 1, (pu) x 2, (w) x 1, (r) x 1, (b) x 2, (w) x 4 (68 squares)
→ Row 69 [WS]: (w) x 5, (b) x 2, (r) x 1, (w) x 1, (pu) x 1, (g) x 2, (pu) x 1, (w) x 2, (b) x 11, (w) x 1, (r) x 12, (b) x 3, (w) x 1, (b) x 26 (69 squares)
← Row 70 [RS]: (b) x 6, (w) x 4, (b) x 3, (w) x 1, (b) x 16, (r) x 2, (w) x 1, (r) x 2, (w) x 1, (r) x 6, (w) x 1, (g) x 1, (b) x 10, (w) x 2, (g) x 2, (pu) x 1, (g) x 1, (w) x 1, (r) x 1, (b) x 3, (w) x 5 (70 squares)
Corner: Start decreasing on both ends
→ Row 71 [WS]: (w) x 5, (b) x 3, (r) x 2, (pu) x 2, (g) x 1, (w) x 2, (b) x 6, (w) x 1, (b) x 4, (w) x 3, (r) x 11, (b) x 20, (w) x 1, (b) x 1, (w) x 1, (b) x 6 (69 squares)
← Row 72 [RS]: (b) x 5, (w) x 4, (b) x 20, (r) x 4, (w) x 3, (r) x 3, (w) x 3, (g) x 1, (b) x 9, (r) x 1, (w) x 2, (g) x 2, (pu) x 1, (w) x 1, (r) x 1, (b) x 4, (w) x 4 (68 squares)
→ Row 73 [WS]: (w) x 4, (b) x 3, (r) x 2, (w) x 6, (r) x 1, (b) x 9, (w) x 4, (r) x 10, (b) x 10, (w) x 1, (b) x 10, (w) x 1, (b) x 6 (67 squares)
← Row 74 [RS]: (b) x 4, (w) x 4, (b) x 19, (r) x 6, (w) x 1, (r) x 2, (b) x 1, (g) x 1, (w) x 3, (g) x 1, (b) x 9, (r) x 1, (w) x 5, (r) x 2, (b) x 4, (w) x 3 (66 squares)
→ Row 75 [WS]: (w) x 3, (b) x 4, (r) x 2, (w) x 3, (pe) x 1, (r) x 2, (b) x 9, (w) x 4, (b) x 2, (r) x 5, (w) x 3, (r) x 1, (b) x 19, (w) x 1, (b) x 1, (w) x 1, (b) x 4 (65 squares)
← Row 76 [RS]: (b) x 3, (w) x 4, (b) x 18, (r) x 2, (w) x 2, (r) x 5, (b) x 2, (g) x 1, (w) x 1, (pe) x 1, (w) x 1, (g) x 1, (b) x 8, (r) x 3, (w) x 3, (r) x 1, (b) x 6, (w) x 2 (64 squares)
→ Row 77 [WS]: (w) x 2, (b) x 8, (w) x 1, (r) x 1, (w) x 2, (r) x 1, (b) x 7, (g) x 1, (w) x 1, (bl) x 2, (w) x 1, (b) x 4, (r) x 3, (w) x 1, (r) x 1, (w) x 1, (r) x 1, (b) x 4, (w) x 1, (b) x 20 (63 squares)
← Row 78 [RS]: (b) x 24, (r) x 2, (w) x 2, (r) x 3, (b) x 4, (g) x 5, (b) x 8, (r) x 5, (b) x 8, (w) x 1 (62 squares)
→ Row 79 [WS]: (w) x 1, (b) x 3, (w) x 1, (b) x 4, (r) x 2, (w) x 2, (r) x 1, (b) x 8, (g) x 4, (b) x 5, (r) x 2, (w) x 3, (r) x 2, (b) x 23 (61 squares)
← Row 80 [RS]: (b) x 22, (r) x 6, (b) x 6, (g) x 5, (b) x 7, (r) x 4, (b) x 10 (60 squares)
→ Row 81 [WS]: (b) x 10, (r) x 4, (b) x 7, (g) x 4, (b) x 7, (r) x 6, (b) x 21 (59 squares)
← Row 82 [RS]: (b) x 2, (w) x 1, (b) x 6, (w) x 1, (b) x 11, (r) x 5, (b) x 8, (g) x 3, (b) x 8, (r) x 2, (b) x 4, (w) x 1, (b) x 6 (58 squares)
→ Row 83 [WS]: (b) x 11, (r) x 2, (b) x 7, (g) x 4, (b) x 6, (w) x 1, (b) x 2, (r) x 4, (b) x 20 (57 squares)
← Row 84 [RS]: (b) x 16, (w) x 2, (b) x 1, (r) x 4, (b) x 10, (g) x 3, (b) x 8, (r) x 2, (w) x 2, (b) x 8 (56 squares)
→ Row 85 [WS]: (b) x 8, (w) x 1, (r) x 3, (b) x 8, (g) x 3, (b) x 10, (r) x 4, (b) x 5, (w) x 1, (b) x 12 (55 squares)
← Row 86 [RS]: (b) x 12, (w) x 5, (b) x 1, (r) x 2, (b) x 8, (w) x 1, (b) x 3, (g) x 2, (b) x 9, (r) x 2, (w) x 2, (b) x 7 (54 squares)
→ Row 87 [WS]: (b) x 19, (g) x 3, (b) x 12, (r) x 1, (w) x 2, (b) x 3, (w) x 1, (b) x 12 (53 squares)
← Row 88 [RS]: (b) x 11, (w) x 1, (b) x 4, (w) x 1, (b) x 14, (g) x 3, (b) x 1, (w) x 1, (b) x 3, (w) x 1, (b) x 12 (52 squares)
→ Row 89 [WS]: (b) x 14, (w) x 3, (g) x 3, (b) x 14, (w) x 5, (b) x 12 (51 squares)
← Row 90 [RS]: (b) x 10, (w) x 1, (b) x 5, (w) x 2, (b) x 16, (w) x 1, (b) x 15 (50 squares)
→ Row 91 [WS]: (b) x 34, (w) x 1, (b) x 2, (w) x 1, (b) x 11 (49 squares)
← Row 92 [RS]: (b) x 8, (w) x 2, (b) x 2, (w) x 1, (b) x 2, (w) x 2, (b) x 31 (48 squares)
→ Row 93 [WS]: (b) x 26, (w) x 1, (b) x 6, (w) x 1, (b) x 2, (w) x 1, (b) x 10 (47 squares)
← Row 94 [RS]: (b) x 2, (w) x 1, (b) x 5, (w) x 1, (b) x 5, (w) x 1, (b) x 31 (46 squares)
→ Row 95 [WS]: (b) x 32, (w) x 4, (b) x 9 (45 squares)
← Row 96 [RS]: (b) x 7, (w) x 1, (b) x 5, (w) x 1, (b) x 12, (w) x 1, (b) x 17 (44 squares)
→ Row 97 [WS]: (b) x 3, (w) x 1, (b) x 9, (w) x 1, (b) x 16, (w) x 1, (b) x 4, (w) x 1, (b) x 7 (43 squares)
← Row 98 [RS]: (b) x 6, (w) x 7, (b) x 9, (w) x 1, (b) x 19 (42 squares)
→ Row 99 [WS]: (b) x 7, (w) x 3, (b) x 18, (w) x 1, (b) x 6, (w) x 1, (b) x 5 (41 squares)
← Row 100 [RS]: (b) x 8, (w) x 1, (b) x 22, (w) x 2, (b) x 7 (40 squares)
→ Row 101 [WS]: (b) x 6, (w) x 3, (b) x 30 (39 squares)
← Row 102 [RS]: (b) x 17, (w) x 1, (b) x 12, (w) x 2, (b) x 6 (38 squares)
→ Row 103 [WS]: (b) x 5, (w) x 3, (b) x 29 (37 squares)
← Row 104 [RS]: (b) x 24, (w) x 1, (b) x 11 (36 squares)
→ Row 105 [WS]: (b) x 14, (w) x 1, (b) x 20 (35 squares)
← Row 106 [RS]: (b) x 32, (w) x 1, (b) x 1 (34 squares)
→ Row 107 [WS]: (b) x 24, (w) x 1, (b) x 4, (w) x 1, (b) x 3 (33 squares)
← Row 108 [RS]: (b) x 32 (32 squares)
→ Row 109 [WS]: (b) x 4, (w) x 1, (b) x 26 (31 squares)
← Row 110 [RS]: (b) x 12, (w) x 1, (b) x 1, (w) x 1, (b) x 15 (30 squares)
→ Row 111 [WS]: (b) x 10, (w) x 1, (b) x 2, (w) x 1, (b) x 4, (w) x 1, (b) x 10 (29 squares)
← Row 112 [RS]: (b) x 11, (w) x 1, (b) x 1, (w) x 1, (b) x 14 (28 squares)
→ Row 113 [WS]: (b) x 27 (27 squares)
← Row 114 [RS]: (b) x 8, (w) x 7, (b) x 5, (w) x 1, (b) x 5 (26 squares)
→ Row 115 [WS]: (b) x 13, (w) x 2, (b) x 10 (25 squares)
← Row 116 [RS]: (b) x 9, (w) x 1, (b) x 1, (w) x 1, (b) x 12 (24 squares)
→ Row 117 [WS]: (b) x 12, (w) x 2, (b) x 9 (23 squares)
← Row 118 [RS]: (b) x 6, (w) x 7, (b) x 9 (22 squares)
→ Row 119 [WS]: (b) x 3, (w) x 1, (b) x 13, (w) x 1, (b) x 3 (21 squares)
← Row 120 [RS]: (b) x 7, (w) x 1, (b) x 1, (w) x 1, (b) x 10 (20 squares)
→ Row 121 [WS]: (b) x 8, (w) x 1, (b) x 4, (w) x 1, (b) x 5 (19 squares)
← Row 122 [RS]: (b) x 6, (w) x 1, (b) x 1, (w) x 1, (b) x 9 (18 squares)
→ Row 123 [WS]: (b) x 17 (17 squares)
← Row 124 [RS]: (b) x 16 (16 squares)
→ Row 125 [WS]: (b) x 15 (15 squares)
← Row 126 [RS]: (b) x 14 (14 squares)
→ Row 127 [WS]: (b) x 13 (13 squares)
← Row 128 [RS]: (b) x 6, (w) x 1, (b) x 5 (12 squares)
→ Row 129 [WS]: (b) x 11 (11 squares)
← Row 130 [RS]: (b) x 10 (10 squares)
→ Row 131 [WS]: (b) x 9 (9 squares)
← Row 132 [RS]: (b) x 8 (8 squares)
→ Row 133 [WS]: (b) x 7 (7 squares)
← Row 134 [RS]: (b) x 3, (w) x 1, (b) x 2 (6 squares)
→ Row 135 [WS]: (b) x 5 (5 squares)
← Row 136 [RS]: (b) x 4 (4 squares)
→ Row 137 [WS]: (b) x 3 (3 squares)
← Row 138 [RS]: (b) x 2 (2 squares)
→ Row 139 [WS]: (b) x 1stitch
Border
Round 1: With Color A, attach to outside edge of blanket with slip stitch; ch 1, sc evenly around outside edge, place (1 sc, ch 1, 1 sc) in each corner sp, sl st to first st.
Round 2: With Color A, ch 5, remove hook from loop, attach color B to next st, ch 5, remove hook from loop, attach color C to next st, ch 5, remove hook from loop. *Insert hook back into loop of Color A, sc into next open st (st next to Color C chains), ch 5, remove hook from loop, insert hook back into loop of color B, sc into next open st, ch 5, remove hook from loop, insert hook back into loop of Color C, sc into next open st, ch 5, remove hook from loop,* continue repeating between * * to corner, in each corner work 3 st into ch 1 corner sp from previous round (1 each of blue, white and red). At the end of the round, sl st blue ch 5 to the bottom of the beginning blue ch 5, sl st white ch 5 to the bottom of the beginning white ch 5, sl st red ch 5 to the bottom of the beginning red ch 5. Be sure to keep the same color sequence at the end so you may need to sk a st to keep colors in order.
Fasten off. Weave in ends.
Copyright 2024 Tonya Bush / Nana’s Crafty Home, LLC.
Social Media links:
Facebook: https://www.facebook.com/nanascraftyhome
Instagram: https://www.instagram.com/nanascraftyhome/
Pinterest: https://www.pinterest.com/nanascraftyhome/
YouTube: https://www.youtube.com/c/TonyaBush
Twitter: https://twitter.com/nanascraftyhome
Facebook Group: https://www.facebook.com/groups/829792060522798
Sign up for my Newsletter: https://nanascraftyhome.com/sign-up-for-my-free-newsletter/
 Hi! Thank you so much for being here! I am Tonya the designer behind Nana's Crafty Home. As a wife, mother, Nana of 9 & with 2 fur babies, my days are filled with love, laughter, hugs and yarn! Here you will find colorful and creative crochet designs for yourself or loved ones. My hope is that you will be inspired to learn and create along with me!