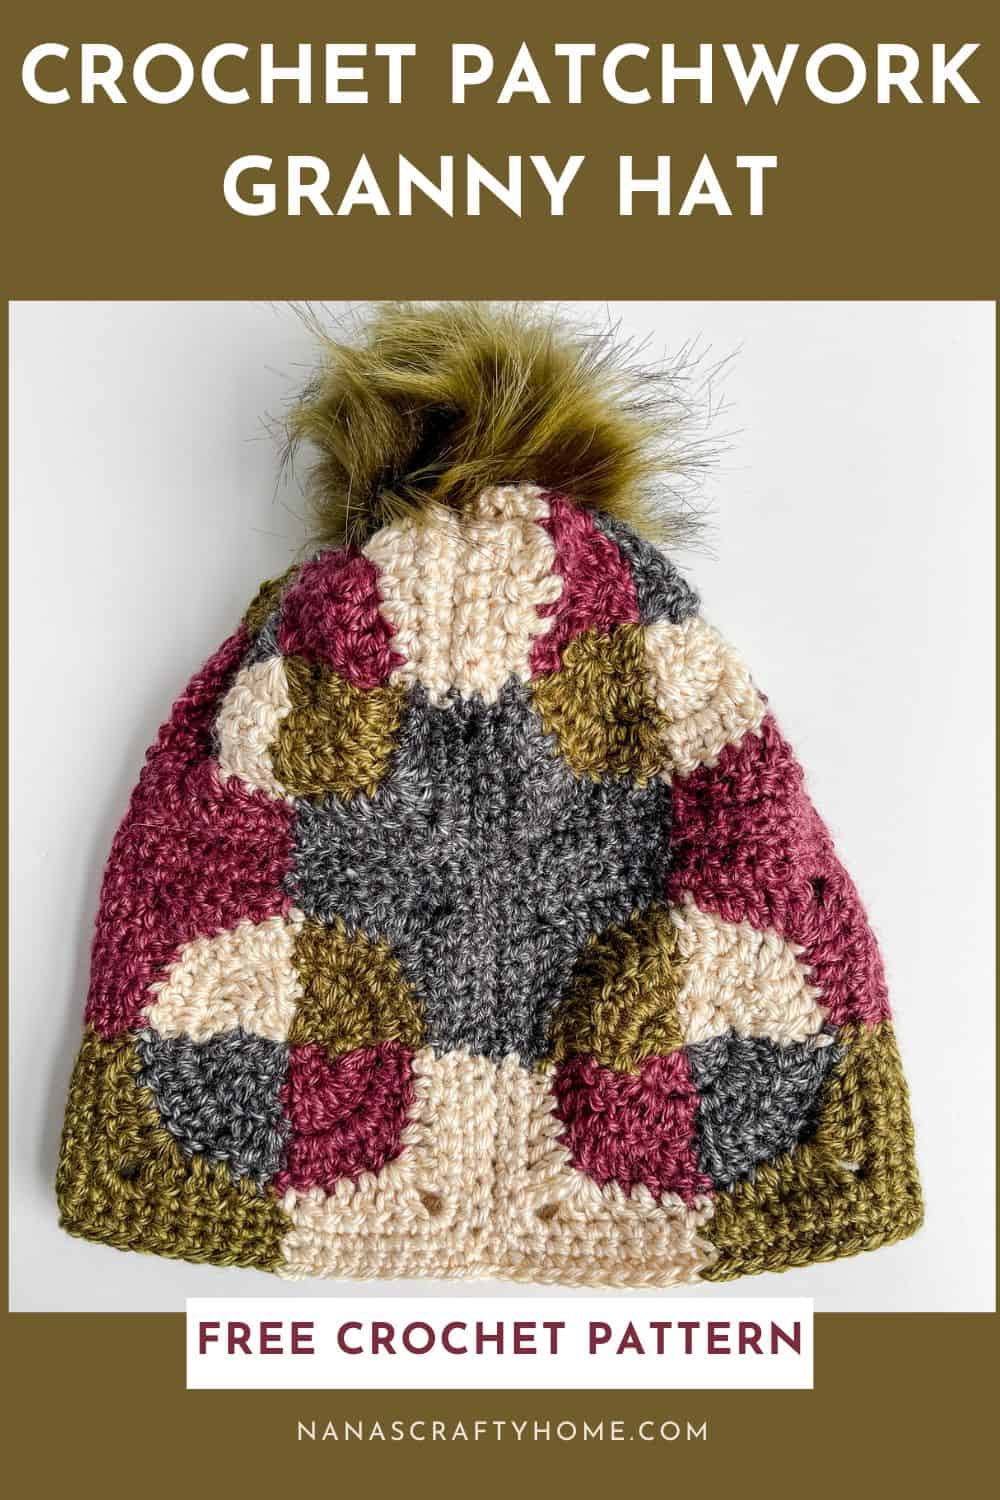
A crochet patchwork hat is a free crochet pattern just in time for cooler fall weather!
There’s nothing quite like a handmade accessory to add that perfect touch of warmth to your wardrobe. Enter the Patchwork Revelry Hat—a free crochet pattern that’s equal parts cozy and captivating. This geometric beanie reimagines classic granny squares through vibrant color work in earthy tones, creating a patchwork design that’s as playful as it is polished.
Topped with a plush faux fur pom-pom for that irresistible boho flair, this intermediate-level project is your ticket to crocheting a one-of-a-kind hat that turns heads at fall festivals or cozy coffee runs. Whether you’re experimenting with color work or a beginner ready for a fun challenge, grab your hook and favorite 4 colors of worsted-weight yarn to stitch up this revelry-ready essential today!
After the success of the Patchwork Revelry Blanket I released a couple of months ago I knew that I had to transform the over-sized Patchwork Revelry Square into a smaller version for both a scarf and hat pattern! I just love how this fun hat turned out!


How to Make the Crochet Patchwork Hat
For the full free written pattern instructions for the Patchwork Revelry Hat, scroll down below. You can purchase the ad-free PDF of this pattern for a small fee. Or, become a Lifetime Member and never pay for a PDF again!
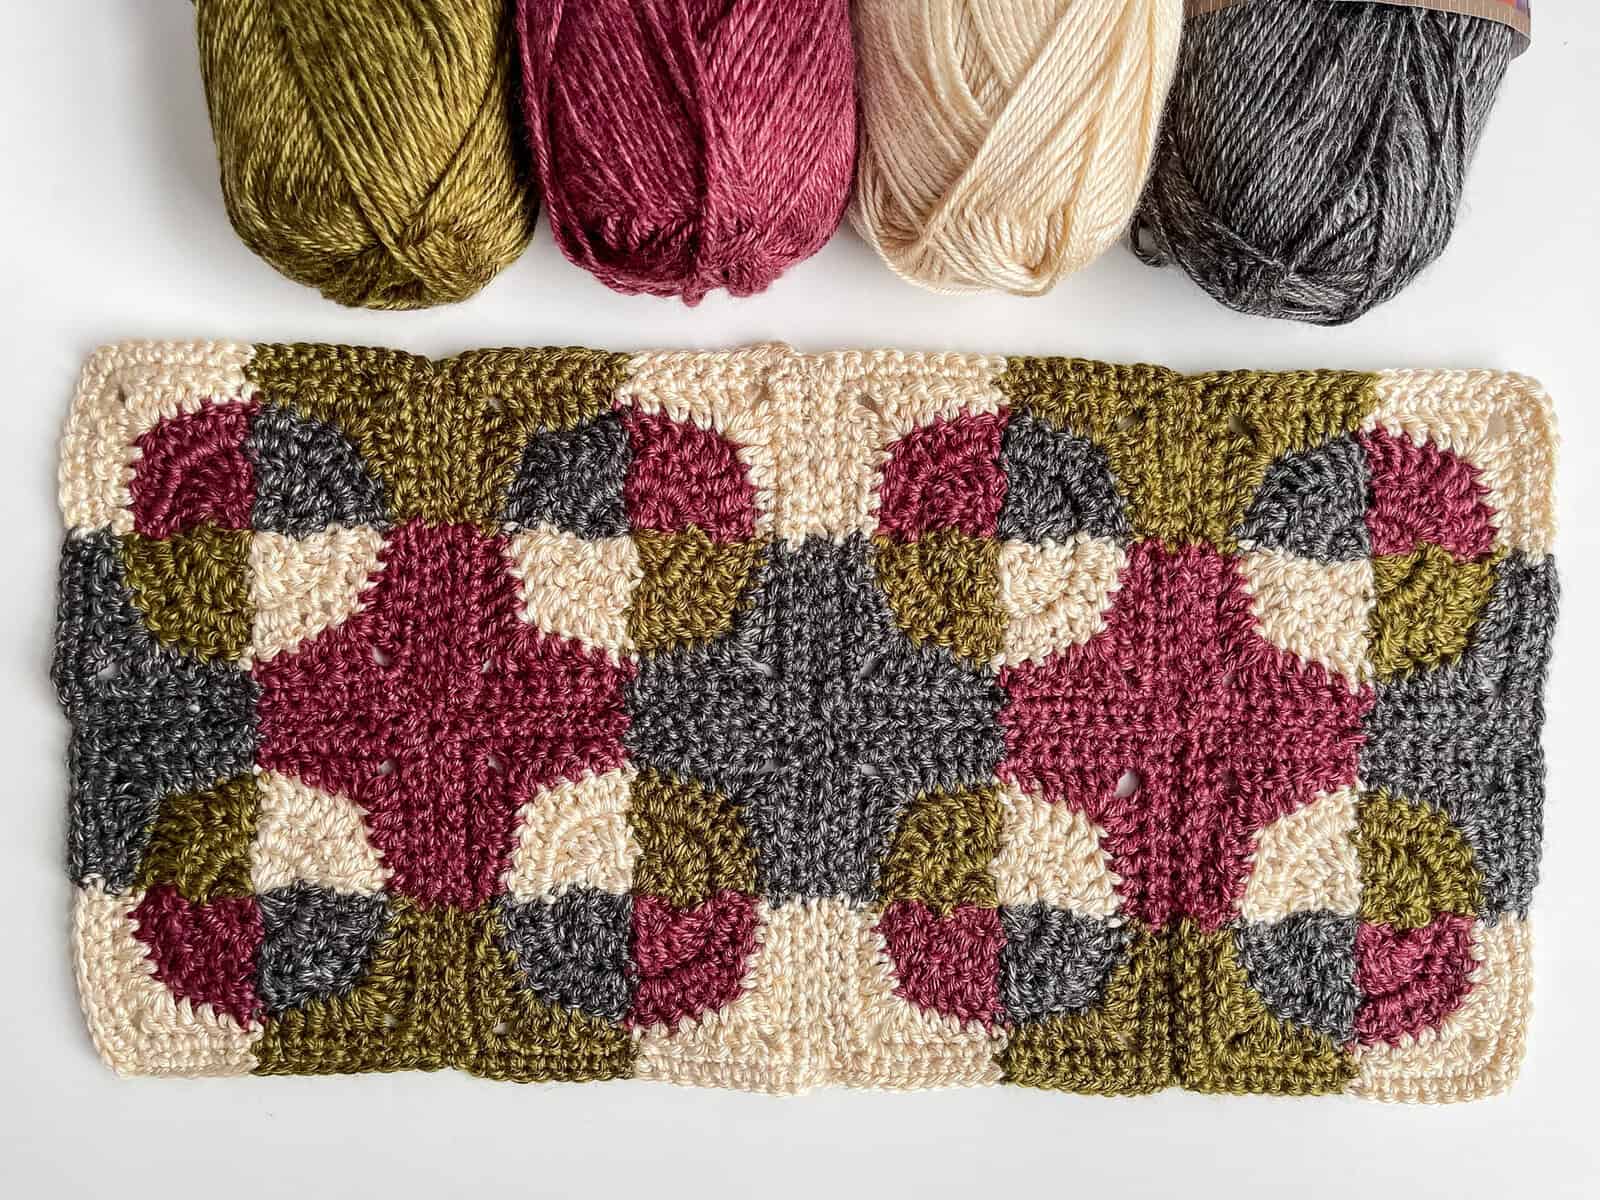
1. The Patchwork Revelry Hat Crochet Pattern is made from 8 smaller squares versions of the Patchwork Revelry Square, which starts out the same as my seasonal granny square blankets and Wildlife Animal granny square Blanket series.
2. Each square starts with a standard double crochet circle which is then squared off for easy joining. Clever color work yields a striking geometric pattern. Turning each round and dropping/picking up colors minimizes end weaving for an efficient, easy make.
I have a video tutorial to help you with the color changing for this square now available!
3. The squares have no distinct right or wrong side, allowing you to determine the look through creative color placement for a captivating patchwork effect. Squares are joined using the Mattress Stitch—a flat, invisible join achieved by matching colors as you sew the squares together.
4. Each of my finished squares measured 5″ x 5″ which made a hat approximately 20″ in circumference. You can easily make your squares larger by adding another round of single crochet stitches for each square. This will add approximately 1″ to the total circumference.
I hope you enjoy making the Patchwork Revelry Hat and be sure to check out the matching Patchwork Revelry Scarf which is also a free crochet pattern on the blog!
Tonya 💕

Patchwork Revelry Crochet Hat Supplies
*This post contains affiliate links. You can click on any yarn or material highlighted to purchase. I will receive a small commission if you purchase but it won’t cost you any extra! As an Amazon Associate I earn from qualifying purchases.
I made my patchwork hat using Lion Brand Heartland yarn, which boasts the most stunning earth tone shades—perfect for a fall vibe! This plush, medium-weight acrylic blend features gentle heathered tones for a natural, understated look, complemented by its silky, ultra-soft feel and vibrant hues, making it ideal for creating cozy accessories!
Since the hat only uses small amounts of each color you will be able to use up the leftover yarn from your matching Patchwork Revelry Scarf! This hat is the perfect project to raid your stash – find your mix and match your favorite colors!
Lion Brand Heartland Weight 4 / Medium (100% acrylic)
Add a matching faux fur pom pom to add boho flair!
Hat of the Month Club 2025 CAL

So excited this crochet patchwork hat pattern is part of the 2025 Hat of The Month CAL hosted by the Stitchin’ Mommy and Oombawka Designs! Get all of the info about this fun CAL! Check out the other designs in this month’s event:

Purchase the ad-free PDF
You can purchase the ad-free PDF of this crochet patchwork hat for a small fee. You can purchase the individual pattern, or if you love PDFs, you might want to check out my Lifetime Membership. It’s an awesome deal! Never pay for one of my PDFs again!!


If you would like daily crochet inspiration be sure to follow me on Facebook, Instagram, Pinterest, YouTube, Twitter and Tumblr!
To get notified of my free crochet patterns and future giveaways, sign up for my newsletter. I never share or sell your information to third parties — it stays private!
You may also like the following free crochet hat patterns by Nana’s Crafty Home:


- 1. Posh Panache Granny Crochet Bucket Hat free crochet pattern
- 2. Macchiato Hat free crochet pattern
- 3. Sassy Autumn Hat free crochet pattern
Revelry Patchwork Hat free crochet pattern
Pattern written in US crochet terminology
Supplies:
Lion Brand Heartland Weight 4 / Medium (100% acrylic)
- (1) Badlands 1.25 oz / 63 yards (R)
- (1) Great Smoky Mountains 1.25 oz / 63 yards (B)
- (1) Acadia 1.25 oz / 63 yards (C)
- (1) Joshua Tree 1.25 oz / 63 yards (G)
Total yardage: 5 oz / 252 yards
Size J (6.0 mm) crochet hook
Scissors
Tapestry needle
Approximate finished size:
Adult: Approximately 20” circumference x 10” height
Gauge: First 3 rounds = 3 3/4” circle
Abbreviations:
MC = magic circle
Rnd = round
- R = red
- B = black
- C = cream
- G = green
- ch(s) = chain(s)
- sc = single crochet
- hdc = half double crochet
- dc = double crochet
- sp = space
- st(s) = stitch(es)
- sl st = slip stitch
- WS = wrong side
- RS = right side
Pattern Notes:
- Ch 3 at beginning of each round counts as first dc stitch.
- When changing colors do not fasten off, drop non-working yarn and pull back into work as indicated in pattern.
- Worked in turned rounds.
- An equal number of stitches are worked in each color for each round. Ex. Round 1 = 3 red, 3 black, 3 cream, 3 green = 12 total stitches worked.
- To change color, drop yarn, pick up new color, yo and pull through loops on hook to complete stitch being worked.
- To follow pattern instructions: First line indicates the stitch pattern for round while second line provides color changes for that round.
Recommended Tutorial:
How to Cinch Top of Hat Closed Tutorial
Pattern Instructions
Square (Make 8)
With red, make MC.
Rnd 1: Ch 3 (counts as first st), 11 dc in MC, join with sl st in top of ch-3 and tighten ring. Turn. (12)
Rnd 1 color changes: R3, B3, C3, G3
Rnd 2: Ch 3, 1 dc in same st, 2 dc in each st around, sl st in top of ch-3. Turn. (24)
Rnd 2 color changes: G6, C6, B6, R6
Rnd 3: Ch 3, 1 dc in same st, 1 dc in next st, *2 dc in next st, 1 dc in next st,* repeat from * to * to end, sl st in top of ch-3 with cream to change color. Do NOT turn. (36)
Rnd 3 color changes: R9, B9, C9, G9
Fasten off all other colors.
Rnd 4: Ch 1, sc in same st, [hdc in next st, dc in next 2 sts, (2 dc, ch 2, 2 dc) in next st, dc in next 2 sts, hdc in next st, sc in next st, switch to next color, sc in next st] three times, omitting final sc at end, sl st in first st. Turn. (48 sts + 4 ch-2 corner sps)
Rnd 4 color changes: C12, G12, R12, B12
Rnd 5: Ch 1, *sc in each st to corner sp, (3 sc) in corner sp,* repeat from * to * around, sl st to first st. Turn. (60)
Rnd 5 color changes: B15, R15, G15, C15
Rnd 6: Ch 1, *sc in each st to middle sc of corner, (3 sc) in corner st,* repeat from * to * around, sl st to first st. (68)
Rnd 6 color changes: C17, G17, R17, B17
Fasten off leaving long tails for joining squares at the end.
I’ve delayed weaving in the remaining ends until the squares are joined, as some will be right side (RS) or wrong side (WS) depending on their placement in the hat.
Join Squares
Arrange the squares so that the corners align with the same colors as shown in the photo below:
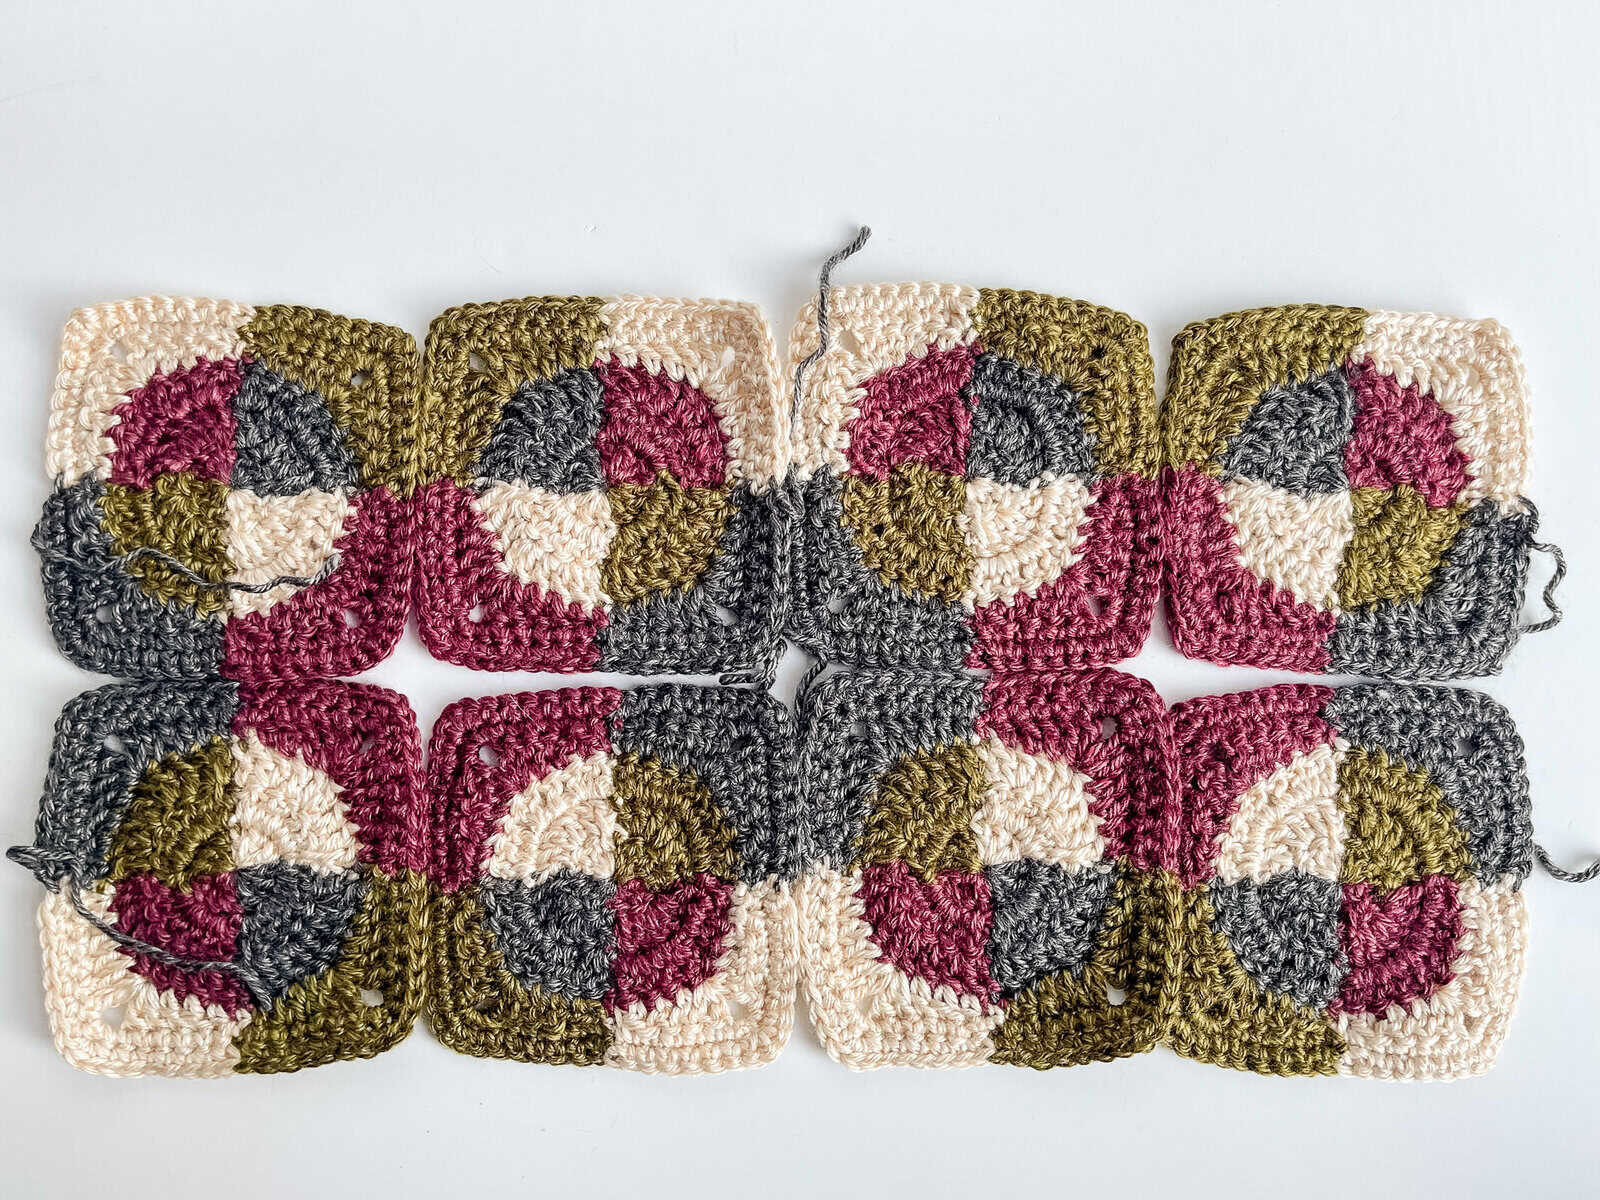
Join the squares by rows, then by columns.
Use the Mattress stitch with long ends matching the color of the squares being joined.
Once all rows are joined, proceed to join the columns.
Fasten off. Weave in ends.
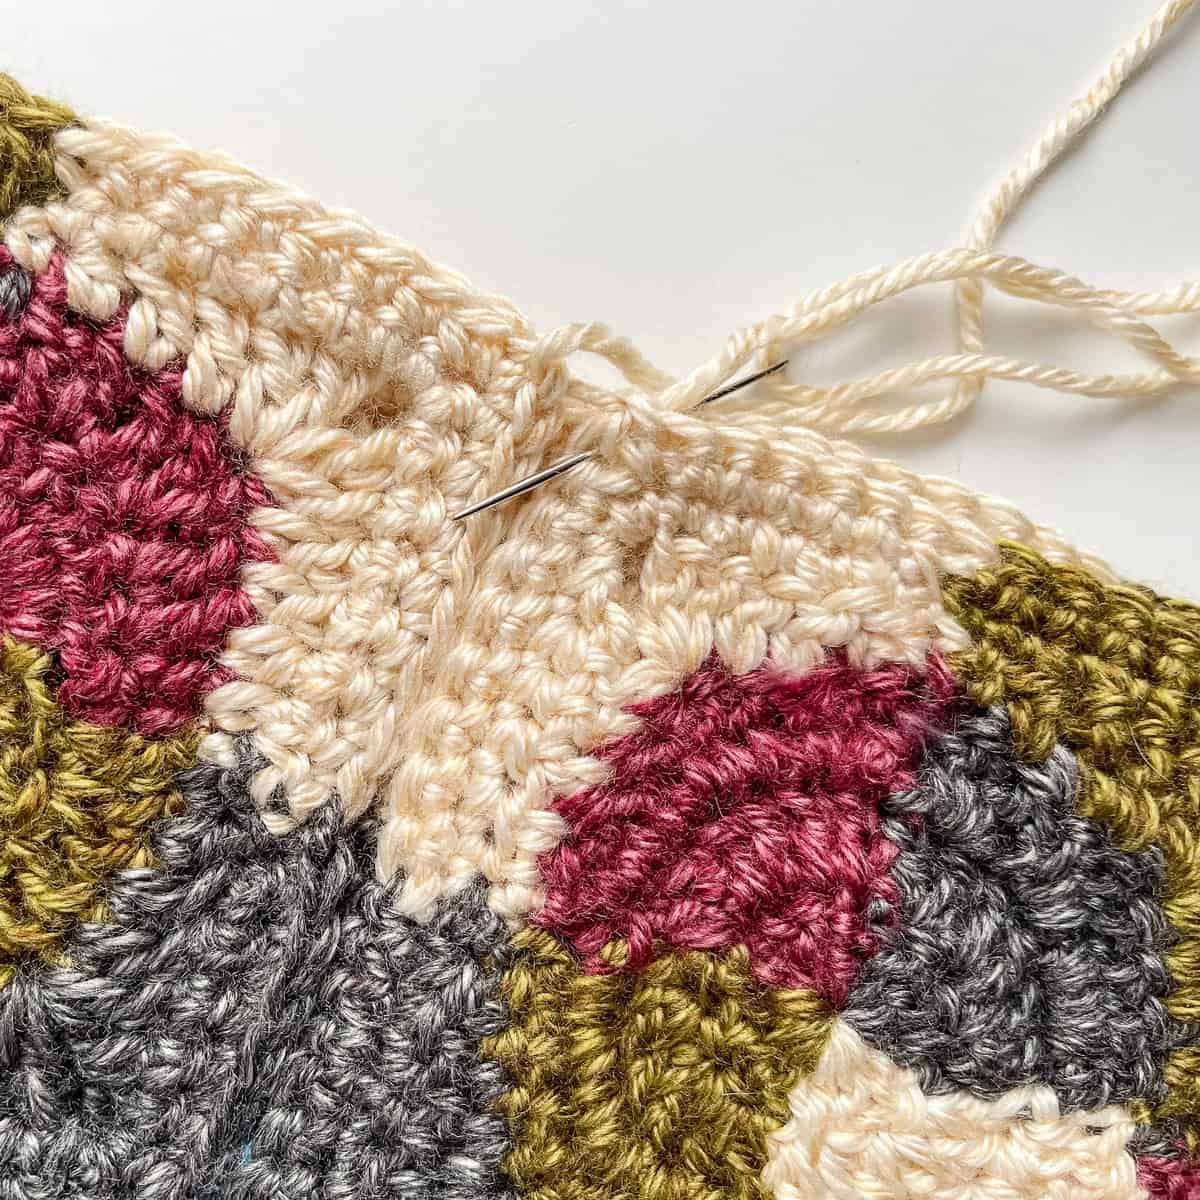
Once squares are joined fold ends together and seam together with the Mattress Stitch in the same manner used in joining the squares.

With a long length of yarn, cinch top of hat closed.
Edge
With RS of the hat facing, join matching yarn with a sl st into any stitch, ch 1, then sc in each st around the edge, adding 1 extra sc between each square; sl st in first sc to join.
Fasten off and weave in remaining ends.
Add pom pom, if desired.
Copyright 2025 Tonya Bush/Nana’s Crafty Home, LLC.
Social Media links:
Facebook: https://www.facebook.com/nanascraftyhome
Instagram: https://www.instagram.com/nanascraftyhome/
Pinterest: https://www.pinterest.com/nanascraftyhome/
YouTube: https://www.youtube.com/c/TonyaBush
X (Formerly Twitter): https://twitter.com/nanascraftyhome
Facebook Group: https://www.facebook.com/groups/829792060522798
Sign up for my Newsletter: https://nanascraftyhome.com/sign-up-for-my-free-newsletter/
 Hi! Thank you so much for being here! I am Tonya the designer behind Nana's Crafty Home. As a wife, mother, Nana of 9 & with 2 fur babies, my days are filled with love, laughter, hugs and yarn! Here you will find colorful and creative crochet designs for yourself or loved ones. My hope is that you will be inspired to learn and create along with me!