This crochet ribbed hat is a free crochet pattern by Nana’s Crafty Home!

Autumn is upon us, and you know what that means – it’s time to whip out those cozy yarns and get our hooks dancing! Today, I’ve got a fabulous and sassy treat for you: a ribbed crochet hat that’s perfect for those crisp autumn days. Get ready to turn heads and make a statement with your handmade masterpiece!
I am so excited to finally share with you this crochet ribbed hat – a match to the Sassy Autumn Cowl and now the Sassy Autumn Scarf (an even warmer edition to the series)! So many of you have requested additional patterns to make a set and I am hoping to add a couple of additional items as well.


I can’t believe how long it has taken me to finally finish it! This design has been in my mind for years and it kept changing into different iterations. First it was going to be worked from the bottom up for a slouchy style hat, then it was going to be worked side to side in an easy rectangle but finally I decided it needed to be a top down beanie with a unique flap to show off the decorative button. Because you know it needed to showcase a big beautiful button just like the original Sassy Autumn Cowl!
The ribbed texture for both the Sassy Autumn Cowl and the crocheted beanie pattern is created with front and back post double crochet stitches. I love this stitch so much I also used it for my Aurora Skies Baby Blanket. Such an easy stitch that has a ton of texture!
I really do love how this crochet ribbed beanie design turned out! It fits so well and is so stretchy and comfortable to wear. So warm, too!

Crochet Ribbed Hat Design Details
This easy crochet hat pattern is worked from the top down working increases for several rounds. This is going to be the trickiest bit of the hat pattern as we have to work the increases evenly around while still trying to keep the back and front post stitch pattern throughout.
Once you get to the main body of the hat it is really smooth sailing. For several rounds you will be working front and back post stitches without increases – really easy. These rounds will be turned so that the stitches will look the same throughout the rest of the hat.
The flap section is created by working additional chains at the beginning of a row and you will no longer be joining at the end of each round. Instead, we begin working turned rows throughout the remainder of the hat.

Once you have finished, you will pull the flap down slightly, sew in place and then add a fun decorative large button to the flap section of your hat.
The Sassy Autumn Cowl was designed with Lion Brand Mandala* which is a light DK #3 weight ombre self-striping yarn which I love. However, in a smaller design using up so much less yardage I really wanted to find another yarn where you could really get the ombre color-changing effect. So, I chose to use Lion Brand’s Ferris Wheel for the hat instead. The gauge is actually quite similar to the Mandala but I really love how it turned out in the Ferris Wheel. I may even make a new sample of the cowl in it as well!
*This post contains affiliate links. You can click on any yarn or material highlighted to purchase. I will receive a small commission if you purchase but it won’t cost you any extra! As an Amazon Associate I earn from qualifying purchases.
I am so super excited that this pattern is part of the 2023 Scarf and Hat of the Month CAL with The Stitchin Mommy and Oombawka Design Crochet. Each month three hat patterns are released at once and you get can get the patterns on each designer’s blog!
The free crochet pattern is available free below and you can get the other two scarf patterns from the CAL at the following links:
Cozy and Quick Chunky Crochet Hat by Oombawka Design Crochet
The Cerise Beanie by The Stitchin’ Mommy
This crochet ribbed hat pattern is also available as an ad-free, printable PDF! You can purchase the individual pattern, or if you love PDFs, you might want to check out my Lifetime Membership. It’s an awesome deal! Never pay for one of my PDFs again!! (Or, scroll down for the free version!)
I have included several stitch diagrams in the ad-free PDF as well! Each section of the hat has its own diagram for stitching ease.

Purchase the ad-free pdf of the Autumn Sassy Hat pattern for a small fee. Thank you so much for supporting my work!

If you would like daily crochet inspiration be sure to follow me on Facebook, Instagram, Pinterest, YouTube, Twitter and Tumblr!
To get notified of my free crochet patterns and future giveaways, sign up for my newsletter. I never share or sell your information to third parties — it stays private!
You may also like the following free crochet hat patterns by Nana’s Crafty Home:


- 1. Just Peachy Hat free crochet pattern
- 2. Remember Me Crochet Beanie free pattern
- 3. Ferris Wheel Granny Square Hat free crochet pattern

Sassy Autumn Hat crochet pattern instructions
Pattern written in US crochet terminology
Supplies:
Lion Brand Ferris Wheel, Weight 4/Medium (100% acrylic) 3 oz / 270 yards
- Buttercup 3 oz / 270 yards
Crochet hook size H (5.0 mm)
Large 2” decorative button
Stitch marker
Scissors
Tapestry Needle
Approximate finished size:
- Adult Small: 8” height x 9” width
- Adult Medium: 8” height x 10” width
Gauge: first 5 rounds of hat = 4”
Abbreviations:
- MC = magic circle
- ch(s) = chain(s)
- RS = right side
- dc = double crochet
- st(s) = stitch(es)
- FPdc = front post double crochet (see special stitches section below)
- BPdc = back post double crochet (see special stitches section below)
- sl st = slip stitch
- yo = yarn over
- sp = space
- hdc = half double crochet
- Rnd = round
Special Stitches:
FPdc (front post double crochet stitch): yo and insert your hook from front to back to front around the dc stitch post from the row below, yo, pull up a loop (3 loops on hook), yo, pull through 2 loops, yo, pull through remaining 2 loops.
BPdc (back post double crochet stitch): yo and insert your hook from back to front to back around the dc stitch post indicated from the row below, yo, pull up a loop (3 loops on hook), yo, pull through 2 loops, yo, pull through remaining 2 loops.
Pattern Notes:
- Hat is worked top down.
- Crown is worked in non-turning rounds.
- Main body of hat is worked in turned rounds to flap section.
- Ch-2 at beginning of round does not count as a stitch through main body of hat.
- Ch-2 at beginning of rows does count as a stitch through flap section of hat to end.
- Stitch and row counts are listed according to size adult small (adult medium).
- Stitch count remains the same unless otherwise stated.
Pattern Instructions
Crown
Make a MC. Alternatively, ch 4, sl st in first ch to form a ring.
Rnd 1: (RS) ch 3 (counts as first st), 11 dc in MC or ring, sl st in first st. (12)
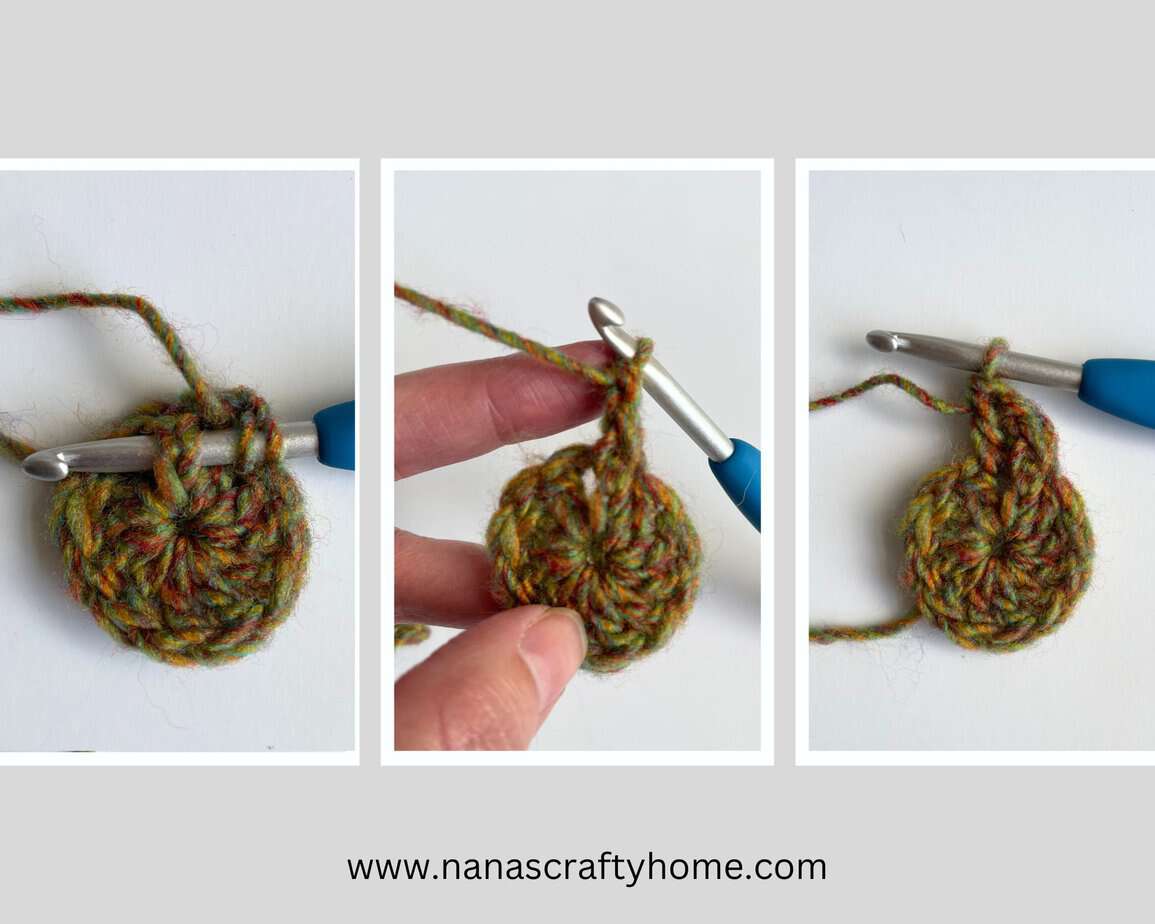
Rnd 2: Ch 2 (does not count as a st), FPdc in st below ch-2 (ch-3 from previous round), *dc in sp between dc sts from previous round, FPdc in next st,* repeat from * to * to end, dc in sp before ch-3 from previous round, sl st in first st. (24)
Rnd 3: Ch 2, *2 FPdc in FPdc st from previous round, BPdc in next st,* repeat from * to * around, sl st in first st. (36)
Rnd 4: Ch 2, *FPdc, dc between FPdc sts from previous round, FPdc in next st, BPdc in next st,* repeat from * to * around, sl st in first st. (48)
Rnd 5: Ch 2, *2 FPdc in FPdc st from previous round, BPdc in next st, FPdc in next st, BPdc in next st,* repeat from * to * around, sl st in first st. (60)
Rnd 6: Ch 2, *FPdc in FPdc st from previous round, dc between FPdc sts from previous round, (FPdc in next st, BPdc in next st) twice, repeat from * to * around, sl st in first st. (72)
Stop here if making the Adult small size and advance to main body of hat instructions.
Adult Medium: Round 7: Ch 2, *3 FPdc in FPdc st from previous round, (BPdc in next st, FPdc in next st) x 5, BPdc,* repeat from * to * around, sl st in first st. (84) Advance to main body of hat instructions.
Main Body
Due to pattern, round numbers will restart at 1.
Rnd 1 (all sizes): Ch 2, *FPdc in FPdc st from previous round, BPdc in next st,* repeat from * to * around, sl st in first st. Turn. 72 (84)
Note: I find it helpful to place in st marker in this round for round counting ease.
Rnd 2 – 7: Repeat round 1.
Flap
Rnd 8: Ch 12, dc in third ch from hook (skipped chs count as first st) and in each ch, *FPdc in FPdc st from previous round, BPdc in next st,* repeat from * to * around, sl st in first FPdc st of round. Turn. 83 (95)
Row 9: Ch 2 (counts as first st), *FPdc in FPdc st from previous round, BPdc in next st,* repeat from * to * to skipped chs from beginning, hdc in top of ch-2. Turn. 84 (96)
Note: Remainder of hat is worked in turned rows without joining.
Row 10: Ch 2, *FPdc in FPdc st from previous round, BPdc in next st,* repeat from * to * to last st, hdc in last st. Turn.
Rows 11 – 19: Repeat row 10.
Fasten off, weave in ends.

With a long length of yarn on needle, pull flap down slightly, place last round of hat under flap, sew flap over bottom edge.
With a long length of yarn, sew decorative button on flap where desired.
There you have it, a sassy crochet hat pattern that’ll keep you stylish and cozy throughout the autumn season. Whether you’re heading to a pumpkin patch, sipping apple cider at a bonfire, or simply strolling through the fallen leaves, this hat will be your perfect companion.
Remember, crochet is all about creativity, so feel free to add your personal touch! Add a pom-pom, add a tag or attach a super funky button to your Sassy Autumn Hat!
Copyright 2023 Tonya Bush / Nana’s Crafty Home, LLC.
Social Media links:
Facebook: https://www.facebook.com/nanascraftyhome
Instagram: https://www.instagram.com/nanascraftyhome/
Pinterest: https://www.pinterest.com/nanascraftyhome/
YouTube: https://www.youtube.com/c/TonyaBush
Twitter: https://twitter.com/nanascraftyhome
Facebook Group: https://www.facebook.com/groups/829792060522798
Sign up for my Newsletter: https://nanascraftyhome.com/sign-up-for-my-free-newsletter/

 Hi! Thank you so much for being here! I am Tonya the designer behind Nana's Crafty Home. As a wife, mother, Nana of 9 & with 2 fur babies, my days are filled with love, laughter, hugs and yarn! Here you will find colorful and creative crochet designs for yourself or loved ones. My hope is that you will be inspired to learn and create along with me!