This ladybug crochet pattern is a free c2c baby lovey blanket crochet pattern by Nana’s Crafty Home!

My new granddaughter loves my Bee C2C Baby Lovey and I knew a ladybug would make another great baby lovey blanket. Since loveys are smaller than a baby sized blanket they are perfect for little hands and as a constant companion. The perfect combo of toy and blanket in one project. And ladybugs are just so cute, too!
Just like the Bee C2C Lovey, this ladybug pattern begins with a simple corner to corner blanket! Works up so quickly and a great introduction to c2c if you are a newbie to this great crochet stitch.
Ladybug Crochet Pattern Details
The crochet ladybug blanket pattern is worked in a mini (hdc) c2c (corner to corner) crochet technique. If you wanted a larger blanket you could use the standard dc (double crochet) c2c technique if desired.
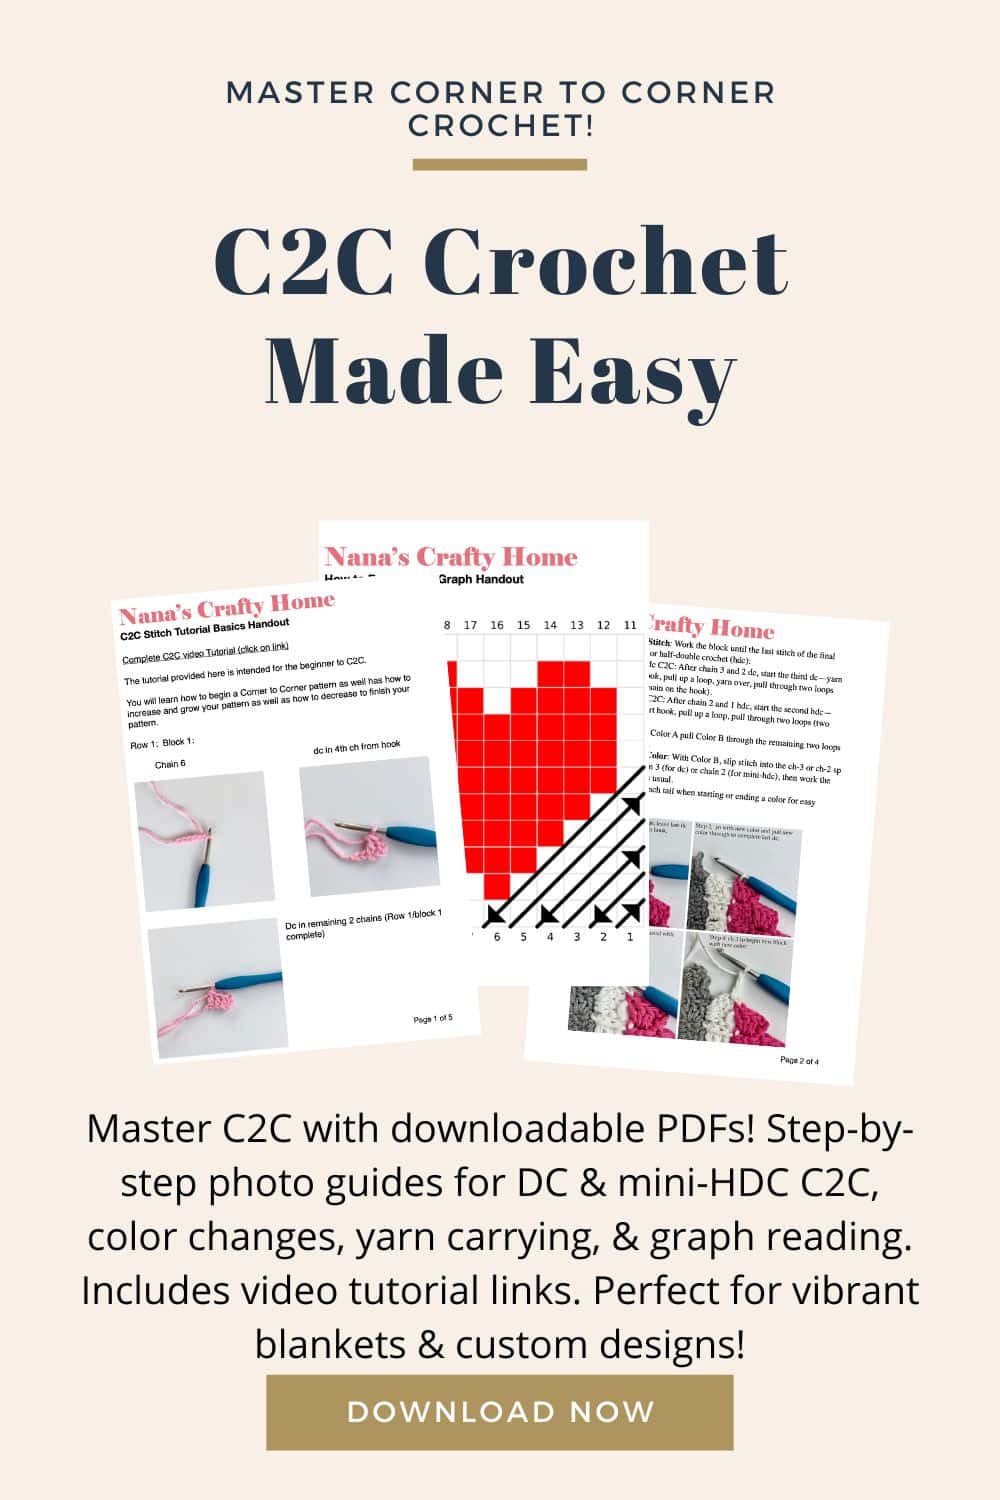
Ready to dig deeper into corner to corner crochet and master this versatile technique? Our Ultimate Guide to C2C Crochet: Techniques and Tips is the foundational c2c resource on the blog, packed with everything beginners and for those that need a c2c refresher! From standard DC and mini-HDC C2C basics to seamless color changes, efficient yarn carrying, custom graph design with Stitch Fiddle, and troubleshooting common issues, this comprehensive C2C crochet guide includes step-by-step tutorials, video links, and free pattern ideas to get you started. Whether you’re tackling your first C2C project or refining your skills, head over to the guide now for all the FREE essential C2C crochet tips and resources in one place!
Elevate your C2C crochet skills with our C2C Crochet PDF Tutorial Bundle! This handy guide is a must-have for crocheters wanting to create stunning blankets and custom designs with ease. Packed with step-by-step photo tutorials for standard DC, mini-HDC, color changes, yarn carrying, graph reading, and making a rectangle shape in c2c, plus links to helpful videos, it’s perfect for beginners. Save time, avoid mistakes, and unlock your creativity—grab your downloadable PDFs now and start crocheting pixel-perfect projects! Includes beginner-friendly patterns to practice your new skills!
And, if you something other than a corner to corner blanket you can use my tutorial to convert this c2c graph into a single crochet tapestry project instead.
The lady bug’s head and antenna are made with beginner-friendly single crochet stitches. The antenna and head are stuffed after you add the eyes and embroider the smile on to the face. You could certainly embroider the eyes if you would prefer.
And, no need to make wings for our ladybug since the blanket are his wings! Which means this project works up even more quickly than the bee! Great for a last minute baby gift.

I never enjoy working with black yarn especially with the smaller single crochet stitches so make sure you are working in a well lighted area. I would recommend using an amazing Crochet Lite Hook* or I love my Neck Light which is even great for reading in a dim corner in the evening.
I used Red Heart’s With Love* yarn which is a medium worsted weight #4 yarn. However, you could certainly use any yarn you have on hand. I think it would be great in blanket yarn, too – so squishy!
*This post contains affiliate links. You can click on any yarn or material highlighted to purchase. I will receive a small commission if you purchase but it won’t cost you any extra! As an Amazon Associate I earn from qualifying purchases.
This crochet ladybug C2C Lovey pattern is also available as an ad-free, printable PDF! You can purchase the individual pattern, or if you love PDFs, you might want to check out my Lifetime Membership. It’s an awesome deal! Never pay for one of my PDFs again!! (Or, scroll down for the free version!)

Purchase the ad-free pdf of the ladybug blanket lovey crochet pattern for a small fee. Thank you so much for supporting my work!
If you would like daily crochet inspiration be sure to follow me on Facebook, Instagram, Pinterest, YouTube, Twitter and Tumblr!
To get notified of my free crochet patterns and future giveaways, sign up for my newsletters. I never share or sell your information to third parties — it stays private!
You may also like the following free crochet patterns by Nana’s Crafty Home:


- 1. Bee C2C Lovey free crochet pattern
- 2. Bunny C2C Blanket free crochet pattern
- 3. Panda Bear C2C Blanket free crochet pattern

Ladybug Crochet Pattern C2C Lovey Blanket free crochet pattern
Pattern written in US crochet terminology
Supplies:
- Red Heart With Love Weight 4/Medium (100% acrylic) 7 oz / 370 yds
- Holly Berry 3.1 oz / 165 yards (r) Red
- Black 4 oz / 211 yards (b) Black
- White 0.1 oz / 6 yards (w) White
Size I (5.5 mm) crochet hook
2 – 8 mm black safety eyes
Polyfil stuffing
Tapestry needle
Stitch Marker
Scissors
Approximate finished size of blanket: 16” x 16”
Gauge: 7.5 blocks = 4”
Abbreviations:
r = red
b = black
w = white
MC = magic circle
RS = right side
WS = wrong side
hdc = half double crochet
ch = chain
sc = single crochet
sc2tog = single crochet 2 stitches together (see special stitches section below)
sl st = slip stitch
st(s) = stitch(es)
Special Stitches:
sc2tog = (insert hook into next st, yo and pull up a loop) twice, yo and pull through all 3 loops on hook.
Pattern Notes:
- Blanket Lovey portion of the pattern is worked in Mini Half Double Crochet (hdc) Corner to Corner (C2C) Crochet technique. Written row by row instructions follow with color pixel graph at bottom of post.
- Head is worked in continuous rounds, do not join, instead use a stitch marker to mark the first stitch of each round.
- Same crochet hook size used throughout pattern.
Recommended Tutorials:
Mini (hdc) C2C crochet technique
Pattern Instructions
Starting & Increase Block: Ch 4, hdc in third ch from hook and last ch (skipped chs counts as ch-2 sp).
Continuing block: sl st to ch-2 sp of next block, ch 2, work 2 hdc in same ch-2 sp as sl st.
Decrease: Sl st in top 2 sts of last block worked on previous row, sl st in ch-2 sp of next block and finish continuing blocks, stop working continuing blocks once you have reached the sl st edge.
Row 1: Work Starting Block
Row 2: Work 1 Increasing Block, work 1 Continuing Block.
Row 3: Work 1 Increasing Block, work Continuing Blocks across all blocks.
Repeat Row 3 to desired width.
To Stop Increasing: Work Decrease, work Continuing Blocks across all blocks.
To create a square: Work Decrease at beginning of each row, work Continuing Blocks across all blocks.
Blanket
← Row 1 [RS]: r1 (1 square)
→ Row 2 [WS]: r2 (2 squares)
← Row 3 [RS]: r3 (3 squares)
→ Row 4 [WS]: r1, b2, r1 (4 squares)
← Row 5 [RS]: r1, b3, r1 (5 squares)
→ Row 6 [WS]: r1, b4, r1 (6 squares)
← Row 7 [RS]: r2, b3, r2 (7 squares)
→ Row 8 [WS]: r2, b4, r2 (8 squares)
← Row 9 [RS]: r3, b3, r3 (9 squares)
→ Row 10 [WS]: r4, b2, r4 (10 squares)
← Row 11 [RS]: r11 (11 squares)
→ Row 12 [WS]: r12 (12 squares)
← Row 13 [RS]: b1, r12 (13 squares)
→ Row 14 [WS]: r12, b2 (14 squares)
← Row 15 [RS]: b2, r5, b2, r6 (15 squares)
→ Row 16 [WS]: r6, b3, r4, b3 (16 squares)
← Row 17 [RS]: b3, r4, b4, r6 (17 squares)
→ Row 18 [WS]: b1, r5, b5, r4, b3 (18 squares)
← Row 19 [RS]: b3, r4, b6, r4, b2 (19 squares)
→ Row 20 [WS]: b2, r5, b5, r5, b2, r1 (20 squares)
← Row 21 [RS]: r8, b6, r4, b3 (21 squares)
→ Row 22 [WS]: b3, r5, b5, r9 (22 squares)
← Row 23 [RS]: r10, b4, r6, b3 (23 squares)
→ Row 24 [WS]: r1, b2, r7, b3, r11 (24 squares)
← Row 25 [RS]: b3, r9, b2, r11 (25 squares)
→ Row 26 [WS]: r22, b4 (26 squares)
← Row 27 [RS]: b5, r22 (27 squares)
→ Row 28 [WS]: r22, b6 (28 squares)
← Row 29 [RS]: b29 (29 squares)
→ Row 30 [WS]: b30 (30 squares)
Corner (begin decreasing)
← Row 31 [RS]: b29 (29 squares)
→ Row 32 [WS]: r22, b6 (28 squares)
← Row 33 [RS]: b5, r22 (27 squares)
→ Row 34 [WS]: r22, b4 (26 squares)
← Row 35 [RS]: b3, r9, b2, r8, b2, r1 (25 squares)
→ Row 36 [WS]: b3, r7, b3, r11 (24 squares)
← Row 37 [RS]: r10, b4, r6, b3 (23 squares)
→ Row 38 [WS]: b3, r5, b5, r9 (22 squares)
← Row 39 [RS]: r8, b6, r4, b3 (21 squares)
→ Row 40 [WS]: b2, r5, b5, r5, b2, r1 (20 squares)
← Row 41 [RS]: b3, r4, b6, r4, b2 (19 squares)
→ Row 42 [WS]: b1, r5, b5, r4, b3 (18 squares)
← Row 43 [RS]: b3, r4, b4, r6 (17 squares)
→ Row 44 [WS]: r6, b3, r4, b3 (16 squares)
← Row 45 [RS]: b2, r5, b2, r6 (15 squares)
→ Row 46 [WS]: r12, b2 (14 squares)
← Row 47 [RS]: b1, r12 (13 squares)
→ Row 48 [WS]: r12 (12 squares)
← Row 49 [RS]: r11 (11 squares)
→ Row 50 [WS]: r4, b2, r4 (10 squares)
← Row 51 [RS]: r3, b3, r3 (9 squares)
→ Row 52 [WS]: r2, b4, r2 (8 squares)
← Row 53 [RS]: r2, b3, r2 (7 squares)
→ Row 54 [WS]: r1, b4, r1 (6 squares)
← Row 55 [RS]: r1, b3, r1 (5 squares)
→ Row 56 [WS]: r1, b2, r1 (4 squares)
← Row 57 [RS]: r3 (3 squares)
→ Row 58 [WS]: r2 (2 squares)
← Row 59 [RS]: r1 (1 square)


Antenna (make 2)
With Black, make MC.
Round 1: (RS) ch 1, 6 sc in MC. (6)
Round 2: 2 sc in each st. (12)
Round 3: sc2tog around. (6)
Round 4: sc2tog, 1 sc in next st, sc2tog, 1 sc in next st. (4)
Stuff ball of antenna.
Round 5 – 7: 1 sc in each st. (4)
Fasten off, leaving a long tail for sewing. Weave in remaining end.
Eyes (make 2)
With white, make MC.
Round 1: ch 1, 6 sc in MC, sl st to first st. (6)
Fasten off, leaving a long tail for sewing. Weave in remaining end.
Ladybug Head
With black, make MC.
Round 1: (RS) ch 1, 6 sc in MC. (6)
Round 2: 2 sc in each st. (12)
Round 3: *2 sc in next st, 1 sc in next st,* repeat from * to * to end. (18)
Round 4: 1 sc in next st, 2 sc in next st, *1 sc in next 2 sts, 2 sc in next st* repeat from * to * to last st, 1 sc in last st. (24)
Round 5: *2 sc in next st, 1 sc in next 3 sts,* repeat from * to * to end. (30)
Round 6: 1 sc in next 2 sts, 2 sc in next st, *1 sc in next 4 sts, 2 sc in next st,* repeat from * to * to last 2 sts, 1 sc in last 2 sts. (36)
Round 7: *2 sc in next st, 1 sc in next 5 sts,* repeat from * to * to end. (42)
Round 8: 1 sc in next 3 sts, 2 sc in next st, *1 sc in next 6 sts, 2 sc in next st,* repeat from * to * to last 3 sts, 1 sc in last 3 sts. (48)
Round 9: *2 sc in next st, 1 sc in next 7 sts,* repeat from * to * to end. (54)
Round 10 – 19: 1 sc in each st. (54)
Round 20: *sc2tog, 1 sc in next 7 sts,* repeat from * to * to end. (48)
Round 21: 1 sc in next 3 sts, sc2tog, *1 sc in next 6 sts, sc2tog,* repeat from * to * to last 3 sts, 1 sc in last 3 sts. (42)
Round 22: *sc2tog, 1 sc in next 5 sts,* repeat from * to * to end. (36)
Round 23: 1 sc in next 2 sts, sc2tog, *1 sc in next 4 sts, sc2tog,* repeat from * to * to last 2 sts, 1 sc in last 2 sts. (30)
Round 24: *sc2tog, 1 sc in next 3 sts,* repeat from * to * to end. (24)
Round 25: 1 sc in next st, sc2tog, *1 sc in next 2 sts, sc2tog,* repeat from * to * to last st, 1 sc in last st. (18)
Place safety eyes in middle of eye and then sew eyes approximately 1” apart between rounds 15-16, embroider smile with white, sew both antenna to top of head approximately 3” apart at round 7 and begin to stuff head with polyfil stuffing.
Note about photo below: I decided to embroider a smile after I had already stuffed and sewn the head shut. It will be much easier to add before stuffing!


Round 26: *sc2tog, 1 sc in next st,* repeat from * to * to end. (12)
Round 27: sc2tog around. (6)
Round 28: sc2tog around. (3)
Fasten off, leaving a long tail for sewing.
Stuff remainder of head and then sew opening closed with long tail.
With long tail, sew head to corner of blanket at approximately row 30.
Weave in remaining ends.
Copyright 2022 Tonya Bush/Nana’s Crafty Home
Social Media links:
Facebook: https://www.facebook.com/nanascraftyhome
Instagram: https://www.instagram.com/nanascraftyhome/
Pinterest: https://www.pinterest.com/nanascraftyhome/
YouTube: https://www.youtube.com/c/TonyaBush
Twitter: https://twitter.com/nanascraftyhome
Facebook Group: https://www.facebook.com/groups/829792060522798
Sign up for my Newsletter: https://nanascraftyhome.com/sign-up-for-my-free-newsletter/

 Hi! Thank you so much for being here! I am Tonya the designer behind Nana's Crafty Home. As a wife, mother, Nana of 9 & with 2 fur babies, my days are filled with love, laughter, hugs and yarn! Here you will find colorful and creative crochet designs for yourself or loved ones. My hope is that you will be inspired to learn and create along with me!