A crochet rectangle shawl that would be the perfect addition to your fall wardrobe!
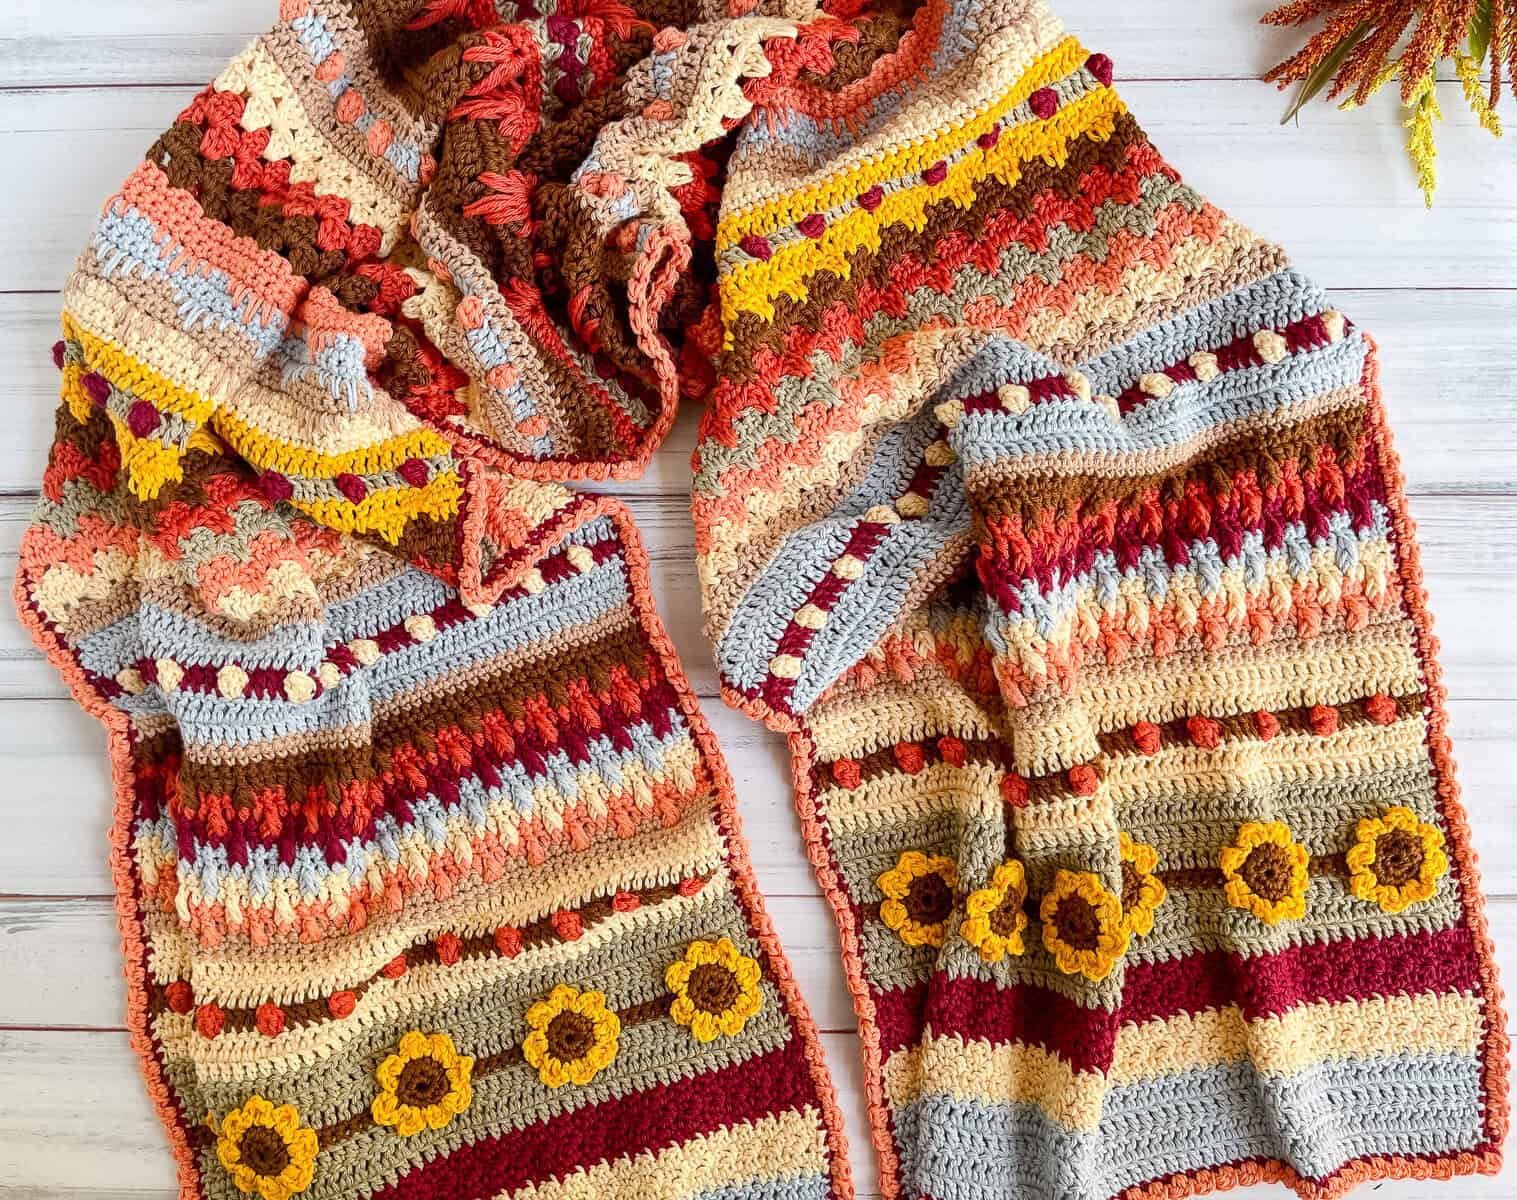
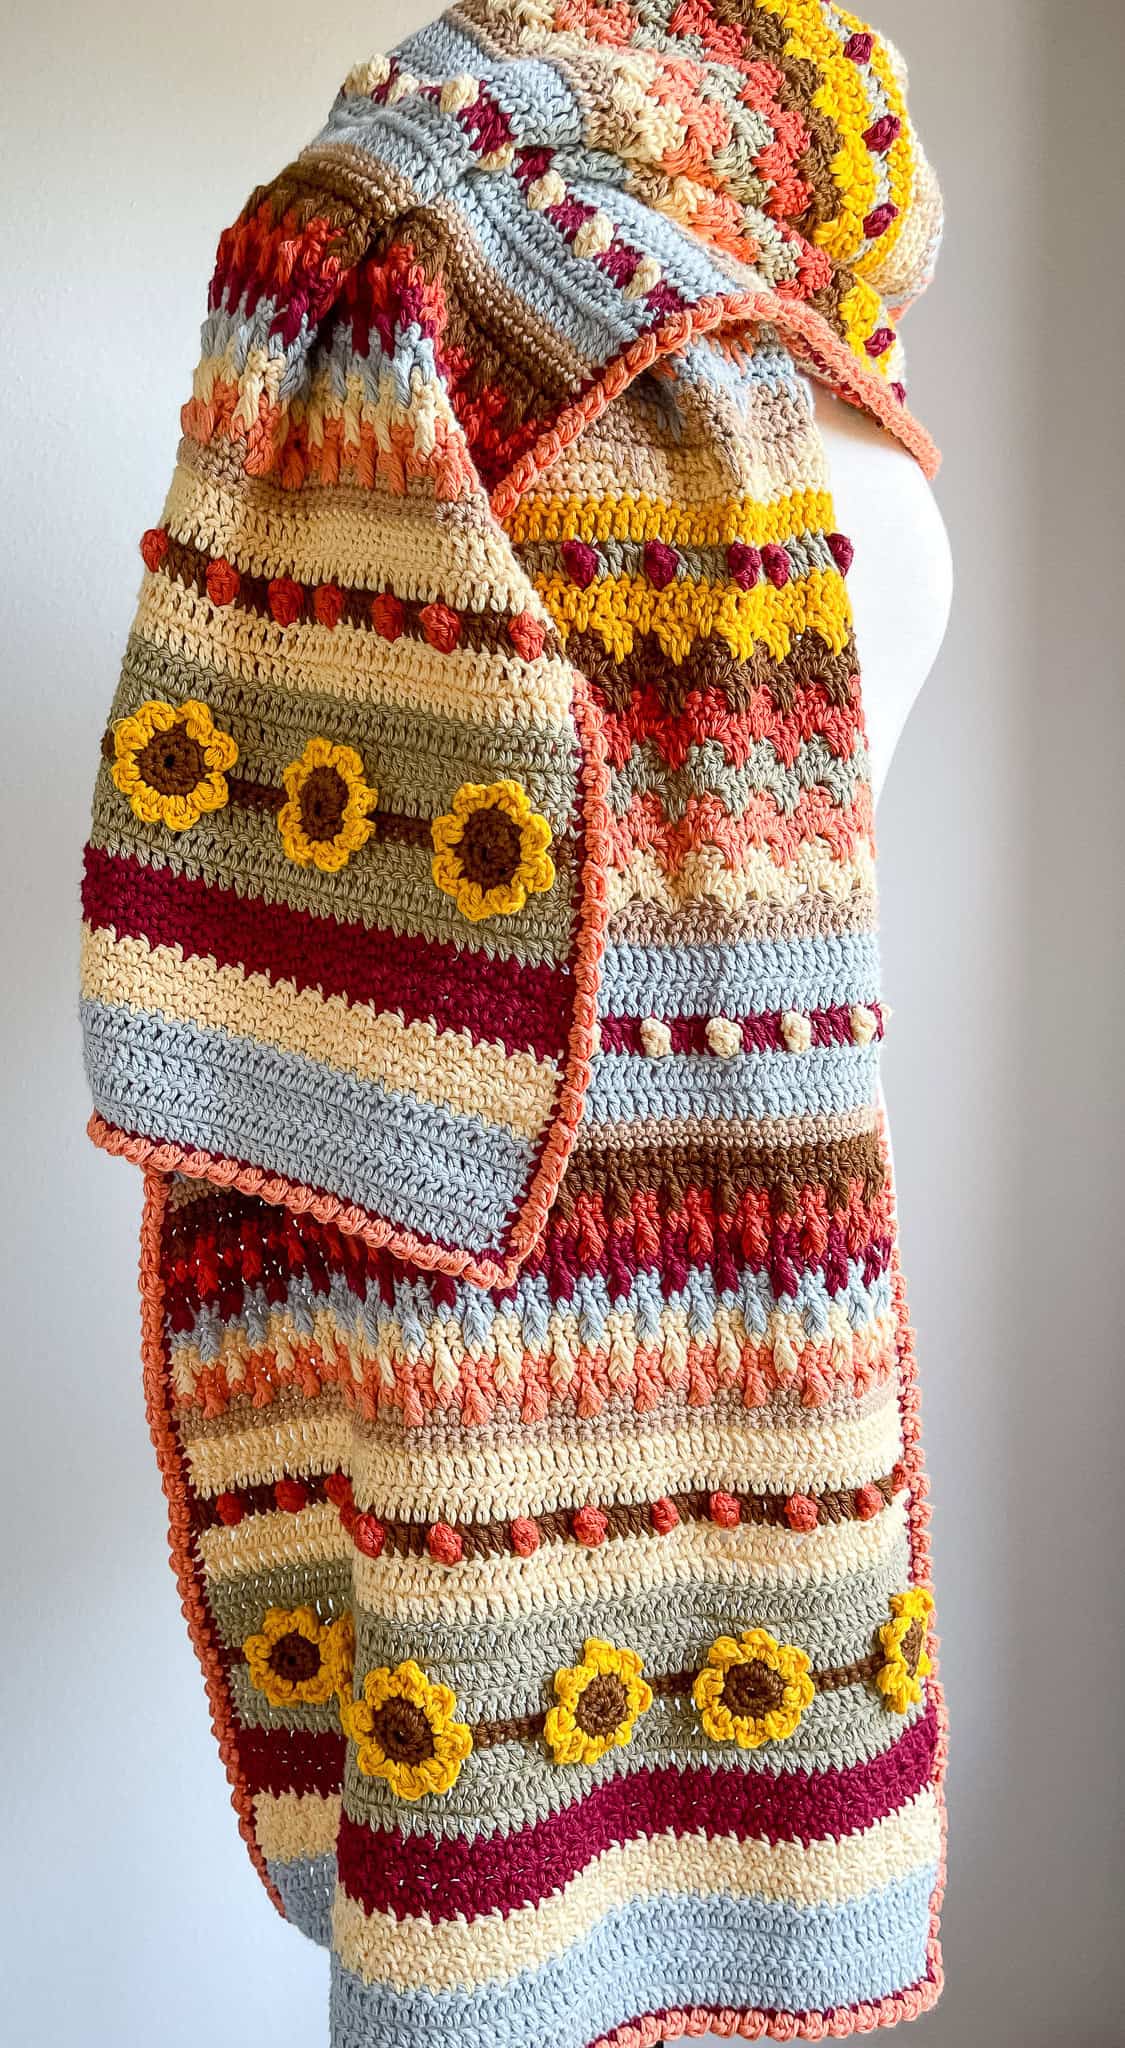
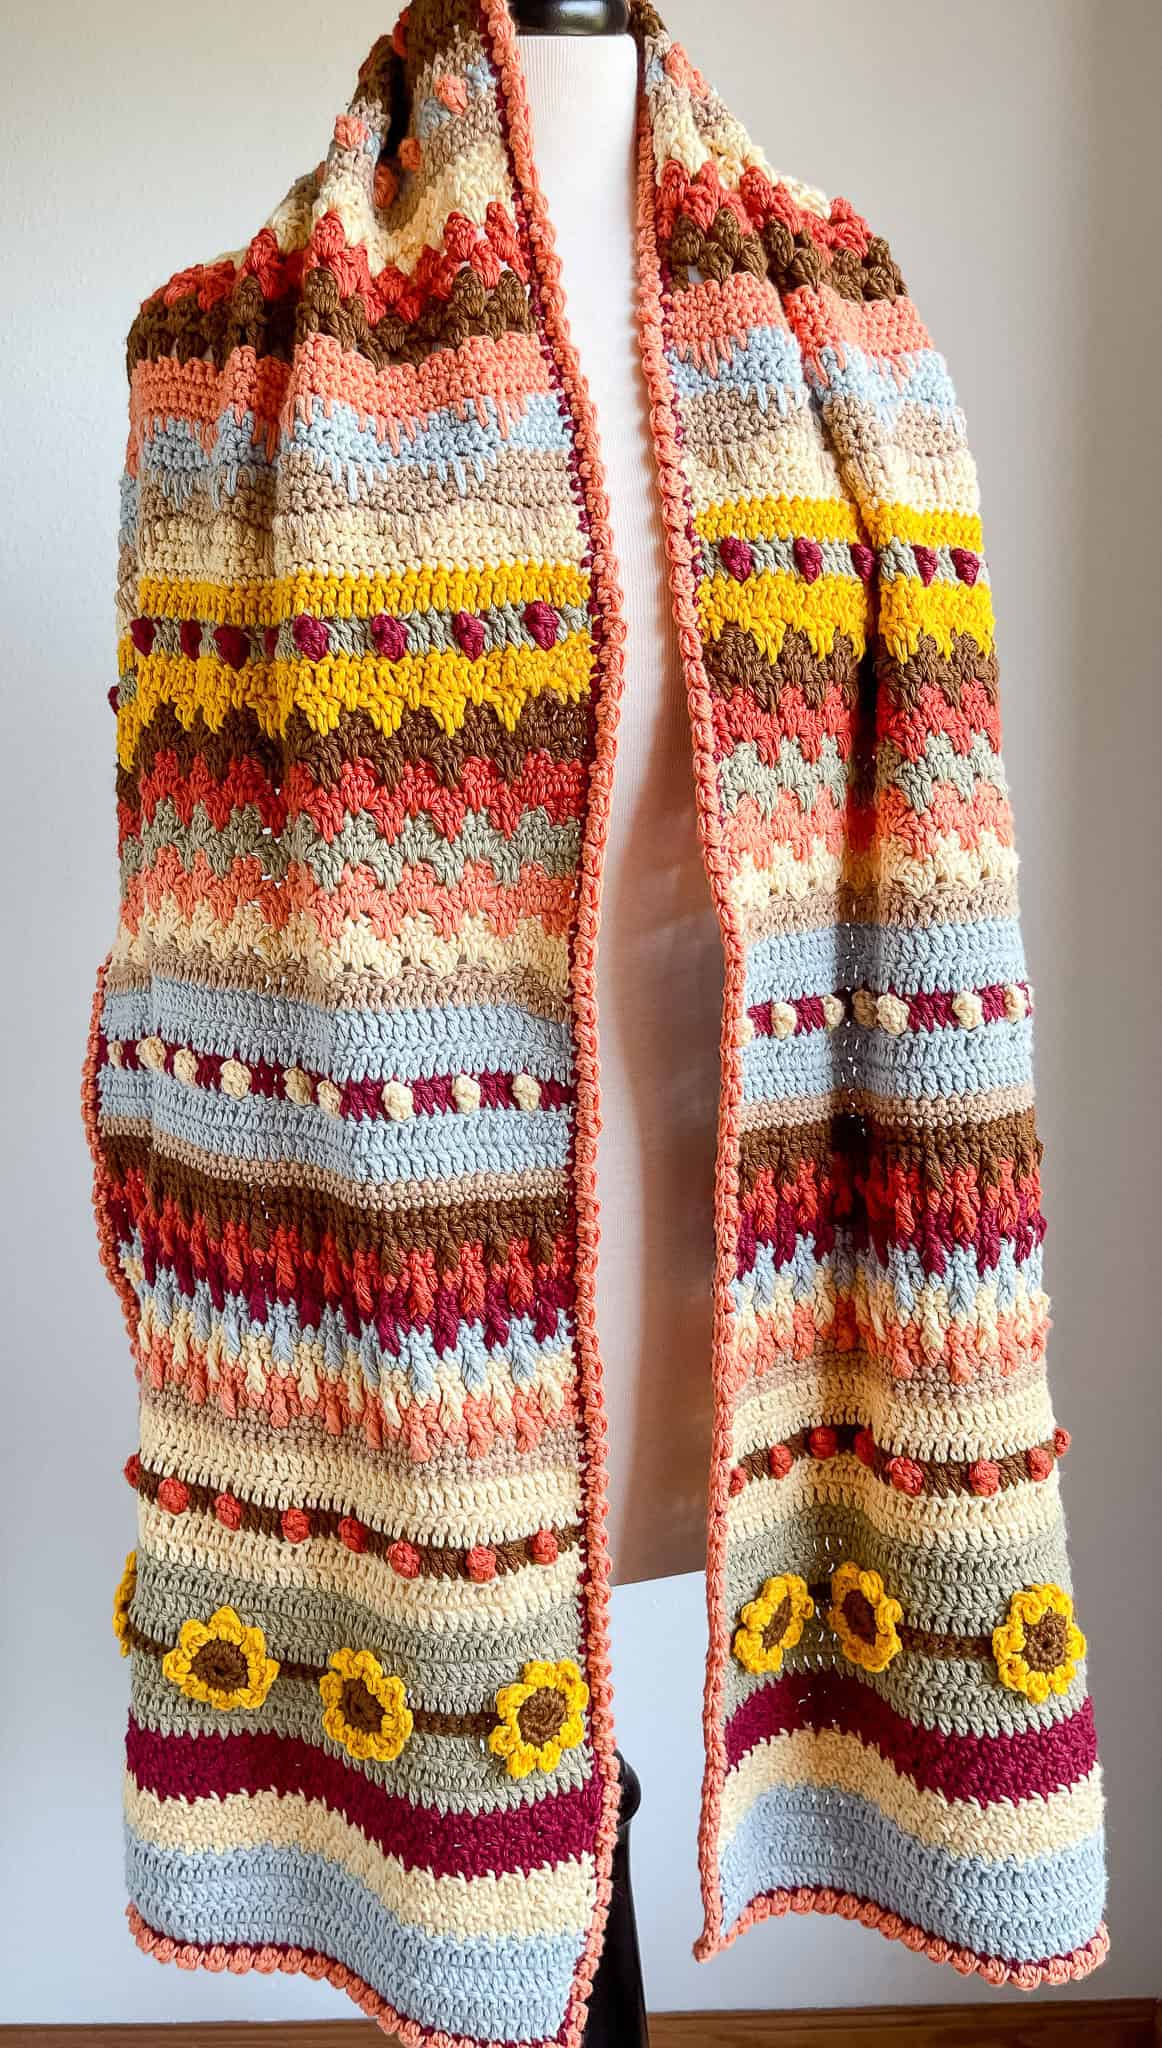
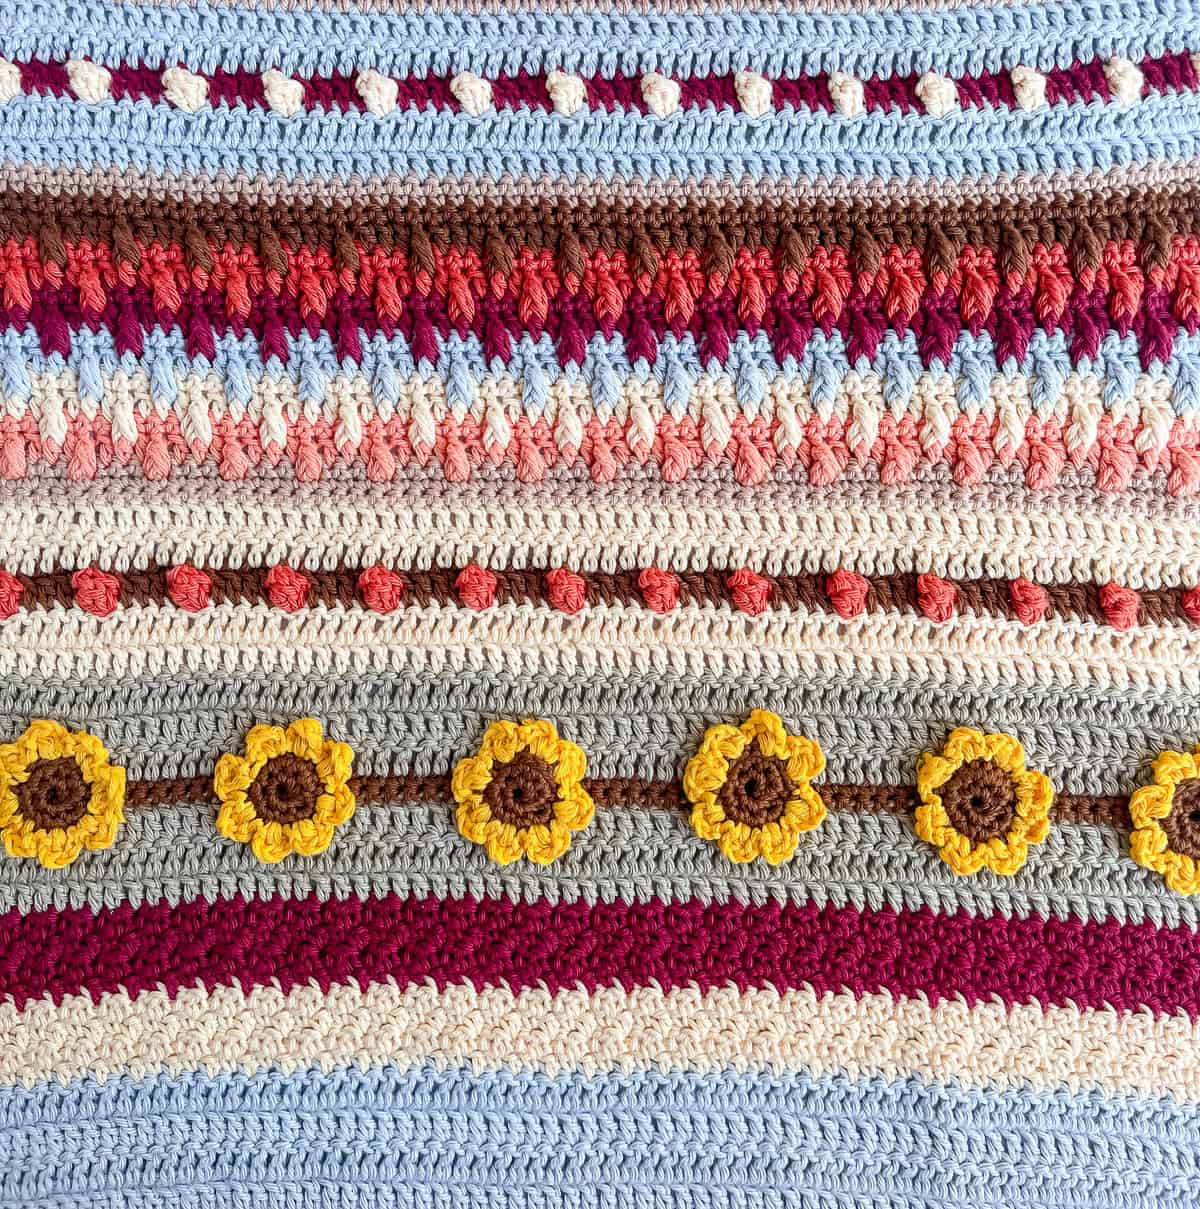
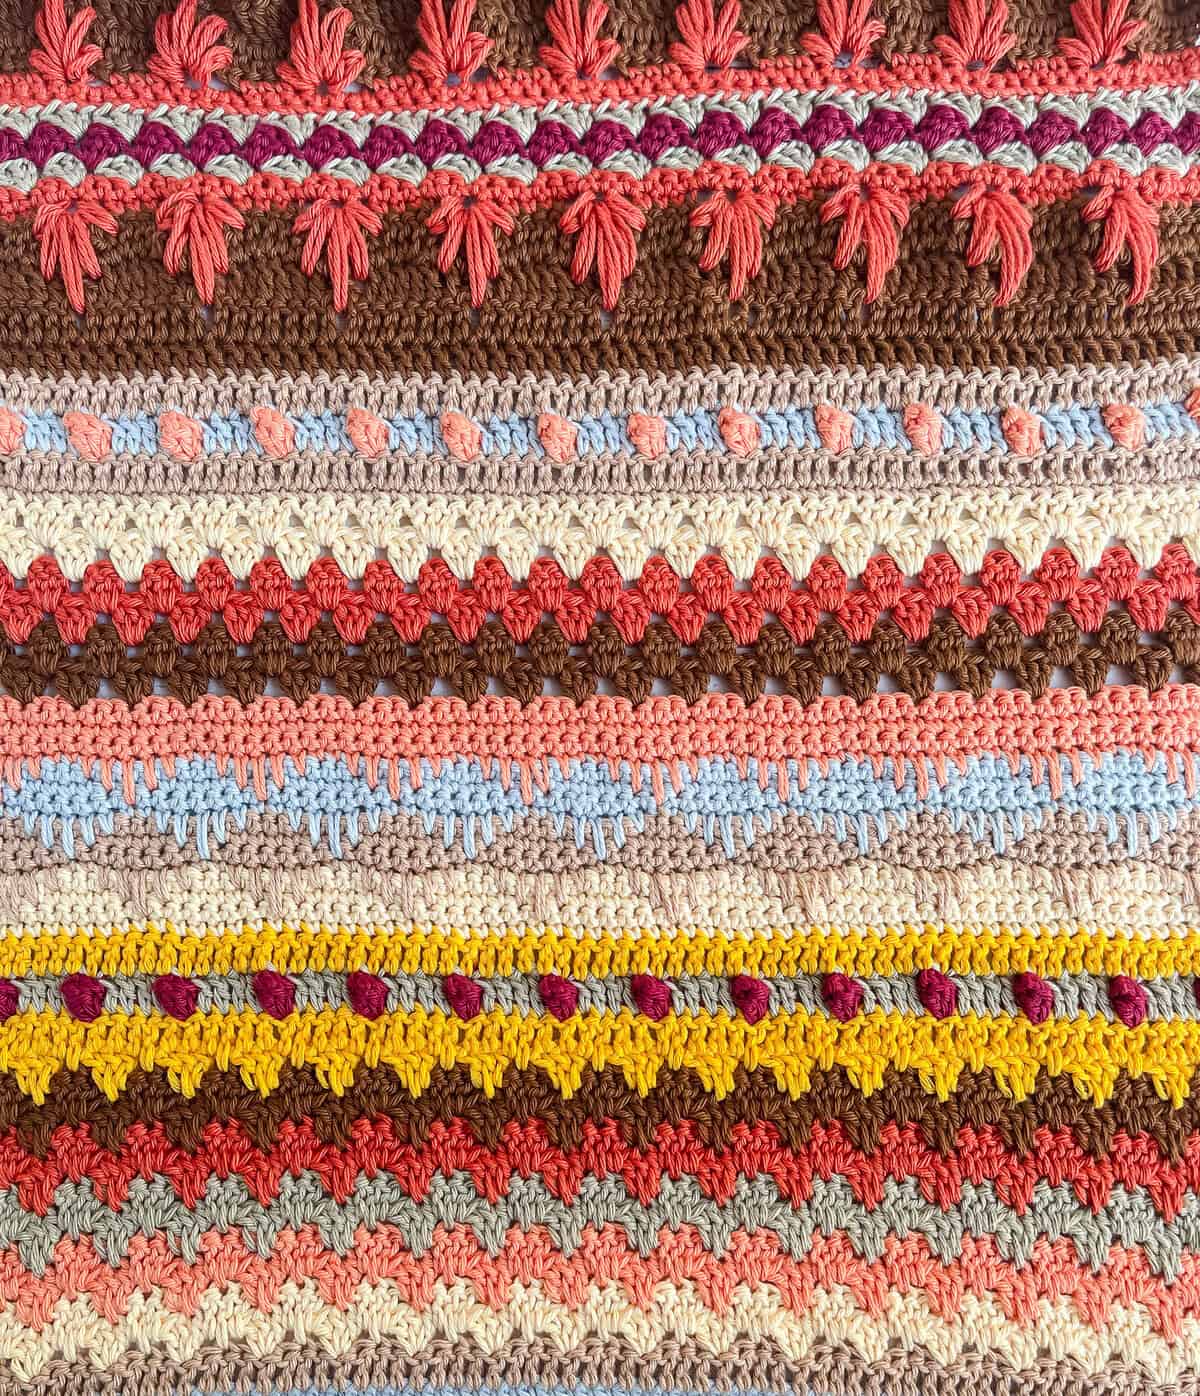
The Autumn Rhapsody Shawl is a richly textured, fall-themed rectangle crochet shawl, perfect for adding a warm, seasonal touch to any outfit. Inspired by the vibrant colors of autumn leaves and cozy evenings, this shawl blends various textured crochet stitches to create a visually stunning piece.
Designed with versatility in mind, the Autumn Rhapsody Shawl can be used as a stylish wrap to keep you warm on chilly days or even as a decorative table runner! The intricate stitch work, including bobbles, stripes, and sunflower motifs together add depth and dimension, making it a fun project to work on!
This stitch sampler style shawl pattern will be released as a free crochet pattern in 3 parts in a crochet-along (CAL) format, making it perfect for you to follow along, enjoy the creative process together, and celebrate the beauty of fall. Whether draped over your shoulders or draped on a table for a bright cheerful piece of fall décor, the Autumn Rhapsody Shawl is sure to become a favorite!
I have really been wanting to revisit my Autumn Rhapsody Blanket pattern which is one of my favorite designs. Several weeks ago I sent out a poll in my weekly newsletter asking if you all would like to see a version of the blanket made into a wearable – it was a resounding yes!
Originally I thought about designing a triangle shawl but didn’t think I would be able to fit enough of the stitches in a cohesive and harmonious way. A rectangle shawl pattern seemed like the answer as it would be the perfect way to get more of the stitches from the blanket incorporated into the final piece. I am in love with how it turned out! This cozy wrap is glorious, colorful and a fantastic scrap busting project! You will definitely stand out from the crowd wearing this show stopper!

Autumn Rhapsody Crochet Rectangle Shawl Pattern Details
For the full written pattern instructions for the Autumn Rhapsody Shawl scroll down below. Part 1 will be releasing soon but I already have the ad-free PDF available for the Autumn Rhapsody Shawl in my shop. The ad-free PDF is also available for FREE to my Lifetime Members as well!
1. The Autumn Rhapsody Shawl pattern will be released in 3 parts:
- Part 1: Now available – scroll down below!
- Part 2: Now available – scroll down below!
- Part 3: Now available – scroll down below!
2. Be sure to bookmark this page as each part will be released here on this post. On the date of release simply scroll down to the bottom of the post for the newest section.
FYI – if you subscribe to my newsletter I will send out an email when each part is available! And, there are lots of other special subscriber-only perks, too!
3. This crochet shawl is approximately 20″ x 73″ which makes it perfect as a long table runner as well. Great if you aren’t a fan of shawls but want to display it as part of your fall home decor!
4. This crochet shawl pattern uses most of the stitches from my Autumn Rhapsody Blanket pattern which means you will be able to use the crochet stitch tutorials I already have available.
Here are all of the stitches (and their tutorials) used in this shawl:
Alternative Turning Chain – Stacked SC Tutorial
Lemon Peel Stitch
Sunflower Stitch – note that the petals are different than tutorial
Falling Leaves Stitch
Granny Spike Stitch
Extreme Drop Leaf Stitch
Popcorn Stitch – changing colors
Single Crochet Spike Stitch
Sedge Stitch
Mattress Stitch Join Tutorial
Bobble Shell Stitch Border
How to Wet Block Tutorial
The only stitch that I didn’t use for this shawl that you find in the blanket is the Mum Stitch. The sunflower stitch is my favorite stitch in the blanket and I wanted both sides of the shawl to be identical. However, you could certainly make one side the sunflower and one side the mum if you wish!
Those of you familiar with the blanket may notice I changed up the petals for the Sunflower stitch. One of the issues with the Sunflower stitch I designed for the blanket is the petals do tend to curl a bit. For the shawl I revised the sunflower petals so they would be easier to tack down when weaving in the ends. There is definitely less need to wet block these petals! I will have a quick video tutorial available for the new sunflower petals when I release Part 1.
Even if you have made the blanket previously I have changed up the placement of the various stitch patterns throughout the shawl so there will still be some mystery for you!
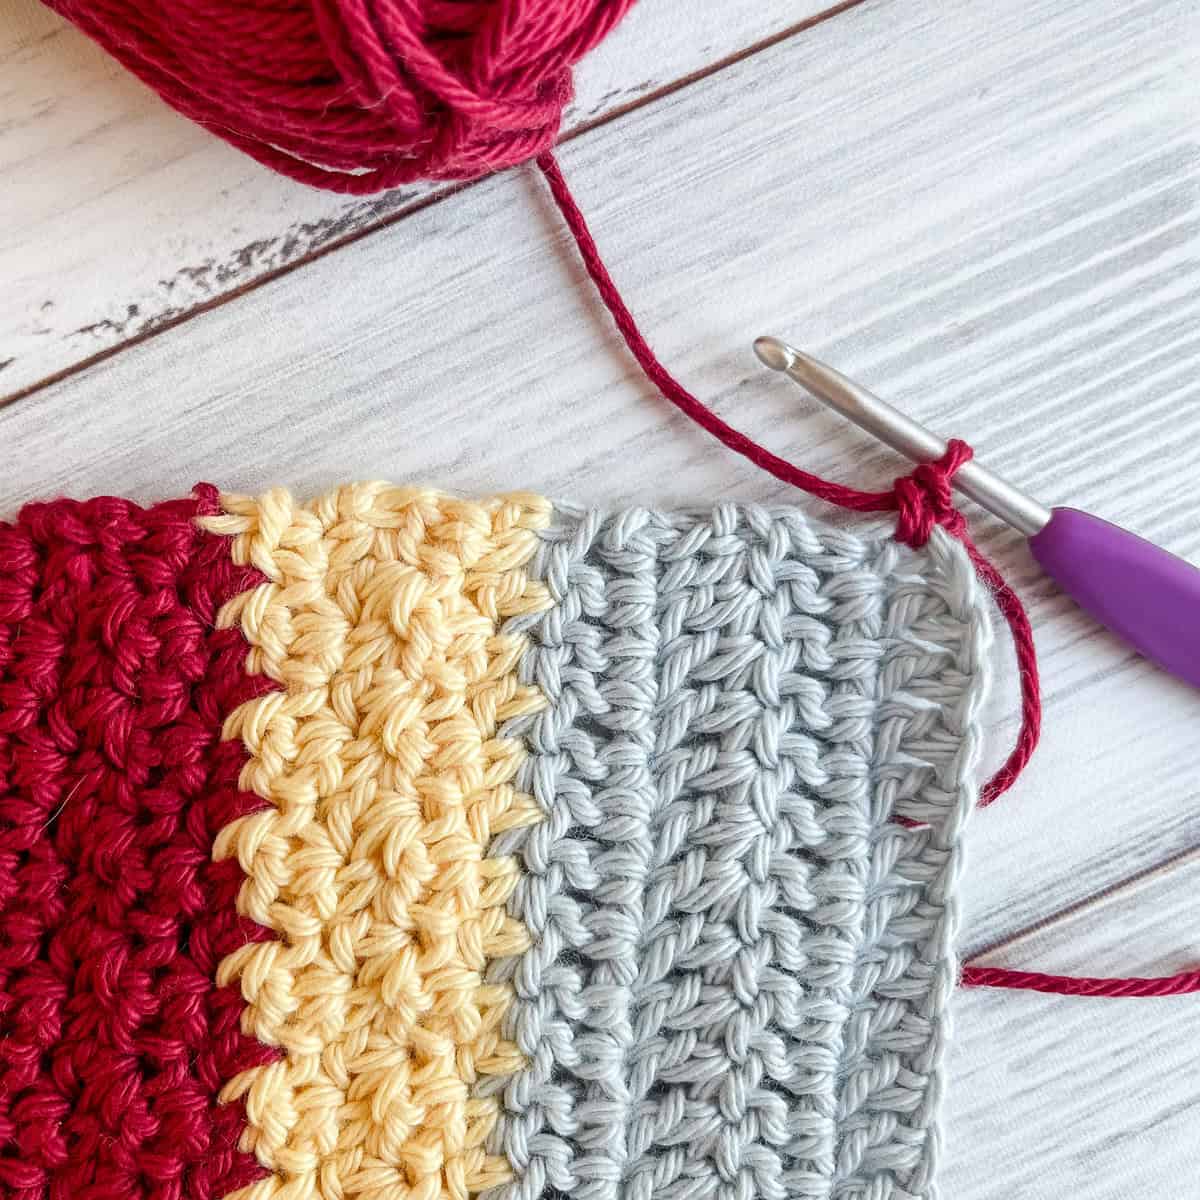
5. This crochet shawl is made in two panels which are sewn together at the end. I did this for two reasons; the main reason is that I wanted the ends of the shawl to be identical if worn over the shoulders. The stitches are all facing the same direction instead of being “upside down” on one side. The second reason is that 70″ of scarf is looooong and I didn’t relish the idea of all that sitting in my lap as I am turning for each new row.
6. Once the panels are sewn together then I added a simple bobble edging to finish.
I would classify this pattern as intermediate given the complexity of the sunflower stitch. However, there were many adventurous beginners that tackled the original blanket pattern and were so happy they were able to easily finish with all of the stitch tutorials provided!
I hope you enjoy making the Autumn Rhapsody Shawl and I can’t wait to see all of your photos!
Yarn Supplies for the Autumn Rhapsody Shawl
*This post contains affiliate links. You can click on any yarn or material highlighted to purchase. I will receive a small commission if you purchase but it won’t cost you any extra! As an Amazon Associate I earn from qualifying purchases.
I again opted for a cotton yarn after using cotton in the original blanket design. I really love the stitch definition with cotton yarn! I went on a hunt for a cotton yarn that had the colors I wanted to use in my crochet rectangle shawl and would (hopefully!) also be easily available. I came across the K+C Essential Cotton yarn at Joann’s and I fell in love with the fall colors they had available! This yarn is classified as a light weight #3 yarn but I personally think it works up between a #3 (light) and a #4 (medium) yarn weight.
There were two different yellow color options available – Buttercup and Golden Coast. The Buttercup colorway is a very light yellow shade and the Golden Coast is a dark golden. Neither option worked for me as a sunflower color. So I raided my stash and found a couple of balls of Paintbox Cotton Aran in Mustard Yellow that worked for me. Paintbox Cotton Aran is the same yarn I used in the Autumn Rhapsody and A Winter’s Night Rhapsody Blanket patterns.
Even though Paintbox Cotton Aran is classified a #4 weight it really worked up very closely in gauge to the K+C Essentials Cotton. And it turned out beautifully!
You may like the Golden Coast for your sunflowers or you could also try Hobby Lobby’s I Love This Cotton in Curry which is another bright yellow cotton yarn option.
You could also choose to use an acrylic yarn for your crochet rectangle shawl but if you do I would recommend using a light (#3) sport or DK weight yarn in order to get closer to the gauge listed.
The Autumn Rhapsody Shawl is going to be released as a free crochet pattern to the blog over 3 weeks starting on October 25th. The ad-free PDF with all three parts is now available for purchase in my shop!
if you love PDFs, you might want to check out my Lifetime Membership. It’s an awesome deal! Never pay for one of my PDFs again!!


To get notified of free crochet patterns and future giveaways, sign up for my newsletter. I never share or sell your information to third parties — it stays private!
If you would like daily crochet inspiration be sure to follow me on Facebook, Instagram, Pinterest, YouTube, Twitter, Reddit and Tumblr!
You may also love the following free crochet patterns by Nana’s Crafty Home:


- Spring Rhapsody Blanket free crochet pattern
- Autumn Rhapsody Pillow free crochet pattern
- Marjorie Blanket free crochet pattern
Autumn Rhapsody Shawl Free Crochet Pattern Instructions
Pattern written in US crochet terminology
Supplies:
KC Cotton Essential Weight 3 / Light (100% cotton, 3.5 oz / 180 yds)
- (2) Ocean Wave 4.2 oz / 220 yds (BL – Blue)
- (2) Buttercup 5.2 oz / 270 yds (C – Cream)
- (1) Red Wood 3.5 oz / 180 yds (R – Red)
- (1) Camper Van 3.5 oz / 180 yds (G – Green)
- (2) Sequoia 4.6 oz / 240 yds (BR – Brown)
- (1) Canyon 3.5 oz / 180 yds (O – Orange)
- (1) Smore 3.5 oz / 180 yds (T – Tan)
- (2) Orange Cliffs 4.0 oz / 210 yds (P – Peach)
Paintbox Cotton Aran Weight 4 / Medium (100% cotton, 1.7 oz / 93 yds)
- (2) Mustard Yellow 2.0 oz / 110 yds (Y – Yellow)
Total yarn needs: 34 oz / 1,660 yards
Yarn Substitutions Note: I found that the Paintbox Cotton Aran and the KC Essentials yarn worked up closely in gauge even though they are marked with a different weight. If substituting I recommend using yarns that are the same weight.
Size G (4.5 mm) crochet hook
Scissors
Tapestry Needle
Approximate finished size: 20” x 73”
Gauge: 14 dc st x 8 dc rows = 4” x 4”
Abbreviations:
- RS = right side
- WS = wrong side
- ch(s) = chain(s)
- st(s) = stitch(es)
- sc = single crochet
- sk = skip
- dc = double crochet
- beg = beginning
- sp(s) = space(s)
- sl st = slip stitch
- yo = yarn over
- pc = popcorn (see special stitches section below)
Special Stitches:
Sunflower Center: working in front and back loops separately:
Round 1: 4 sc in back loop, rotate, 4 sc in front loop.
Round 2: 2 sc in each st around.
Round 3; St st in 8 sts.
Sunflower Puff: Ch 2, yo, insert hook into st, yo, pull up a tall loop (3 loops on hook), yo, insert hook into same st, yo, pull up a tall loop (5 loops on hook), yo, pull through all loops on hook, ch 2.
pc (popcorn): 4 dc sts in same st, drop loop from hook, insert hook into top of first dc made, place dropped loop on hook and pull loop through st. When changing colors at the end of the pc, yo with new color and draw through both loops to close popcorn.
Leaf stitch: (Yo, insert hook in st indicated, pull up a loop) twice, yo, pull through 4 loops on hook, yo and pull through last 2 loops on hook.
Cluster: Group of 3 double crochet stitches worked in same stitch/space.
Long Spike dc: Dc into the middle stitch of the cluster from 2 rows below. The stitch is worked around the ch-1 sp from the previous row.
Spike Stitch:
- SP-2: Insert hook below sc from 2 rows below your hook (current row counts as row 1), yo, draw up a loop even with the loop on your hook (2 loops on hook), yo, pull through all 2 loops on hook.
- SP-3: Insert hook below sc from 3 rows below (current row counts as row 1), yo, draw up a loop even with the loop on your hook (2 loops on hook), yo, pull through all 2 loops on hook.
- SP-4: Insert hook below sc from 4 rows below (current row counts as row 1), yo, draw up a loop even with the loop on your hook (2 loops on hook), yo, pull through all 2 loops on hook.
Extreme Drop Stitch:
- (Working in ch-sp 1 row below) yo, insert hook, pull up a loop, yo, insert hook in same ch-sp, pull up a loop (5 loops on hook),
- (Working in next ch-sp 2 rows below) yo, insert hook, pull up a loop, yo, insert hook in same ch-sp, pull up a loop (9 loops on hook),
- (Working in next ch-sp 3 rows below) yo, insert hook, pull up a loop, yo, insert hook in same ch-sp, pull up a loop (13 loops on hook),
- (Working in next ch-sp 2 rows below) yo, insert hook, pull up a loop, yo, insert hook in same ch-sp, pull up a loop (17 loops on hook),
- (Working in next ch-sp 1 row below) yo, insert hook, pull up a loop, yo, insert hook in same ch-sp, pull up a loop (21 loops on hook).
- Yo, pull through all loops, ch 1.
Bobble: Yo, insert hook into st, yo, pull up a loop, (3 loops on hook), yo, pull through 2 loops on hook (2 loops on hook), yo, insert hook into same st, yo, pull up a loop, (4 loops on hook), yo and pull through all 4 loops.
Pattern Notes:
- Ch 3 at the beginning counts as first stitch.
- To easily keep track of colors used for each row, every row will indicate color with abbreviation at the beginning. When a row changes color, fasten off previous color and change color at the end of the row with final yo of the last st. Begin next row with new color.
- For popcorn stitch rows, do not fasten off colors while working row. Instead, drop and work over non-working yarn color.
- Shawl is made by working 2 panels which are sewn together at the end to create one long rectangle shawl.
Recommended Tutorials:
Alternative Turning Chain – Stacked SC Tutorial
Lemon Peel Stitch
Sunflower Stitch – note that the petals are different than tutorial
Falling Leaves Stitch
Granny Spike Stitch
Extreme Drop Leaf Stitch
Popcorn Stitch – changing colors
Single Crochet Spike Stitch
Sedge Stitch
Mattress Stitch Join Tutorial
Bobble Shell Stitch Border
Pattern Instructions
Panel 1
With BL, ch 74.
Row 1: RS (BL) Dc in fourth ch from hook (skipped chs count as first st), dc in each ch to end. Turn. (72)
Row 2: WS (BL) Ch 3, dc in each st. Turn.
Row 3 – 4: (BL) Repeat row 2.
Row 5: (C) Ch 1, sc in same st, dc in next st, *sc in next st, dc in next st,* repeat from * to * to end. Turn.
Rows 6 – 8: (C) Repeat row 5.
Rows 9 – 12: (R) Repeat row 5.
Rows 13 – 15: (G) Ch 3, dc in each st. Turn.
Row 16: (BR) Ch 1, sc in same st and in each st to end. Turn.
Row 17: (BR) Ch 1, sc in same st, sc in next 4 st, sunflower center in next st (see special stitches section), *sc in next 11 sts, sunflower center in next,* repeat from * to * to last 6 sts, sc in last 6 sts. Turn.
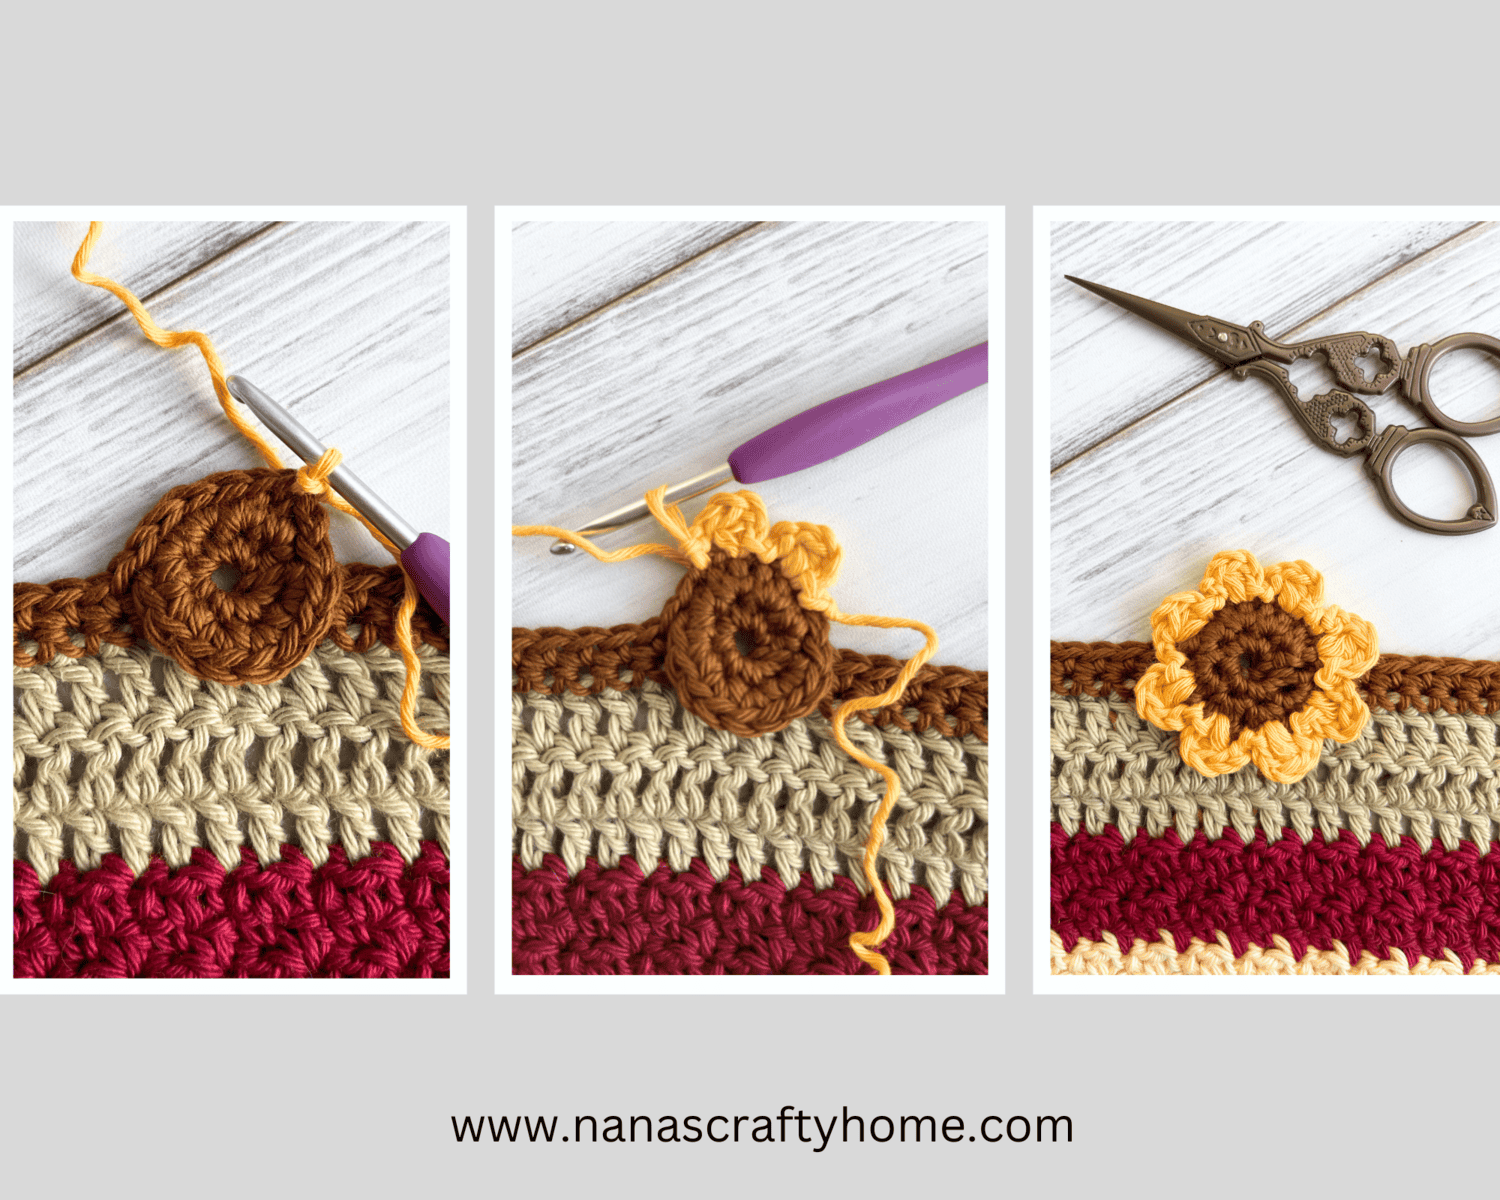
Row 17a: (Y) Working on RS of first sunflower center, attach (Y) to any stitch of sunflower center with sl st, sunflower puff (see special stitches section) in same st, *sl st in next st, (sl st, sunflower puff in next st),* repeat from * to * to last st, sl st in last st. Fasten off leaving a long tail for tacking petals down. Repeat for each sunflower center. (8 sunflower petals per flower)
Row 18: (G) Ch 3, dc in each st of row. In order to maintain stitch count of 72, pick up a stitch behind sunflowers or work 2 dc in last st before each sunflower. Turn. (72)
Rows 19 – 20: (G) Ch 3, dc in each st. Turn.
Rows 21 – 22: (C) Ch 3, dc in each st. Turn.
Row 23: PC row (BR – carry O), Ch 3, dc in next 2 sts, (O) pc in the next st, *(BR) dc in next 4 sts, (O) pc in next st,* repeat from * to * to last 3 sts, (BR) dc in last 3 sts. Turn.
Rows 24 – 25: (C) Ch 3, dc in each st. Turn.
Rows 26 – 28: (T) Ch 1, sc in each st. Turn.
Row 29: (P) Ch 3, dc in next 3 sts, *1 leaf st (see special stitches section) around the sc post st from 2 rows below, sk next st in current row, dc in next 3 sts,* repeat from * to * to end. Turn.
Row 30: (P) Ch 1, sc in each st. Turn.
Row 31: (C) Ch 3, dc in next st, *1 leaf st around the dc post st from 2 rows below, sk next st in current row, dc in next 3 sts,* repeat from * to * to last 2 sts, leaf st in next st, dc in last st. Turn.
Row 32: (C) Ch 1, sc in each st. Turn.
Row 33: (BL) Ch 3, dc in next 3 sts, *1 leaf st around the dc post st from 2 rows below, sk next st in current row, dc in next 3 sts,* repeat from * to * to end. Turn.
Row 34: (BL) Ch 1, sc in each st. Turn.
Row 35: (R) Repeat row 31.
Row 36: (R) Ch 1, sc in each st. Turn.
Row 37: (O) Repeat row 33.
Row 38: (O) Ch 1, sc in each st. Turn.
Row 39: (BR) Repeat row 31.
Row 40: (BR) Ch 1, sc in each st. Turn.
Rows 41 – 42: (T) Ch 1, sc in each st. Turn.
Rows 43 – 44: (BL) Ch 3, dc in each st. Turn.
Row 45: PC row (R – carry C),Ch 3, dc in next 2 sts, (C) pc in the next st, *(R) dc in next 4 sts, (C) pc in next st,* repeat from * to * to last 3 sts, (R) dc in last 3 sts. Turn.
Rows 46 – 47: (BL) Ch 3, dc in each st. Turn.
Row 48: (T) Ch 3, dc in each st. Turn.
Row 49: (C) Ch 3, dc in next 2 sts, *ch 1, sk next 3 sts, cluster in next st,* repeat from * to * to last 5 sts, ch 1, sk next 3 sts, dc in last 2 sts. Turn.
Row 50: (C) Ch 3, dc in next st, (1 dc, 1 long spike dc, 1 dc) into next ch-1 sp, *ch 1, (1 dc, 1 long spike dc st, 1 dc) into next ch-1 sp* repeat from * to * to last 3 sts, dc in last 3 sts. Turn.
Row 51: (P) Ch 3, dc in next 2 sts, ch 1, sk next 3 sts, *(1 dc, 1 long spike dc, 1 dc) into next ch-1 sp, ch 1,* repeat from * to * to last 5 sts, sk next 3 sts, dc in last 2 sts. Turn.
Row 52: (P) Repeat row 50.
Row 53: (GR) Repeat row 51.
Row 54: (GR) Repeat row 50.
Row 55: (O) Repeat row 51.
Row 56: (O) Repeat row 50.
Row 57: (BR) Repeat row 51.
Row 58: (BR) Repeat row 50.
Row 59: (Y) Repeat row 51.
Row 60: (Y) Ch 3, dc in next st, dc in ch-1 sp, *long spike dc in ch-1 sp, dc in next 3 sts,* repeat from * to * to last ch-1 sp, long spike dc in ch-1 sp, dc in same ch-1 sp, dc in last 3 sts. Turn. (72)
Row 61: PC row (GR – carry R),Ch 3, dc in next 2 sts, (R) pc in the next st, *(GR) dc in next 4 sts, (R) pc in next st,* repeat from * to * to last 3 sts, (GR) dc in last 3 sts. Turn.
Row 62: (Y) Ch 3, dc in each st. Turn.
Rows 63 – 66: (C) Ch 1, sc in each st. Turn.
Row 67: (T) Ch 1, sc in same st, sc in next st, SP-2 in next st, SP-3 in next st, SP-4 in next st, SP-3 in next st, SP-2 in next st, *sc in next 2 sts, SP-2 in next st, SP-3 in next st, SP-4 in next st, SP-3 in next st, SP-2 in next st* repeat from * to * to last 2 sts, sc in last 2 sts. Turn.
Rows 68 – 70: (T) Ch 1, sc in each st. Turn.
Row 71: (BL) Ch 1, sc in same st, sc in next 5 sts, *SP-2 in next st, SP-3 in next st, SP-4 in next st, SP-3 in next st, SP-2 in next st, sc in next 2 sts,* repeat from * to * to last 3 sts, sc in last 3 sts. Turn.
Rows 72 – 74: (BL) Ch 1, sc in each st. Turn.
Row 75: (P) Ch 1, sc in same st, *sc in next 2 sts, SP-2 in next st, SP-3 in next st, SP-4 in next st, SP-3 in next st, SP-2 in next st,* repeat from * to * to last st, sc in last st. Turn.
Rows 76 – 78: (P) Ch 1, sc in each st. Turn.
Row 79: (BR) Ch 3, dc in next st, *sk 2 sts, cluster in next st,* repeat from * to * to last 4 sts, sk 2 sts, dc in last 2 sts. Turn. (22 dc clusters + 4 sts)
Row 80: (BR) Ch 3, cluster in next sp and in each sp between clusters to end, dc in last st. Turn. (23 dc clusters + 2 sts)
Row 81: (O) Ch 3, dc in next sp (between ch-3 and first cluster from previous row), cluster in next sp and in each sp between clusters to end, dc in last sp (sp between last cluster and last st from previous row), dc in last st. Turn. (22 dc clusters + 4 sts)
Row 82: (O) Repeat row 80.
Row 83: (C) Repeat row 81.
Row 84: (C) Repeat row 80.
Row 85: (T) Ch 1, 2 sc in same st (to maintain st count), sc in remaining sts to end. (72)
Row 86: (T) Ch 3, dc in each st. Turn.
Row 87: PC row (BL – carry P),Ch 3, dc in next 2 sts, (P) pc in the next st, *(BL) dc in next 4 sts, (P) pc in next st,* repeat from * to * to last 3 sts, (BL) dc in last 3 sts. Turn.
Row 88: (T) Ch 3, dc in each st. Turn.
Row 89: (BR) Ch 3, dc in each st. Turn.
Extreme Drop Stitch Section:
Note:
- In this section you will NOT skip a stitch after the ch-1 — work your next dc in the very next st.
- You will always skip the ch-1 sp from the previous row — working your dc in the next st after the ch-1 sp from the previous row.
Row 90: (BR) Ch 3, dc in next 7 sts, *ch 1, dc next 7 sts,* repeat from * to * to last 8 sts, ch 1, dc in last 8 sts. Turn.
Row 91: (BR) Ch 3, dc in next 6 sts, ch 1, dc next 2 sts, *ch 1, dc next 5 sts, ch 1, dc next 2 sts,* repeat from * to * to last 7 sts, ch 1, dc in last 7 sts. Turn.
Row 92: (BR) Ch 3, dc next 5 sts, ch 1, dc next 4 sts, *ch 1, dc next 3 sts, ch 1, dc next 4 sts,* repeat from * to * to last 6 sts, ch 1, dc in last 6 sts. Turn.
Row 93: (O) Ch 1, sc in same st, sc in next 5 sts, *extreme drop st over next 5 ch-1 sps, ch 2, sk 4 sts in current row, sc next 3 sts,* repeat from * to * to last 3 sts, sc last 3 sts.
Note: After the extreme drop st it will feel like a ch-3 as there is a ch-1 to secure the st + 2 more chains after the stitch.
Row 94: (O) Ch 1, sc in same st, sc in next 5 sts, *2 sc in ch-2 sp, sc in ch-1 sp, sc in next 4 sts,* repeat from * to * to last 3 sts, sc in last 3 sts. (72)
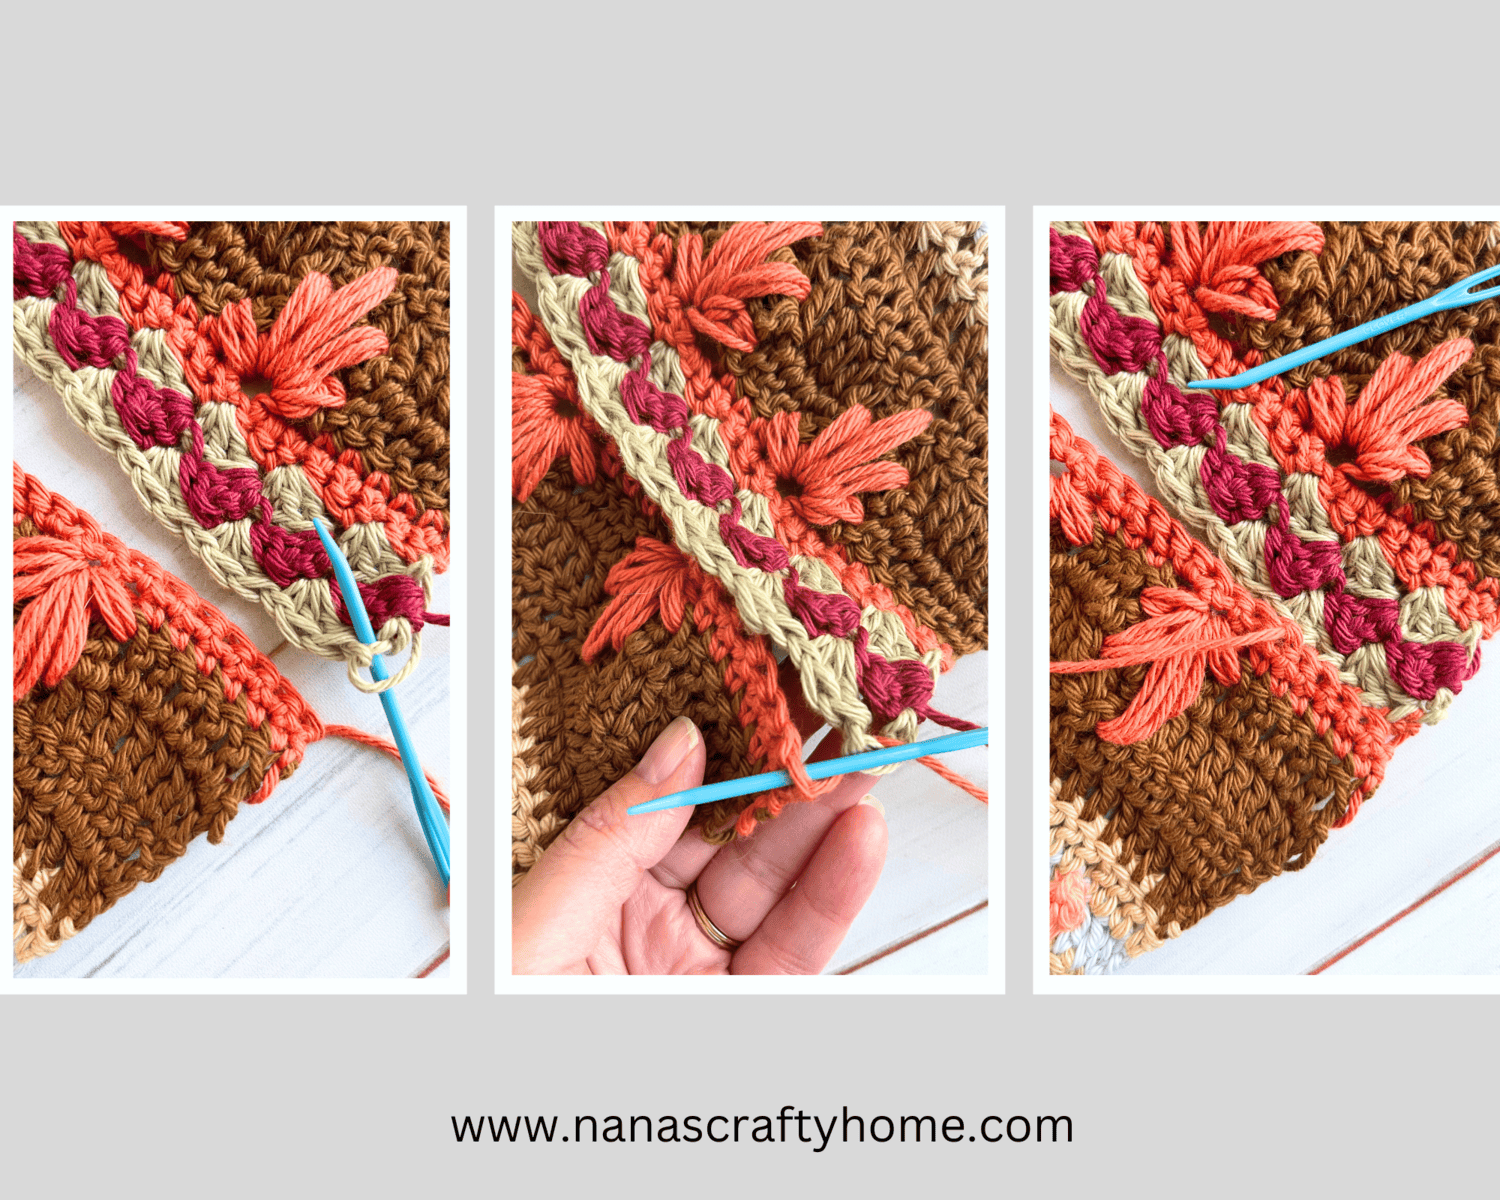
Fasten off. Tack down sunflower petals with long length of yarn and then then weave in all remaining ends.
Panel 2
Repeat rows 1 – 94 of Panel 1.
Row 95: (GR) Ch 1, (1 sc, 2 dc) in same st, *sk 2 sts, (1 sc, 2 dc) in next st,* repeat from * to * to last 2 sts, sk next st, sc in last st. Turn.
Row 96: (R) Ch 1, (1 sc, 2 dc) in same st, sk 2 sts, *(1 sc, 2 dc) in next st, sk 2 sts,* repeat from * to * to end, sc in last st. Turn. Note: All groups of (1 sc, 2 dc) will be worked in the sc st from previous row.
Row 97: (GR) Repeat row 95.
Fasten off leaving a long tail for sewing panels together. Weave in remaining ends.
With long length of yarn left for sewing on tapestry needle, RS facing out and last rounds of each panel together, use the Mattress Stitch for sewing panels together.
Border
Round 1: (R) Attach red with a sl st to a stitch right after any corner, ch 1, sc evenly around outside edge working (sc, ch 1, sc) in each corner, sl st to first st with (P). Turn.
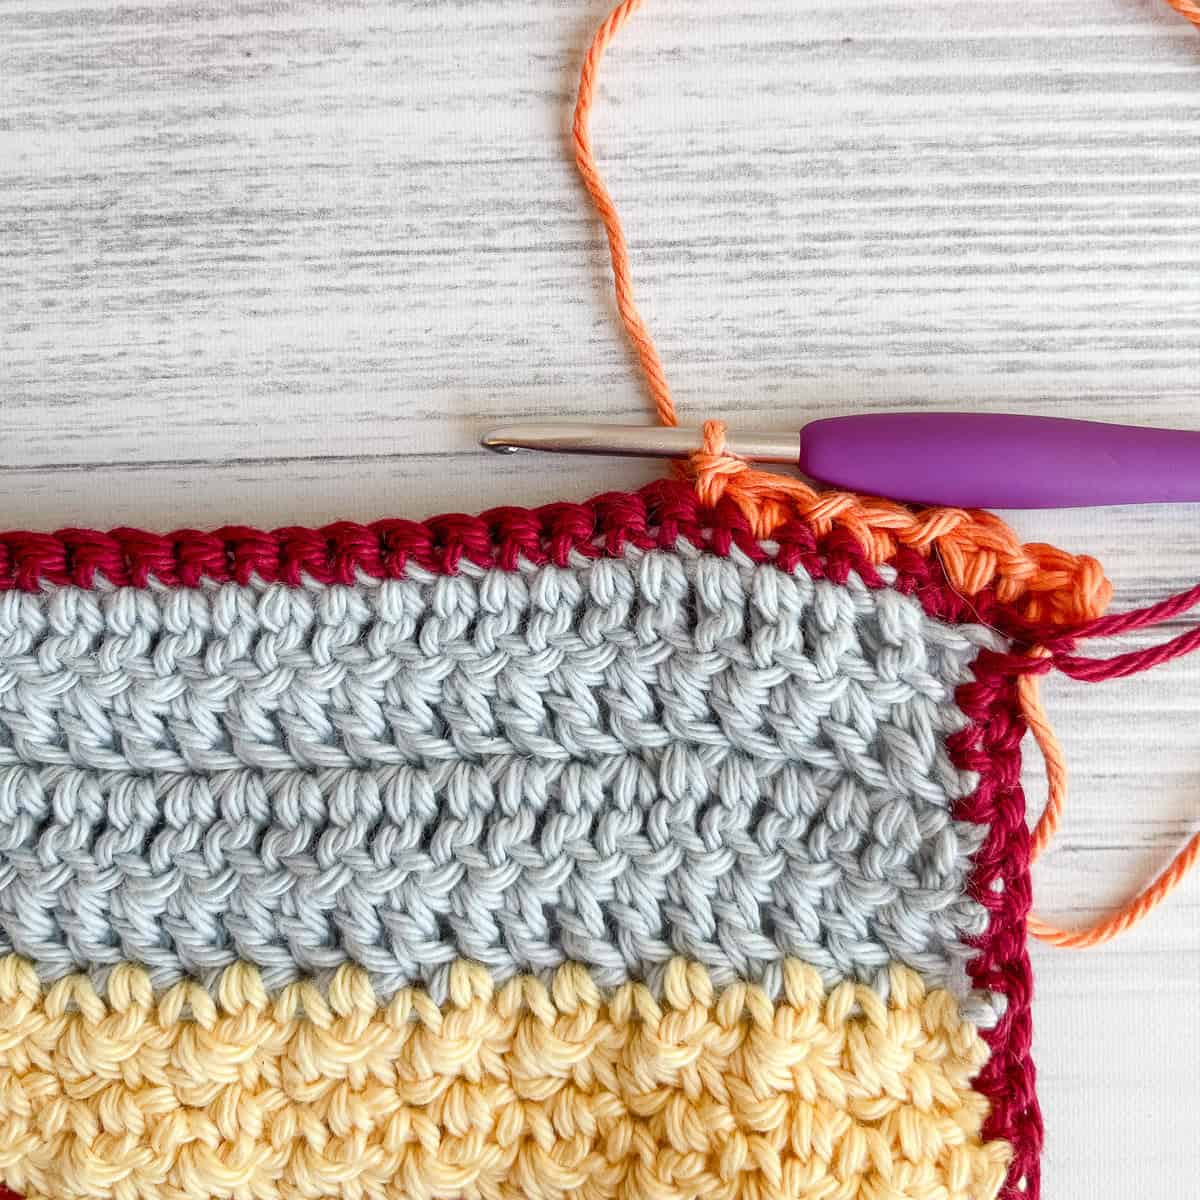
Round 2: (P) Now working on the WS of shawl, ch 3, dc in same st, [*sl st in next st, bobble in next st,* repeat from * to * to corner, (bobble, sl st, bobble) in corner ch-1 sp] 4 times, omitting final corner, sl st in next st.
Fasten off. Weave in ends.
Copyright 2024 Tonya Bush / Nana’s Crafty Home, LLC.
Facebook: https://www.facebook.com/nanascraftyhome
Instagram: https://www.instagram.com/nanascraftyhome/
Pinterest: https://www.pinterest.com/nanascraftyhome/
YouTube: https://www.youtube.com/c/TonyaBush
Twitter (X): https://twitter.com/nanascraftyhome
Facebook Group: https://www.facebook.com/groups/829792060522798
Sign up for my Newsletter: https://nanascraftyhome.com/sign-up-for-my-free-newsletter/

 Hi! Thank you so much for being here! I am Tonya the designer behind Nana's Crafty Home. As a wife, mother, Nana of 9 & with 2 fur babies, my days are filled with love, laughter, hugs and yarn! Here you will find colorful and creative crochet designs for yourself or loved ones. My hope is that you will be inspired to learn and create along with me!
0 Comments