This cute Christmas Basket pattern is a free crochet pattern by Nana’s Crafty Home!

These cute little baskets are perfect for last minute Christmas making and gifting. I love quick projects that make fun little presents for little ones or even for special Secret Santa ideas.
I recently designed the Halloween Crochet Treat Cups which were a big hit and knew I had to add a Christmas version!
These cute little treat cups would make the perfect alternative to Christmas stockings. They are quick and you could customize each one. And, they actually hold quite a few treats in there. Present holiday treats like candy, trinkets, small bottles of body wash, perfume, lip balm or even small toys. Present a gift card and candy to a coworker or for a teacher. So many ways to use these fun treat baskets!

Christmas Reindeer Crochet Basket Pattern Details
Made with simple single crochet stitches throughout make this pattern very easy and nice for a beginner crocheter. The basket is crocheted from the bottom up in seamless single crochet rounds with a round of Crab Stitch aka Reverse Single Crochet to finish the top of the basket.
If you would like to learn the Crab Crochet Stitch also known as the Reverse Single Crochet Stitch, I have a complete photo and video tutorial for you. Subscribe to my YouTube Channel to get notified whenever I post a new video.
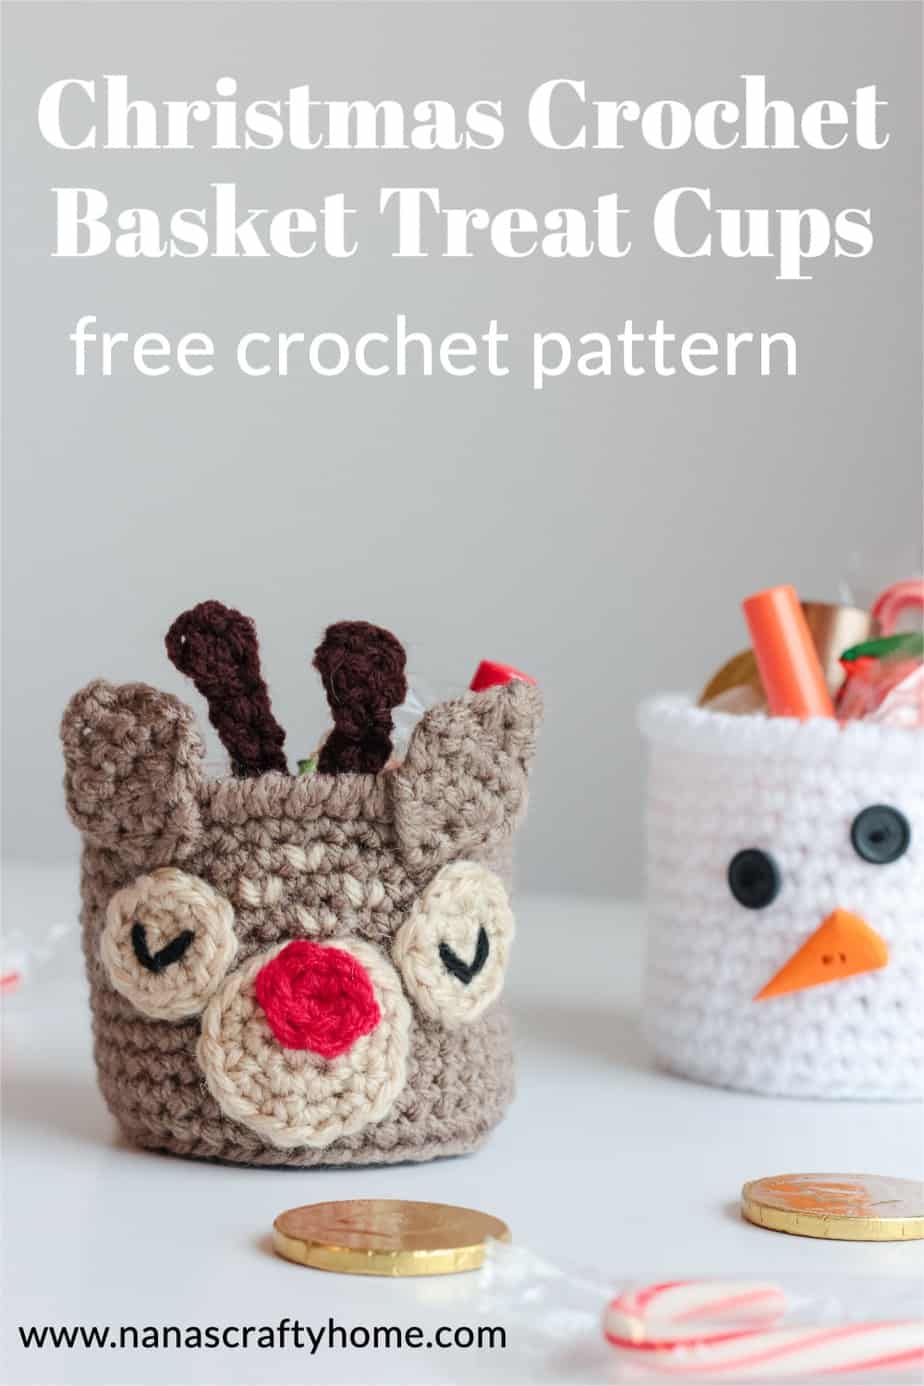
Then you will crochet the muzzle, nose, eyes, ears and antlers separately, embroider your eyes and sew to the outside of your basket.
If you would like to make the crochet snowman basket, use white yarn for the basket, add buttons for the eyes and a carrot for a nose you end up with an adorable snowman. I found a set of buttons at Joanns that were perfect for my snowman basket. However, you could certainly crochet up small eyes and a nose instead.

I am using Red Heart With Love yarn* which is a medium worsted weight acrylic yarn but you could certainly use your favorite similar weight cotton or acrylic yarn as a substitute. This project would be perfect for your yarn scraps!
*Disclosure: I only recommend products I would use myself. This post may contain affiliate links that if you make a purchase at no additional cost to you, I may earn a small commission.
The Christmas Reindeer Treat Cup crochet pattern is also available as an ad-free, printable PDF! You can purchase the individual pattern for the Reindeer Treat Cup Pattern, or if you love PDFs, you might want to check out my Lifetime Membership. It’s an awesome deal! Never pay for one of my PDFs again!! (Or, scroll down for the free version!)

Purchase the ad-free pdf of the Christmas Reindeer Treat Cup Crochet Pattern for a small fee. Thank you so much for supporting my work!

If you would like daily crochet inspiration be sure to follow me on Facebook, Instagram, Pinterest, YouTube, Twitter and Tumblr!
To get notified of my free crochet patterns and future giveaways, sign up for my newsletter. I never share or sell your information to third parties — it stays private!
You may also like the following free crochet patterns by Nana’s Crafty Home:


- Reindeer Hot Pad free crochet pattern
- Snowman Towel Topper free crochet pattern
- Christmas Ponytail Holders free crochet pattern

Christmas Crochet Basket Reindeer Treat Cup free crochet pattern instructions
Pattern written in US crochet terminology
Supplies:
- Red Heart With Love Weight 4/Medium (100% acrylic, 7 oz / 370 yds)
- Taupe 0.7 oz / 37 yds (Color A)
- Tan 0.2 oz / 10 yds (Color B)
- Holly Berry 0.1 oz / 6 yds (Color C)
- Chocolate 0.1 oz / 6 yds (Color D)
- Black 0.1 oz / 6 yds (Color E)
Size I (5.5 mm) crochet hook
Stitch Marker
Scissors
Tapestry needle
Approximate finished size: 2 1/2” wide x 2 1/2” tall (not including ears and antlers)
Gauge: not necessary to project
Abbreviations:
MC = magic circle
ch = chain
sc = single crochet
st(s) = stitch(es)
sc2tog = single crochet 2 sts together (see special stitches section below)
BLO = back loop only
rsc = reverse single crochet (see special stitches section below)
WS = wrong side
RS = right side
Special Stitches:
sc2tog = (insert hook into next st, yo and pull up a loop) twice, yo and pull through all 3 loops on hook.
rsc = working from left to right, sk first st, insert hook from front to back in next st to the right, yo, pull loop through st, yo, pull through 2 loops on hook.
Recommended Tutorials:
Crab Stitch (Reverse Single Crochet Stitch) photo and video tutorial
Pattern Notes:
- Face, eyes, nose and muzzle are all worked in the round. Ears and antlers are worked in turned rows.
- Basket is worked in seamless rounds. Do not slip stitch join at the end of each round. Use stitch marker to place in first stitch of each round.
- Face, eyes, nose, muzzle and antlers are sewn to finished basket. Eyes and face details are embroidered.
Pattern Instructions
Ears (make 2)
Leaving a long tail for sewing, with Color A, ch 2.
Row 1: (RS) 2 sc in second ch from hook. Turn. (2)
Row 2: ch 1, 2 sc in each st. Turn. (4)
Row 3: ch 1, 2 sc in first st, 1 sc in next 2 sts, 2 sc in last st. Turn. (6)
Row 4: ch 1, sc2tog, 1 sc in next 2 sts, sc2tog Turn. (4)
Row 5: ch 1, sc2tog x 2. Turn. (2)
Row 6: ch 1, sc2tog. (1)
Fasten off, weave in end not left for sewing.
Basket
With Color A, make MC.
Round 1: ch 1, 6 sc in MC. Tighten MC. (6)
Round 2: 2 sc in each st around. (12)
Round 3: *1 sc in next st, 2 sc in next st,* repeat from * to * around. (18)
Round 4: 1 sc in next st, 2 sc in next st, *1 sc in next 2 st, 2 sc in next sts* repeat from * to * to last st, 1 sc in last st. (24)
Round 5: *2 sc in next st, 1 sc in next 3 sts,* repeat from * to * around. (30)
Round 6: 1 sc in next 2 sts, 2 sc in next st, *1 sc in next 4 sts, 2 sc in next st,* repeat from * to * to last 2 sts, 1 sc in last 2 sts. (36)
Round 7: working in BLO, 1 sc in each st. (36)
Round 8 – 17: working in both loops, 1 sc in each st. (36)
Round 18: slip stitch to first st of round 17, ch 1, rsc in each st to end, sl st to first st. (36)
Fasten off. Weave in ends.
Eyes (make 2)
With Color B, repeat rounds 1 – 2 of basket.
Fasten off, leaving a long tail for sewing. Weave in remaining end.
With Color E, embroider eyes, weave in ends.
Muzzle
With Color B, repeat rounds 1 – 3 of basket.
Fasten off, leaving a long tail for sewing. Weave in remaining end.
Nose
With Color C, make MC.
Round 1: ch 1, 6 sc in MC, sl st join to first st. Tighten MC. (6)
Fasten off, leaving a long tail for sewing. Weave in remaining end.

Antlers (make 2)
With Color D, ch 5.
Row 1: 1 sc in second ch from hook and in each ch to end. (4) DO NOT TURN.
(Top of antlers) Ch 2, sc in second ch from hook, sl st to side of last sc from row 1.
Fasten off. Weave in ends.
Assembly
Note: Sew following pieces to RS of same face panel.
With long tail, sew nose to muzzle.
With long tail, sew muzzle to basket.
With long tail, sew eyes to basket.
With long tails, sew ears to basket.

With a length of Color D yarn, sew bottom of antlers behind top edge of basket. Make sure tops of antlers are pointing in opposite directions.
With Color B, embroider v’s on RS of basket between eyes and above muzzle. Weave in ends.
Copyright 2021 Tonya Bush/Nana’s Crafty Home
Social Media links:
Facebook: https://www.facebook.com/nanascraftyhome
Instagram: https://www.instagram.com/nanascraftyhome/
Pinterest: https://www.pinterest.com/nanascraftyhome/
YouTube: https://www.youtube.com/c/TonyaBush
Twitter: https://twitter.com/nanascraftyhome
Facebook Group: https://www.facebook.com/groups/829792060522798
Sign up for my Newsletter: https://nanascraftyhome.com/sign-up-for-my-free-newsletter/
 Hi! Thank you so much for being here! I am Tonya the designer behind Nana's Crafty Home. As a wife, mother, Nana of 9 & with 2 fur babies, my days are filled with love, laughter, hugs and yarn! Here you will find colorful and creative crochet designs for yourself or loved ones. My hope is that you will be inspired to learn and create along with me!