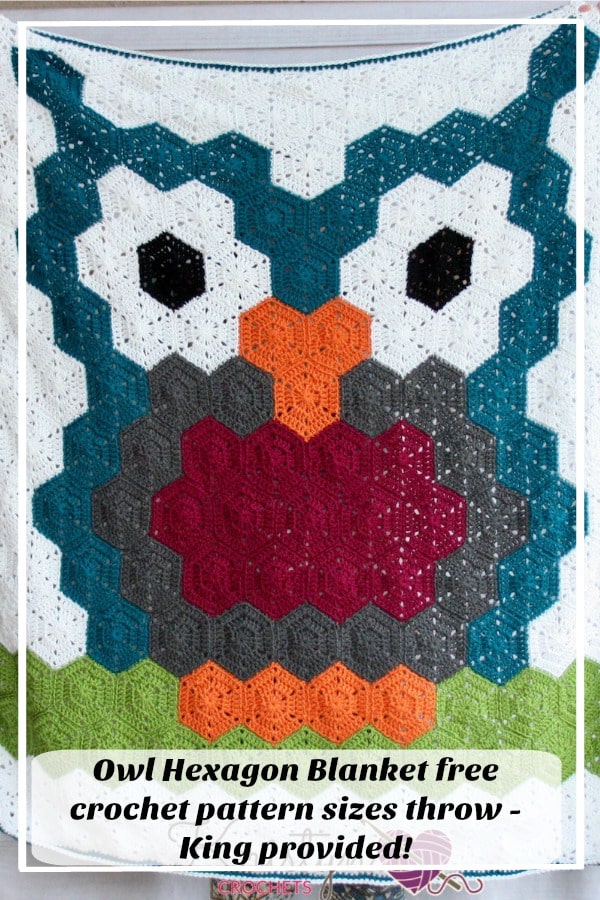
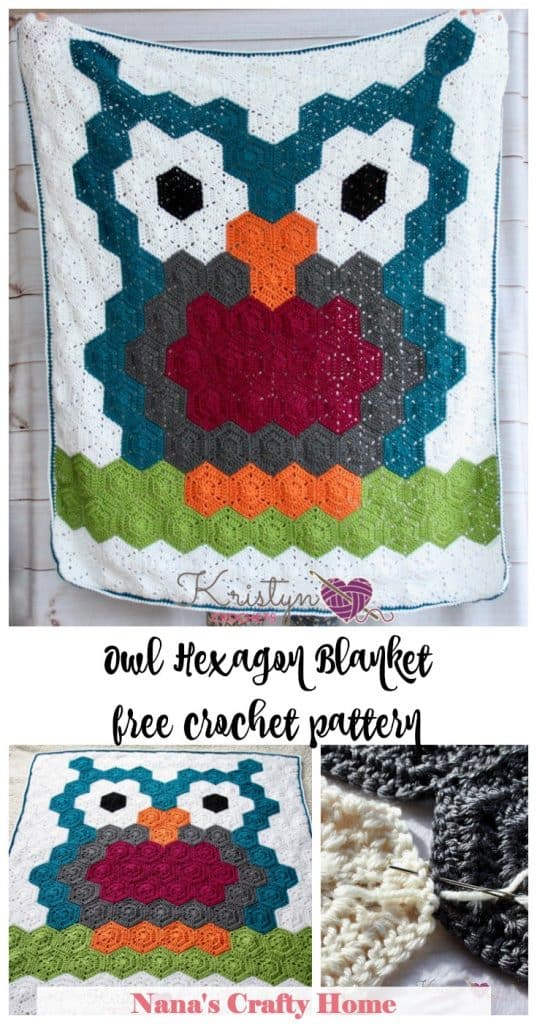
A crochet owl blanket pattern this gorgeous Night Owl Crochet Blanket is a free crochet pattern by Kristyn Crochets!
Nana’s Crafty Home is excited to host this free crochet owl blanket pattern by Kristyn Crochets. If you are someone you know love owls this gorgeous owl blanket would make the perfect gift!
If you enjoy patterns by Kristyn you may also like free crochet patterns for the Hexagon Medley Shawl, the Never Ending Star Plant Hanger or the Fall Leaves Granny Square!

This crochet owl blanket pattern is a simple blanket to make using the easy to learn hexagon motif. The hexagon shape is made in various colors joined to create this cute owl. After making this blanket you should be very comfortable with the hexagon and half hexagons. This pattern was a lot of fun to play with colors and surprisingly entertaining.
I decided to break my steps up in stages and crochet a little, sew a little, and block a little, every time getting more excited at the results. I truly hope you enjoy this project as much as I did, if you decide to let this be your night owl I would love to see how it turned out.
The pattern instructions now include 6 sizes! Please note this is based on measurements from the original design. The written pattern is for the Toddler size and I can confirm the size.
This cozy owl blanket would make a great gift for for any owl lover but would be especially lovely as a baby shower gift and perfect addition to a nursery! I love the blanket in bright colors which makes it so cheerful but you can change it up to pastels for a completely different look.
If you would like to purchase the ad-free pdf version of this pattern you can find it on Ravelry here. Thank you for supporting Kristyn’s work!
You May also like the following free crochet patterns by Nana’s Crafty Home:


- 1. Cross My Heart Baby Blanket free crochet blanket pattern
- 2. Bee C2C Blanket Lovey free crochet pattern
- 3. Owl C2C Scarf free crochet pattern
Crochet Owl Blanket Pattern free pattern instructions
Skill: Easy
Finished Size:
42in. by 52in. – Toddler/Small Throw (Size confirmed, this size is shown in pattern.)
53in. by 70in. – Large Throw
64in. by 82in. – Twin
75in. by 94in. – Full
86in. by 91in. – Queen
97in. by 102in. – King
Gauge:
Not super important just maintain the same throughout. I got about 4 stitches and 1 rounder inch.
*This post contains affiliate links. You can click on any yarn or material highlighted to purchase. I will receive a small commission if you purchase but it won’t cost you any extra! As an Amazon Associate I earn from qualifying purchases.
Supplies:
- Red Heart Soft (1698/2916/3209/3500/3560/3834 total yards)100% acrylic medium worsted weight yarn *
- White (760/1457/1603/1749/1663/1791 yards or 3/6/7/7/7/7 skeins)
- Black (22/36/40/43/47/50 yards or less than 1 skein)
- Tangerine (75/125/137/150/162/175 yards or less than 1 skein)
- Guacamole (192/320/352/384/416/448 yards or 1/2/2/2/2/2 skein)
- Teal (350/480/528/576/624/672 yards or just under 2/2/3/3/3/3 skeins)
- Charcoal (160/267/294/320/347/374 yards or less than 1/2/2/2/2/2 skein)
- Berry (139/231/255/278/301/324 yards or less than 1/1/1/2/2/2 skein)
- 6.0 mm (J) clover crochet hook
- Blocking supplies (blocking board and pins or desired tools)
- scissors
- tapestry needle
Recommended Amazon supplies:
Stitches/Abbreviations:
CH – Chain
DC – Double Crochet
HDC – Half Double Crochet
MR – Magic RIng
SC – Single Crochet
SS – Slip Stitch
Notes:
- The entire pattern is written in Toddler size, there are notes throughout regarding other sizes.
- Please follow the appropriate text color defined below for sizes other than Toddler:
- Large Throw
- Twin
- Full
- Queen
- King
- A * to * indicates a repeated stitch sequence.
- The Hexagon is worked in rounds all facing up, the half hexagon motifs are worked in rows and are turned after each row.
Night Owl Crochet Hexagon Blanket – Free Pattern:
Making the owl blanket is quite simple, we start off with making up the 3 types of hexagon motifs, the whole hexagon, and the two, half hexagons. The motifs are made up of 3 to 8 rounds depending on the size you are making. I have listed below the colors, type, and amount of motifs needed for each blanket size. Hopefully its lined out for you well enough for you to make your own color pics, which I would very much love to see!
For Toddler, Small Throw, Queen and King Sizes:
Whole Hexagons:
27 Teal – for the main body color for the owl
15 Charcoal – for the outline of the owls belly
13 Berry – for the belly of the owl
7 Tangerine – for the beak and feet
2 Black – for the pupils in the eyes
17 Guacamole – for the log
12 White – for the eyes
43 White – for the background
136 – Total
Pointed Halves:
22 White – for the top and bottom edges background
22 – Total
Squared Halves:
12 White – to even out the sides of the background
2 Guacamole – for the sides of the log
14 – Total
For Large Throw, Twin, and Full Sizes:
Whole Hexagons:
27 Teal – for the main body color for the owl
15 Charcoal – for the outline of the owls belly
13 Berry – for the belly of the owl
7 Tangerine – for the beak and feet
2 Black – for the pupils in the eyes
17 Guacamole – for the log
12 White – for the eyes
64 White – for the background
157 – Total
Pointed Halves:
22 White – for the top and bottom edges background
22 – Total
Squared Halves:
14 White – to even out the sides of the background
2 Guacamole – for the sides of the log
16 – Total
Hexagon Motif (make 136/157 **see above for colors**):
Depending on the size you are making you will want 3 to 8 rounds for each hexagon. Follow the color coding for your specific size.
Here is the video on how to crochet the whole hexagon by Kristyn or continue for simple written instructions:
Make a MR, CH2,
Round 1:
*Place 2DC into the MR, CH2,* 6 times, SS to the first stitch of the round. (12DC, 6-CH2 spaces)
Round 2:
SS in the next stitch, DC in the same stitch, *place (DC, CH2, DC) in the next CH2 space, DC in each stitch until you reach the next CH2 space,* 5 times, (DC, CH2, DC) in the last CH2 space, DC in each stitch, SS to the first stitch of the round. (24DC, 6-CH2 spaces)
Round 3:
SS in the next stitch, DC in the same stitch, *place (DC, CH2, DC) in the next CH2 space, DC in each stitch until you reach the next CH2 space,* 5 times, (DC, CH2, DC) in the last CH2 space, DC in each stitch, SS to the first stitch of the round. (36DC, 6-CH2 spaces)
*Stop here for Toddler/Small Throw Sizes**

Round 4:
SS in the next stitch, DC in the same stitch, *place (DC, CH2, DC) in the next CH2 space, DC in each stitch until you reach the next CH2 space,* 5 times, (DC, CH2, DC) in the last CH2 space, DC in each stitch, SS to the first stitch of the round. (48DC, 6-CH2 spaces)
*stop here for large throw*
Round 5:
SS in the next stitch, DC in the same stitch, *place (DC, CH2, DC) in the next CH2 space, DC in each stitch until you reach the next CH2 space,* 5 times, (DC, CH2, DC) in the last CH2 space, DC in each stitch, SS to the first stitch of the round. (60DC, 6-CH2 spaces)
*stop here for twin*
Round 6:
SS in the next stitch, DC in the same stitch, *place (DC, CH2, DC) in the next CH2 space, DC in each stitch until you reach the next CH2 space,* 5 times, (DC, CH2, DC) in the last CH2 space, DC in each stitch, SS to the first stitch of the round. (72DC, 6-CH2 spaces)
*stop here for full*
Round 7:
SS in the next stitch, DC in the same stitch, *place (DC, CH2, DC) in the next CH2 space, DC in each stitch until you reach the next CH2 space,* 5 times, (DC, CH2, DC) in the last CH2 space, DC in each stitch, SS to the first stitch of the round. (84DC, 6- CH2 spaces)
*stop here for queen*
Round 8:
SS in the next stitch, DC in the same stitch, *place (DC, CH2, DC) in the next CH2 space, DC in each stitch until you reach the next CH2 space,* 5 times, (DC, CH2, DC) in the last CH2 space, DC in each stitch, SS to the first stitch of the round. (96DC, 6-CH2 spaces)
*stop here for king*
Pointed Half Hexagon (make 22):
Follow the color coding for your specific size.
The complete video tutorial for the Pointed and Squared Half Hexagon can be found here, or continue for simple written instructions:
Make a MR, CH2,
Round 1:
DC into the MR, *CH2, 2DC into the MR,* 2 times, CH2, DC into the MR, pull MR closed. (6DC, 3-CH2 spaces)
Round 2:
CH1, turn your work, *DC in each stitch until you reach a CH2 space, (DC, CH2, DC) in the CH2 space,* 3 times, DC in each remaining stitch. (12DC, 3-CH2 spaces)
Round 3:
CH1, turn your work, *DC in each stitch until you reach a CH2 space, (DC, CH2, DC) in the CH2 space,* 3 times, DC in each remaining stitch. (18DC, 3-CH2 spaces)
*stop here for toddler/small throw sizes*

Round 4:
CH1, turn your work, *DC in each stitch until you reach a CH2 space, (DC, CH2, DC) in the CH2 space,* 3 times, DC in each remaining stitch. (24DC, 3-CH2 spaces)
*stop here for large throw*
Round 5:
CH1, turn your work, *DC in each stitch until you reach a CH2 space, (DC, CH2, DC) in the CH2 space,* 3 times, DC in each remaining stitch. (30DC, 3-CH2 spaces)
*stop here for twin*
Round 6:
CH1, turn your work, *DC in each stitch until you reach a CH2 space, (DC, CH2, DC) in the CH2 space,* 3 times, DC in each remaining stitch. (36DC, 3-CH2 spaces)
*stop here for full*
Round 7:
CH1, turn your work, *DC in each stitch until you reach a CH2 space, (DC, CH2, DC) in the CH2 space,* 3 times, DC in each remaining stitch. (42DC, 3-CH2 spaces)
*stop here for queen*
Round 8:
CH1, turn your work, *DC in each stitch until you reach a CH2 space, (DC, CH2, DC) in the CH2 space,* 3 times, DC in each remaining stitch. (48DC, 3-CH2 spaces)
*stop here for king*
Squared Half Hexagon (make 14/16 **see above for colors**):
Follow for color coding for size.
Make a MR, CH2,
Round 1:
*2DC, CH2, into the MR,* 2 times, 2DC into the MR, pull MR closed. (6DC, 2-CH2 spaces)
Round 2:
CH1, turn your work, place 2DC in the first stitch, *DC in each stitch until you reach a CH2 space, (DC, CH2, DC) in the CH2 space,* 2 times, DC in each stitch until you reach the last stitch, place 2DC in the last stitch. (12DC, 2-CH2 spaces)
Round 3:
CH1, turn your work, place 2DC in the first stitch, *DC in each stitch until you reach a CH2 space, (DC, CH2, DC) in the CH2 space,* 2 times, DC in each stitch until you reach the last stitch, place 2DC in the last stitch. (18DC, 2-CH2 spaces)
*stop here for toddler/small throw*

Round 4:
CH1, turn your work, place 2DC in the first stitch, *DC in each stitch until you reach a CH2 space, (DC, CH2, DC) in the CH2 space,* 2 times, DC in each stitch until you reach the last stitch, place 2DC in the last stitch. (24DC, 2-CH2 spaces)
*stop here for large throw*
Round 5:
CH1, turn your work, place 2DC in the first stitch, *DC in each stitch until you reach a CH2 space, (DC, CH2, DC) in the CH2 space,* 2 times, DC in each stitch until you reach the last stitch, place 2DC in the last stitch. (30DC, 2-CH2 spaces)
*stop here for twin*
Round 6:
CH1, turn your work, place 2DC in the first stitch, *DC in each stitch until you reach a CH2 space, (DC, CH2, DC) in the CH2 space,* 2 times, DC in each stitch until you reach the last stitch, place 2DC in the last stitch. (36DC, 2-CH2 spaces)
*stop here for full*
Round 7:
CH1, turn your work, place 2DC in the first stitch, *DC in each stitch until you reach a CH2 space, (DC, CH2, DC) in the CH2 space,* 2 times, DC in each stitch until you reach the last stitch, place 2DC in the last stitch. (42DC, 2-CH2 spaces)
*stop here for queen*
Round 8:
CH1, turn your work, place 2DC in the first stitch, *DC in each stitch until you reach a CH2 space, (DC, CH2, DC) in the CH2 space,* 2 times, DC in each stitch until you reach the last stitch, place 2DC in the last stitch. (48DC, 2-CH2 spaces)
*stop here for king*
Joining the Hexagons:
Before you join your motifs you may want to block them first, I used a light spray of water and pinned them to my blocking board, this really gave it that polished neat, gorgeous, I just love this yarn, look in the end.
Below is the layout of the owl with hexagons, this is how you’ll want to arrange your color scheme. You may choose to work all your hexagons then join them at once or just join them as you go along. I used the “mattress stitch” to join my hexagons, which I’ll explain in a moment. You can however, use a “whip stitch” or even a slip stitch from the back side. These should show no seam provided you use a matching yarn color and work in the Back Loops Only (BLO). Whatever method you are most comfortable with should work, :-).

- With your hexagons facing down and the back side facing you line up 2 hexagons in the order they should be joined.
- Starting in the CH space that is next to the first stitch to join on both motifs, insert needle in the BLO through both CH spaces.


Add a Border:
After you have your hexagons and half hexagons joined, its time to add the border. I decided to keep it slightly simple, as to not take away from the owl.
Round 1:
Starting along one side join your white yarn in the first stitch, SC in each stitch, SC once in each CH2 space, and SC along the row ends. I added 2 SC per row. When you reach the corner, place 3SC in the corner space. Work your SC all the way around in the manner until you reach the first stitch of the round, SS to the first stitch and fasten off.

Round 2:
With Teal, join yarn, I joined in the same stitch that I fastened off in round 1. HDC in each stitch around, place 3HDC stitches in the corner stitch (this is the center stitch from the 3SC that you added in round 1), SS to the first stitch of the round and fasten off.

Round 3:
Join white yarn, SC in each stitch, place 3SC in each corner stitch, SS to the first stitch of the round, fasten off and weave in ends.


From here just stand back an admire, until next time, happy crocheting!

Social Media links:
Facebook: https://www.facebook.com/nanascraftyhome
Instagram: https://www.instagram.com/nanascraftyhome/
Pinterest: https://www.pinterest.com/nanascraftyhome/
YouTube: https://www.youtube.com/c/TonyaBush
Twitter: https://twitter.com/nanascraftyhome
Facebook Group: https://www.facebook.com/groups/829792060522798
Sign up for my Newsletter: https://nanascraftyhome.com/sign-up-for-my-free-newsletter/
 Hi! Thank you so much for being here! I am Tonya the designer behind Nana's Crafty Home. As a wife, mother, Nana of 9 & with 2 fur babies, my days are filled with love, laughter, hugs and yarn! Here you will find colorful and creative crochet designs for yourself or loved ones. My hope is that you will be inspired to learn and create along with me!