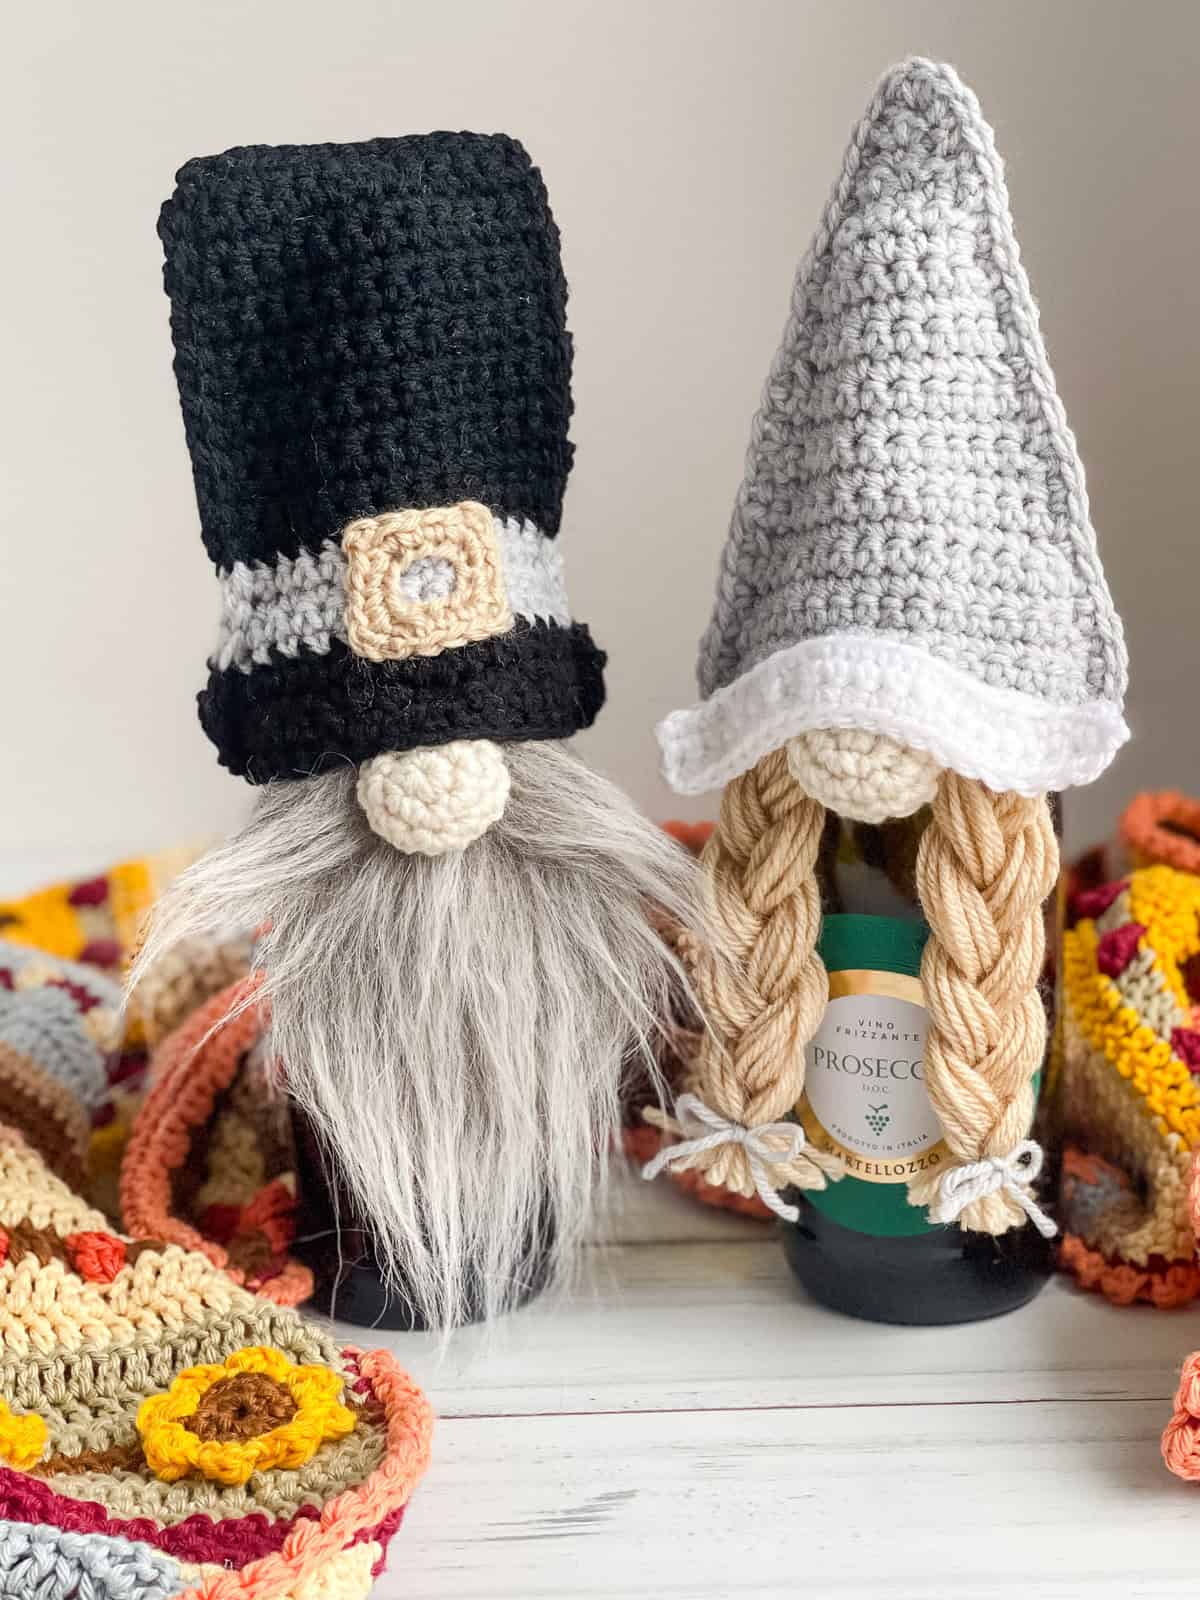
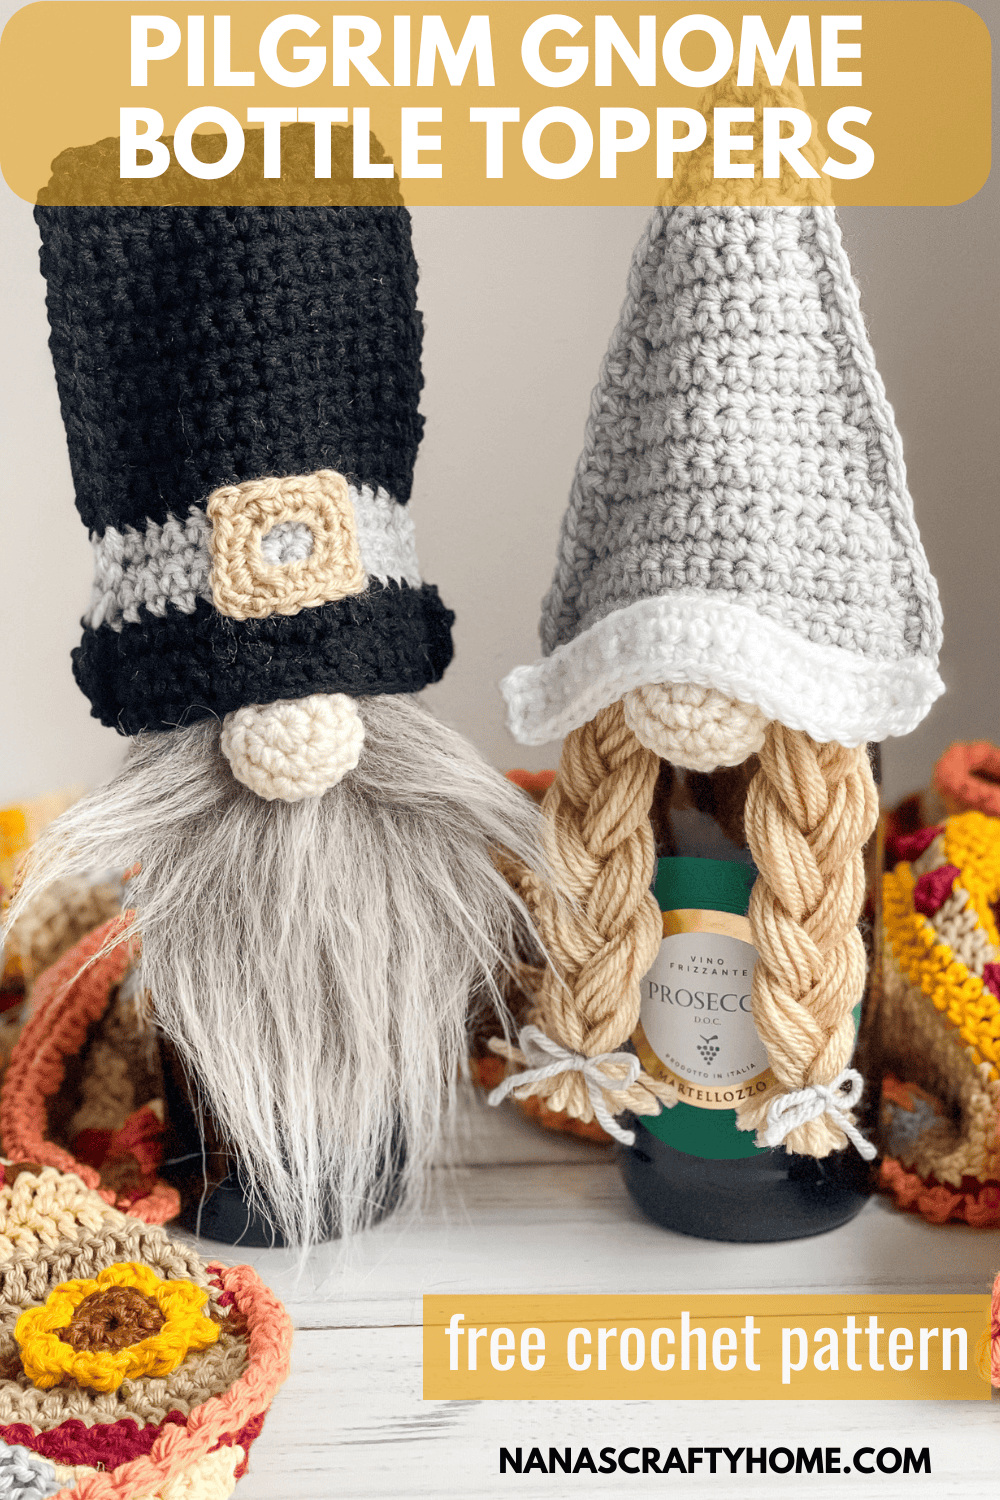
These crochet Thanksgiving Pilgrim Gnome Bottle Toppers are a fun and whimsical last-minute addition to your Thanksgiving holiday celebrations!
Introducing the Pilgrim Gnome Bottle Topper Set, a charming pair of festive bottle toppers that are perfect for Thanksgiving. These whimsical Pilgrim Gnomes are a spin off pattern of my Pilgrim Gnome Towel Toppers – another fun pattern.
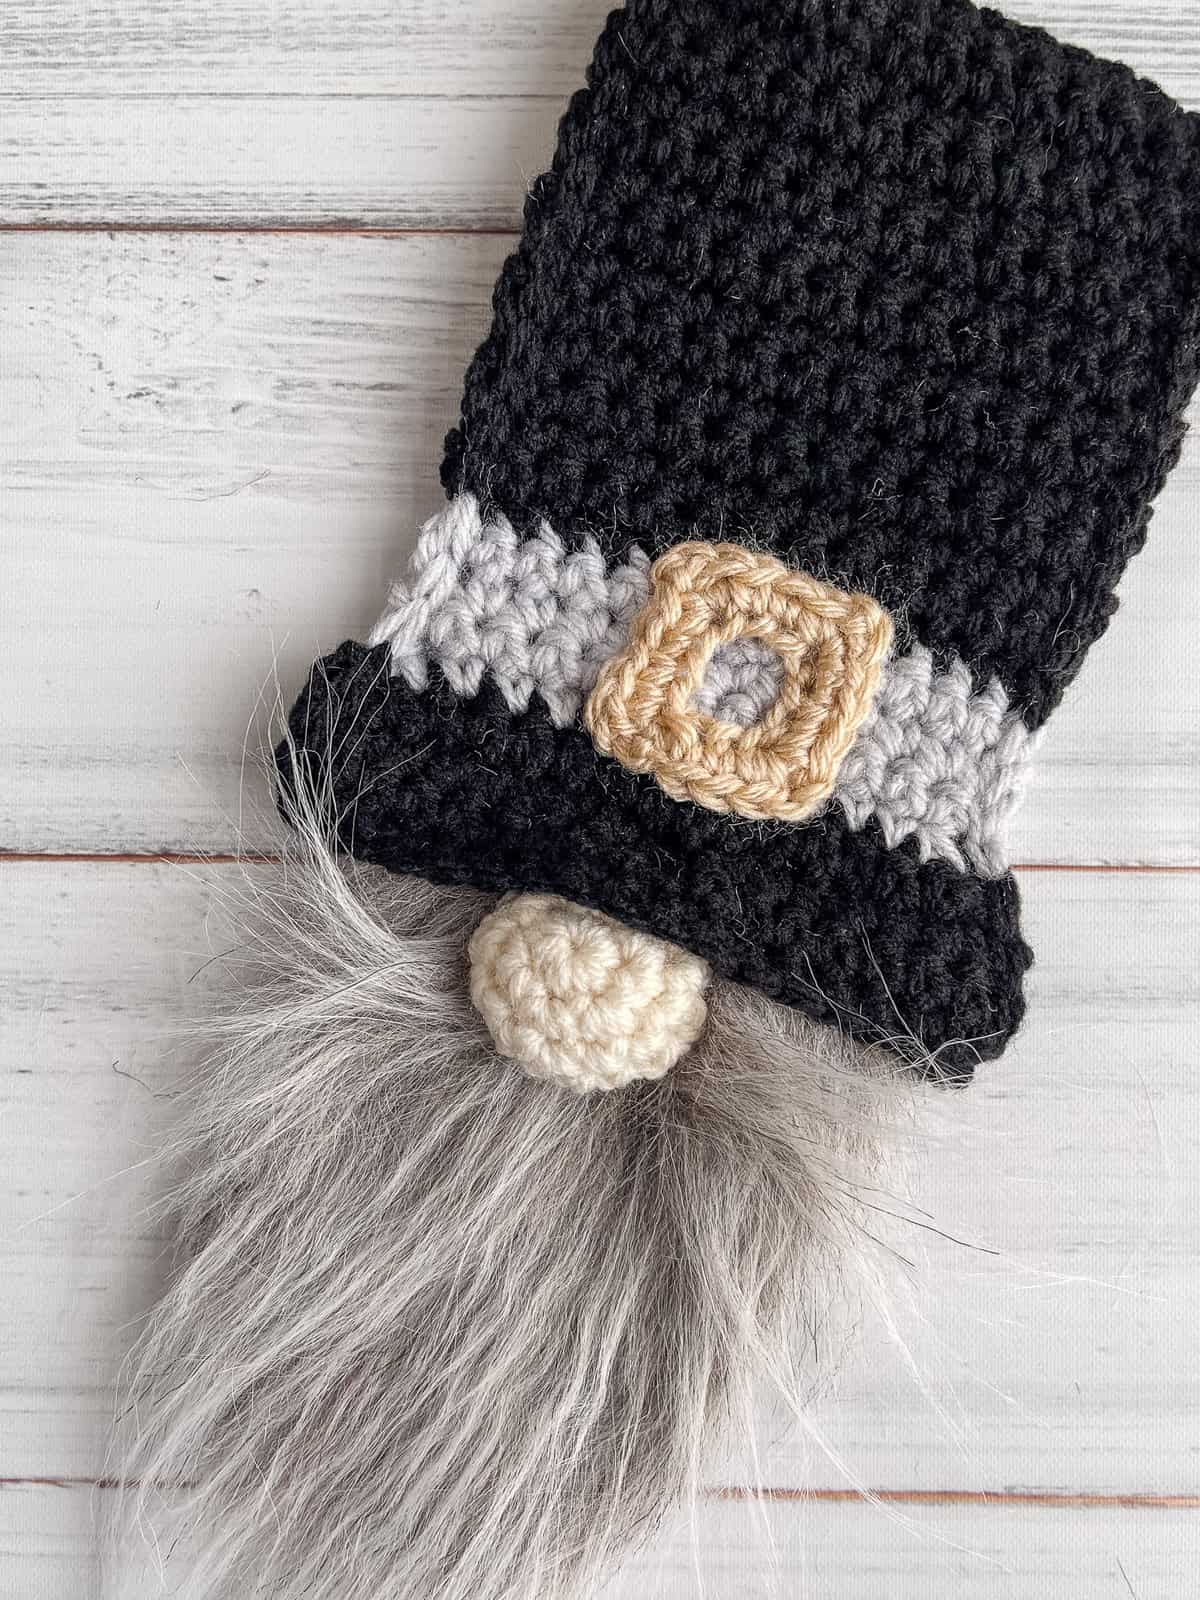
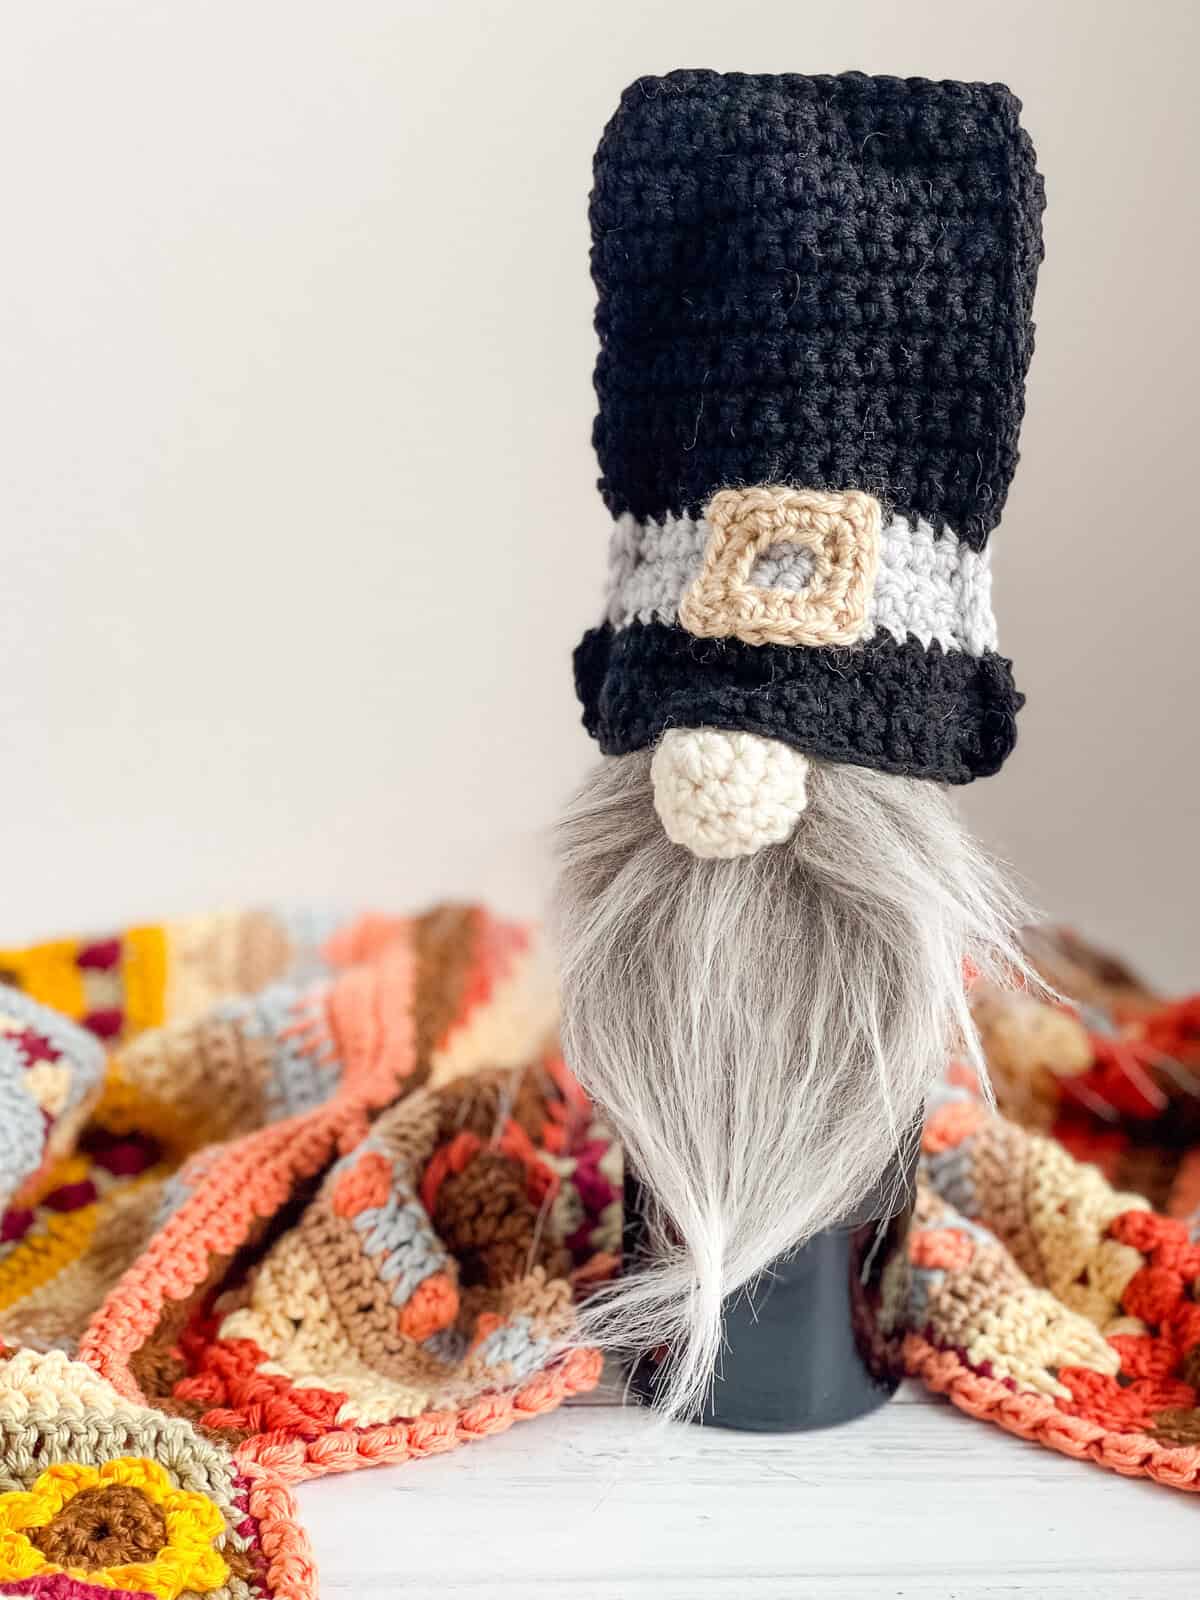
- Mr. Pilgrim Gnome sports a tall black hat with a beige buckle detail, complemented by a long, flowing faux fur beard. His elegant look adds a touch of whimsy to any bottle of wine or sparkling beverage.
- Mrs. Pilgrim Gnome wears a soft gray pointed hat with a subtle white trim and adorable braided “hair” tied with tiny bows.
Both gnomes are designed to fit snugly over most standard wine bottles, making them functional and decorative. They will bring a touch of fun to your Thanksgiving festivities and are sure to be conversation starters. This set would make quick, easy and adorable hostess gifts.

How to make the Crochet Thanksgiving Pilgrim Gnomes
For the full written pattern instructions for Pilgrim Gnome Bottle Toppers, scroll down below. The ad-free PDF is available for the set of Bottle Toppers in my shop. The ad-free PDF is also available for FREE to my Lifetime Members as well!
1. Both of these pilgrim gnomes are made with two identical hat panels worked from the bottom up made with beginner-friendly single crochet stitches.
2. For Mr. Pilgrim you will crochet a nose and buckle. Sew the nose and the buckle to the front hat panel.
3. Now you will cut a piece of faux fur fabric that will be sewn to the front hat panel behind the nose. If you need some help here is a tutorial I put together for my original Christmas Gnome Bottle Topper that uses faux fur as well.
4. Once the beard is affixed, crochet slip stitch the two hat panels together to complete. So quick & easy!
5. For Mrs. Pilgrim you will make two yarn braids. If you need a bit of assistance with my braid method I have a complete tutorial for that as well.
6. Sew the braids inside the front hat panel and then sew the nose in front of the braids and behind the front of the hat.
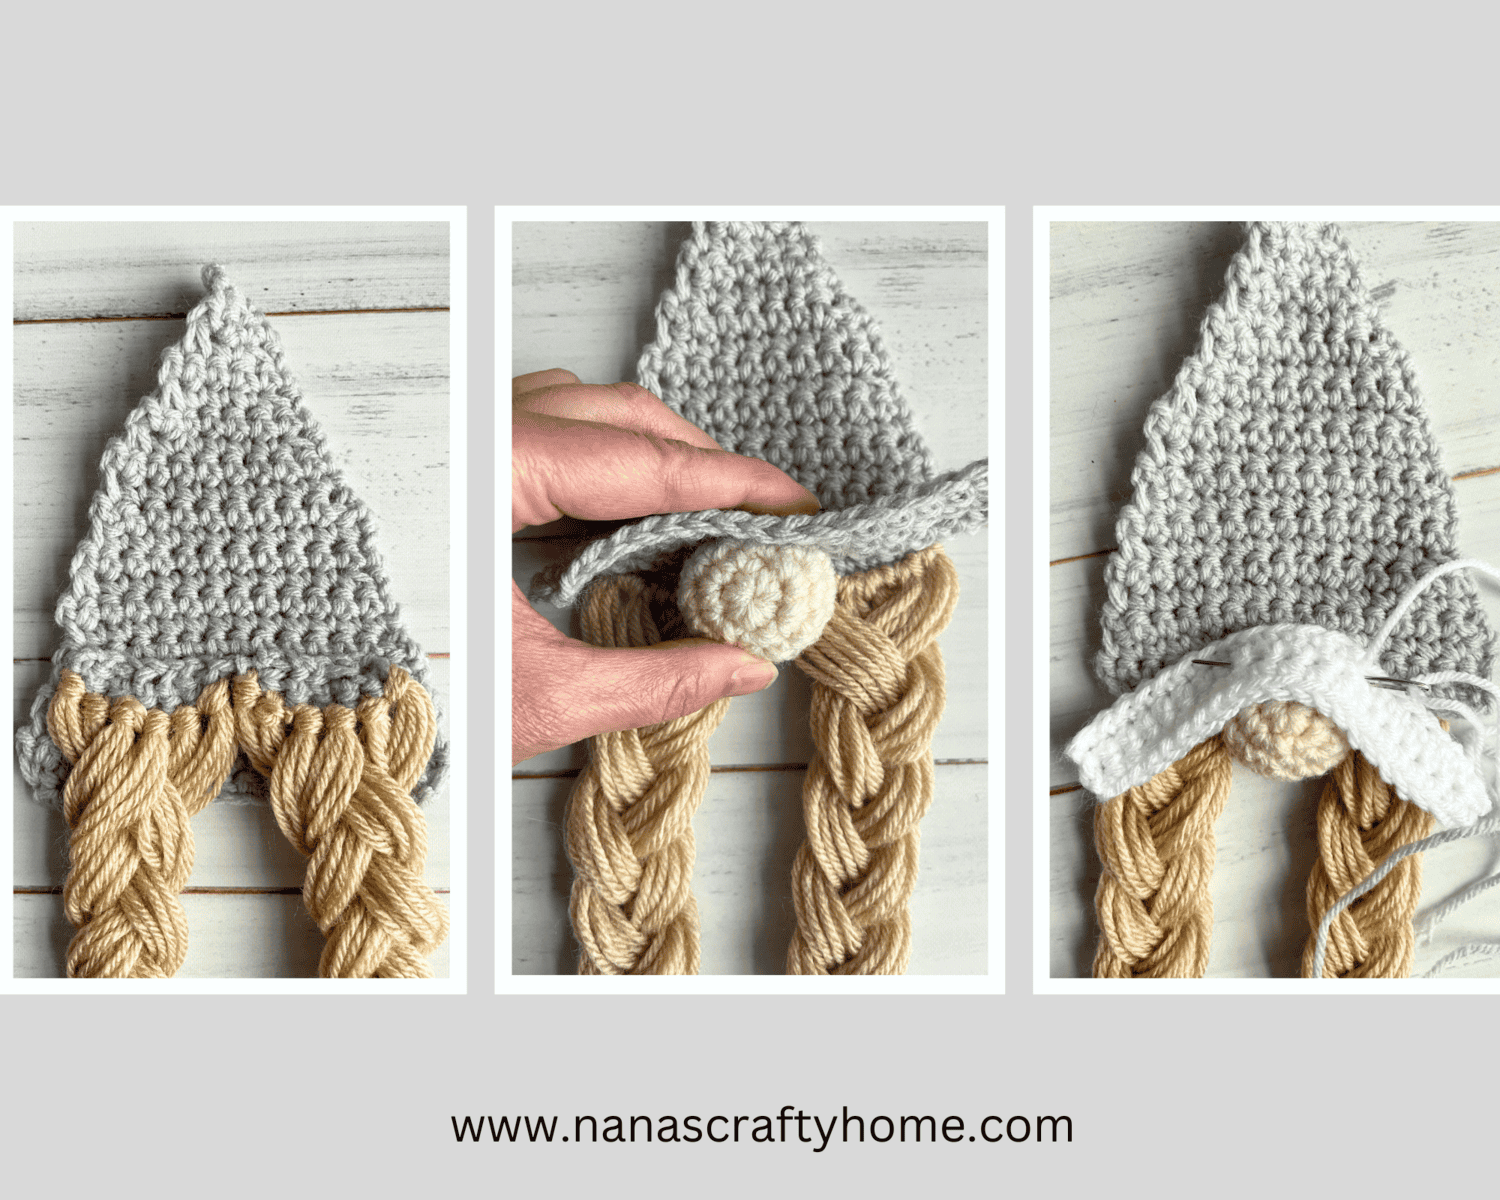
7. The hat trim is then sewn to the front of the hat over her nose.
8. Join the hat panels together with single crochet around the outside edges.
All done!
I hope you love making these Pilgrim Gnome Bottle Toppers! I would love to see your finished gnomes – be sure to send me a photo to tonya@nanascraftyhome.com so I can see and share!
Happy Thanksgiving!
Tonya

Supplies for the Pilgrim Gnome Bottle Toppers
*This post contains affiliate links. You can click on any yarn or material highlighted to purchase. I will receive a small commission if you purchase but it won’t cost you any extra! As an Amazon Associate I earn from qualifying purchases.
I am using Red Heart Super Saver* yarn for my bottle toppers which is a medium worsted weight acrylic yarn. Very economical and with plentiful color options! You can certainly substitute your favorite worsted weight yarn – Hobby Lobby’s I Love This Yarn!, Red Heart With Love, Paintbox Simply Aran, Vanna’s Choice, Big Twist Value, Caron Simply Soft, Caron One Pound and so many more! Raid your yarn stash – even mix and match.
Faux fur fabric material can be found at most craft supply stores. You can find it in the fabric section of the store and it is purchased by the yard. It is a bit pricey per yard but you really don’t need much at all. I purchased 1/4 of a yard a couple of years ago and have barely made a dent in it!


This pattern is also available as an ad-free, printable PDF! You can purchase the individual pattern, or if you love PDFs, you might want to check out my Lifetime Membership. It’s an awesome deal! Never pay for one of my PDFs again!! (Or, scroll down for the free version!)
For more Thanksgiving crochet pattern inspiration check out my pattern roundup of 20 adorable and free crochet Thanksgiving patterns!
You may also love the following free crochet patterns by Nana’s Crafty Home:


- 1. Santa Gnome Bottle Topper free crochet pattern
- 2. Thanksgiving Turkey Towel Topper crochet pattern
- 3. Leprechaun Gnome Towel Topper free crochet pattern
Pilgrim Gnomes Bottle Topper Set free written pattern instructions
Pattern written in US crochet terminology
Supplies:
Red Heart Super Saver Weight 4 / Medium (100% acrylic, 7 oz / 370 yds)
- Black 0.8 oz / 43 yards (Black)
- Light Grey 0.8 oz / 43 yards (Grey)
- Aran 0.2 oz / 12 yards (Cream)
- Buff 0.6 oz / 32 yards (Brown)
Size I (5.5 mm) crochet hook
Small amount of polyfil stuffing
Black embroidery thread to sew faux fur beard to hat
Stitch marker
Scissors
Tapestry needle
Approximate finished size: 5” wide x 6” tall
Gauge: 5 rows = 1” / 4 sc st = 1”
Abbreviations:
- MC = magic circle
- ch = chain
- sc = single crochet
- st(s) = stitch(es)
- sk = skip
- sc2tog = single crochet 2 st together (see special stitches section below)
- sp = space
- WS = wrong side
- RS = right side
- yo = yarn over
Special Stitches:
sc2tog = (insert hook into next st, yo and pull up a loop) twice, yo and pull through all 3 loops on hook.
Pattern Notes:
- Nose is worked in seamless rounds – do not slip stitch join at the end of rounds.
- Faux fur fabric is cut to size and then sewn to inside of finished hat.
Recommended Tutorial
How to cut & sew on faux fur beard – instructions shown from another video tutorial for the Christmas Gnome Bottle Topper
Man Gnome Instructions
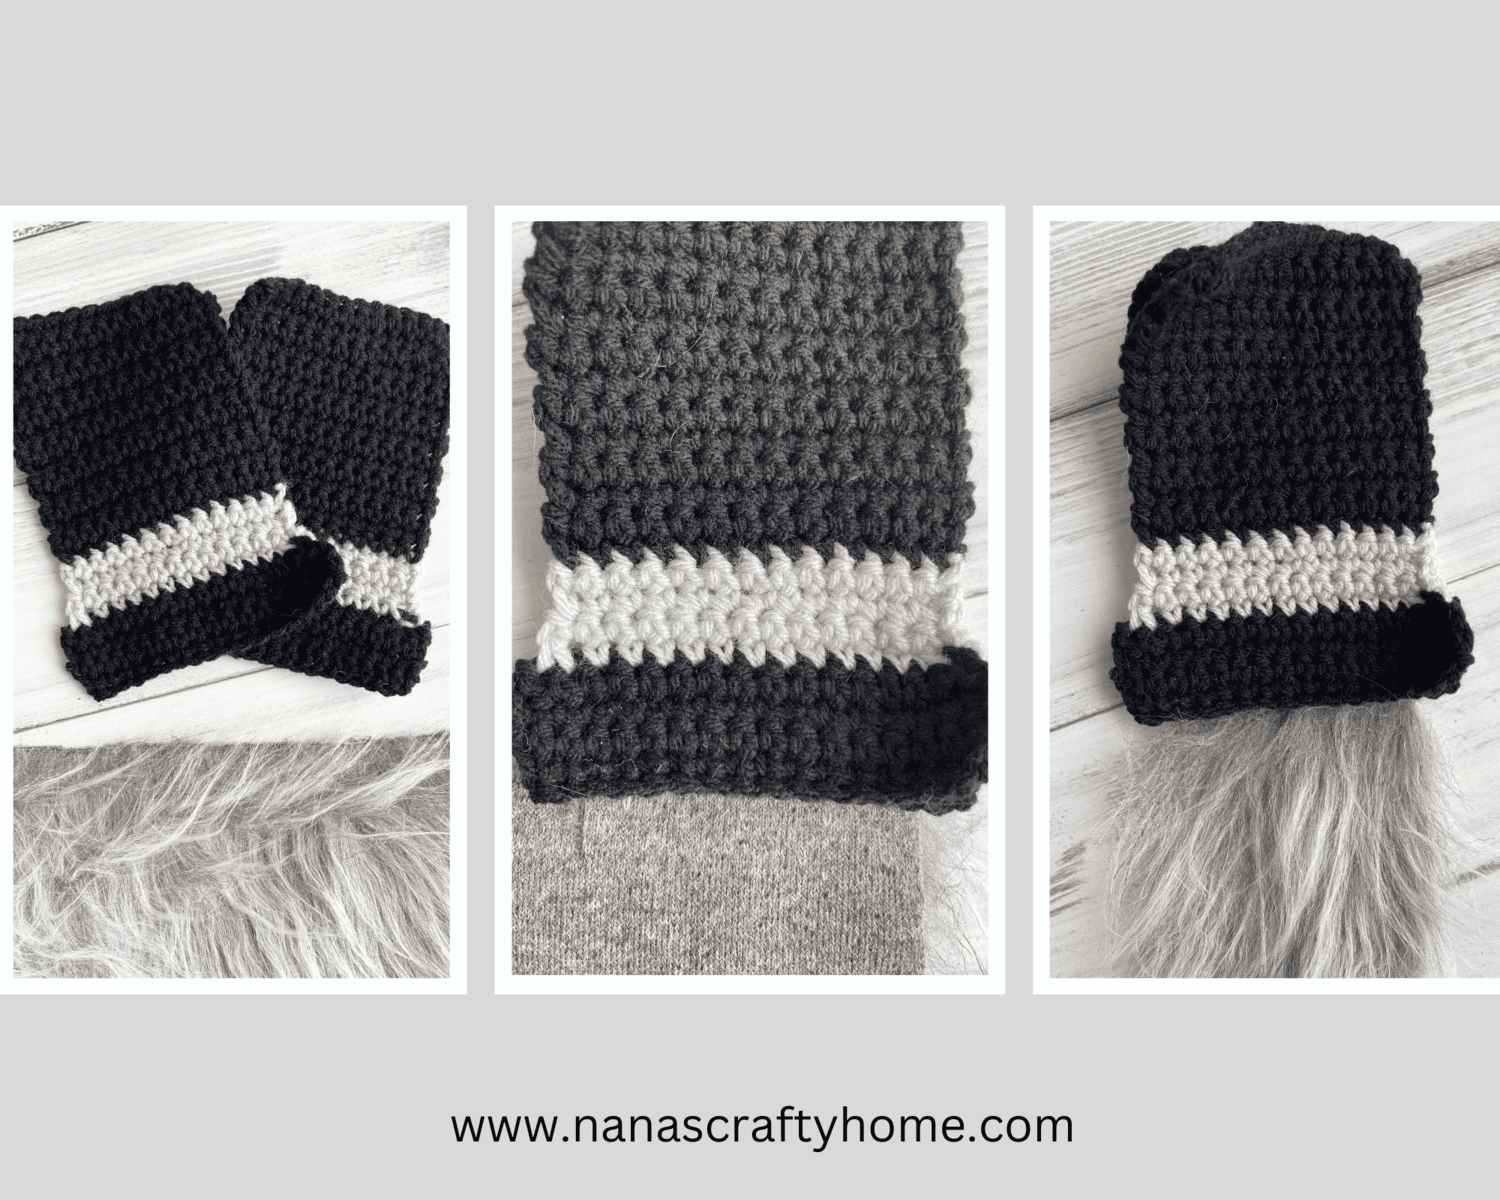
Hat Panel (Make 2)
With Black, ch 18.
Row 1: (RS) Sc in second ch from hook and in each ch to end. Turn. (17)
Row 2 – 3: Ch 1, 1 sc in each st across. Turn. (17)
Row 4: Ch 1, sc2tog, 1 sc in each st to last 2 sts, sc2tog. Turn. (15) Fasten off Black.
Row 5: With Grey, repeat row 4. (13)
Row 6 – 8: Ch 1, 1 sc in each st across. Turn. (13)
Fasten off Grey.
Row 9 – 23: With Black, 1 sc in each st across. Turn.
Fasten off after row 23. Weave in ends.
Nose
Round 1: With Cream, 6 sc in MC, place a stitch marker in the first sc made. Do not join with sl st to first st after last sc st. (6)
Note: Continue moving up your stitch marker to the first st of each round.
Round 2: 2 sc in each st. (12)
Round 3: *1 sc in next 3 sts, 2 sc in next st*; repeat from * to * to end. (15)
Round 4: 1 sc in each st. (15)
Round 5: *1 sc in next 3 sts, 1 sc2tog*; repeat from * to * to end. (12)
Stuff nose
Round 6: Sc2tog 6 times. Join with sl st to first st. (6). Fasten off. Pull yarn through last st, sew yarn end through front loop of each of the 6 st, pull tight to close the circle. Note: I recommend stuffing the nose right before the last sc2tog.
Buckle
With Brown, ch 12, sl st to first st to form a ring without twisting chain.
Ch 1, sc in same st, 1 sc in next st, *(sc, ch 2, sc) in next st, 1 sc in next 2 sts,* repeat from * to * to last st, (sc, ch 2, sc) in last st, sl st to first st.
Fasten off, leaving a long tail for sewing.
Assembly
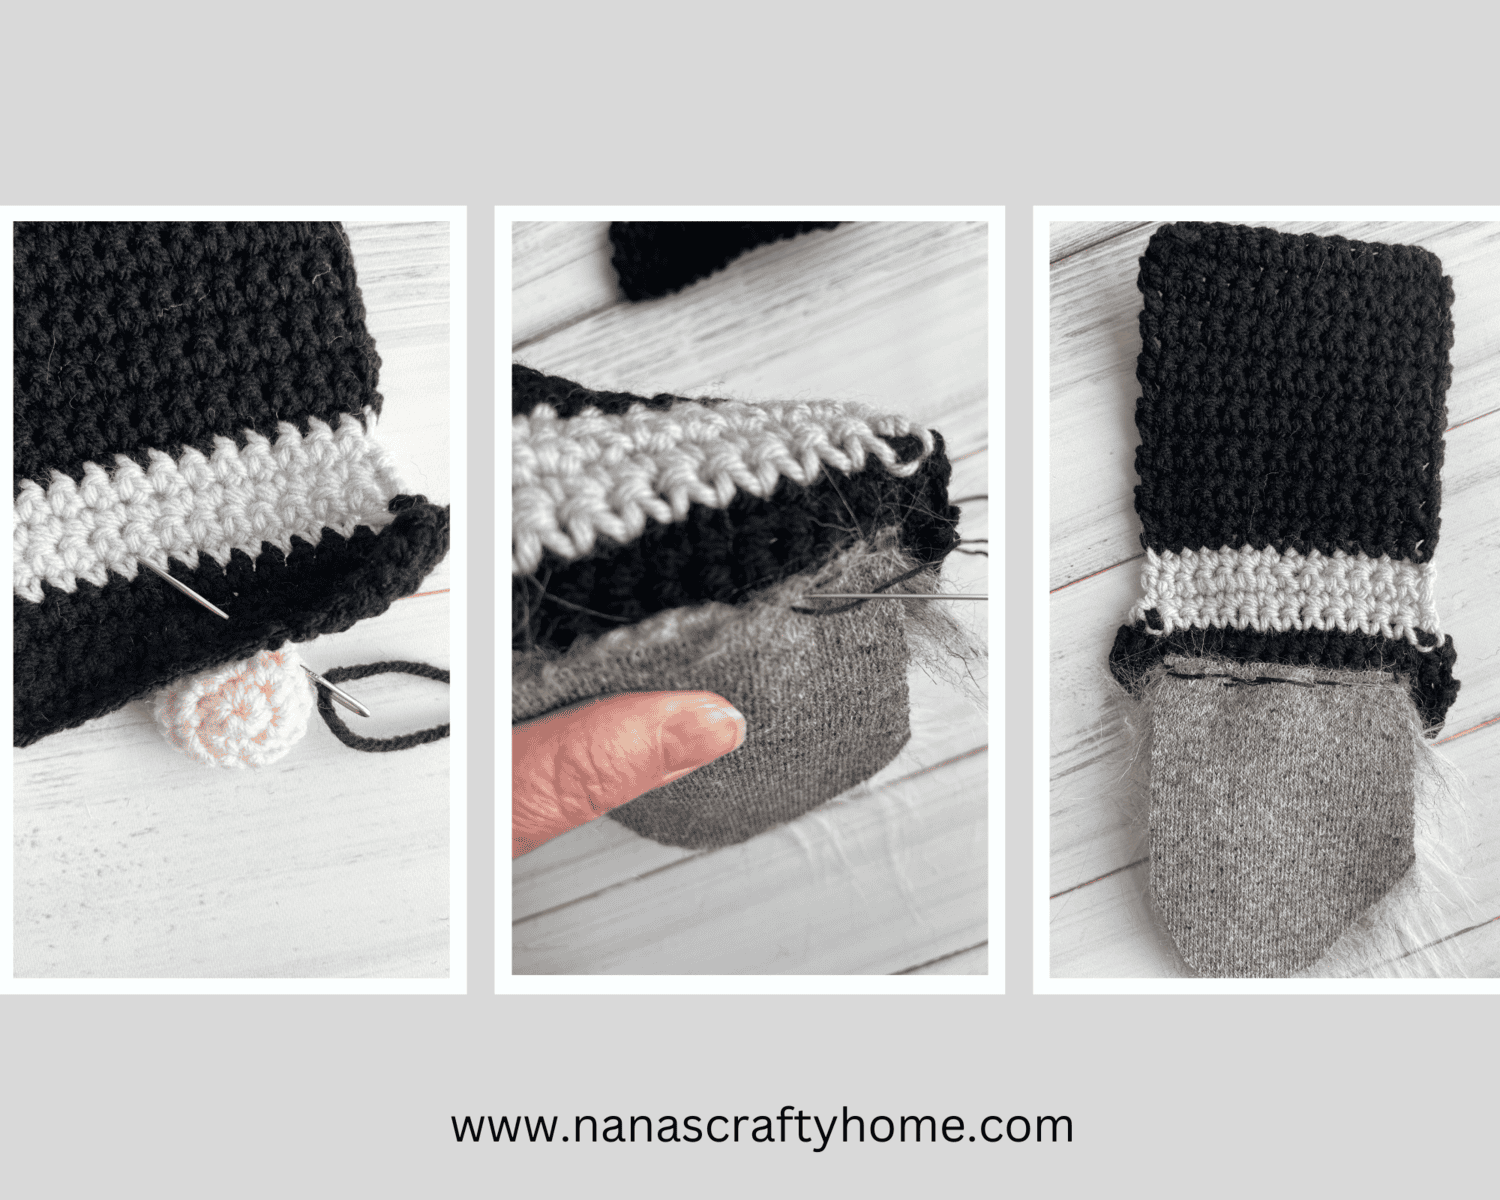
With long length of yarn, sew buckle to RS of front hat panel in middle of grey hat band.
With a long length of black yarn on needle, sew nose on the WS of front hat panel inside the bottom edge of hat in the middle (centered under buckle).
Cut faux fur material to size desired for beard approx 4” wide at top x 4.5” long to tip. Taper cut slightly going towards bottom of beard. With embroidery thread, sew top of beard to bottom edge of the inside of hat behind nose.
With WS of hat panels facing, sl st join black yarn to bottom corner of hat and sl st join hat panels together, switch to grey yarn when working through grey hat band sections, leaving bottom of hat open.
Fasten off. Weave in ends.
Woman Gnome Instructions
Hat Panel (Make 2)
With Grey, ch 18.
Row 1: (RS) Sc in second ch from hook and in each ch to end. Turn. (17)
Row 2 – 3: Ch 1, 1 sc in each st across. Turn.
Row 4: Ch 1, sc2tog, 1 sc in each st to last 2 sts, sc2tog. Turn. (15)
Row 5 – 6: Ch 1, 1 sc in each st across. Turn.
Row 7: Ch 1, sc2tog, 1 sc in each st to last 2 sts, sc2tog. Turn. (13)
Row 8 – 9: Ch 1, 1 sc in each st across. Turn.
Row 10: Ch 1, sc2tog, 1 sc in each st to last 2 sts, sc2tog. Turn. (11)
Row 11 – 12: Ch 1, 1 sc in each st across. Turn.
Row 13: Ch 1, sc2tog, 1 sc in each st to last 2 sts, sc2tog. Turn. (9)
Row 14 – 15: Ch 1, 1 sc in each st across. Turn.
Row 16: Ch 1, sc2tog, 1 sc in each st to last 2 sts, sc2tog. Turn. (7)
Row 17: Ch 1, 1 sc in each st across. Turn.
Row 18: Ch 1, sc2tog, 1 sc in each st to last 2 sts, sc2tog. Turn. (5)
Row 19: Ch 1, 1 sc in each st across. Turn.
Row 20: Ch 1, sc2tog, 1 sc in next st, sc2tog. Turn. (3)
Row 21: Ch 1, 1 sc in each st across. Turn.
Row 22: Ch 1, sc2tog, 1 sc in last st. Turn. (2)
Row 23: Ch 1, sc2tog. (1)
Fasten off. Weave in ends.
Hat Trim
With White, ch 21.
Row 1: Sc in second ch from hook and in each ch to end. Turn. (20)
Row 2 – 3: Ch 1, 1 sc in each st across. Turn.
Fasten off, leaving a long tail for sewing.
Nose
Repeat nose instructions for Man Gnome.
Braids
Braid base
With Grey (hat color), ch 7.
Row 1: 1 sc in second ch from hook and in each ch to end. (6)
Fasten off, leaving a long tail for sewing to hat. Weave in remaining end.
Braid
Cut 18 long pieces of Brown (braid color) approximately 19” long. Take 3 strands of yarn and add to each stitch of base as fringe. To form fringe, insert hook into 1st sc stitch of base, fold 3 strands of yarn in half, place fold of strands on hook, pull through stitch to form a loop, pull ends of fringe through loop and gently tighten to form fringe. Repeat for each of the 6 stitches of base.
To braid, separate yarn fringe into 3 sections of 12 strands of yarn per section. Braid sections. Use Grey (hat color) to tie a knot at the bottom of the braid and form a bow.
Trim braid as desired. Repeat instructions for second braid. Trim braids to match.
Assembly
With long length of yarn left for sewing to hat, place braid base on the inside front edge of hat where desired. Sew securely to inside of hat. Repeat for second braid – be sure braids match in placement!
With long length of grey, sew nose to bottom edge of front panel of hat in the middle over braids.
With long length of yarn, sew hat trim band to hat over nose.
With WS of hat panels facing together, join Grey with sl st to bottom right corner. Sc evenly around outside edge of hat to bottom left corner leaving bottom of hat open.
Fasten off, weave in ends.
Copyright 2024 Tonya Bush / Nana’s Crafty Home
Social Media links:
Facebook: https://www.facebook.com/nanascraftyhome
Instagram: https://www.instagram.com/nanascraftyhome/
Pinterest: https://www.pinterest.com/nanascraftyhome/
YouTube: https://www.youtube.com/c/TonyaBush
Twitter: https://twitter.com/nanascraftyhome
Facebook Group: https://www.facebook.com/groups/829792060522798
Sign up for my Newsletter: https://nanascraftyhome.com/sign-up-for-my-free-newsletter/
 Hi! Thank you so much for being here! I am Tonya the designer behind Nana's Crafty Home. As a wife, mother, Nana of 9 & with 2 fur babies, my days are filled with love, laughter, hugs and yarn! Here you will find colorful and creative crochet designs for yourself or loved ones. My hope is that you will be inspired to learn and create along with me!