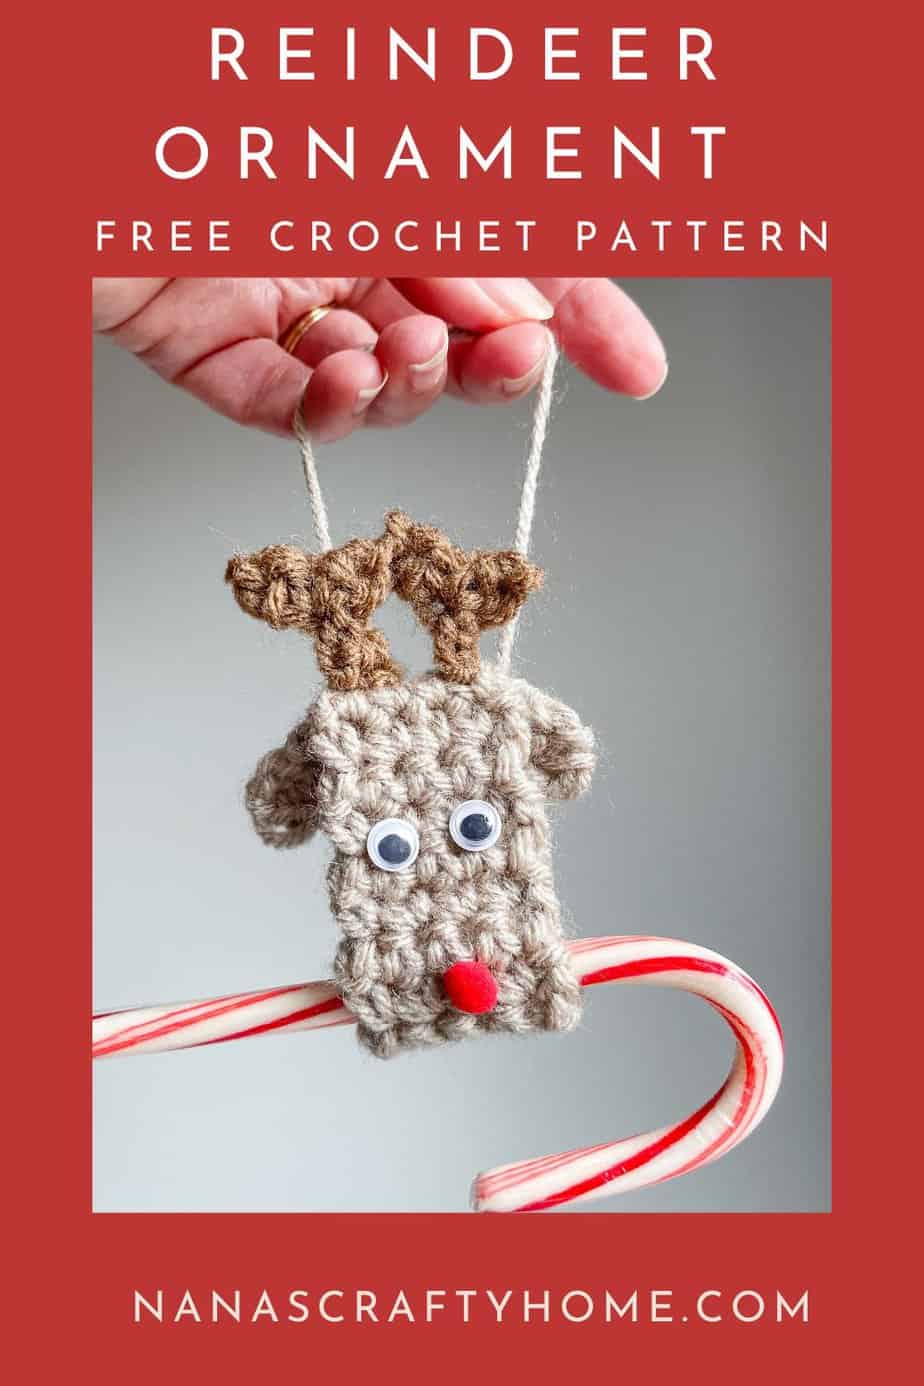
The crochet reindeer pattern free Christmas Decor ornament is a free crochet pattern by Nana’s Crafty Home!

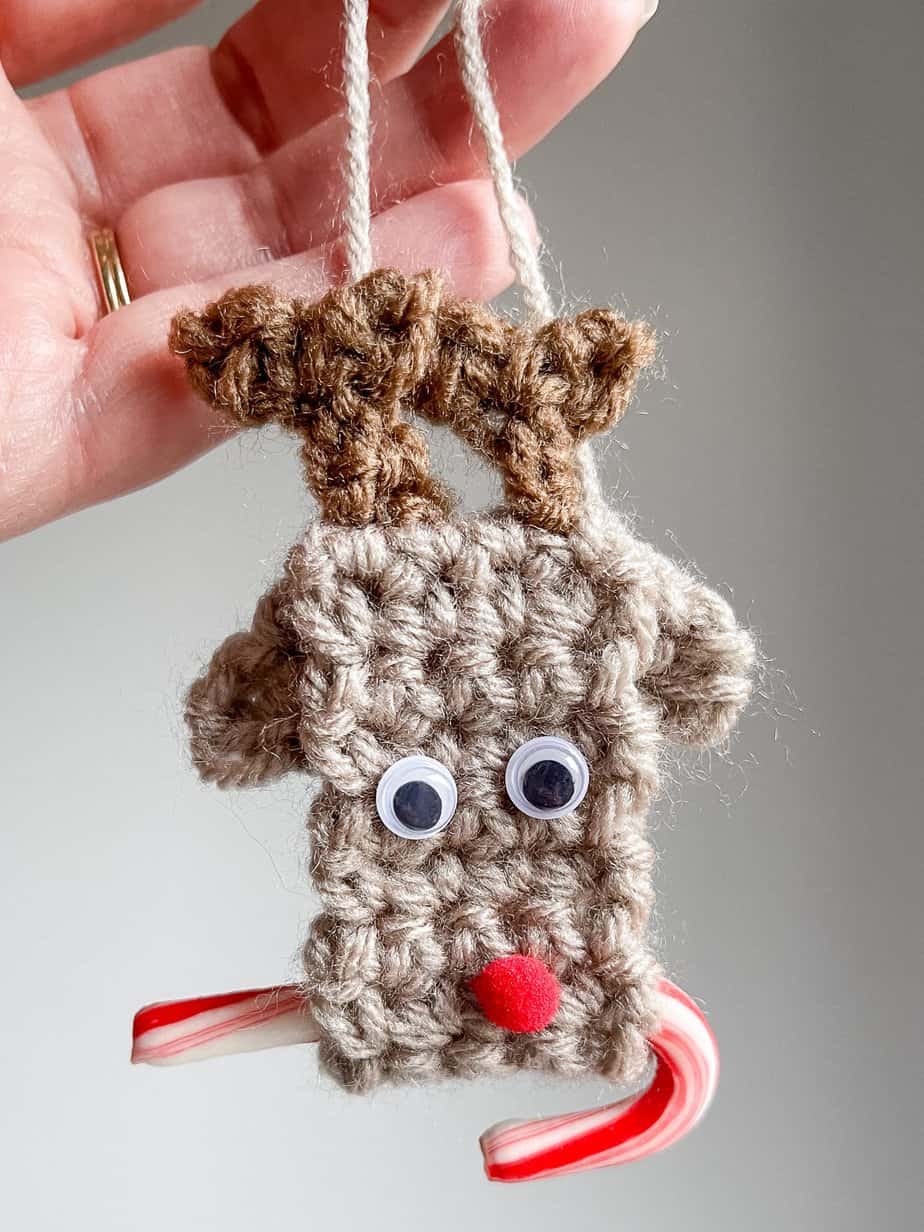
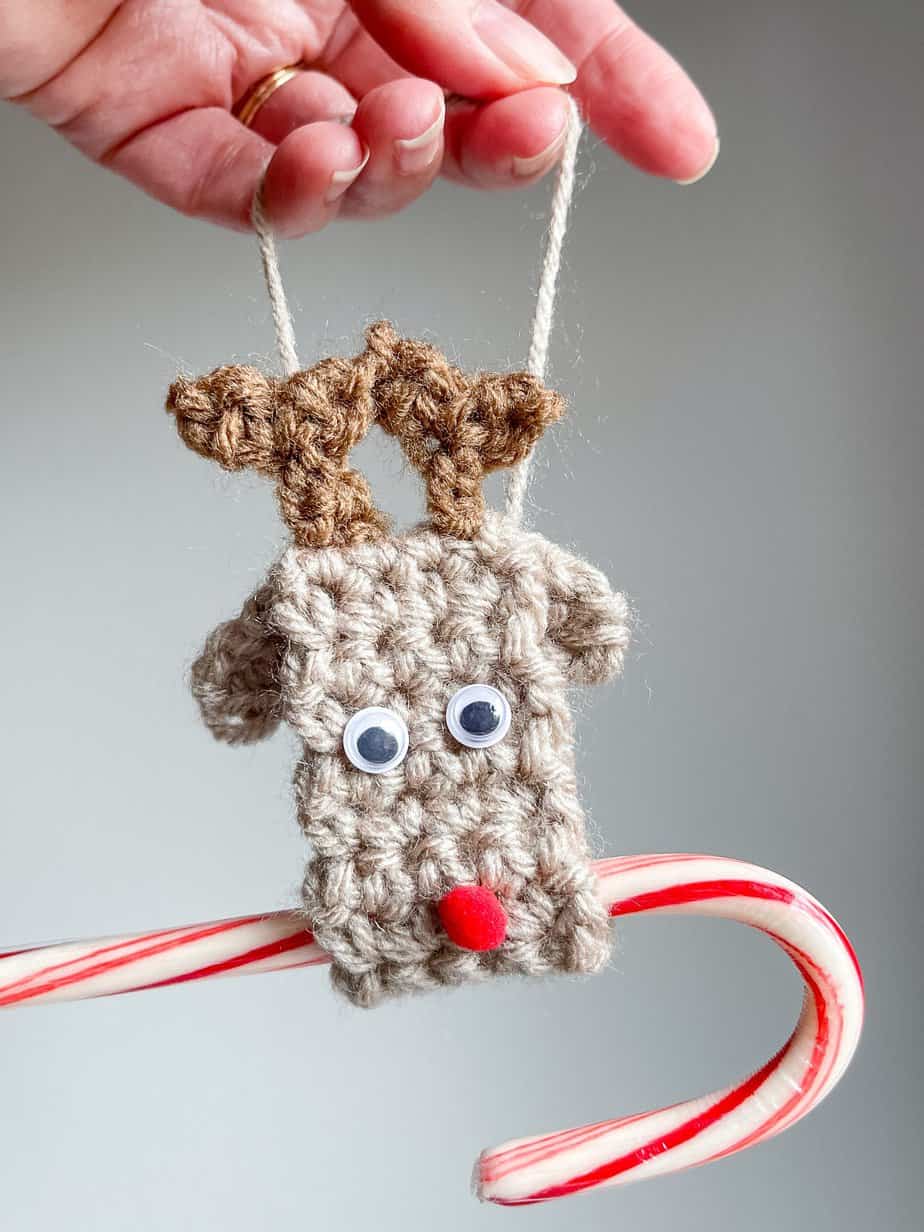
A crochet reindeer Christmas ornament is a charming and festive decoration that adds a touch of warmth and holiday spirit to your Christmas tree or home.
These cute little reindeer ornaments work up so quickly too! Perfect project for beginning crocheters as they are made with simple stitches.
This adorable reindeer ornament is a versatile and charming decoration that can be used in various ways to add a festive touch to your Christmas celebrations. Here are several different ways you can use this crochet reindeer pattern:
A Christmas Tree Decoration – simply attach a loop to hang and add a fun and whimsical touch to your tree.
Gift Topper – use this cute reindeer as a unique and decorative gift topper. Instead of a traditional bow or ribbon, tie the reindeer to the top of the wrapped gift to add a touch of handmade to make your gift even more special!
Wreath Embellishment – attach this reindeer to your Christmas wreath – with or without candy cane!
Garland Decoration – hang several reindeer on a hanging garland on your fireplace mantel or staircase railing.
Stocking Stuffer – tuck this small crochet reindeer into a loved one’s Christmas stocking as an extra surprise gift!
Find unique ways to incorporate this adorable ornament into your Christmas holiday decor! Or, pass out these ornaments to classmates, work colleagues or residents of your local nursing home.
Crochet Reindeer Pattern Free Pattern Details
The main portion of the reindeer is made with rows of single crochet stitches and before fastening off you will create ears on each side.
After fastening off you will fold the ends together over the ears which then stick out from the center of the circle you formed.
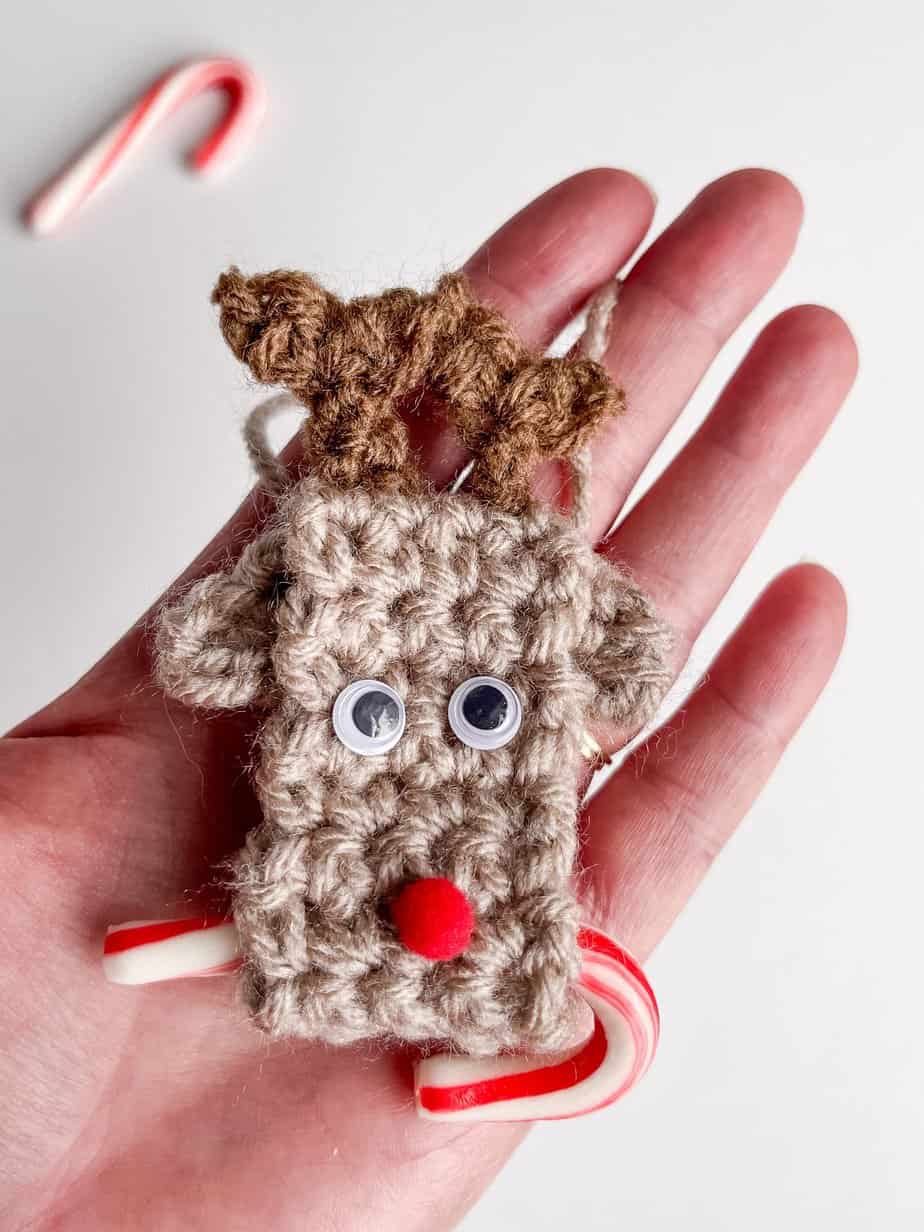
The antlers work up quickly in dark brown yarn and are then sewn to the top of the reindeer’s face over the ears.

Now add your safety or wiggly eyes, sew on your button nose or glue on a tiny red pom pom for his nose, then add your hanging loop to complete your reindeer! Your hanging loop could be a long strand of yarn or ribbon. All he needs is a candy cane and he is all ready for gifting!
I have a complete video tutorial for this crochet reindeer pattern that you can find below or on Youtube. Subscribe to my YouTube Channel to get notified whenever I post a new video.
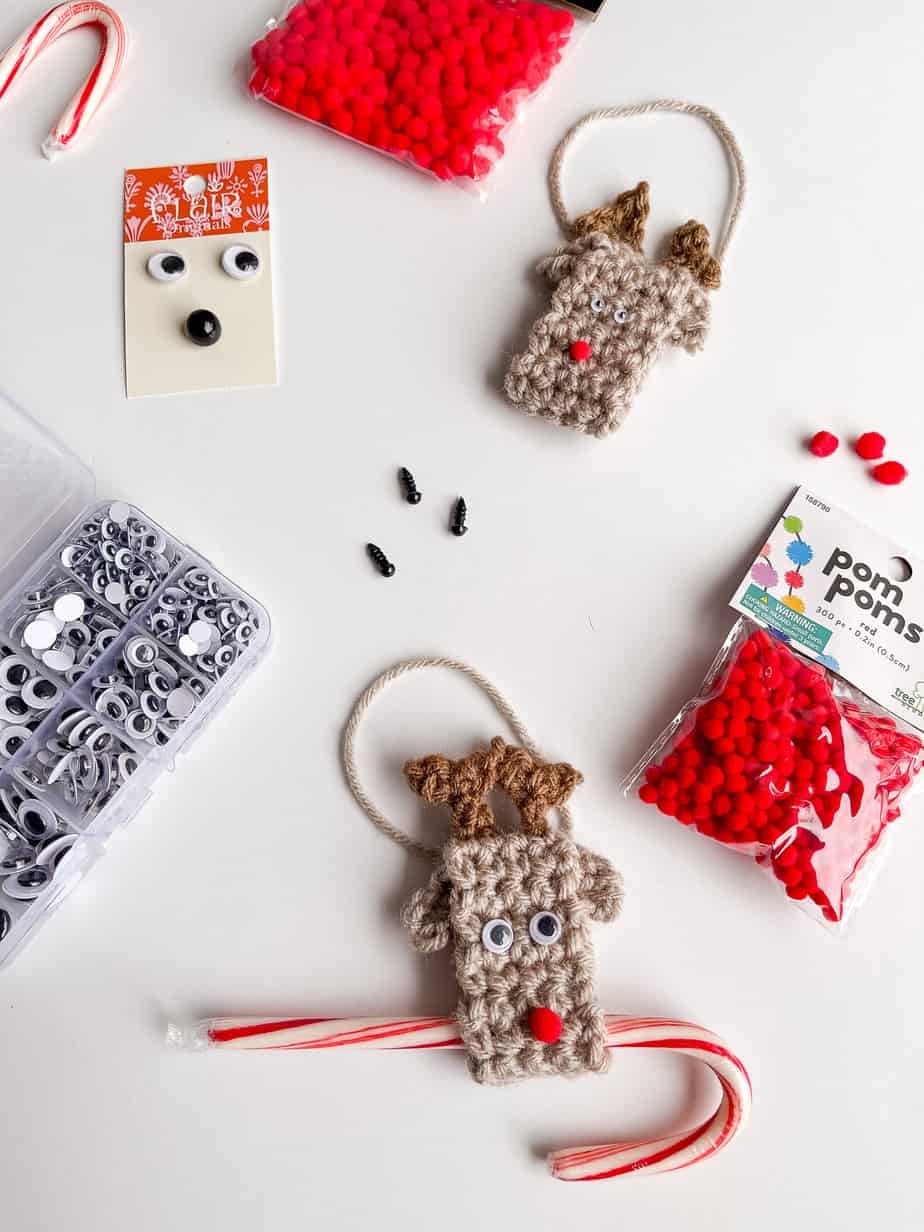
I used some Red Heart With Love medium worsted weight yarn* that I had left over from my previous reindeer projects but this is a great project for your scrap basket – cotton or acrylic!
For the fun embellishments I found a lot of different options! For the eyes I used small plastic black safety eyes or fun wiggly eyes in different sizes. I found both of these options at Amazon:
Small black 6mm safety Eyes set of 130
Wiggle Googly Eyes in multiple sizes SET of 450 eyes! – these are self-adhesive, too!
For the red pom poms I found those at Hobby Lobby in multiple sizes but my favorite was the larger 7 mm size.
*Disclosure: I only recommend products I would use myself. This post may contain affiliate links that if you make a purchase at no additional cost to you, I may earn a small commission. As an Amazon Associate I earn from qualifying purchases.
If you didn’t want to purchase safety eyes and buttons you could certainly embroider those on your reindeer. No need to get fancy here! I would recommend using embroidery thread rather than yarn for your eyes and nose since his face is pretty small.
This post is part of the Holiday Stashdown Crochet Along sponsored by CAL Central! For more information head on over to the blog post for all the details!
The crochet reindeer pattern is also available as an ad-free, printable PDF. You can purchase the individual pattern for the Reindeer Ornament, or if you love PDFs, you might want to check out my Lifetime Membership. It’s an awesome deal! Never pay for one of my PDFs again!! (Or, scroll down for the free version!)

You can find the free written pattern below at the bottom of this post or you can purchase the ad-free pdf of the crochet reindeer pattern for a small fee. Thank you so much for supporting my work!

If you would like daily crochet inspiration be sure to follow me on Facebook, Instagram, Pinterest, YouTube, Twitter and Tumblr!
To get notified of my free crochet patterns and future giveaways, sign up for my newsletter. I never share or sell your information to third parties — it stays private!
Check these 25+ free crochet reindeer patterns:

You may also like the following crochet reindeer free patterns by Nana’s Crafty Home:


- 1. Reindeer Granny Square free crochet pattern
- 2. Crochet Reindeer pattern free treat basket pattern
- 3. Reindeer Towel Holder free crochet pattern
Reindeer Ornament Free Written Pattern Instructions
Pattern written in US crochet terminology
Supplies:
Red Heart With Love Weight 4 / Medium (100% acrylic, 7 oz / 370 yds)
- Taupe 0.2 oz / 11 yards (Tan)
- Chocolate 0.1 oz / 6 yards (Brown)
Size J / 6.0 mm crochet hook
2 – 6 mm safety eyes or wiggle googly eyes
1 – 1/2” red button or 7 mm red pom pom
Embroidery floss for sewing on button
Scissors
Tapestry Yarn Needle
Stitch Markers
Approximate finished size: 1 1/4” x 3” (including antlers)
Abbreviations:
- ch(s) = chain(s)
- sc = single crochet
- sl st = slip stitch
- st(s) = stitch(es)
- sk = skip
- sc2tog = single crochet 2 sts together (see special stitches section below)
Special Stitches:
sc2tog = (insert hook in next st, yo and pull up a loop) twice, yo and pull through all 3 loops on hook.
Recommended Tutorial:
Reindeer Ornament Video Tutorial
Pattern Instructions
Face
With tan and leaving a long tail for sewing, ch 5.
Row 1: 1 sc in second ch from hook and in each ch to end. Turn. (4)
Row 2 – 18: Ch 1, sc in each st. Turn.
Row 19: Ch 1, sc in same st, sc in next st (leave remaining sts unworked). Turn. (2)
Row 20: Ch 1, sc in each st. Turn.
Row 21: Ch 1, sc2tog. (1)
Fasten off.
Attach tan yarn to first unworked st of row 19.
Row 1: Ch 1, sc in same st, sc in next st. Turn. (2)
Row 2: Ch 1, sc in each st. Turn.
Row 3: Ch 1, sc2tog. (1)
Fasten off. Weave in ends not left for sewing.
Antlers (make 2)
With brown, ch 4, sc in second ch from hook, sl st in next ch, ch 2, sc in second ch from hook, sl st in next ch (same ch with previous sl st), sc in last ch.
Fasten off leaving a tail for sewing and weave in remaining ends.
Assembly
With long tail left for sewing, fold row 1 of face over ears and sew to row 19 of face.
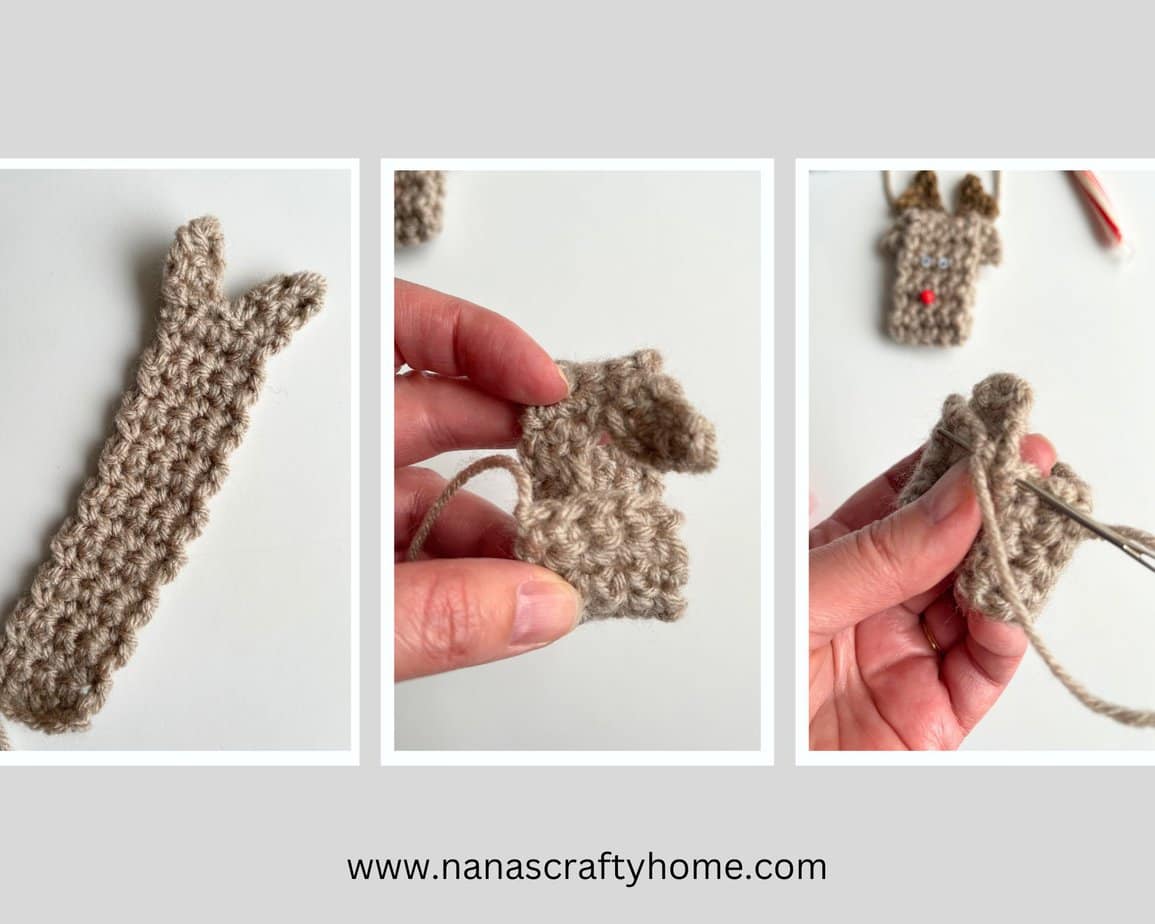
Sew antlers to top of face.

Attach safety eyes to face.
Sew button below eyes.
Cut a long length of tan insert through center of face and knot to create a hanging loop.
Copyright 2023 Tonya Bush / Nana’s Crafty Home, LLC.
Social Media links:
Facebook: https://www.facebook.com/nanascraftyhome
Instagram: https://www.instagram.com/nanascraftyhome/
Pinterest: https://www.pinterest.com/nanascraftyhome/
YouTube: https://www.youtube.com/c/TonyaBush
Twitter: https://twitter.com/nanascraftyhome
Facebook Group: https://www.facebook.com/groups/829792060522798
Sign up for my Newsletter: https://nanascraftyhome.com/sign-up-for-my-free-newsletter/
 Hi! Thank you so much for being here! I am Tonya the designer behind Nana's Crafty Home. As a wife, mother, Nana of 9 & with 2 fur babies, my days are filled with love, laughter, hugs and yarn! Here you will find colorful and creative crochet designs for yourself or loved ones. My hope is that you will be inspired to learn and create along with me!