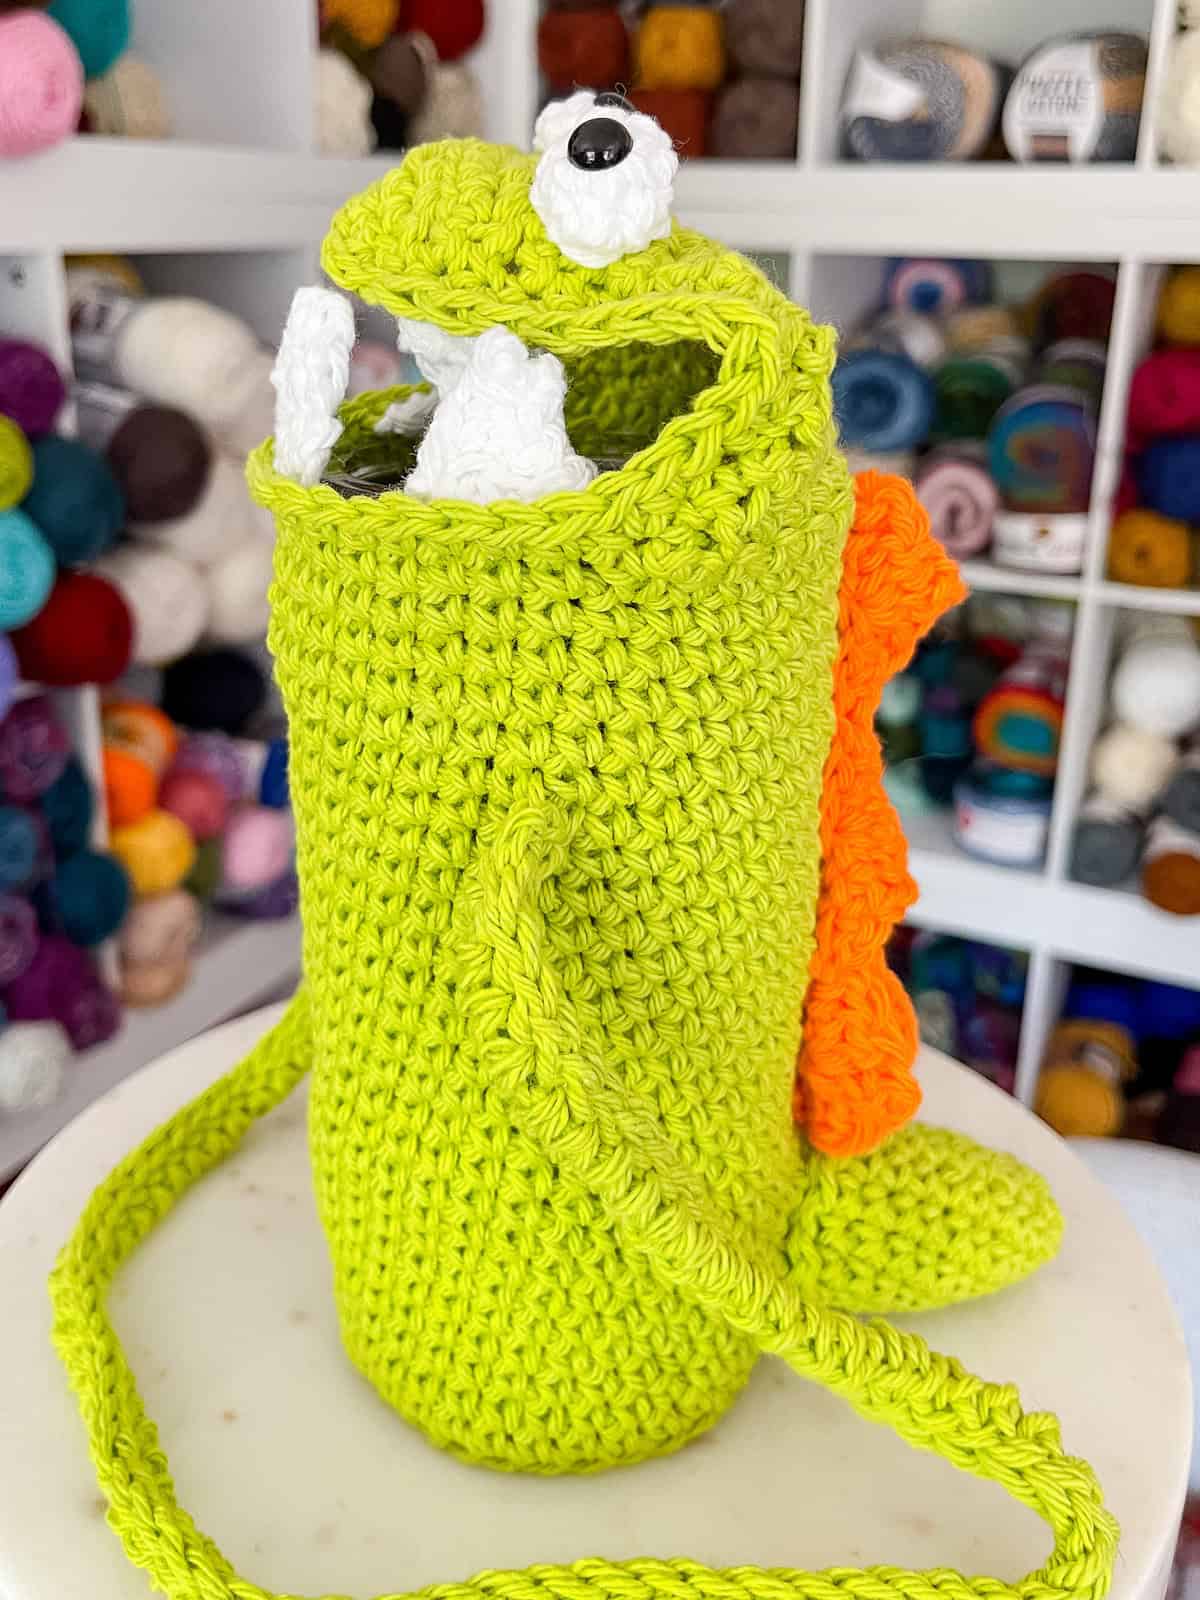
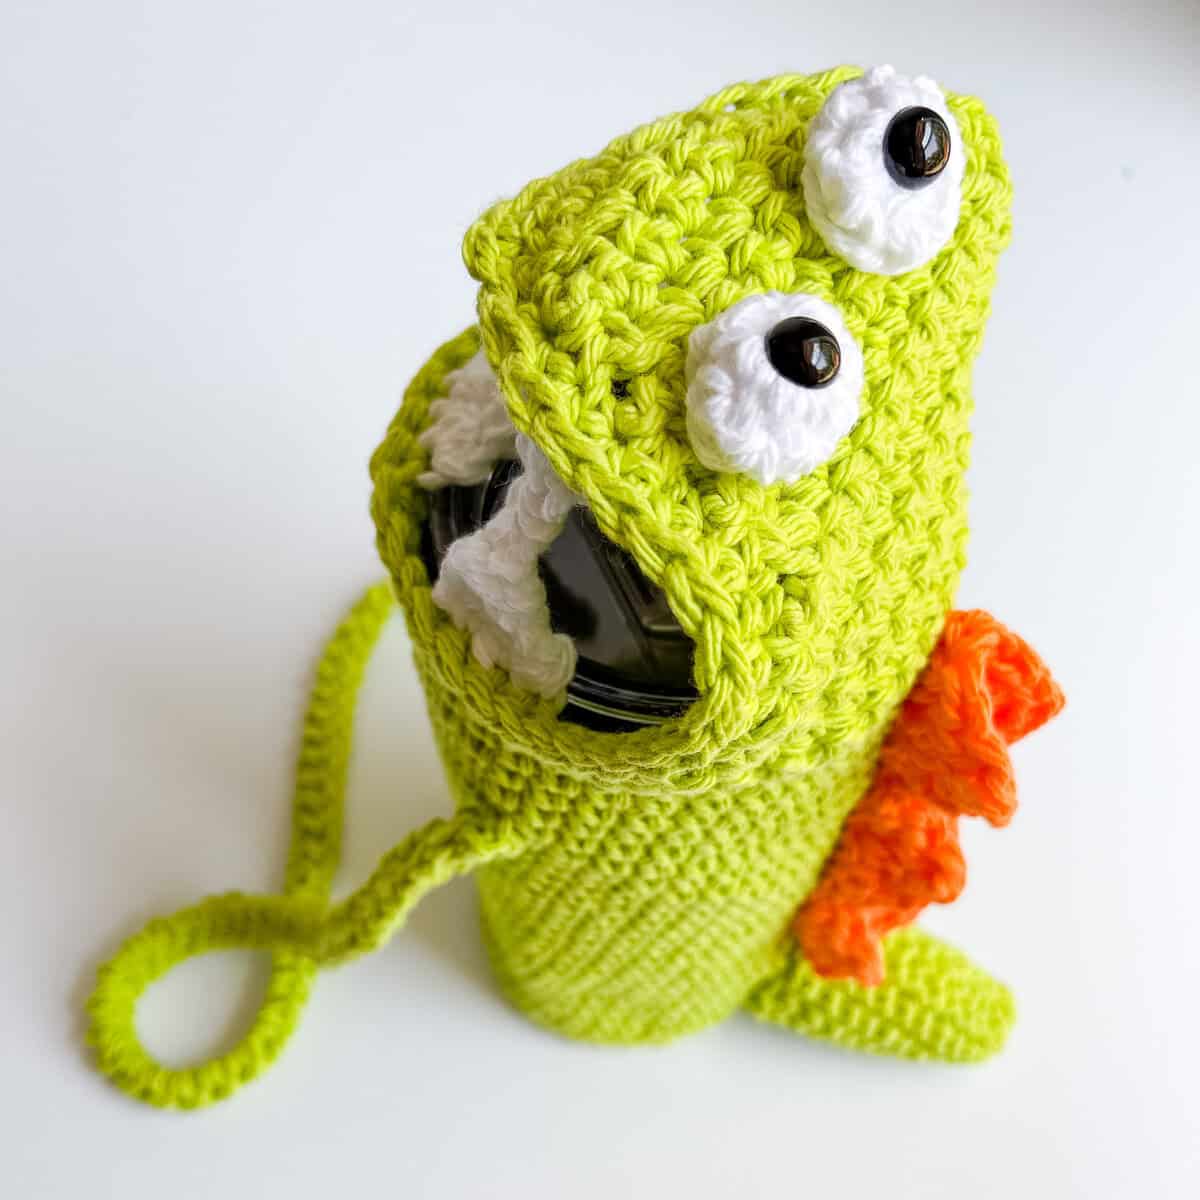
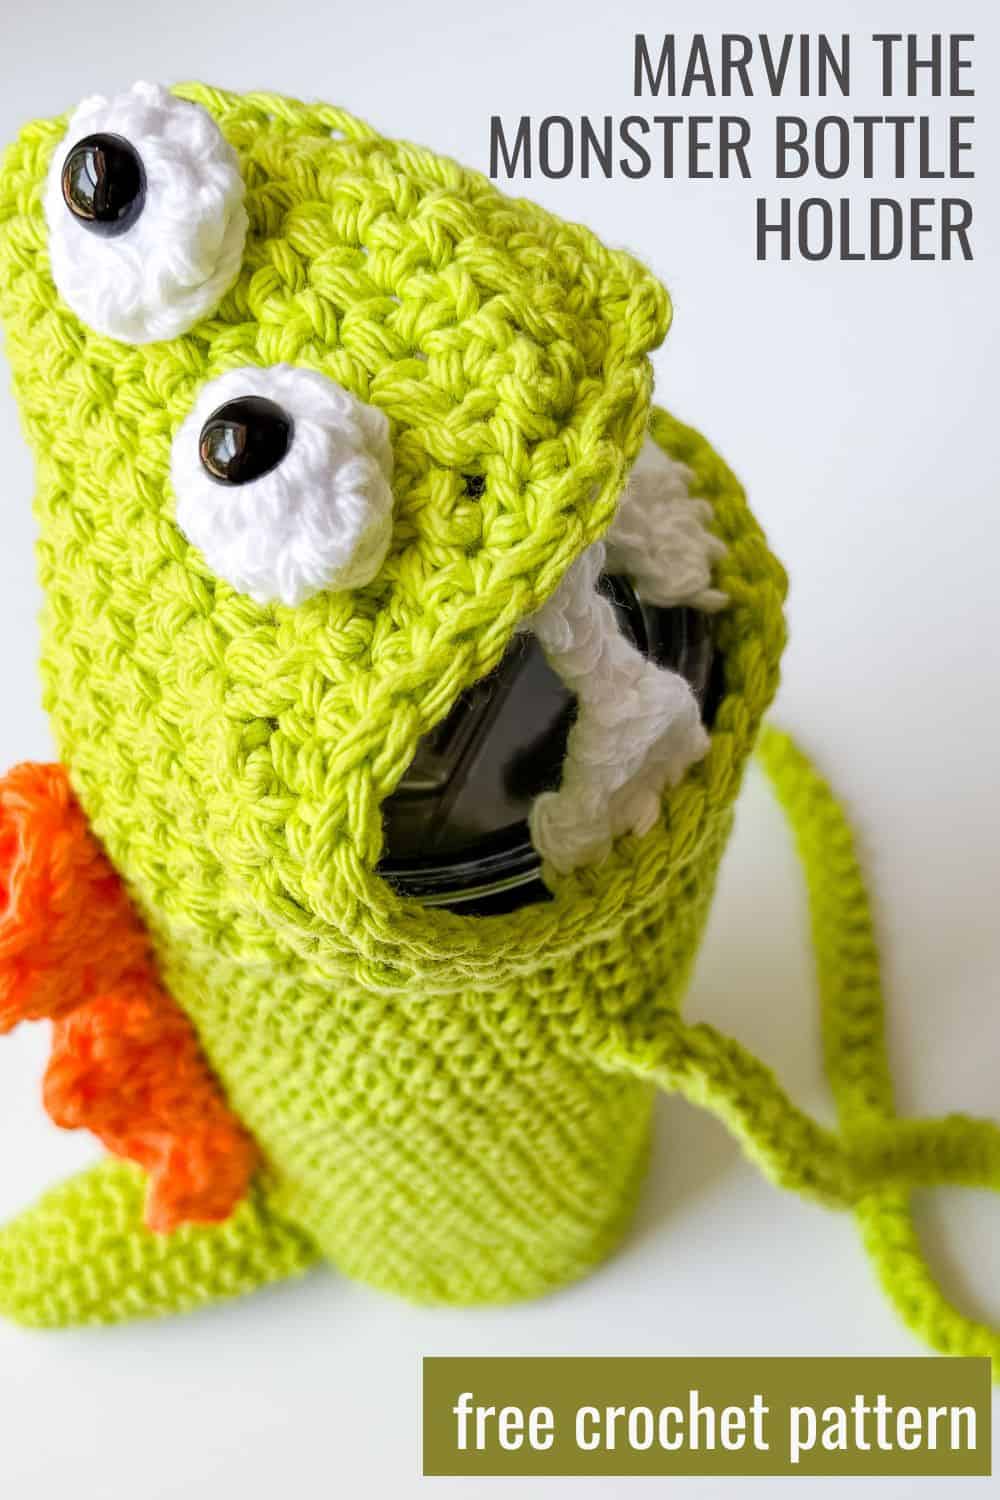
Marvin the crochet monster water bottle holder is perfect for kids and back-to-school fun!
When it came time to celebrate my youngest grandson’s birthday a few months ago, I wanted to make something special that he could use and enjoy every single day. I knew a backpack wasn’t quite what he needed, so I decided to crochet something that would help him stay hydrated and make him smile – an adorable crochet monster water bottle holder! Not only does it remind him to grab his bottle every morning, but it’s also become his constant side-kick for our summer outings!
This perfect for kids crochet pattern is great for back-to-school or for a fun whimsical idea for a birthday, Christmas or Easter!
Marvin the Monster Crochet Water Bottle Holder—a fun and functional accessory that kids will love! Made with bright, durable cotton yarn, Marvin features a playful design with a green monster body, big eyes, and a wide toothy grin. The holder is designed to fit most standard water bottles (with instructions provided to customize), with simple strap for carrying. Whether for school, picnics, or outdoor adventures, this adorable monster keeps drinks handy and adds a touch of whimsy to your child’s day. Perfect as a handmade gift for birthdays and more!

How to make Marvin the Crochet Monster Water Bottle Holder
For the full written pattern instructions for Marvin the Crochet Monster scroll down below. I have the ad-free PDF available for Marvin the crochet monster water bottle holder in my shop. Or, become a Lifetime Member and never pay for a PDF again!
This crochet bottle holder is made from the bottom-up with single crochet stitches throughout the main portion of the pattern. The back spines are made with sl st, sc, hdc, dc and treble all made in one row!
1. Starts with a single crochet base made in a circle. I have a complete tutorial to help you with making a perfect round circle in single crochet stitches. You can easily customize the base size by adding or subtracting rounds of single crochet increases! My tutorial will help you with this as well.
2. Once the base is the size desired you will stop working increases and begin the sides of your bottle holder by working one round of single crochet stitches in the back loop only in each stitch.
3. Now working in both loops, continue working seamless rounds of single crochet stitches to height desired. Stop when the height is just over the height of the bottle you are making it to fit.
4. Once the sides are completed, place stitch markers in the last round by counting half of the total stitch count. With a total of 36 stitches, place stitch markers 18 stitches apart.
5. Begin making head portion by working single crochet stitches in each of the 18 stitches and then turn leaving the remaining stitches unworked. You will now working in turned rows.
6. Once the head portion is complete, work a round of single crochet stitches around the entire head and sides.
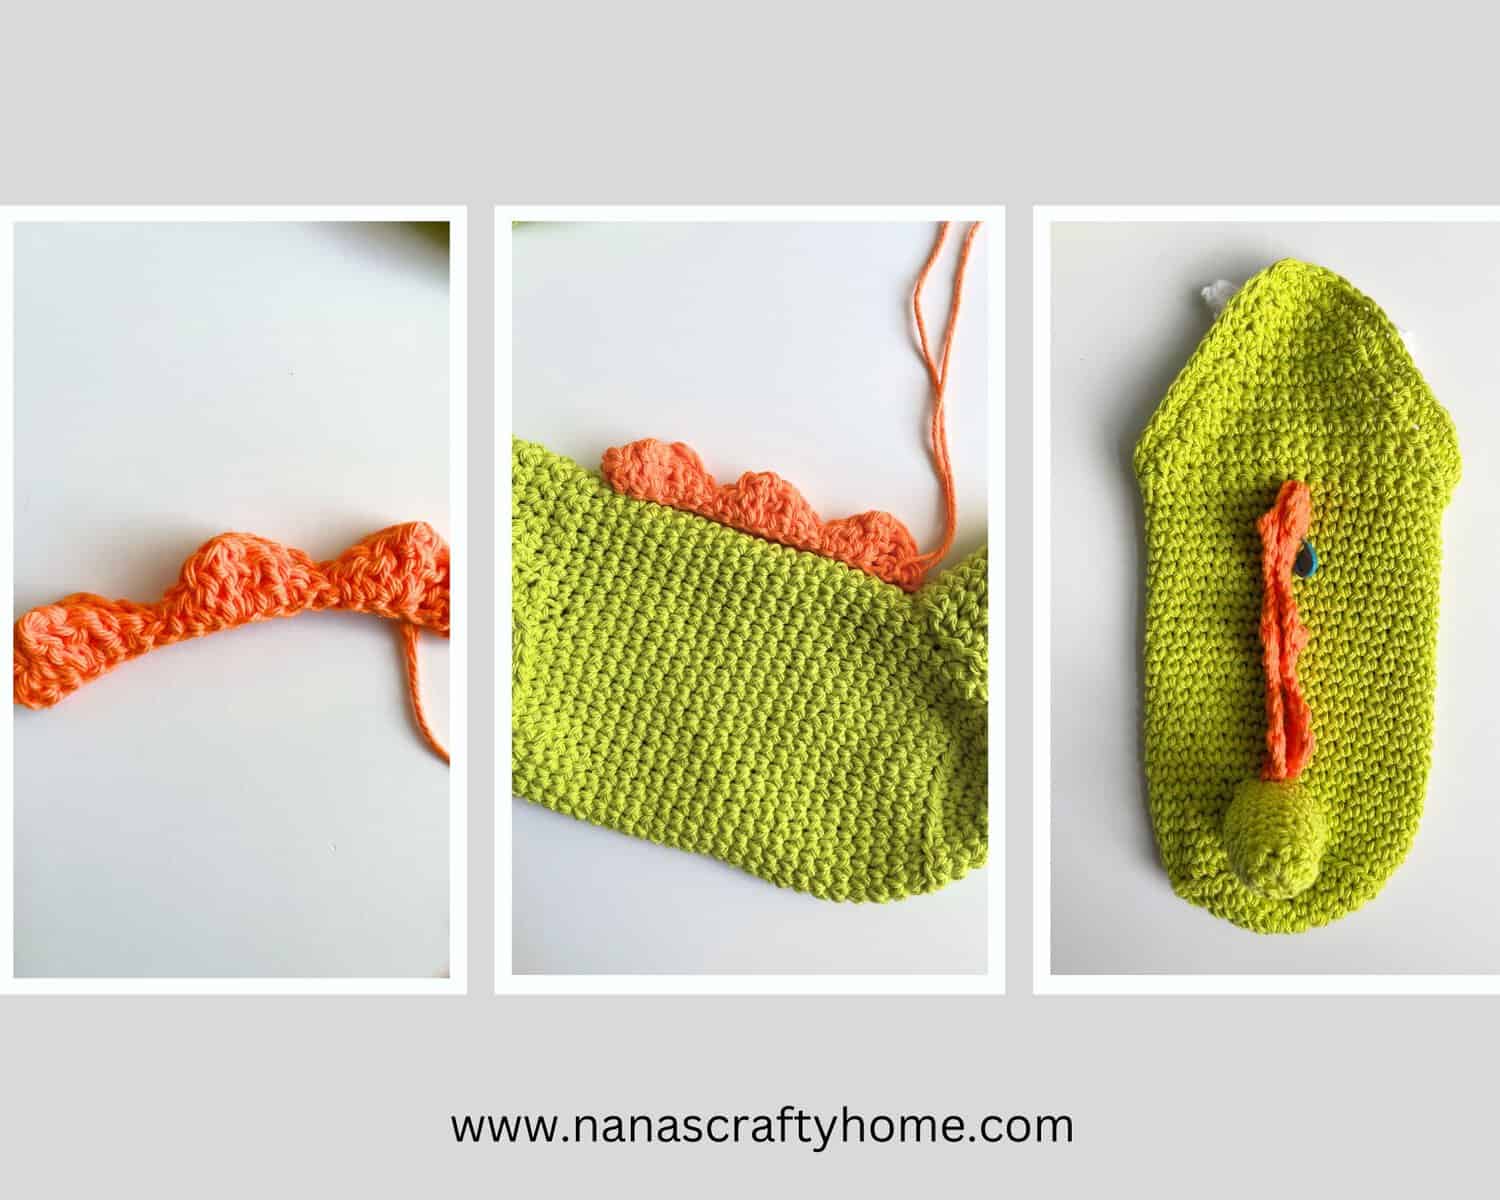
7. Make 5 teeth with your white yarn and set aside.
8. Place stitch markers for teeth placement in last round of single crochet stitches.
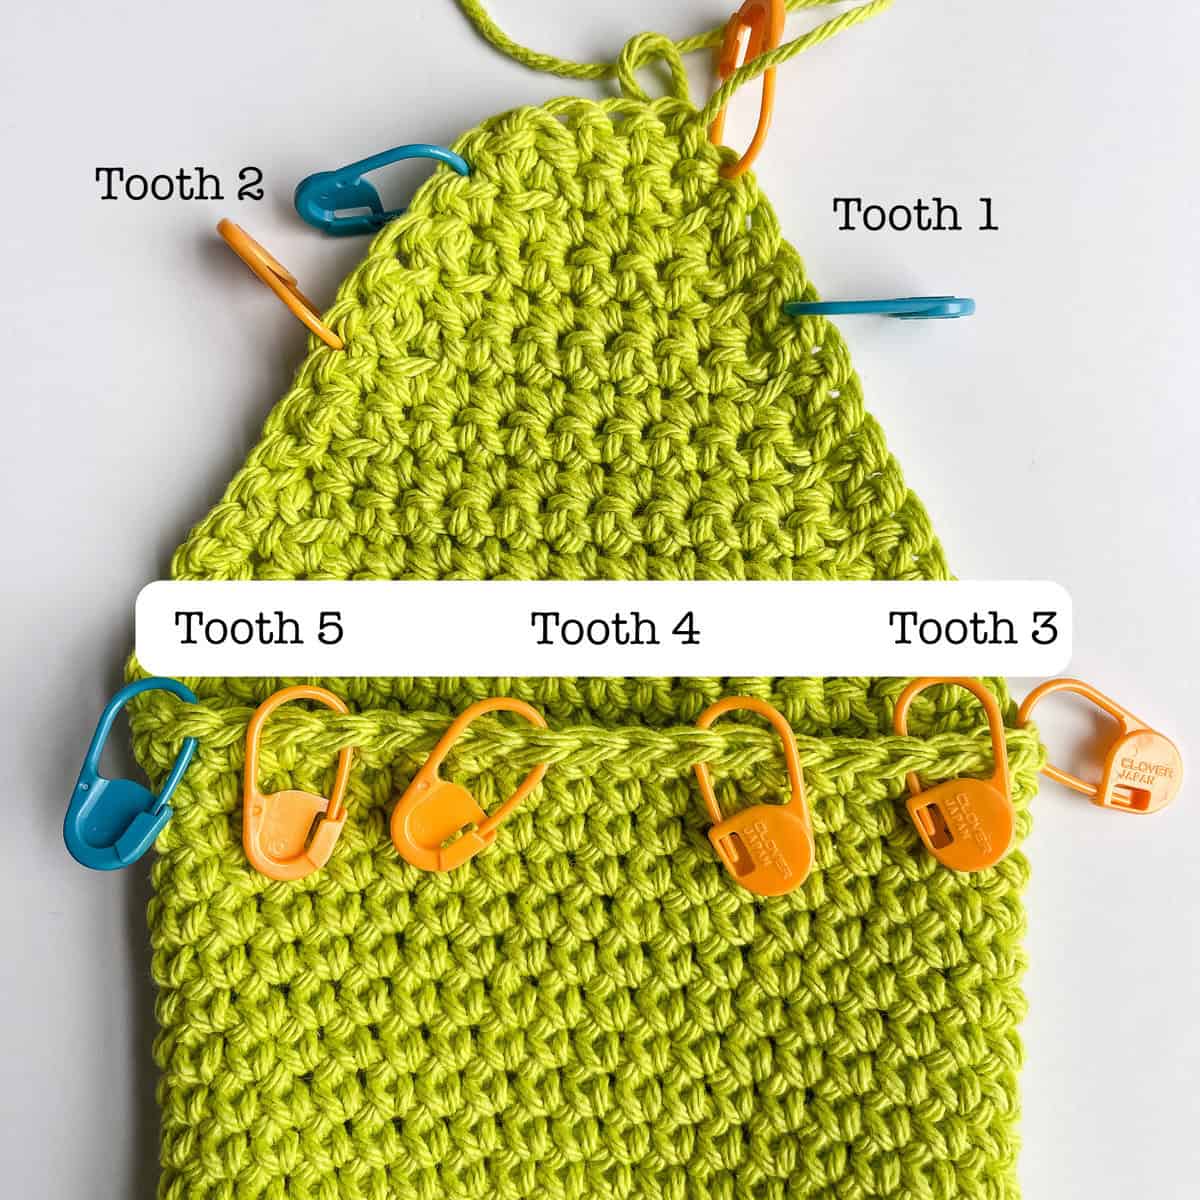
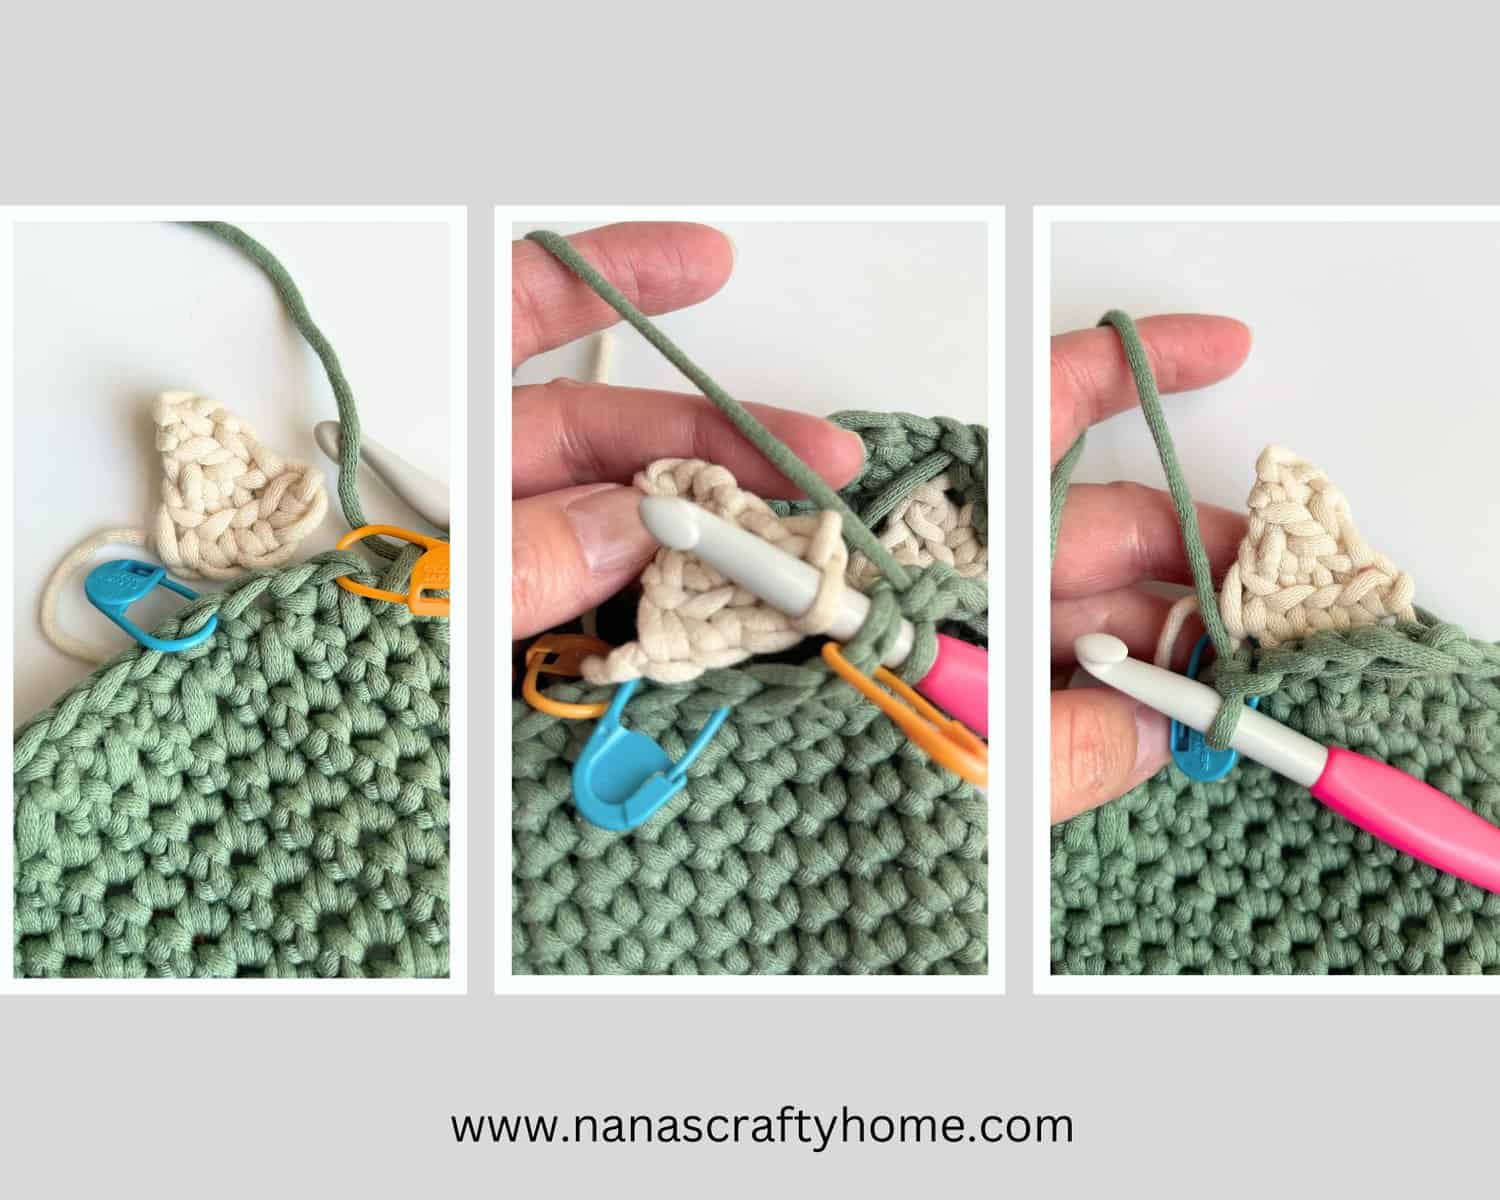
9. Pick up green yarn and begin crocheting another round of single crochet stitches around outside edge, crocheting the teeth into the stitches marked with stitch markers. No sewing!
10. Crochet the tail, back spines and eyes.
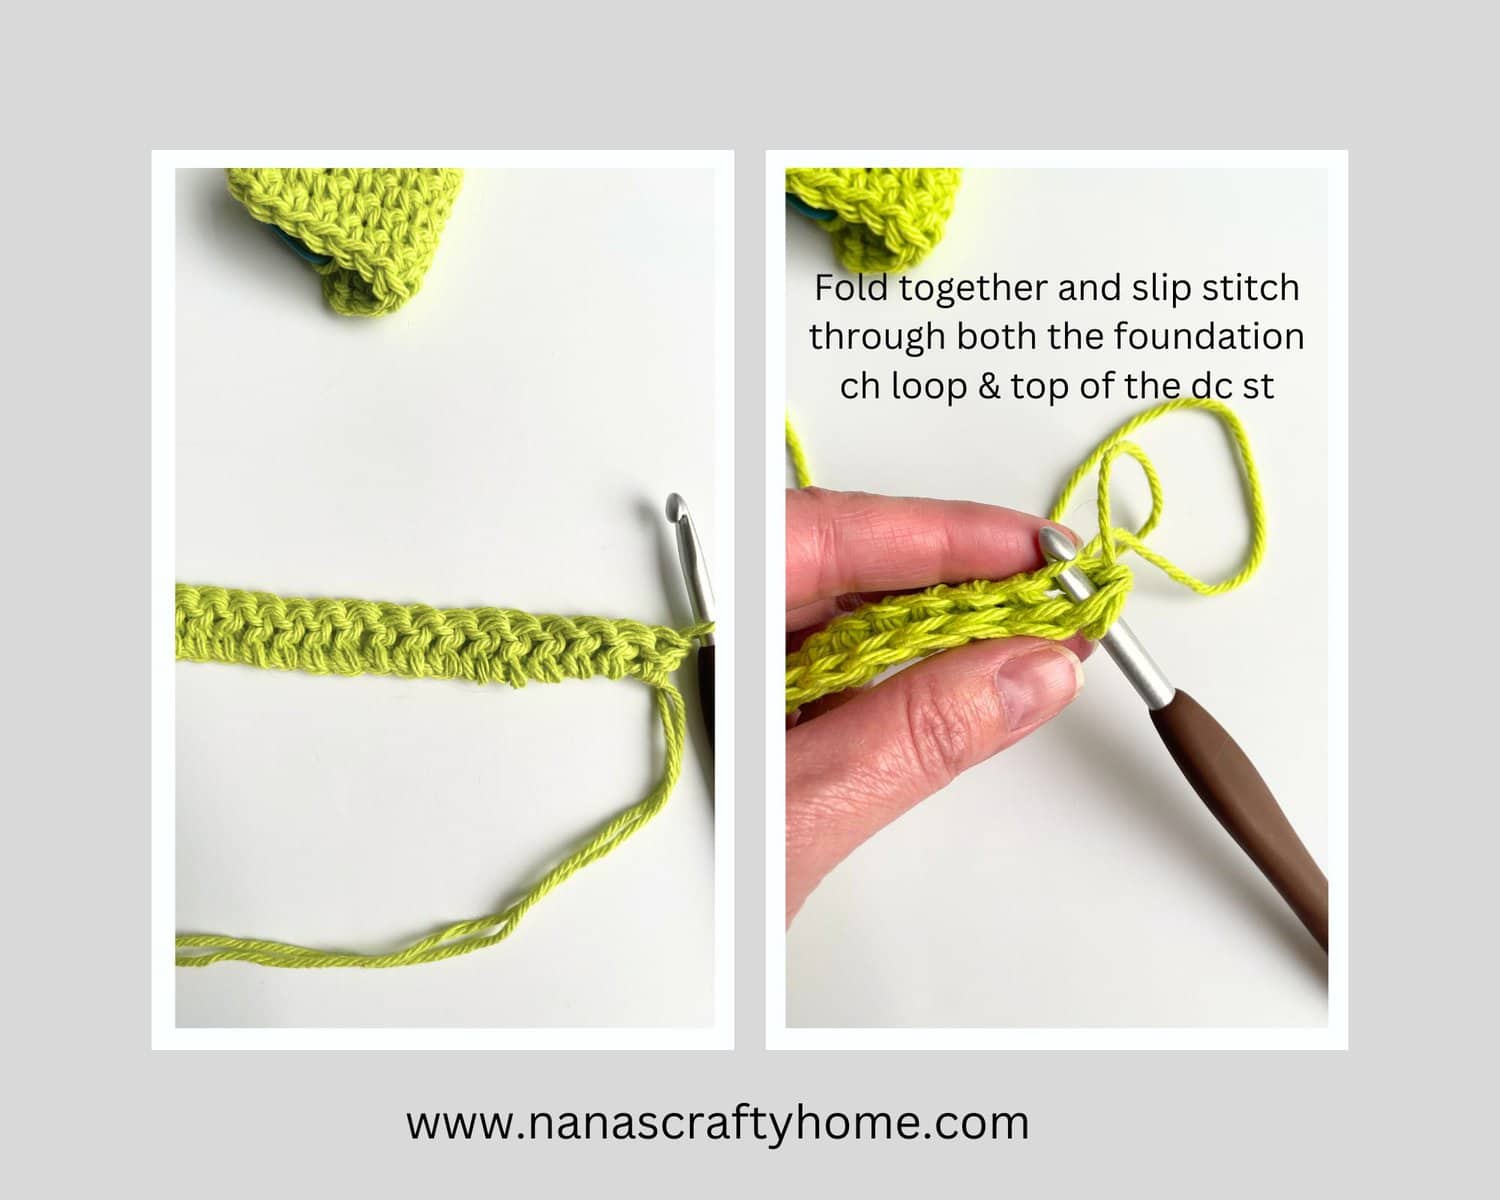
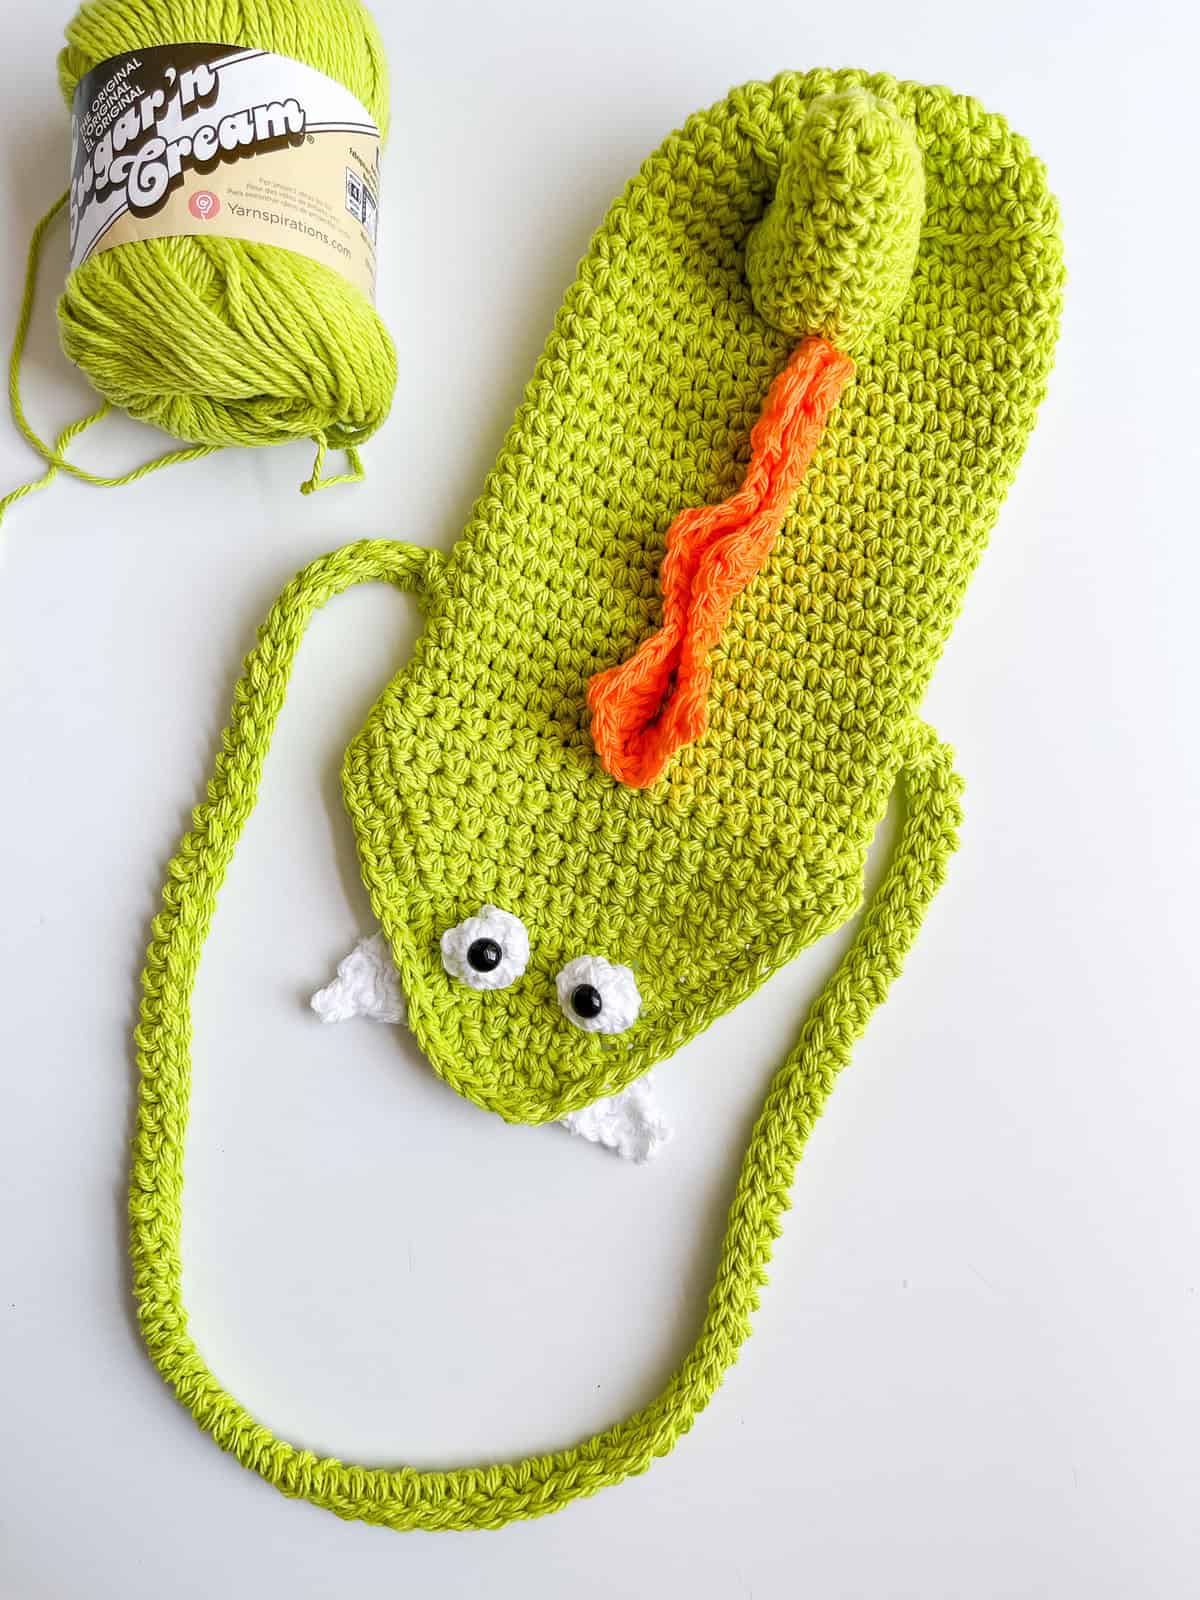
11. To make the strap, crochet a row of double crochet stitches (so easy to customize to length!), fold, and then slip stitch through the loop left from the foundation chain and through the top of each dc stitch to create a sturdy, functional and easy strap!
For other strap ideas; check out my romanian cord tutorial or make a cord with hdc!
12. Sew the tail to the bottom side on the same side as the head.
13. Fold the back spines and sew above the tail.
14. Add your black safety eyes to the eyes and sew to the top of the head.
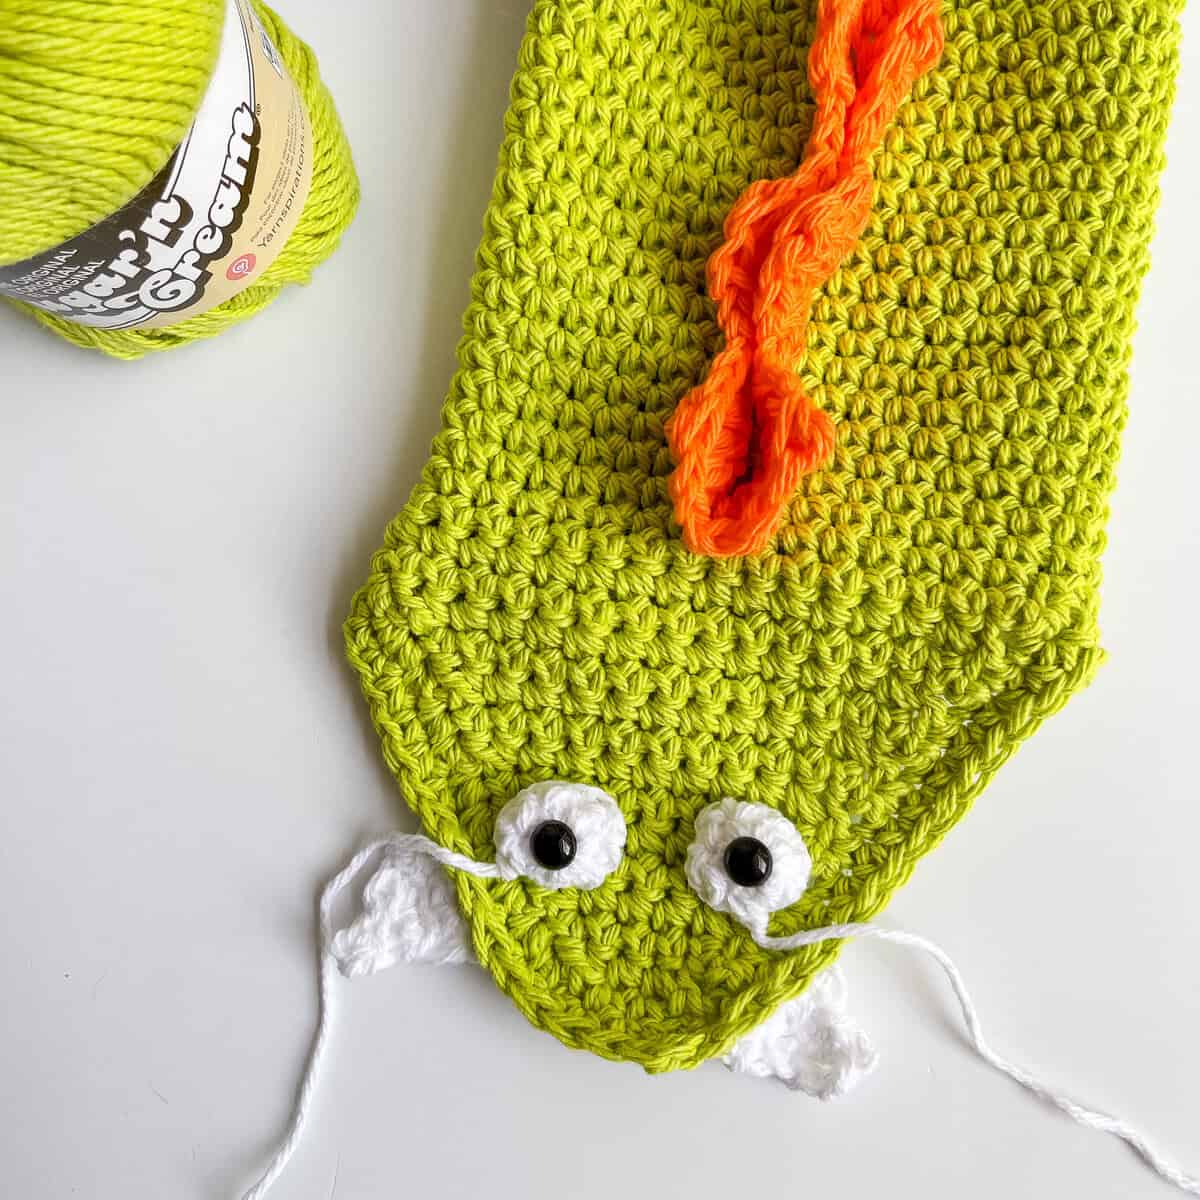
Another option for the eyes if you don’t like to use plastic safety eyes is to replace with my cartoon crochet eyes in the small single crochet size!
All done!
Make your crochet monster water bottle in all the colors! I hope you have fun making him!
Tonya
Marvin the Monster Water Bottle Holder Supplies
*This post contains affiliate links. You can click on any yarn or material highlighted to purchase. I will receive a small commission if you purchase but it won’t cost you any extra! As an Amazon Associate I earn from qualifying purchases.
- Lily Sugar’n Cream 4 / Medium (100% cotton)
- Hot Green 3.0 oz / 144 yds (Green)
- White 0.3 oz / 15 yds (White)
- Hot Orange 0.2 oz / 10 yds Orange)
- Size J (6.0 mm) crochet hook
- Poly-fil for stuffing tail
- (2) 11.0 mm black plastic safety eyes
- Scissors
- Tapestry Needle
- Stitch Markers (10)
I am recommending a worsted medium weight cotton yarn for this pattern for the following reasons:
- Absorbent: Cotton yarn can absorb moisture, making it ideal for holding cold bottles that may sweat.
- Durable: Cotton is strong and holds up well to regular use, ensuring your holder lasts longer.
- Easy to Clean: Cotton is machine washable, making it convenient to clean any spills or stains.
- Eco-Friendly: Cotton is a natural, biodegradable fiber, making it a more sustainable choice.
However, you could certainly substitute with a medium worsted weight acrylic yarn as well.
If you love this crochet pattern, you may also enjoy these free crochet patterns by Nana’s Crafty Home:

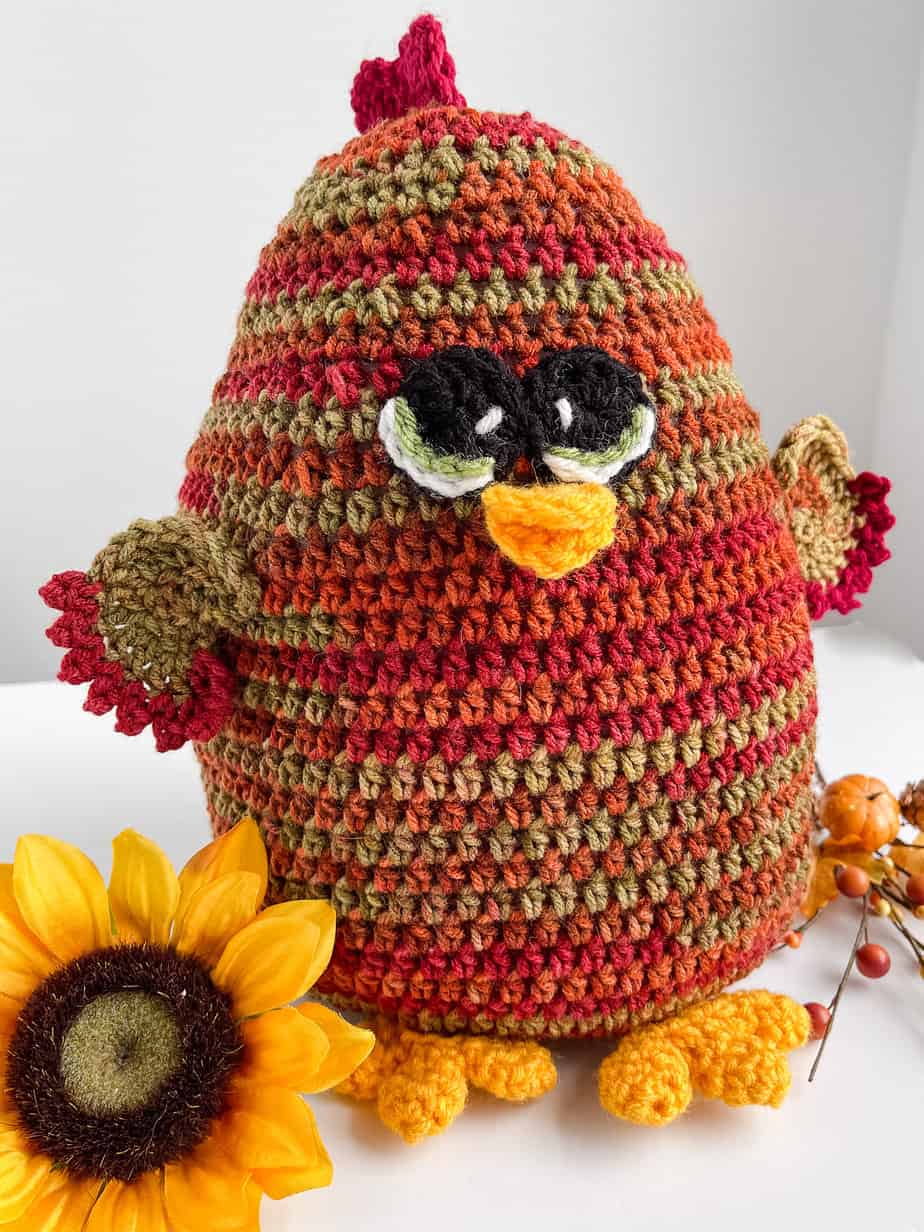

- 1. Crochet Pig in a Blanket Squish
- 2. Bawk Bawk Chicken Squish
- 3. Unicorn C2C Scarf in toddler – adult sizes!

Marvin the Monster Water Bottle Holder pattern instructions
Pattern written in US crochet terminology
Supplies:
- Lily Sugar’n Cream 4 / Medium (100% cotton)
- Hot Green 3.0 oz / 144 yds (Green)
- White 0.3 oz / 15 yds (White)
- Hot Orange 0.2 oz / 10 yds Orange)
- Size J (6.0 mm) crochet hook
- Poly-fil for stuffing tail
- (2) 11.0 mm black plastic safety eyes
- Scissors
- Tapestry Needle
- Stitch Markers (10)
Approximate finished size:
Base: 3 1/2” across
Height:
7 1/4” from base to top of side
12” from base to top of head
Gauge: 3 1/2” = 6 rounds of sc
Abbreviations:
- WS = wrong side
- RS = right side
- MC = magic circle
- ch(s) = chain(s)
- sc = single crochet
- BLO = back loop only
- sl st = slip stitch
- st(s) = stitch(es)
- sc2tog = single crochet 2 sts together (see special stitches section below)
- hdc = half double crochet
- tr = treble crochet
- dc = double crochet
Special Stitches:
Sc2tog = (insert hook in next st, yo and pull up a loop) twice, yo and pull through all 3 loops on hook.
Pattern Notes:
- Work in continuous rounds, do not join, instead use a stitch marker to mark the first stitch of each round.
- To resize to width of bottle, add or subtract increasing rounds for base.
- To resize to height of bottle, add or subtract rounds for side.
- Bottle should fit snugly inside holder with last round of side just over the top of the bottle.
Recommended Tutorials:
How to make a perfect circle tutorial
Pattern Instructions
Base
With green, make a MC.
Round 1: (RS) Ch 1, 6 sc in MC. (6)
Round 2: 2 sc in each st. (12)
Round 3: *2 sc in next st, 1 sc in next st,* repeat from * to * to end. (18)
Round 4: 1 sc in next st, 2 sc in next st, *1 sc in next 2 sts, 2 sc in next st,* repeat from * to * to last st, 1 sc in last st. (24)
Round 5: *2 sc in next st, 1 sc in next 3 sts,* repeat from * to * to end. (30)
Round 6: 1 sc in next 2 sts, 2 sc in next st, *1 sc in next 4 sts, 2 sc in next st,* repeat from * to * to last 2 sts, 2 sc in last st. (36)
Note: To make width of base larger, continue with increases to size desired. Each round will increase by 6 stitches. Refer to Perfect Circle Tutorial for instructions on increase rounds in single crochet. Once desired width of base is achieve, continue to Side instruction.
Side
Round 1: Working in BLO, 1 sc in each st.
Rounds 2 – 25 (or to height desired): Working in both loops, 1 sc in each st.
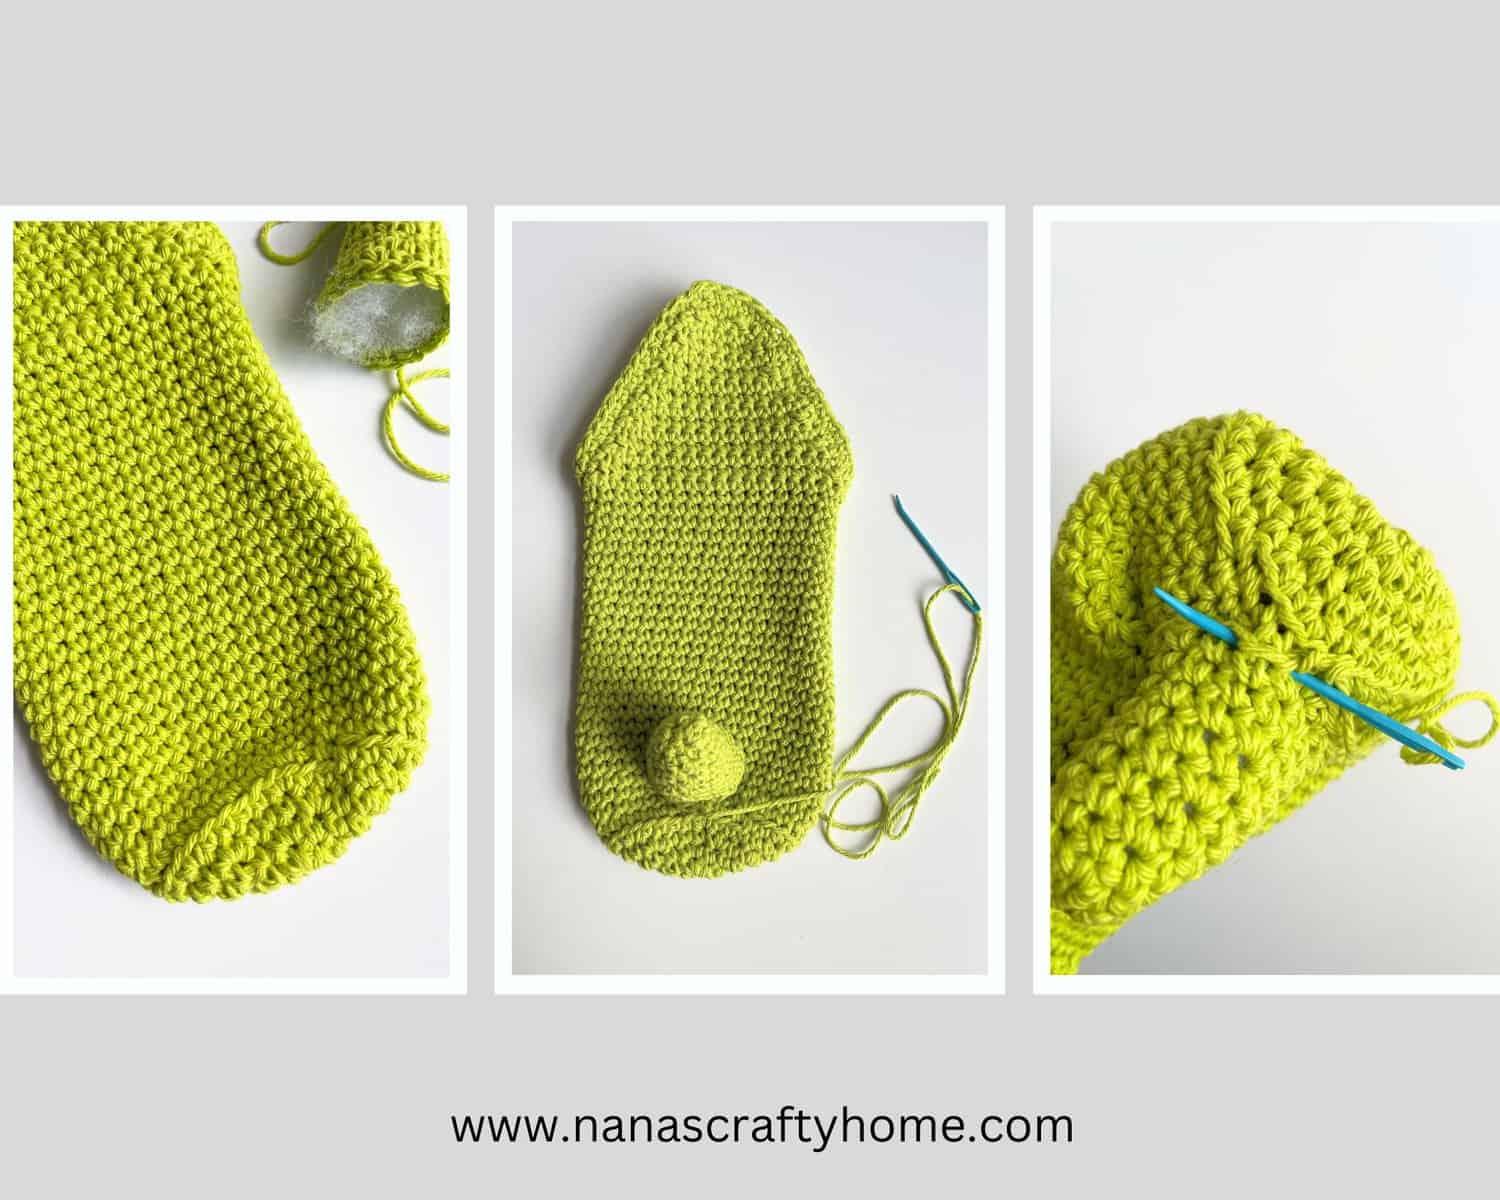
Head
After final round of side, place 1 marker in first st of round, starting with first st, count 18 sts and place second st marker. Note: If you adjusted the size of your bottle, divide the number of sts by 2 and place the second st marker in that st. Ex. Total of 42 sts/2 = 21, count 21 sts from first st and place stitch marker.
Row 1: Now working in turned rows, sc in next 18 sts from st marker to st marker, leaving remaining 18 sts unworked. Turn. (18)
Row 2: Ch 1, sc in each st. Turn. (18)
Row 3: Ch 1, sc2tog, sc in each st to last 2 sts, sc2tog. Turn. (16)
Rows 4 – 15: Repeat rows 2 – 3. Stitch count after row 15 is 4.
Do not turn after row 15.
Work a round of sc sts evenly around top edge, placing a sc st at the end of each row of head and a sc st in each remaining sts of last round of side, sl st in first st. Do not fasten off!
Teeth (make 5)
With cream, ch 5.
Row 1: Sc in second ch from hook and in each ch across. Turn. (4)
Row 2: Ch 1, sc2tog x 2. Turn. (2)
Row 3: Ch 1, sc2tog. (1)
Fasten off. Weave in ends.
Use stitch markers for teeth placement – two teeth on top and 3 teeth on the bottom. Each tooth will take 4 stitches.
Top teeth placement:
Tooth 1: Leaving three stitches from row 15 open, place a stitch marker in first st on right side of those four stitches, count over four stitches towards side and place stitch marker.
Tooth 2: Leaving four stitches from row 15 open, place a stitch marker in first st on left side of those four stitches, count over four stitches towards side and place stitch marker.
Bottom teeth placement:
Place a stitch marker in first stitch of final round of side, count over four sts along top edge of side and place another st marker in fourth st (tooth 3 placement), sk next 3 sts, place a st marker in next st, count over four sts and place st marker in fourth st (tooth 4 placement), sk next 3 sts, place a st marker in next st, count over four sts and place last st marker in fourth st (tooth 5 placement).
Attaching Teeth
Continue with green from final round of sc stitches, sc in every stitch around top edge, in stitches marked for teeth; work sc st through sc st of head and through foundation chain loop from first row of each tooth for four stitches and continue around to end, sl st to first st.
Fasten off and weave in ends.
Tail
With green, make a MC.
Round 1: Ch 1, 6 sc in MC. (6)
Round 2: [Sc in next 2 sts, 2 sc in next st] twice. (8)
Round 3: Sc in each st.
Round 4: [Sc in next 3 sts, 2 sc in next st] twice. (10)
Round 5: Sc in each st.
Round 6: [Sc in next 4 sts, 2 sc in next st] twice. (12)
Round 7: Sc in each st.
Round 8: [Sc in next 5 sts, 2 sc in next st] twice. (14)
Round 9: Sc in each st.
Round 10: [Sc in next 6 sts, 2 sc in next st] twice. (16)
Round 11: Sc in each st.
Fasten off, leaving a long tail for sewing. Weave in remaining ends.
Strap
With green, ch 85.
Row 1: Dc in fourth ch from hook and in each ch to end.
Do not fasten off.
Fold foundation ch towards last st made; insert hook into top of last dc st made and in loop from foundation ch, yarn over and pull through to complete a sl st, sl st through both top of dc st and foundation loop of each st to end.
Fasten off, leaving a long tail for sewing.
Back Spines
With orange, ch 36.
Row 1: (WS) Sc in second ch from hook, *hdc in next ch, (dc, tr, dc) in next ch, hdc in next ch, sc in next ch, sl st in next ch, sc in next ch,* repeat from * to * to last 4 chs, hdc in next ch, (dc, tr, dc) in next ch, hdc in next ch, sc in last ch.
Fasten off, leaving a long tail for sewing.
Eyes (make 2)
With white, make a MC.
Round 1: Ch 1, 6 sc in MC. (6)
Round 2: 1 sc in each st, sl st in first st. Note: Eye will cup slightly.
Fasten off, leaving a long tail for sewing.
Assembly
Stuff tail with poly-fil and with long tail, sew to back of water bottle side just above the base.
Fold RS of back spine together with spines together and with long tail, sew to back of water bottle side just above tail.
With long tails, sew strap to each side of water bottle.
Attach plastic safety eyes to center of eye. Sew eye to head of water bottle.

Copyright 2024 Tonya Bush / Nana’s Crafty Home
Social Media links:
Facebook: https://www.facebook.com/nanascraftyhome
Instagram: https://www.instagram.com/nanascraftyhome/
Pinterest: https://www.pinterest.com/nanascraftyhome/
YouTube: https://www.youtube.com/c/TonyaBush
Twitter: https://twitter.com/nanascraftyhome
Facebook Group: https://www.facebook.com/groups/829792060522798
Sign up for my Newsletter: https://nanascraftyhome.com/sign-up-for-my-free-newsletter/
 Hi! Thank you so much for being here! I am Tonya the designer behind Nana's Crafty Home. As a wife, mother, Nana of 9 & with 2 fur babies, my days are filled with love, laughter, hugs and yarn! Here you will find colorful and creative crochet designs for yourself or loved ones. My hope is that you will be inspired to learn and create along with me!
0 Comments