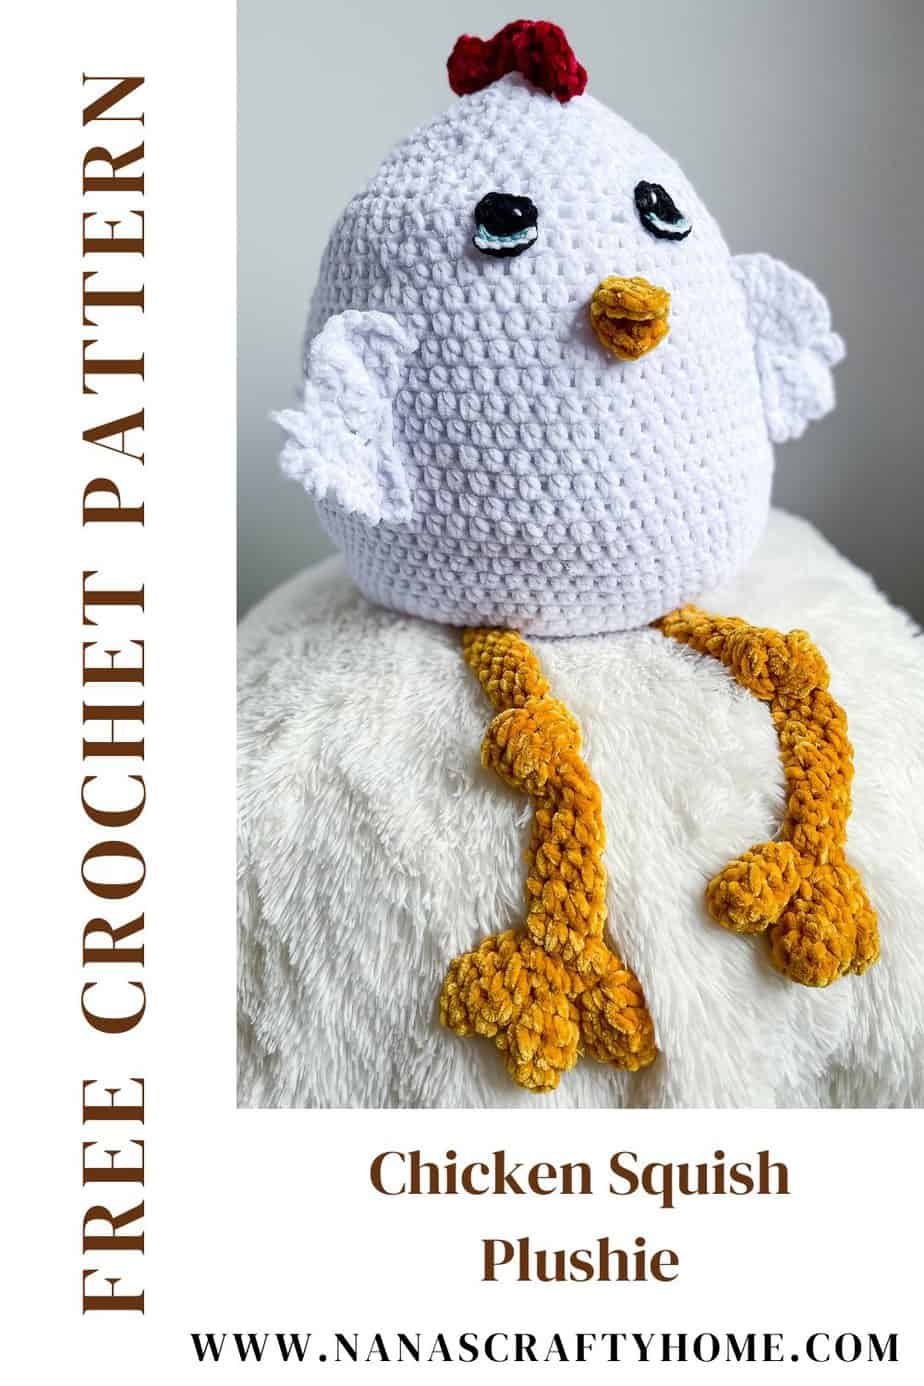
A crochet chicken squish is a free crochet pattern by Nana’s Crafty Home!

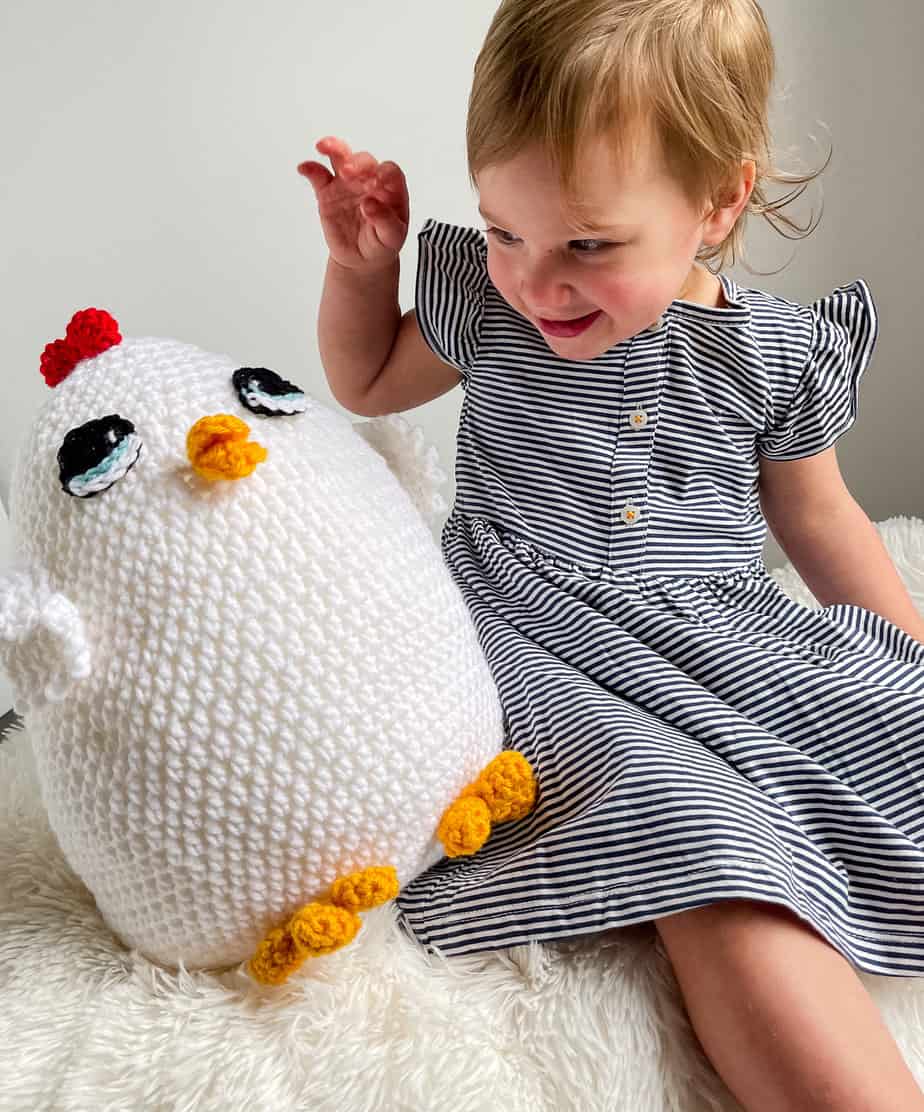
Are you ready for a fun and adorable new project? I’m thrilled to share with you my latest creation Bawk Bawk the Chicken Squish! 🐔
This big chicken is the perfect combination of cuteness and squishiness. With its soft, plush body in your favorite color it’s bound to bring a smile to your face!
My designing mind can sometimes wend its way on mysterious journeys. My crochet chicken squish design is the perfect example of this. The idea of my crochet chicken started with my youngest granddaughter Livvy who adores chickens. She calls them bawk bawks and gets so excited when she gets to visit with them.
I originally intended on designing little chickens for her to carry around. In my design quest searching for yarn I came across the perfect piggy pink color. I know, I know – I wasn’t there for a pig. I had zero intention of designing a pig. But that pink yarn was calling me to make a pig! So in the cart it went!

Still I intended on designing the chicken first. Nope. My mind was stuck on that silly pig! So I decided to just go with it and design a pig. My pig squish design ended up being a pretty large plushie so when I moved on to designing my chicken she had to be a similar size to the pig – hence the large squishy chicken!
So Bawk Bawk the Chicken is a pretty good sized chicken squish or pillow. Livvy adores her and wants to take her home asap. Each time she comes over she has to come say hi to Bawk Bawk in my office. So cute!
Crochet Chicken Squish Pattern Details
I would classify this squishy chicken pattern as beginner-friendly other than the chick’s toes. They may be a little intimidating for a beginning crocheter but I think it would be great for an adventurous beginner!
This large squishy amigurumi chicken works up pretty quickly in half double crochet stitches throughout the main body. Essentially the body of the chicken starts from the bottom up in half double crochet stitches worked in standard increasing rounds. Once width is achieved, simply working rounds of half double crochet to where we begin decreasing to close the top of the chicken’s head.
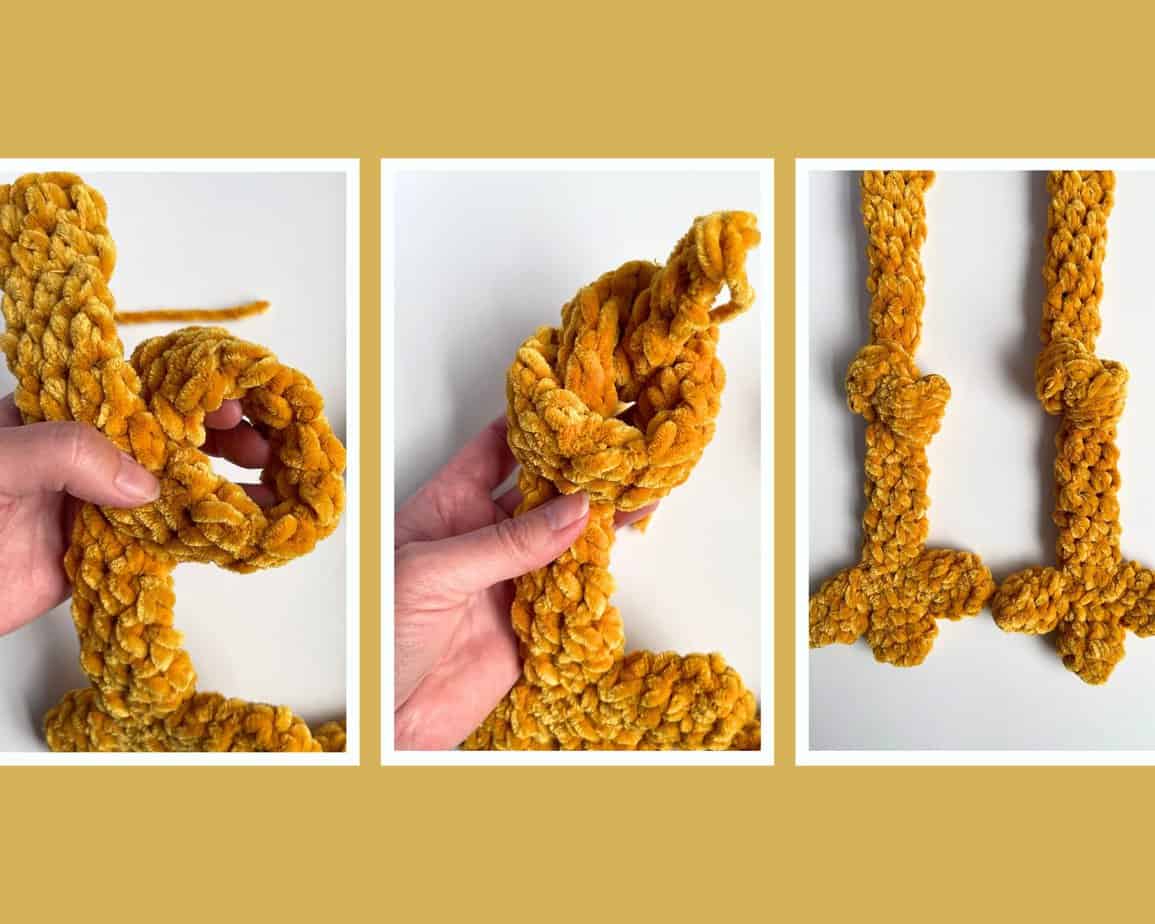
Once the main body of the chicken is complete I added eyes, beak, wings and legs. The legs are easily customizable to desired length. I made my legs pretty long – approximately 22″ long and then knotted them in the middle which shortened them a bit. However, you could easily make the legs any length you choose. My chick looks pretty cute with just the toes peaking out from her squishy egg shaped body!

The toes are made in the round separately and then crocheted together – no sewing needed! Basically once you have completed the third toe you will not fasten off and instead begin crocheting in the top of one of the previously made toes across the top and then do the same for the third toe. Working in all of the stitches across the top of each toe will crochet them together!
The legs are made separately in the round and the legs are then sewn to the toes. After completing the legs I tied a simple knot for the knobby knees.
I am using the same eyes I used in my Pig Squish – they add so much personality! However, you could certainly use safety eyes if you wish. I have a complete photo and video tutorial for my cartoon crochet eyes to help you along the way.
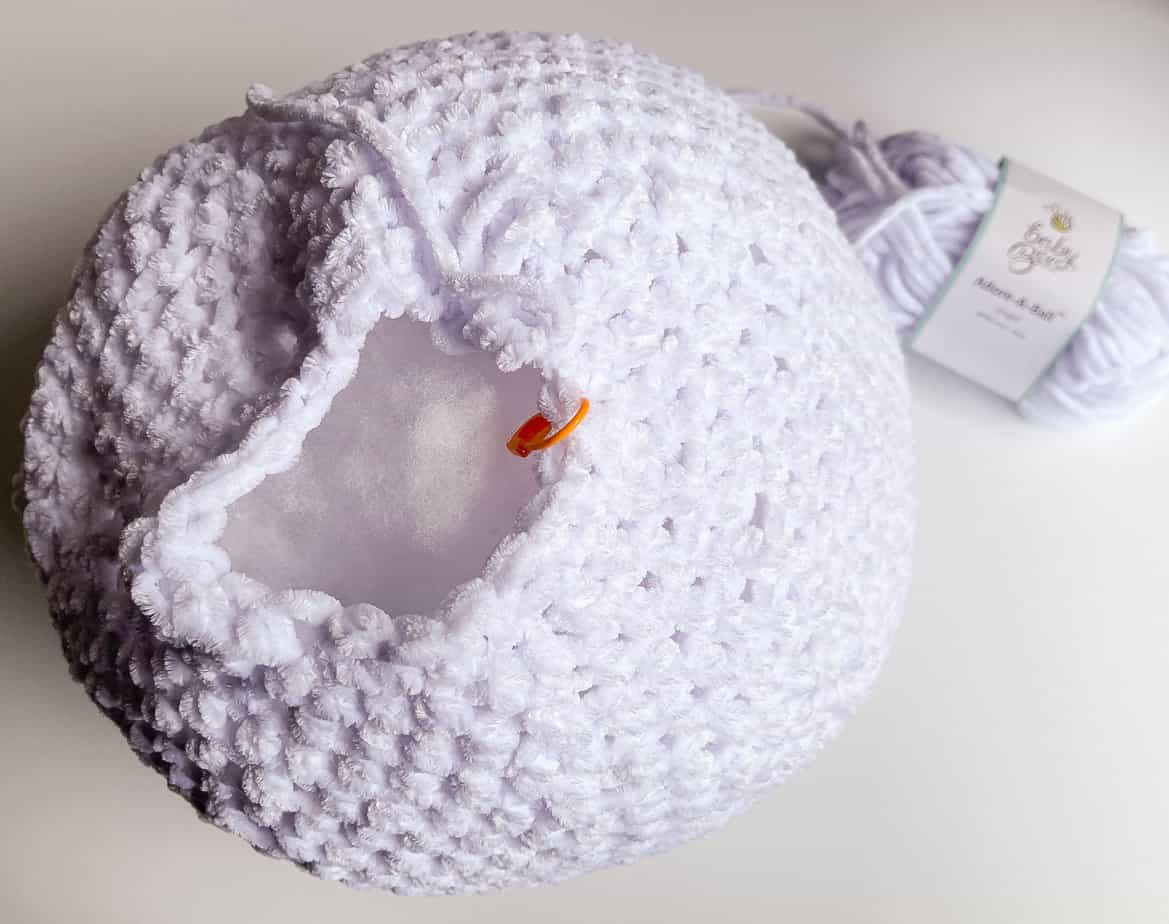
I found the perfect soft velvety yarn in Hobby Lobby’s Baby Bee Adore-A-Ball. It was easy to work with and it is so very soft and squishy! This chenille yarn is a size weight 5 bulky yarn. I really do love the sheen in this yarn. If you wanted to make a smaller chicken just substitute out the yarn with a medium worsted weight yarn.
Since Bawk Bawk was originally designed with my almost 2 year old granddaughter the large squishy was a bit much for her to carry around. So, I went ahead and made it smaller by simply changing up to a medium worsted weight yarn – Red Heart With Love. Perfect size for her to carry around and love! I also skipped the legs and sewed the toes to the bottom of Bawk Bawk so the legs wouldn’t drag and trip her as she toddled around.
*This post contains affiliate links. You can click on any yarn or material highlighted to purchase. I will receive a small commission if you purchase but it won’t cost you any extra! As an Amazon Associate I earn from qualifying purchases.
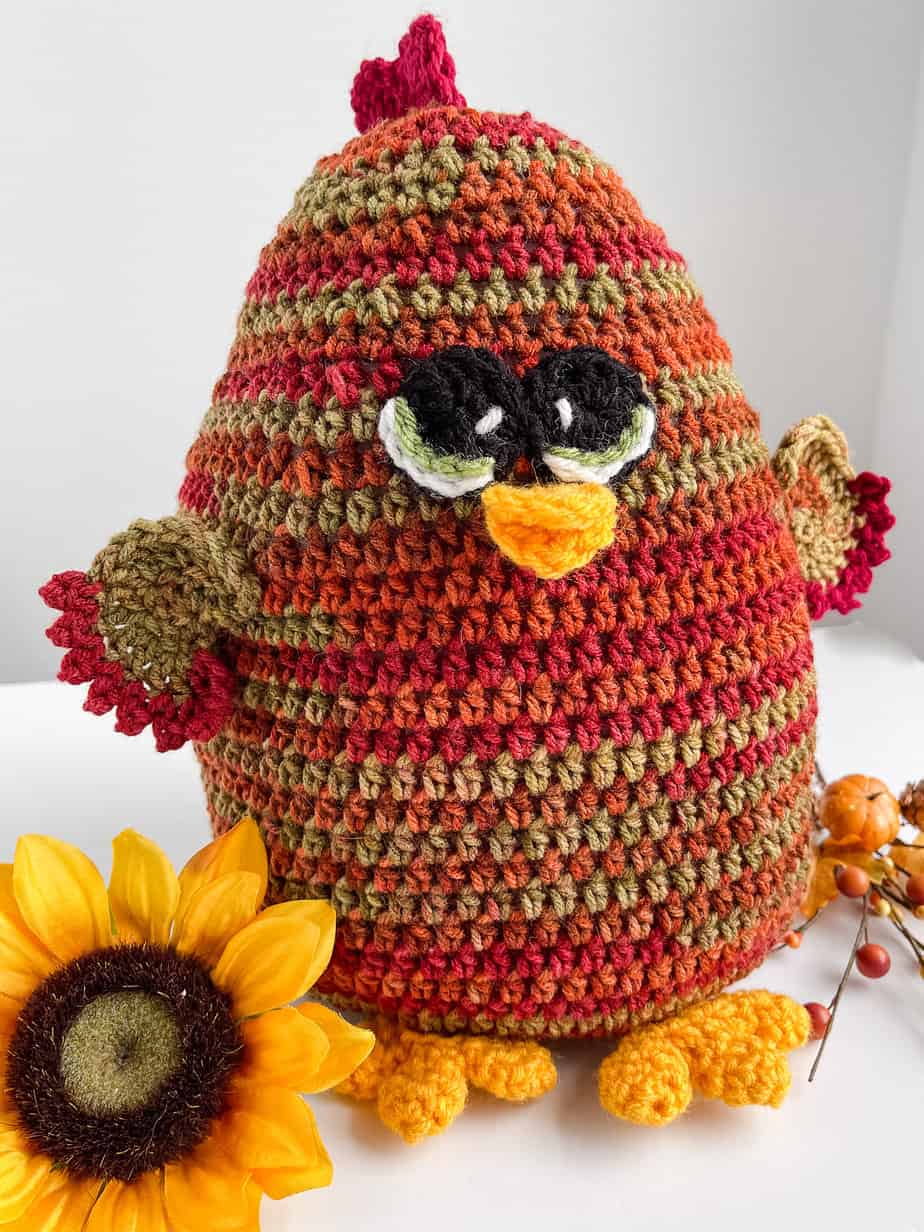
I made another Bawk Bawk Chicken in worsted weight yarn for my grandson and he loves it so much! Yarn used is Hobby Lobby’s I Love This Yarn Print in Autumn Stripe colorway.
This crochet chicken squish pattern is also available as an ad-free, printable PDF! You can purchase the individual pattern, or if you love PDFs, you might want to check out my Lifetime Membership. It’s an awesome deal! Never pay for one of my PDFs again!! (Or, scroll down for the free version!)

Purchase the ad-free pdf of the crochet chicken squish pattern for a small fee. Thank you so much for supporting my work!

If you would like daily crochet inspiration be sure to follow me on Facebook, Instagram, Pinterest, YouTube, Twitter and Tumblr!
To get notified of my free crochet patterns and future giveaways, sign up for my newsletter. I never share or sell your information to third parties — it stays private!
You may also like the following free patterns by Nana’s Crafty Home:


- 1. Turkey Towel Topper free crochet pattern
- 2. Pig Squish free crochet pattern
- 3. Bee Lovey free crochet pattern

Bawk Bawk the Chicken Squish free crochet pattern
Pattern written in US crochet terminology
Supplies:
Baby Bee Adore-A-Ball Weight 5 / Bulky (100% polyester, 3.5 oz / 92 yds)
- Angel 9.5 oz / 250 yds (White)
Yarn Bee Velvety Smooth Weight 5 / Bulky (100% polyester, 3.5 oz / 80 yds)
- Mustard 2.5 oz / 66 yds (Yellow)
- Red 0.3 Oz / 8 yds (Red)
Red Heart With Love Weight 4 / Medium (100% acrylic, 7.0 oz / 370 yds)
- Black 0.2 oz / 11 yds (Black)
- Aqua 0.01 oz / 1 yd (Blue)
- White 0.01 oz / 1 yd (White)
Size M/N (9.0 mm) crochet hook
Size J (6.0 mm) crochet hook
Poly-fil for stuffing
Scissors
Tapestry Needle
Stitch Markers
Approximate finished size: Stuffed body is 12” wide x 18” and legs are approximately 22” before knotting.
Gauge: 3″ = 3 rounds of sc (gauge is not important for this project)
Abbreviations:
- RS = right side
- MC = magic circle
- ch(s) = chain(s)
- hdc = half double crochet
- sc = single crochet
- sl st = slip stitch
- st(s) = stitch(es)
- sk = skip
- sc2tog = single crochet 2 sts together (see special stitches section below)
- dc = double crochet
- sp(s) = space(s)
- WS = wrong side
Special Stitches:
sc2tog = (insert hook in next st, yo and pull up a loop) twice, yo and pull through all 3 loops on hook.
Pattern Notes:
- Main body, legs and toes are worked in continuous rounds, do not slip st join at the end of the round. Use a stitch marker to mark first stitch of each round.
- Larger crochet hook is used throughout the pattern using the larger weight yarn, smaller crochet hook is used for the eyes portion of the pattern.
- Main body is worked from bottom to top.
Recommended Tutorial:
Cartoon Crochet Eyes in 3 sizes Tutorial
Main Body
Round 1: (RS) With larger crochet hook and white, make a MC, ch 1, 1 sc, 9 hdc in MC. (10)
Round 2: 2 hdc in each st. (20)
Round 3: *2 hdc in next st, 1 hdc in next st,* repeat from * to * to end. (30)
Round 4: 1 hdc in next st, 2 hdc in next st, *1 hdc in next 2 sts, 2 hdc in next st,* repeat from * to * to last st, 1 hdc in last st. (40)
Round 5: *2 hdc in next st, 1 hdc in next 3 sts,* repeat from * to * to end. (50)
Round 6: 1 hdc in next 2 sts, 2 hdc in next st, *1 hdc in next 4 sts, 2 hdc in next st,* repeat from * to * to last 2 sts, 1 hdc in last 2 sts. (60)
Round 7: *2 hdc in next st, 1 hdc in next 5 sts,* repeat from * to * to end. (70)
Round 8 – 23: 1 hdc in each st. (70)
Round 24: *Hdc2tog, 1 hdc in next 8 sts,* repeat from * to * to end. (63)
Round 25: 1 hdc in each st.
Round 26: *Hdc2tog, 1 hdc in next 7 sts,* repeat from * to * to end. (56)
Round 27: 1 hdc in each st.
Round 28: *Hdc2tog, 1 hdc in next 6 sts,* repeat from * to * to end. (49)
Round 29: 1 hdc in each st.
Round 30: *Hdc2tog, 1 hdc in next 5 sts,* repeat from * to * to end. (42)
Round 31: 1 hdc in each st.
Round 32: *Hdc2tog, 1 hdc in next 4 sts,* repeat from * to * to end. (35)
Round 33: 1 hdc in each st.
Round 34: *Hdc2tog, 1 hdc in next 3 sts,* repeat from * to * to end. (28)
Round 35: 1 hdc in each st.
Weave in ends and stuff main body before moving on to round 36.
Round 36: *Hdc2tog, 1 hdc in next 2 sts,* repeat from * to * to end. (21)
Round 37: *Hdc2tog, 1 hdc in next st,* repeat from * to * to end. (14)
Leaving a long tail for sewing, fasten off. Add any additional stuffing before closing. Using long tail, sew top of main body closed. Weave in any remaining ends.
Legs (make 2)
With yellow, ch 6.
Round 1: 1 sc in first ch to form a ring, 1 hdc in each ch remaining. (6)
Round 2 – 23: 1 hdc in each st. (6)
Fasten off, leaving a long tail for sewing.
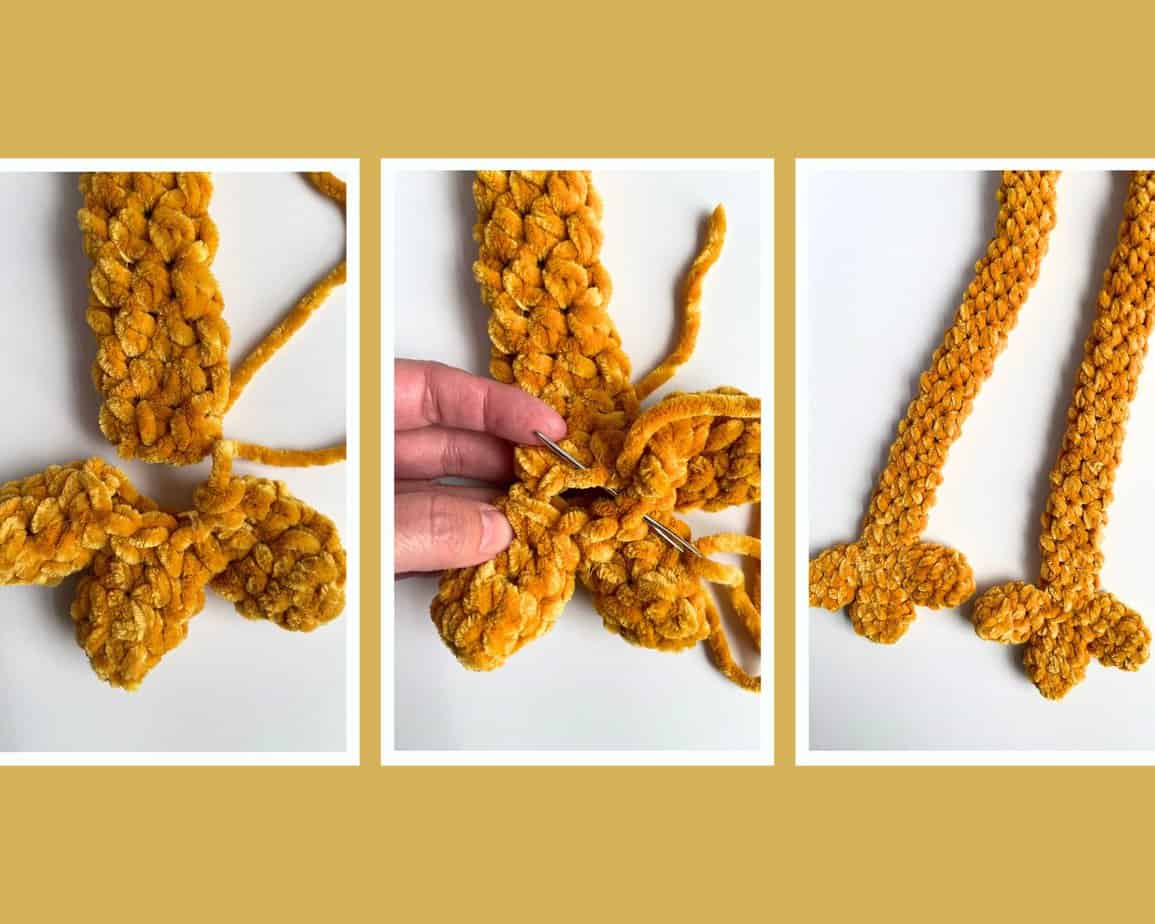
Toes (make 6 – 3 for each leg)
Round 1: With yellow, make a MC, ch 1, 6 sc in MC. (6)
Round 2: *1 sc in next st, 2 sc in next st,* repeat from * to * around. (9)
Round 3: *1 sc in next st, sc2tog,* repeat from * to * to around. (6)
Round 4: 1 sc in each st.
Fasten off after round 4 on toe 1 and toe 2. After completing toe 3 do not fasten off. Move on to round 5.
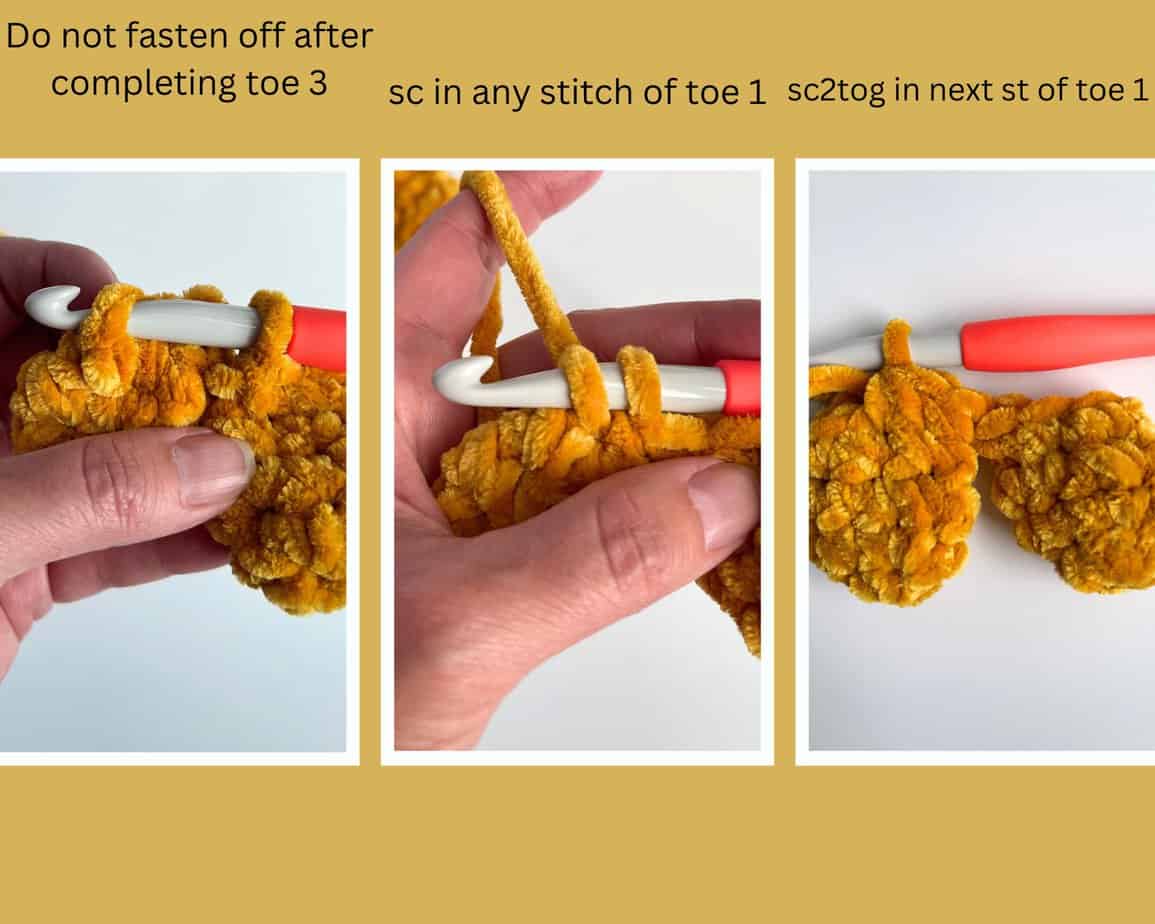
Round 5: Working in toe 1, 1 sc in any st of round 4, sc2tog, working in toe 2, 1 sc in any st of round 4, sc2tog, 1 sc in next st, sc2tog, working in unused sts of toe 1, 1 sc in next unworked st, sc2tog, working in unworked sts of toe 3, (1 sc in next unworked st, sc2tog) twice. (12)

Leaving a long tail for sewing, fasten off and weave in remaining ends. While weaving in ends from toes you can close the gaps between the toes.
With long tail left for sewing, sew toes to round 1 of legs.
Weave in ends.
Tie a basic knot in center of leg by creating a ring in the center of the leg and pulling top of leg through center of ring. Pull gently. Repeat with second leg making sure that knot is level with knot made in first leg.
Beak (make 2)
(RS) With yellow, make MC, ch 2 (counts as first st), (4 hdc, 1 dc, 5 hdc) in MC. Tighten MC. (11)
Leaving a long end for sewing, fasten off. Sew WS of beaks together on rounded ends leaving pointed ends open.
Weave in ends not left for sewing.
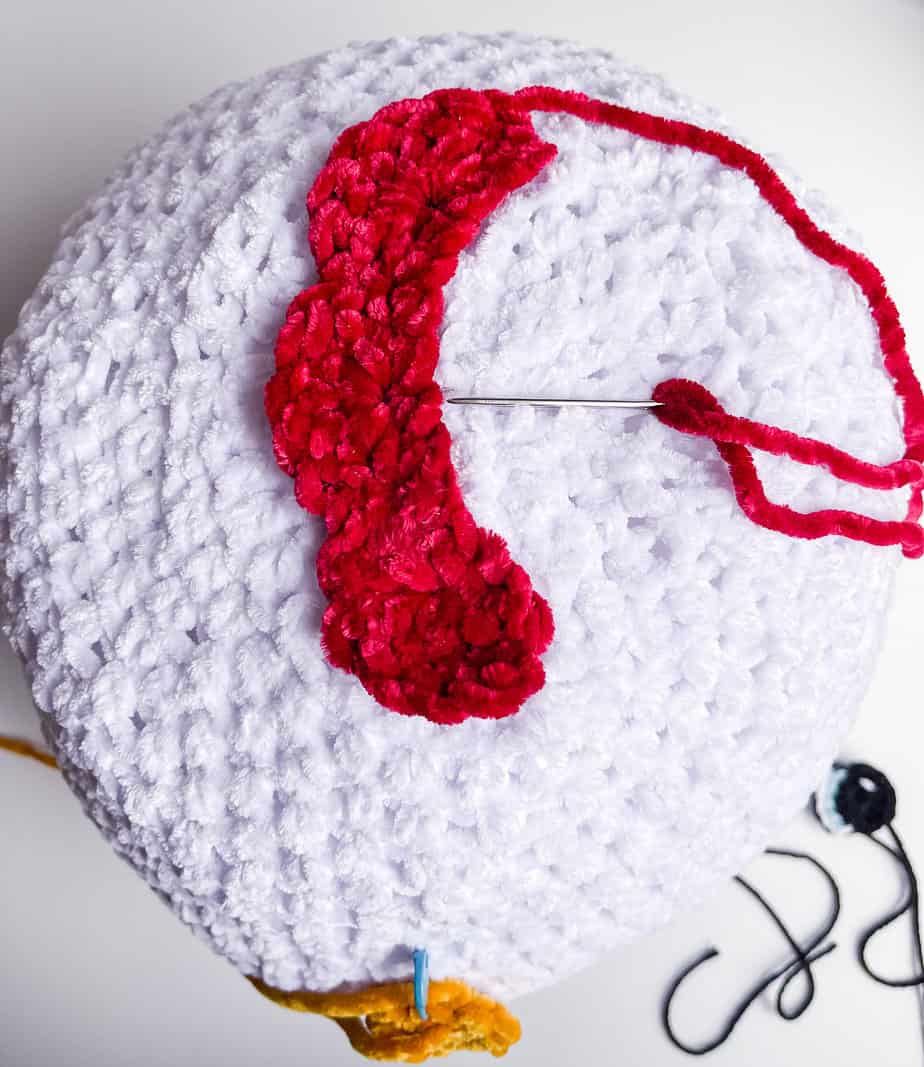
Comb
With red, ch 14.
Row 1: 1 sc in second ch from hook and in each ch to end. Turn. (13)
Row 2: Ch 1, 1 sc in same st, *sk next st, 5 dc in next st, sk next st, 1 sc in next st,* repeat from * to * twice. (19)
Leaving a long tail for sewing, fasten off. Weave in remaining ends.
Wings (make 2)
Leaving a long tail for sewing and with white, make MC.
Row 1: Ch 3 (counts as first st), 7 dc in MC. Tighten MC. Turn. (8)
Row 2: Ch 3, 1 dc in same st, 2 dc in each st to end. Turn. (16)
Row 3: (Ch 2, 1 sc in second ch from hook, sl st in next st) 6 times.
Fasten off. Weave in ends not left for sewing.
Eyes (make 2)
With smaller crochet hook and black, make MC.
Round 1: (RS) Ch 3 (counts as first st), 10 dc in MC, join with sl st in top of ch-3, tighten ring. (11)
Fasten off Black, leaving a long tail for sewing.
Row 2: Join Blue in first st of round 1, sl st in next 5 sts.
Fasten off Blue.
Row 3: Join White in first st of round 1 (behind slip stitches of row 2), sl st in next 5 sts.
Fasten off White, leaving a long tail for embroidery of eye.
With long tail of White, embroider center of eye.
Weave in remaining ends not left for sewing.
Assembly
With long tail, sew comb to top of main body.
With long tail, sew beak to RS of face.
With long tails, sew eyes to RS of face evenly spaced above beak.
With long tails, sew legs to bottom of main body.

With long tails, sew wings to sides of main body evenly spaced from beak.
Copyright 2023 Tonya Bush / Nana’s Crafty Home, LLC.
Social Media links:
Facebook: https://www.facebook.com/nanascraftyhome
Instagram: https://www.instagram.com/nanascraftyhome/
Pinterest: https://www.pinterest.com/nanascraftyhome/
YouTube: https://www.youtube.com/c/TonyaBush
Twitter: https://twitter.com/nanascraftyhome
Facebook Group: https://www.facebook.com/groups/829792060522798
Sign up for my Newsletter: https://nanascraftyhome.com/sign-up-for-my-free-newsletter/
 Hi! Thank you so much for being here! I am Tonya the designer behind Nana's Crafty Home. As a wife, mother, Nana of 9 & with 2 fur babies, my days are filled with love, laughter, hugs and yarn! Here you will find colorful and creative crochet designs for yourself or loved ones. My hope is that you will be inspired to learn and create along with me!