A cute crochet ghost pattern is a free corner to corner (c2c) pillow pattern by Nana’s Crafty Home!

I was recently scrolling through Pinterest and saw a Pottery Barn ad for some spooky themed pillows. The pillow I fell in love with instantly was already sold out so I decided I could easily make my own! I am so pleased with how my ghost pillow cover turned out – he is so adorable and fun!
Honestly, this adorable little guy is proof that something easy can still be awesome! I guarantee everyone who sees this pillow will want one. I am still debating on whether or not to keep him. Currently he is sitting in my office by the window cuddled up in a chair. But I think once my grandkids spy him he won’t stay there long! 😉
Crochet Ghost Pattern Details
Boo-Boo the Baby Ghost is so easy to make, too! He needed to be made out of fuzzy yarn to make him squishy soft and huggable. However, I am not a big fan of crocheting with textured yarn – so hard to see stitches!
I have had a lot of success combining textured yarn with the corner to corner (c2c) crochet stitch technique. I don’t need to worry so much about stitches since I am primarily working into chain spaces instead of the top of stitches.
Using a textured yarn also covers up the gaps you would typically see in corner to corner as well.

Yarnspiration’s Bernat Pipsqueak yarn* is the perfect yarn for this project – you will want to snuggle all day with him! Pipsqueak is a bulky weight yarn with texture. You could certainly substitute with another bulky weight yarn as well. If you change up to a worsted weight yarn, your finished square will be smaller so you would need to make your square larger by simply working your increases up to 26.5″ height and width and then begin decreasing.
*This post contains affiliate links. You can click on any yarn or material highlighted to purchase. I will receive a small commission if you purchase but it won’t cost you any extra!

You will begin by making a large corner to corner square – basically a square blanket. Once the square is complete you will attach to your 12″ round pillow insert. No need for stuffing on this one!
If you aren’t familiar with the crochet c2c stitch technique I have all the tutorials you need to get started! This project would be the perfect way to get started with this fun stitch.
Basic C2C for Beginners
Mini (hdc) C2C crochet technique
This is not a “typical” pillow cover in that the crochet square is secured to the pillow at just one point – the very center of the square to the very top of the pillow. Basically securing at the top of the head. This allows the crochet square to flow around the pillow. The pillow is essentially a prop. This allows Boo-Boo to be more pose-able, too!

Once the square is secured to the pillow insert you will add the eyes. The crochet eyes are two oval squares made with Red Heart With Love* acrylic medium worsted weight yarn that are then sewn to the front of your pillow. I only sew them to the square not all the way through to the pillow insert. You could alternatively find some cute safety eyes instead if you prefer.
If you feel that your crochet ghost is going to be getting a lot of love from the littles, you could certainly tack down the square a little more securely in other areas. Just make sure you have as much drape and movement as possible in your cover. I love how I can arrange him differently according to where he is sitting.

I purchased my 12″ round pillow insert from Amazon as I had a hard time finding round pillows in my local craft stores. I could primarily only find 12″ square pillow inserts locally. However, a good hack might be to fold over and tack down the top two corners of the pillow insert to round those edges. Keep the bottom two corners in the square shape to allow the pillow to stand more easily on its own.
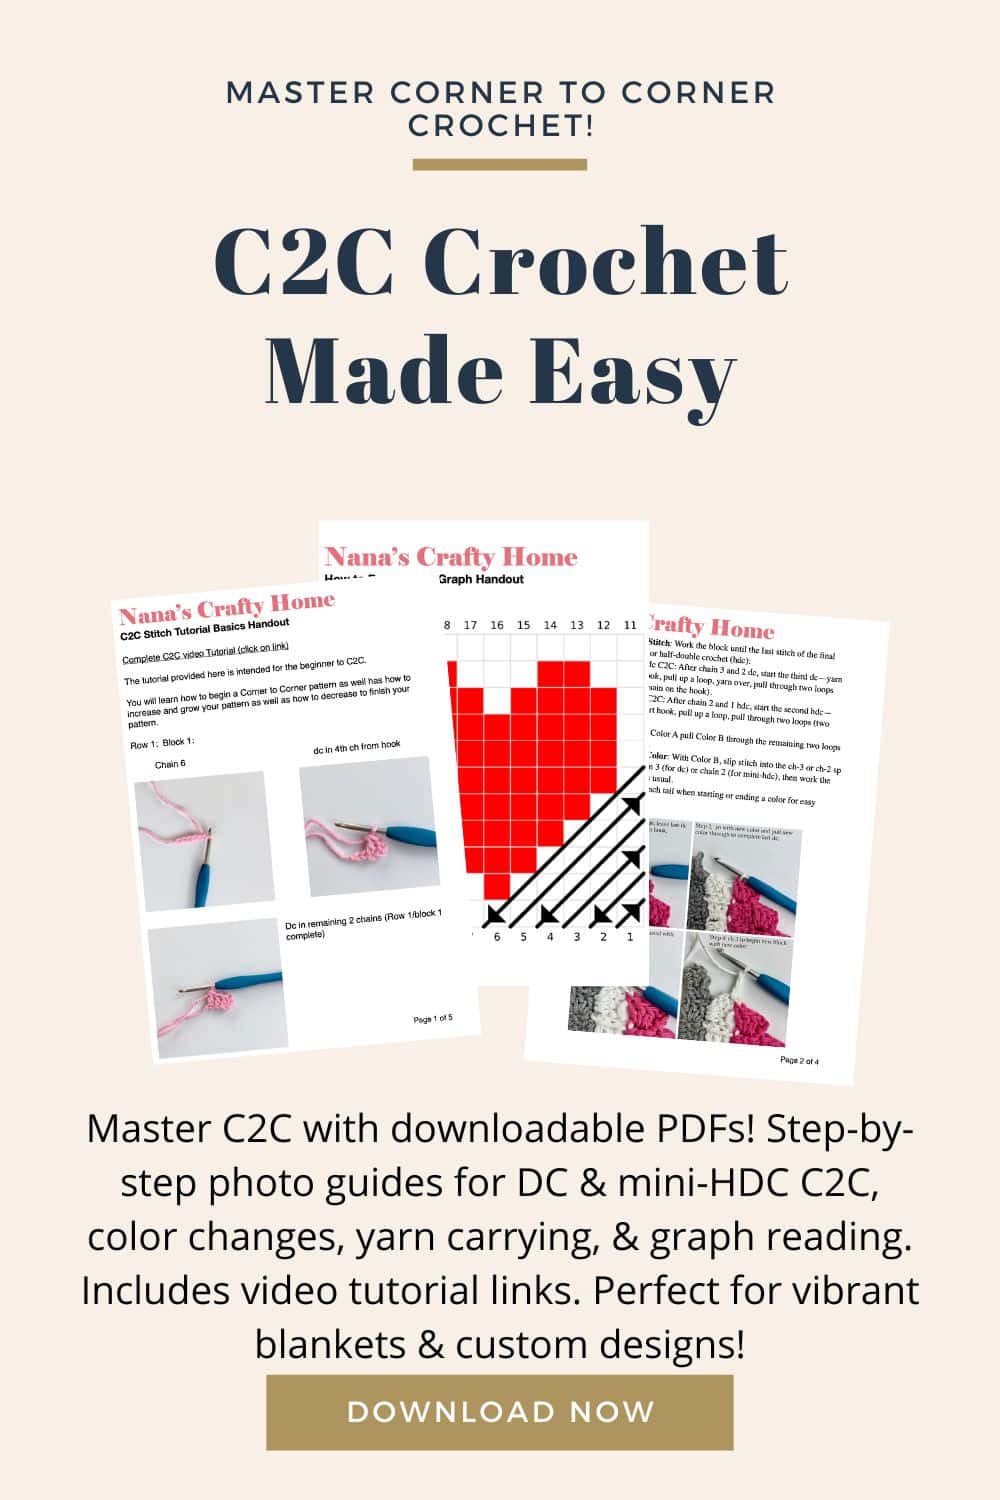
Ready to dig deeper into corner to corner crochet and master this versatile technique? Our Ultimate Guide to C2C Crochet: Techniques and Tips is the foundational c2c resource on the blog, packed with everything beginners and for those that need a c2c refresher! From standard DC and mini-HDC C2C basics to seamless color changes, efficient yarn carrying, custom graph design with Stitch Fiddle, and troubleshooting common issues, this comprehensive C2C crochet guide includes step-by-step tutorials, video links, and free pattern ideas to get you started. Whether you’re tackling your first C2C project or refining your skills, head over to the guide now for all the FREE essential C2C crochet tips and resources in one place!
Elevate your C2C crochet skills with our C2C Crochet PDF Tutorial Bundle! This handy guide is a must-have for crocheters wanting to create stunning blankets and custom designs with ease. Packed with step-by-step photo tutorials for standard DC, mini-HDC, color changes, yarn carrying, graph reading, and making a rectangle shape in c2c, plus links to helpful videos, it’s perfect for beginners. Save time, avoid mistakes, and unlock your creativity—grab your downloadable PDFs now and start crocheting pixel-perfect projects! Includes beginner-friendly patterns to practice your new skills!
This crochet ghost pattern is also available as an ad-free, printable PDF! You can purchase the individual pattern, or if you love PDFs, you might want to check out my Lifetime Membership. It’s an awesome deal! Never pay for one of my PDFs again!! (Or, scroll down for the free version!)

Purchase the ad-free pdf of Boo-Boo the C2C Crochet Ghost Pattern for a small fee. Thank you so much for supporting my work!
If you would like daily crochet inspiration be sure to follow me on Facebook, Instagram, Pinterest, YouTube, Twitter and Tumblr!
To get notified of my free crochet patterns and future giveaways, sign up for my newsletter. I never share or sell your information to third parties — it stays private!
You may also like the following free patterns by Nana’s Crafty Home:


- 1. Black Cat & Spider Towel Topper free crochet pattern
- 2. Spiderweb & Spider Applique free crochet pattern
- 3. Black Cat & Pumpkin Halloween Treat Cups free crochet pattern

Boo Boo the Baby Ghost C2C Pillow free crochet pattern instructions
Pattern written in US crochet terminology
Supplies:
Bernat Pipsqueak Weight 5/Bulky (100% polyester) 3.5 oz / 101 yards
Whitey White 17.6 oz / 510 yards
Red Heart With Love 4/Medium (100% acrylic) 7.0 oz / 370 yards
Black 0.2 oz / 11 yards
Size I – 5.5 mm crochet hook
12” round pillow insert (affiliate)
Tapestry yarn needle
Stitch marker
Scissors
Approximate finished size of square: 26.5” x 26.5”
Abbreviations:
w = white
RS = right side
hdc = half double crochet
ch = chain
sc = single crochet
sl st = slip stitch
st(s) = stitch(es)
Pattern Notes:
- Pillow cover portion of the pattern is worked in Mini Half Double Crochet (hdc) Corner to Corner (C2C) Crochet technique. Written row by row instructions follow with color pixel graph on last page of pdf.
- Eyes are worked in continuous rounds, do not join, instead use a stitch marker to mark the first stitch of each round.
- Not intended as a typical pillow cover; will not be seamed around the pillow insert. Attached to and covers top of pillow insert more as a prop.
Recommended Tutorials:
Mini (hdc) C2C crochet technique
Pattern Instructions
With White yarn,
Starting & Increase Block: Ch 4, hdc in third ch from hook and last ch (skipped chs counts as ch-2 sp).
Continuing block: sl st to ch-2 sp of next block, ch 2, work 2 hdc in same ch-2 sp as sl st.
Decrease: Sl st in top 2 sts of last block worked on previous row, sl st in ch-2 sp of next block and finish continuing blocks, stop working continuing blocks once you have reached the sl st edge.
Row 1: Work Starting Block
Row 2: Work 1 Increasing Block, work 1 Continuing Block.
Row 3: Work 1 Increasing Block, work Continuing Blocks across all blocks.
Repeat Row 3 to desired width.
To Stop Increasing: Work Decrease, work Continuing Blocks across all blocks to last block, sl st in ch-2 sp of last block.
To create a square: Work Decrease at beginning of each row, work Continuing Blocks across all blocks to last block, sl st in ch-2 sp of last block.
Pillow Cover Square
← Row 1 [RS]: w1 (1 square)
→ Row 2 [WS]: w2 (2 squares)
← Row 3 [RS]: w3 (3 squares)
→ Row 4 [WS]: w4 (4 squares)
← Row 5 [RS]: w5 (5 squares)
→ Row 6 [WS]: w6 (6 squares)
← Row 7 [RS]: w7 (7 squares)
→ Row 8 [WS]: w8 (8 squares)
← Row 9 [RS]: w9 (9 squares)
→ Row 10 [WS]: w10 (10 squares)
← Row 11 [RS]: w11 (11 squares)
→ Row 12 [WS]: w12 (12 squares)
← Row 13 [RS]: w13 (13 squares)
→ Row 14 [WS]: w14 (14 squares)
← Row 15 [RS]: w15 (15 squares)
→ Row 16 [WS]: w16 (16 squares)
← Row 17 [RS]: w17 (17 squares)
→ Row 18 [WS]: w18 (18 squares)
← Row 19 [RS]: w19 (19 squares)
→ Row 20 [WS]: w20 (20 squares)
← Row 21 [RS]: w21 (21 squares)
→ Row 22 [WS]: w22 (22 squares)
← Row 23 [RS]: w23 (23 squares)
→ Row 24 [WS]: w24 (24 squares)
← Row 25 [RS]: w25 (25 squares)
→ Row 26 [WS]: w26 (26 squares)
← Row 27 [RS]: w27 (27 squares)
→ Row 28 [WS]: w28 (28 squares)
← Row 29 [RS]: w29 (29 squares)
→ Row 30 [WS]: w30 (30 squares)
← Row 31 [RS]: w31 (31 squares)
→ Row 32 [WS]: w32 (32 squares)
← Row 33 [RS]: w33 (33 squares)
→ Row 34 [WS]: w34 (34 squares)
← Row 35 [RS]: w35 (35 squares)
→ Row 36 [WS]: w36 (36 squares)
← Row 37 [RS]: w37 (37 squares)
→ Row 38 [WS]: w38 (38 squares)
← Row 39 [RS]: w39 (39 squares)
→ Row 40 [WS]: w40 (40 squares)
← Row 41 [RS]: w41 (41 squares)
→ Row 42 [WS]: w42 (42 squares)
← Row 43 [RS]: w43 (43 squares)
Corner (begin decreasing)
→ Row 44 [WS]: w42 (42 squares)
← Row 45 [RS]: w41 (41 squares)
→ Row 46 [WS]: w40 (40 squares)
← Row 47 [RS]: w39 (39 squares)
→ Row 48 [WS]: w38 (38 squares)
← Row 49 [RS]: w37 (37 squares)
→ Row 50 [WS]: w36 (36 squares)
← Row 51 [RS]: w35 (35 squares)
→ Row 52 [WS]: w34 (34 squares)
← Row 53 [RS]: w33 (33 squares)
→ Row 54 [WS]: w32 (32 squares)
← Row 55 [RS]: w31 (31 squares)
→ Row 56 [WS]: w30 (30 squares)
← Row 57 [RS]: w29 (29 squares)
→ Row 58 [WS]: w28 (28 squares)
← Row 59 [RS]: w27 (27 squares)
→ Row 60 [WS]: w26 (26 squares)
← Row 61 [RS]: w25 (25 squares)
→ Row 62 [WS]: w24 (24 squares)
← Row 63 [RS]: w23 (23 squares)
→ Row 64 [WS]: w22 (22 squares)
← Row 65 [RS]: w21 (21 squares)
→ Row 66 [WS]: w20 (20 squares)
← Row 67 [RS]: w19 (19 squares)
→ Row 68 [WS]: w18 (18 squares)
← Row 69 [RS]: w17 (17 squares)
→ Row 70 [WS]: w16 (16 squares)
← Row 71 [RS]: w15 (15 squares)
→ Row 72 [WS]: w14 (14 squares)
← Row 73 [RS]: w13 (13 squares)
→ Row 74 [WS]: w12 (12 squares)
← Row 75 [RS]: w11 (11 squares)
→ Row 76 [WS]: w10 (10 squares)
← Row 77 [RS]: w9 (9 squares)
→ Row 78 [WS]: w8 (8 squares)
← Row 79 [RS]: w7 (7 squares)
→ Row 80 [WS]: w6 (6 squares)
← Row 81 [RS]: w5 (5 squares)
→ Row 82 [WS]: w4 (4 squares)
← Row 83 [RS]: w3 (3 squares)
→ Row 84 [WS]: w2 (2 squares)
← Row 85 [RS]: w1 (1 square)
Fasten off. Weave in ends.
Once pillow square is complete, measure to locate the very center of the cover. Place a stitch marker to mark center.
Cut 2 long lengths of white yarn approximately 15”-20” long.
With long lengths of yarn on tapestry need, pull yarn through top of pillow and then pull through center of pillow cover at stitch marker. Secure pillow cover to top of pillow. Weave in remaining ends.


Eyes (make 2)
With black, ch 7.
Round 1: sc in the second ch from the hook, sc in next 4 chs, 3 sc in last ch, rotate work to begin working in unused loop of foundation ch; sc in next 4 sts, 2 sc in last ch. (14)
Round 2: 2 sc in first st, sc in next 4 sts, 2 sc in each of next three sts, sc in next 4 sts, 2 sc in each of next two sts, sl st to first st of round. (20)
Fasten off, leaving a long tail for sewing.
Sew eyes where desired on front facing side of pillow cover. I placed mine approximately 10” from the bottom front of pillow cover below the top center of pillow.

Pillow Cover Graph provided if you like to work from graphs and mark off each row as you work:

Copyright 2022 Tonya Bush/Nana’s Crafty Home

Social Media links:
Facebook: https://www.facebook.com/nanascraftyhome
Instagram: https://www.instagram.com/nanascraftyhome/
Pinterest: https://www.pinterest.com/nanascraftyhome/
YouTube: https://www.youtube.com/c/TonyaBush
Twitter: https://twitter.com/nanascraftyhome
Facebook Group: https://www.facebook.com/groups/829792060522798
Sign up for my Newsletter: https://nanascraftyhome.com/sign-up-for-my-free-newsletter/
 Hi! Thank you so much for being here! I am Tonya the designer behind Nana's Crafty Home. As a wife, mother, Nana of 9 & with 2 fur babies, my days are filled with love, laughter, hugs and yarn! Here you will find colorful and creative crochet designs for yourself or loved ones. My hope is that you will be inspired to learn and create along with me!