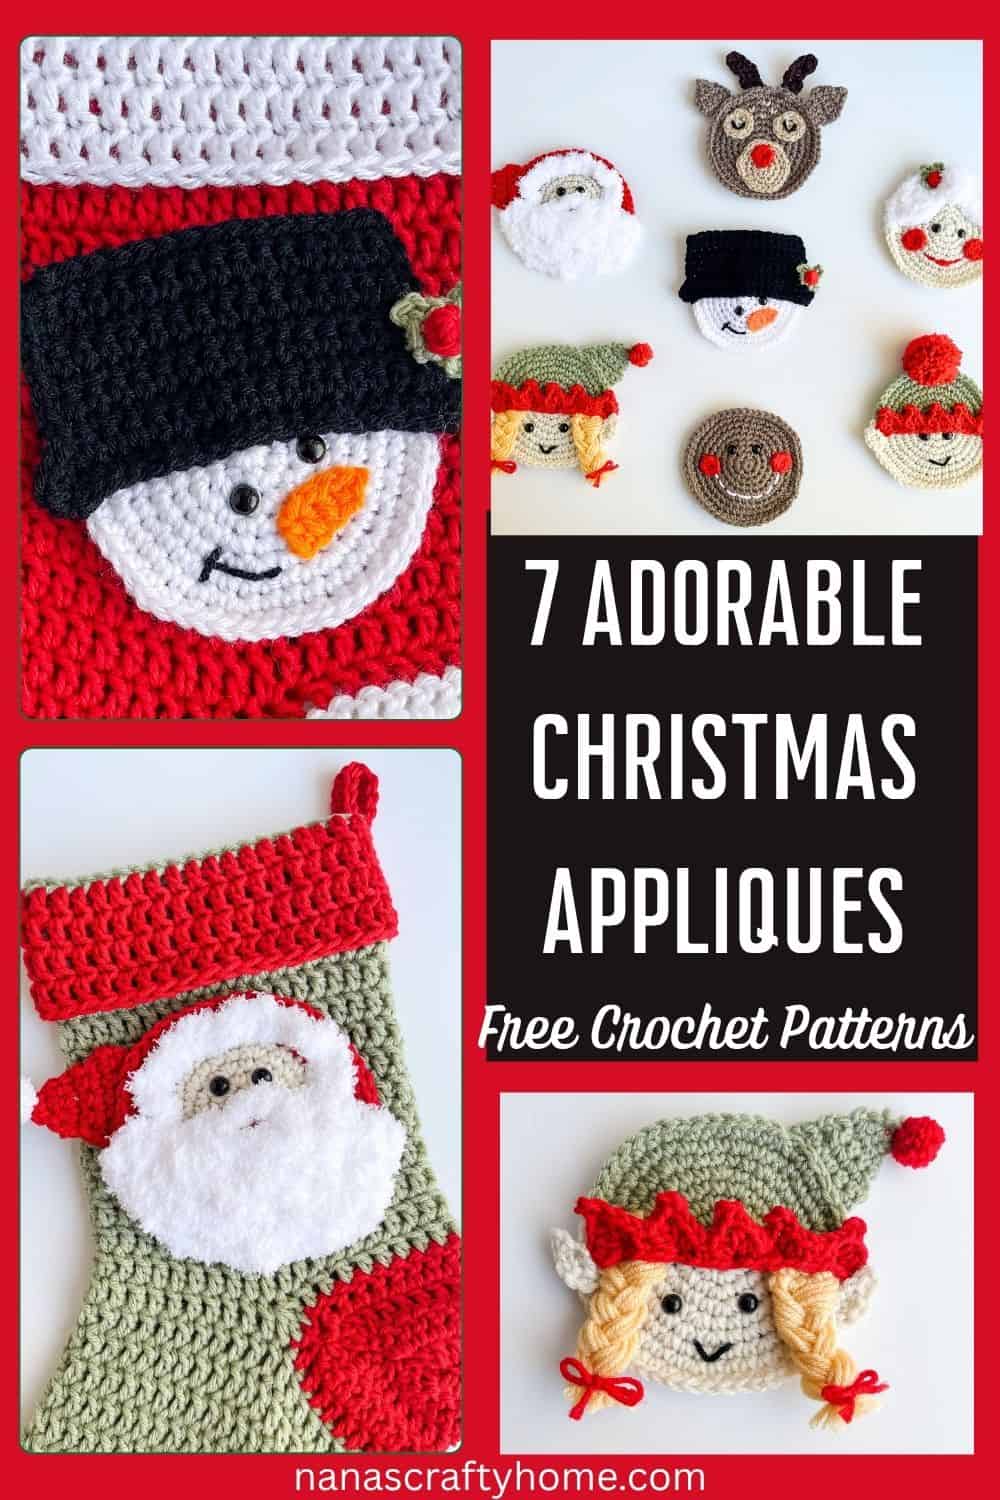
I’m absolutely thrilled to unveil my latest holiday adventure: a free Mini Crochet-Along featuring seven utterly adorable crochet Christmas appliques that will have you stitching up smiles faster than Santa can check his list!
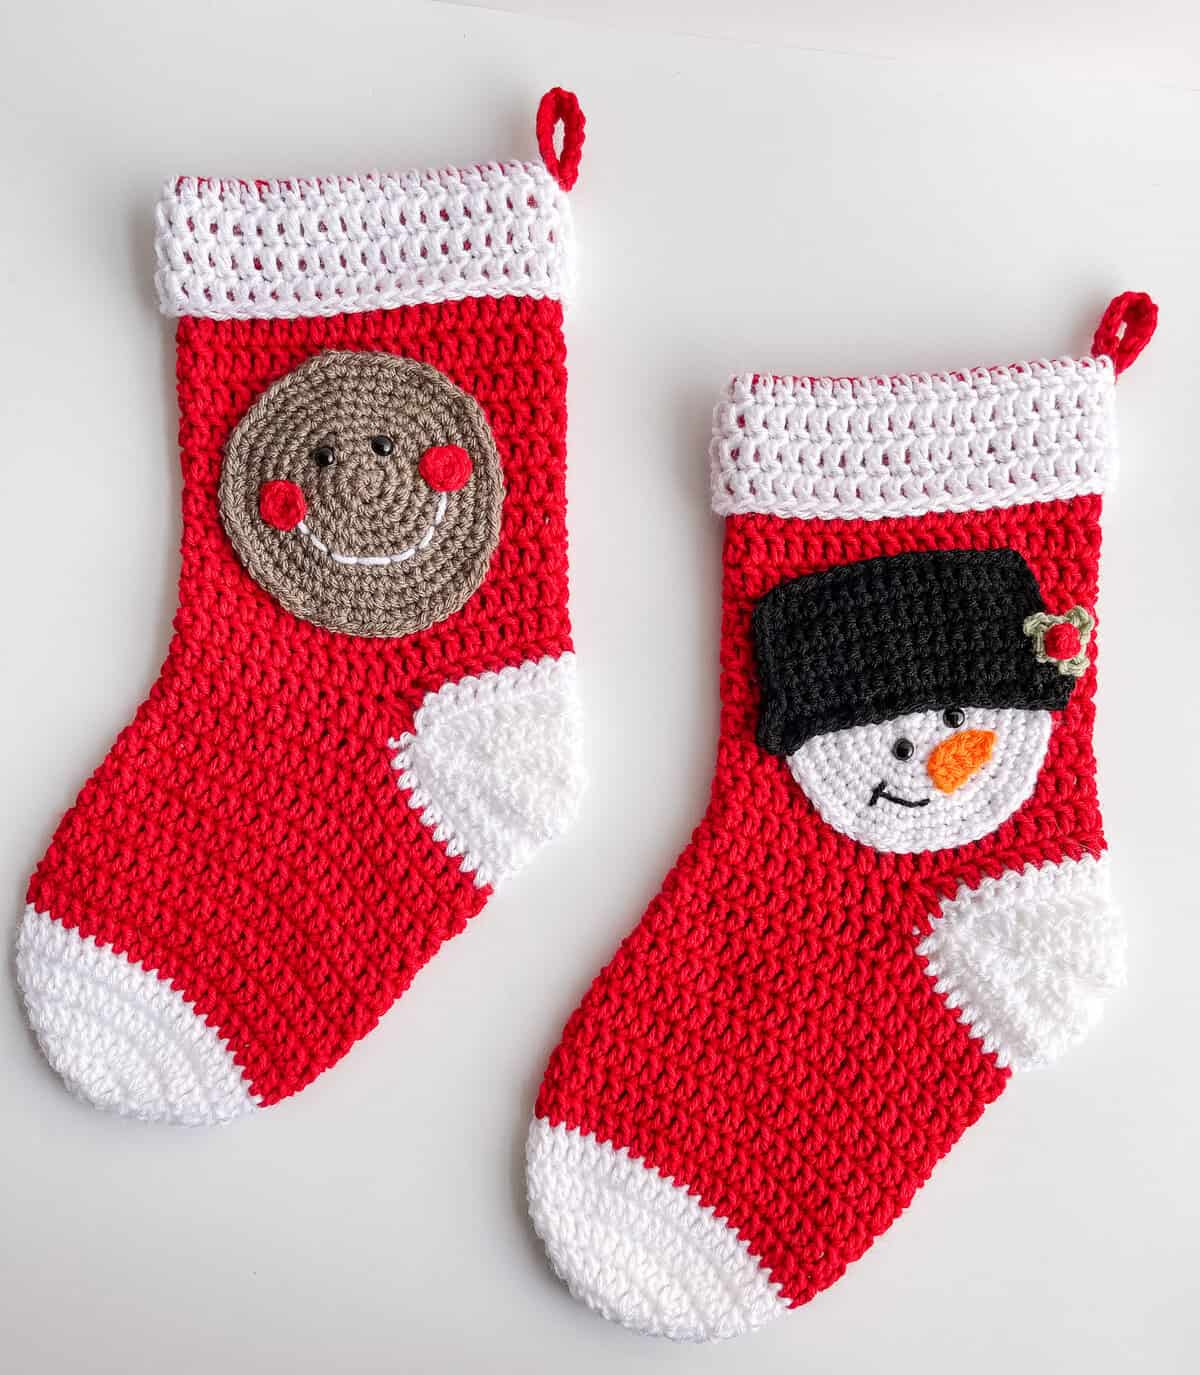
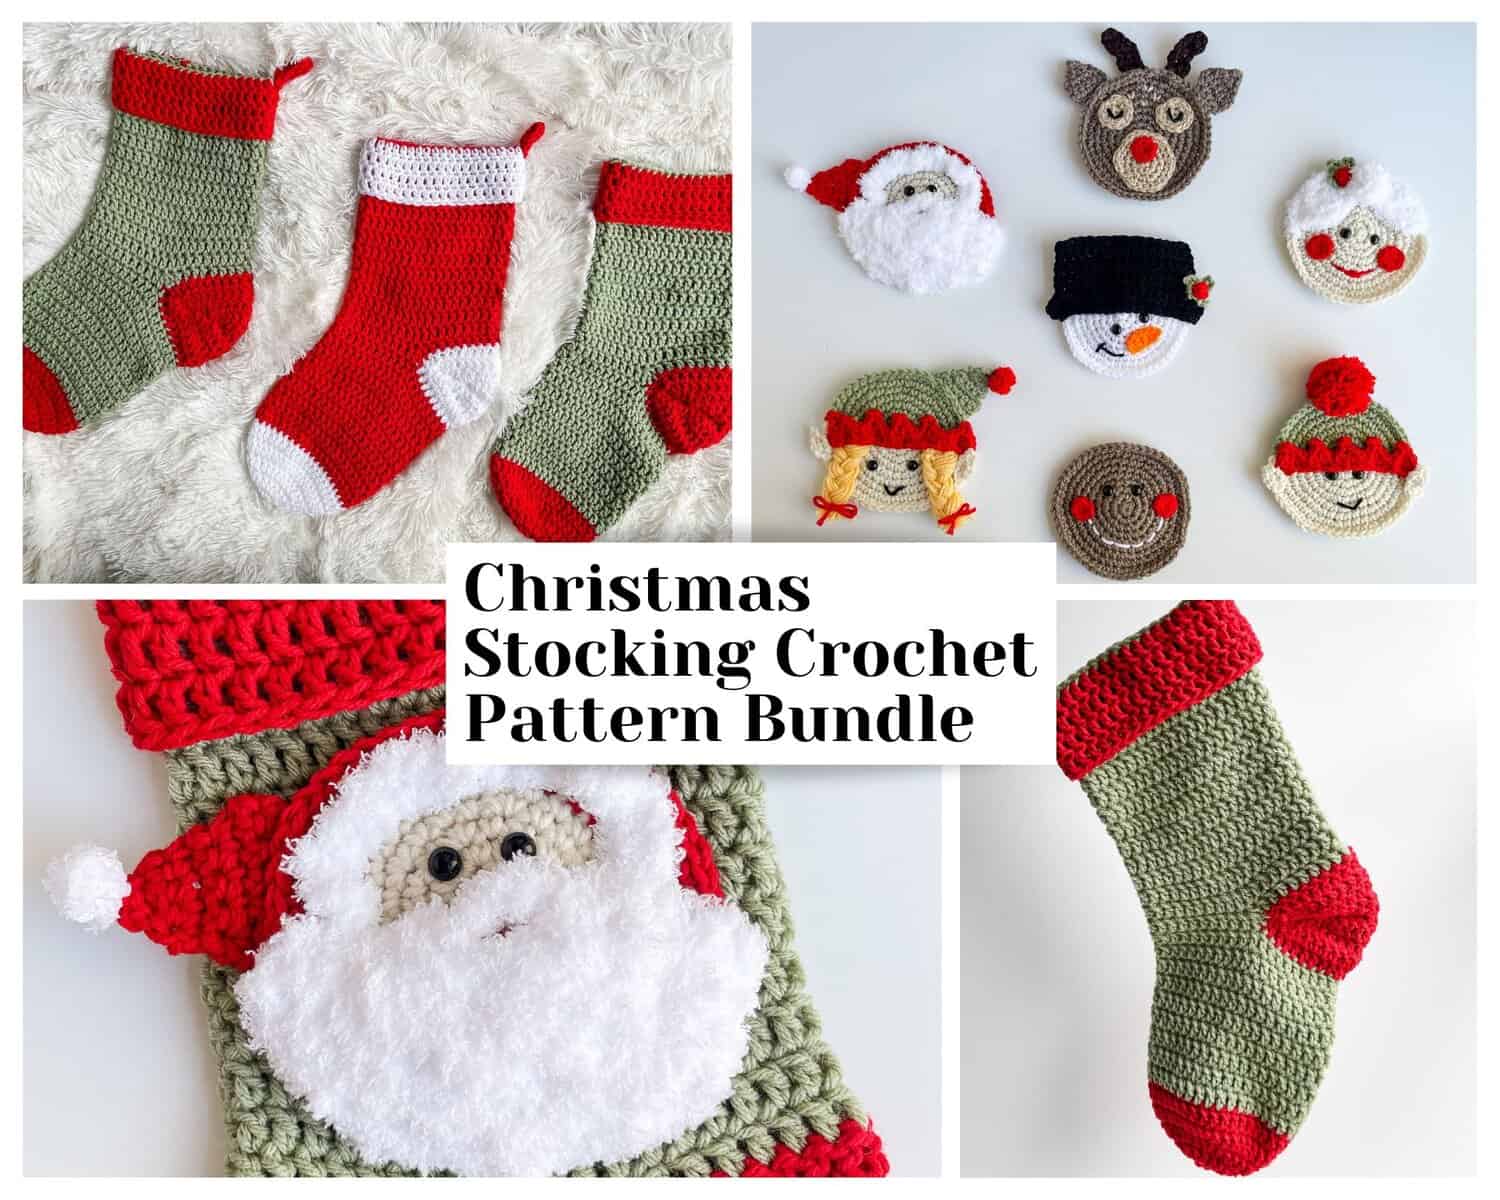
Picture this: a jolly Snowman with his signature carrot nose and jaunty hat, a cheeky Gingerbread Man ready to dash away (but hopefully not from your stocking!), a sweet Reindeer with and a bright red nose, a fluffy-bearded Santa bursting with ho-ho-ho cheer, a rosy-cheeked Mrs. Claus, a playful Elf Girl with bouncy braids and pointy hat, and her mischievous counterpart, the Elf Boy, complete with a pom pom hat.
These crochet Christmas appliques are pint-sized personalities, ready to add a bit of holiday cheer to stockings, blankets, wreaths, garlands, or even your favorite holiday sweater.
Here’s a sneak peek at the finished crew, all lined up and ready to steal your heart! This mini CAL is designed to fit into your busy holiday hustle, with one free pattern dropping right here on the blog every few days for the next couple of weeks.

We will start with the Snowman (find the free pattern today – scroll down below!), the Gingerbread Man (now available – scroll down below!), Santa (scroll down below) then 2-3 each week until all the free appliques are released.
Each pattern will be added to the bottom of this blog post so be sure to bookmark this page for later!
If you’re the type who loves everything in one tidy package, I’ve bundled these seven charmers together with my timeless Classic Christmas Stocking pattern—perfect for personalization with your new appliqué pals. Snag the bundle for a steal and dive in whenever you’re ready, or stick to the free CAL – the patterns will be heading here soon!
These adorable Christmas characters may look pretty familiar to many of you already! They originally made an appearance in my Christmas Granny Square Blanket and several have been adapted to make Christmas Towel Holders!
Let’s get this festive party started! Which character are you most excited to crochet first?

How to Make Crochet Christmas Appliques
For the full free written pattern instructions for the Crochet Christmas Applique pattern set, scroll down below. You can purchase the ad-free PDF of this pattern for a small fee. Or, become a Lifetime Member and never pay for a PDF again!
1. These crochet Christmas Appliques all start with my perfect single crochet circle all made to the same size. I have a complete photo and video tutorial for how to make the perfect circle in single crochet if you need some help with that.
2. I am also using the tapestry single crochet color work technique in order to change colors in my single crochet circle. I have a photo and video tutorial with all of my tapestry sc tips & tricks including how to carry & change colors in single crochet.
3. Once your circles are complete each character will have different little pieces that will be attached to the circle to finish. You can choose to sew the pieces on to the circle or you could simply glue the pieces on as well. If you have never sewn appliques in crochet I have a complete video tutorial to help with that as well!
Once the applique is completed you can then sew or glue to anything you wish – scarves, hats, blankets, Christmas Tree skirts, cardigans, towels & more! If these appliques are a hit this year perhaps I will do a Christmas applique bundle for next Christmas. I already have ideas for a gingerbread house, candy canes and more!
Supplies for the Crochet Christmas Appliques
*This post contains affiliate links. You can click on any yarn or material highlighted to purchase. I will receive a small commission if you purchase but it won’t cost you any extra! As an Amazon Associate I earn from qualifying purchases.
I am primarily using Red Heart Super Saver for my appliques which is a medium worsted weight acrylic yarn. It is very sturdy and economical. However, these are fantastic patterns for using up your yarn scraps! Raid your stash for the colors you need and if you are like me with a large scrap basket you won’t even need to go buy any yarn for this project!
For Santa & Mrs. Claus I am using Bernat Pipsqueak to give them a little bit of fuzzy texture but you could use regular worsted weight yarn as a substitute.
I am also using black plastic safety eyes for my appliques. I purchase my safety eyes from Amazon and they come in a wide range of sizes. Since I am adding my appliques to my stockings I don’t really need to worry about the shaft sticking through and being a bother. However, if you are adding your appliques to a hat, scarf or sweater and don’t want that shaft sticking out on the back side I would recommend getting some black dome buttons and sewing them on to your applique.
Christmas Stocking + 7 Christmas Applique Pattern Bundle
I have put together a bundle of patterns which include 7 Christmas Character Appliques with the Classic Christmas Stocking Pattern included in one pattern bundle! Now available for one-low price! Also available to Lifetime Members free!
Purchase the ad-free PDF
You can purchase the ad-free PDF of this Christmas Applique & Stocking Bundle for a small fee. You can purchase the individual pattern, or if you love PDFs, you might want to check out my Lifetime Membership. It’s an awesome deal! Never pay for one of my PDFs again!!


If you would like daily crochet inspiration be sure to follow me on Facebook, Instagram, Pinterest, YouTube, Twitter and Tumblr!
To get notified of my free crochet patterns and future giveaways, sign up for my newsletter. I never share or sell your information to third parties — it stays private!
You may also like the following free Christmas crochet patterns by Nana’s Crafty Home:
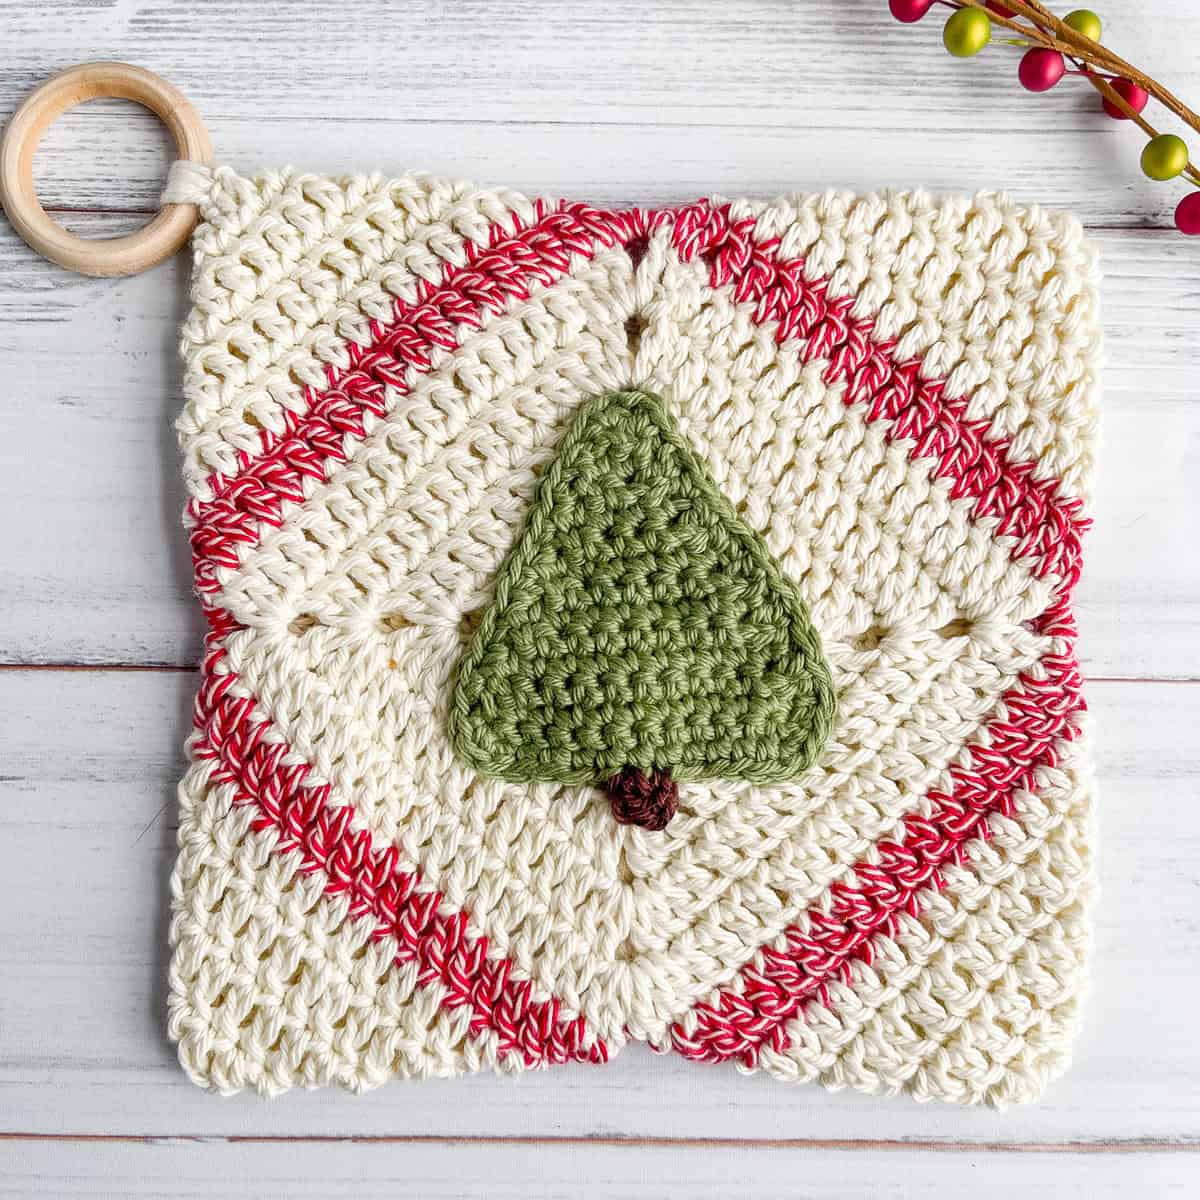


- Christmas Tree Pot Holder free crochet pattern
- Christmas Tree Gnome Towel Topper free crochet pattern
- Reindeer Basket free crochet pattern
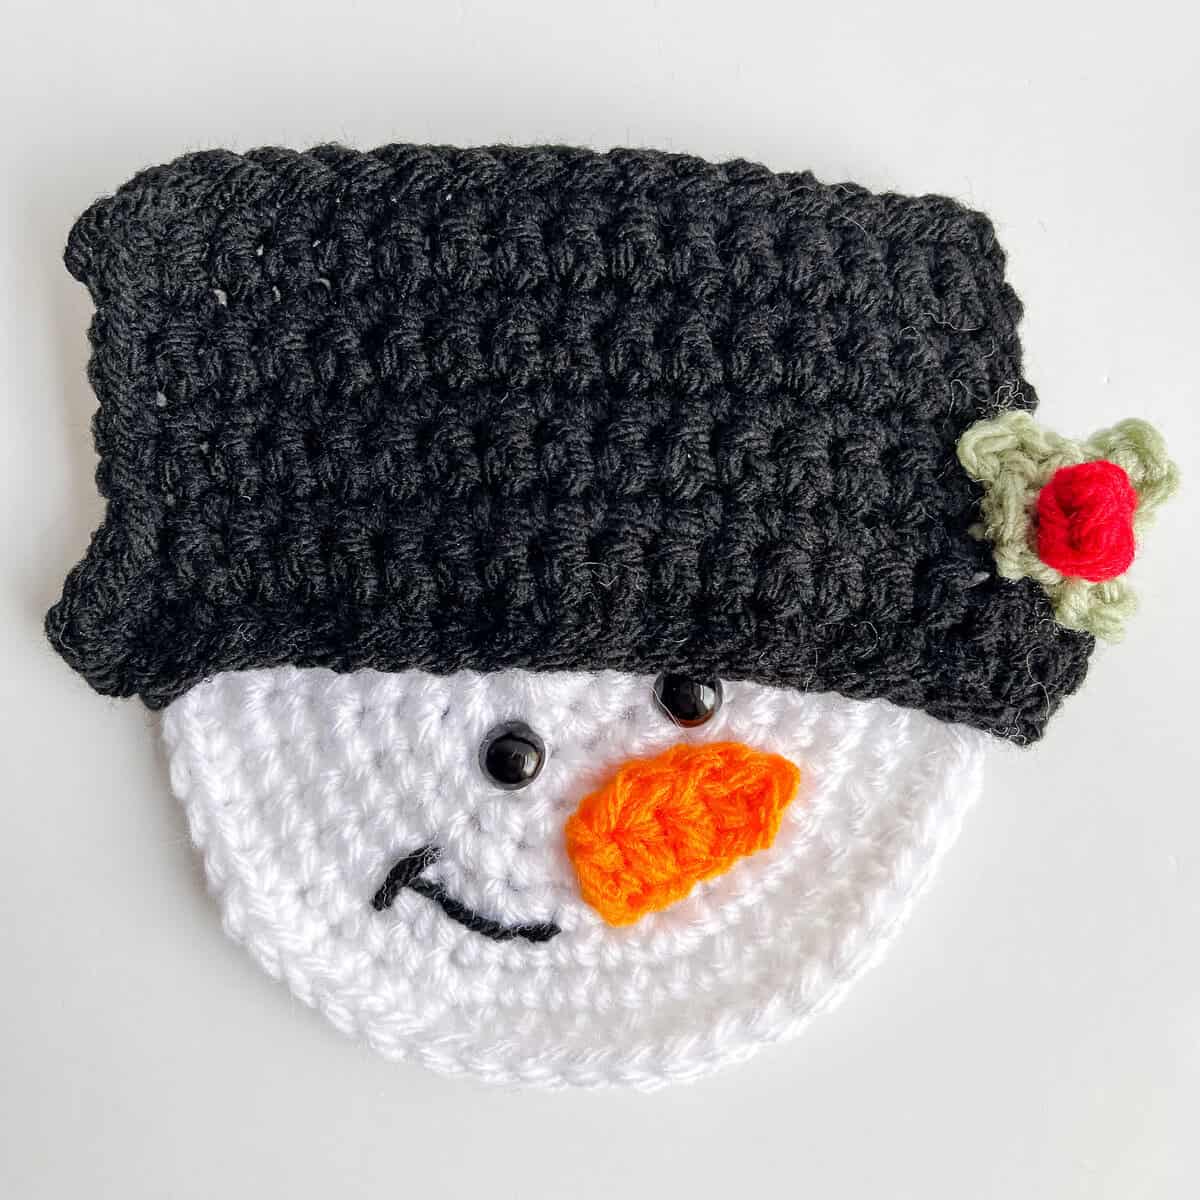
Snowman Applique free crochet pattern
Supplies:
Red Heart Super Saver Weight 4 Medium (100% acrylic)
- White 0.4 oz / 23 yds (White)
- Cherry Red 0.1 oz / 5 yds (Red)
- Pumpkin 0.1 oz / 5 yds (Orange)
- Black 0.3 oz / 15 yds (Black)
- Frosty Green 0.1 oz / 5 yds (Green)
Size I (5.5 mm) crochet hook
2- 12 mm safety eyes
Scissors
Tapestry Needle
Stitch Markers
Approximate finished size: 5” round
Abbreviations:
- WS = wrong side
- RS = right side
- MC = magic circle
- ch = chain
- sc = single crochet
- sl st = slip stitch
- st(s) = stitch(es)
- sk = skip
- hdc = half double crochet
- dc = double crochet
Recommended Tutorial:
How to make a perfect single crochet circle
Pattern Notes:
- Worked in seamless rounds – do not sl st join at the end of each round, use a stitch marker in first st of each round and move up to keep track of rounds.
Make the Classic Christmas Stocking in MC: Red / CC: White
Face Panel
Round 1: (RS) With white, make a MC, ch 1, 6 sc in MC. (6)
Round 2: 2 sc in each st. (12)
Round 3: *2 sc in next st, 1 sc in next st,* repeat from * to * to end. (18)
Round 4: 1 sc in next st, 2 sc in next st, *1 sc in next 2 sts, 2 sc in next st* repeat from * to * to last st, 1 sc in last st. (24)
Round 5: *2 sc in next st, 1 sc in next 3 sts,* repeat from * to * to end. (30)
Round 6: 1 sc in next 2 sts, 2 sc in next st, *1 sc in next 4 sts, 2 sc in next st,* repeat from * to * to last 2 sts, 1 sc in last 2 sts. (36)
Round 7: *2 sc in next st, 1 sc in next 5 sts,* repeat from * to * to end. (42)
Round 8: 1 sc in next 3 sts, 2 sc in next st, *1 sc in next 6 sts, 2 sc in next st,* repeat from * to * to last 3 sts, 1 sc in last 3 sts. (48)
Round 9: *2 sc in next st, 1 sc in next 7 sts,* repeat from * to * to end, sl st to first st. (54)
Fasten off. Weave in ends.
Hat
With black, ch 21.
Row 1: Sc in second ch from hook and in each ch to end. Turn. (20)
Row 2: Ch 1, sc in each st. Turn.
Row 3: Sl st in next 2 sts (do not count as sts), ch 1, sc in same st, sc in next 15 sts, leave last 2 sts unworked. Turn. (16)
Row 4: Ch 1, sc in each st. Turn. (16)
Rows 5 – 9: Repeat row 4. At the end of round 9, do not turn, sl st evenly around outside edge of hat.
Fasten off, leaving a long tail for sewing.
Ivy
With green, make MC, ch 1, work (sc, ch 3, sl st in third ch from hook) three times in MC, sc in MC, tighten MC. Fasten off.
Holly Berry
With red, make MC, ch 1, 3 sc in MC, sl st in first st, tighten MC. Fasten off. (3)
Nose
With orange, ch 5, sc in second ch from hook, hdc in next 2 sts, dc in last st.
Fasten off, leaving a long tail for sewing.
Assembly
Sew holly berry to ivy.
Sew ivy to hat.
Sew hat to RS of face panel.
Add safety eyes to face panel.
Sew nose to face panel.
With black, embroider smile to face panel.
Weave in any remaining ends not left for sewing appliqué.
Sew Applique to front RS of Classic Christmas Stocking with end left for sewing. Need help with sewing appliques in crochet? Check out my tutorial below:
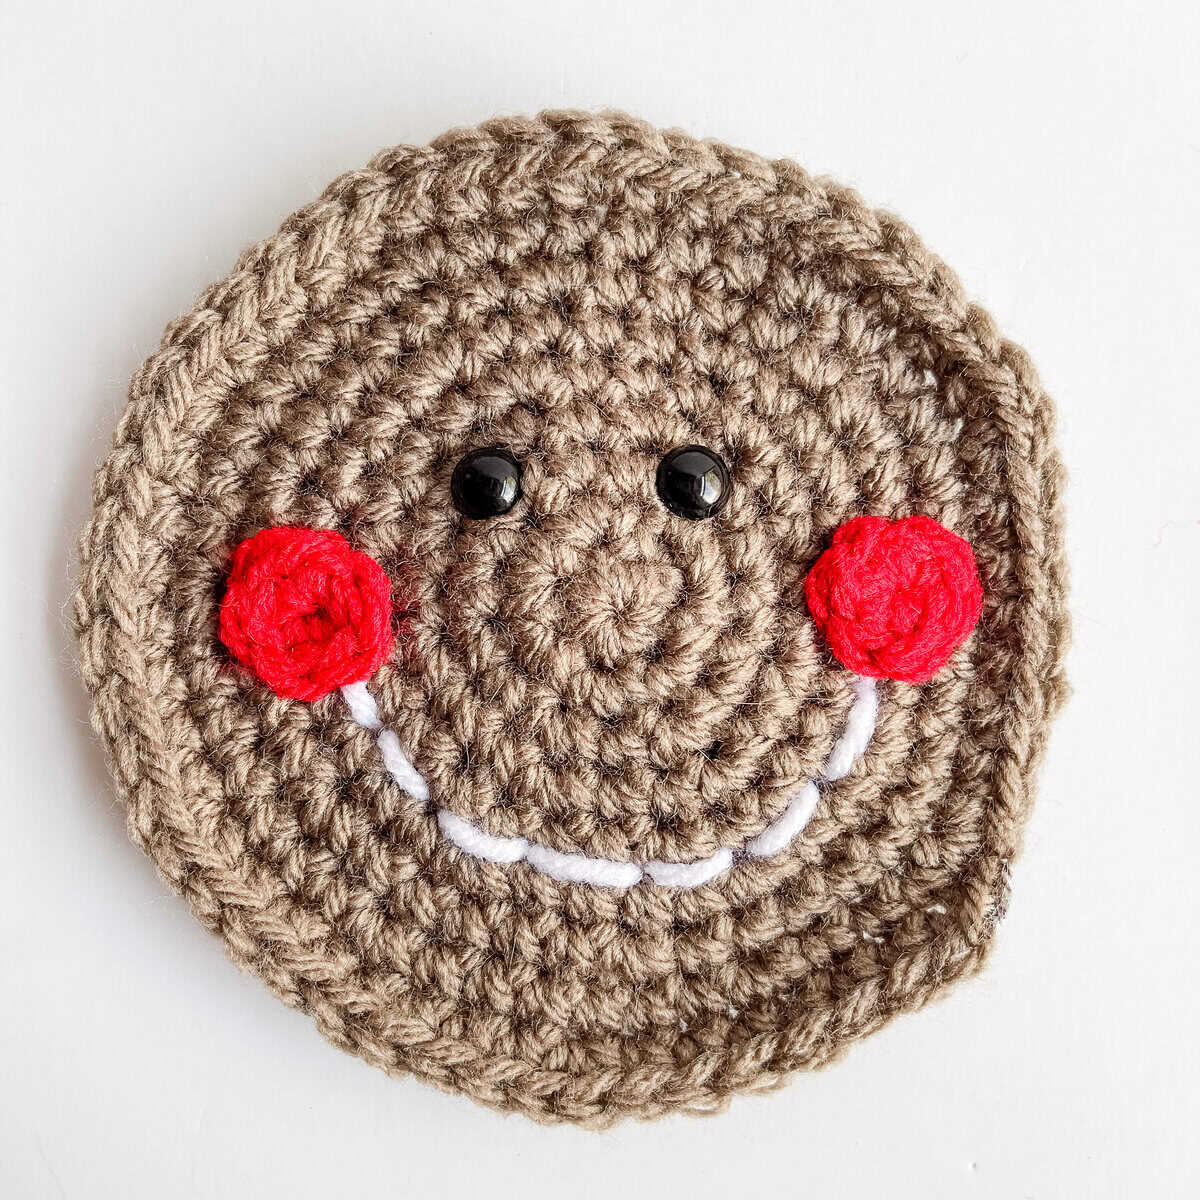
Gingerbread Man Applique free crochet pattern
Pattern written in US crochet terminology
Supplies:
- Red Heart With Love Weight 4 Medium (100% acrylic)
- Taupe 0.4 oz / 23 yds (Brown)
- Red Heart Super Saver Weight 4 Medium (100% acrylic)
- Cherry Red 0.1 oz / 6 yds (Red)
- White 0.2 oz / 10 yds (White)
Size I (5.5 mm) crochet hook
2 – 12 mm safety eyes
Scissors
Tapestry Needle
Stitch Markers
Approximate finished size: 5” round
Abbreviations:
- WS = wrong side
- RS = right side
- MC = magic circle
- ch = chain
- sc = single crochet
- sl st = slip stitch
- st(s) = stitch(es)
- sk = skip
Recommended Tutorial:
Make a Perfect Single Crochet Circle
Pattern Notes:
- Worked in seamless rounds – do not sl st join at the end of each round, use a stitch marker in first st of each round and move up to keep track of rounds.
Face Panel
Round 1: (RS) With brown, make a MC, ch 1, 6 sc in MC. (6)
Round 2: 2 sc in each st. (12)
Round 3: *2 sc in next st, 1 sc in next st,* repeat from * to * to end. (18)
Round 4: 1 sc in next st, 2 sc in next st, *1 sc in next 2 sts, 2 sc in next st* repeat from * to * to last st, 1 sc in last st. (24)
Round 5: *2 sc in next st, 1 sc in next 3 sts,* repeat from * to * to end. (30)
Round 6: 1 sc in next 2 sts, 2 sc in next st, *1 sc in next 4 sts, 2 sc in next st,* repeat from * to * to last 2 sts, 1 sc in last 2 sts. (36)
Round 7: *2 sc in next st, 1 sc in next 5 sts,* repeat from * to * to end. (42)
Round 8: 1 sc in next 3 sts, 2 sc in next st, *1 sc in next 6 sts, 2 sc in next st,* repeat from * to * to last 3 sts, 1 sc in last 3 sts. (48)
Round 9: *2 sc in next st, 1 sc in next 7 sts,* repeat from * to * to end, sl st to first st. (54)
Fasten off. Weave in ends.
Cheeks (make 2)
With red, make MC, ch 1, 6 sc in MC, sl st in first st. Tighten MC.
Fasten off, leaving a long tail for sewing to stocking.
Assembly
Add safety eyes to RS of panel evenly spaced at approximately round 3 of face panel. With long tail left for sewing, sew cheeks to face panel.
With white, embroider smile between cheeks.
Weave in any remaining ends not left for sewing appliqué.
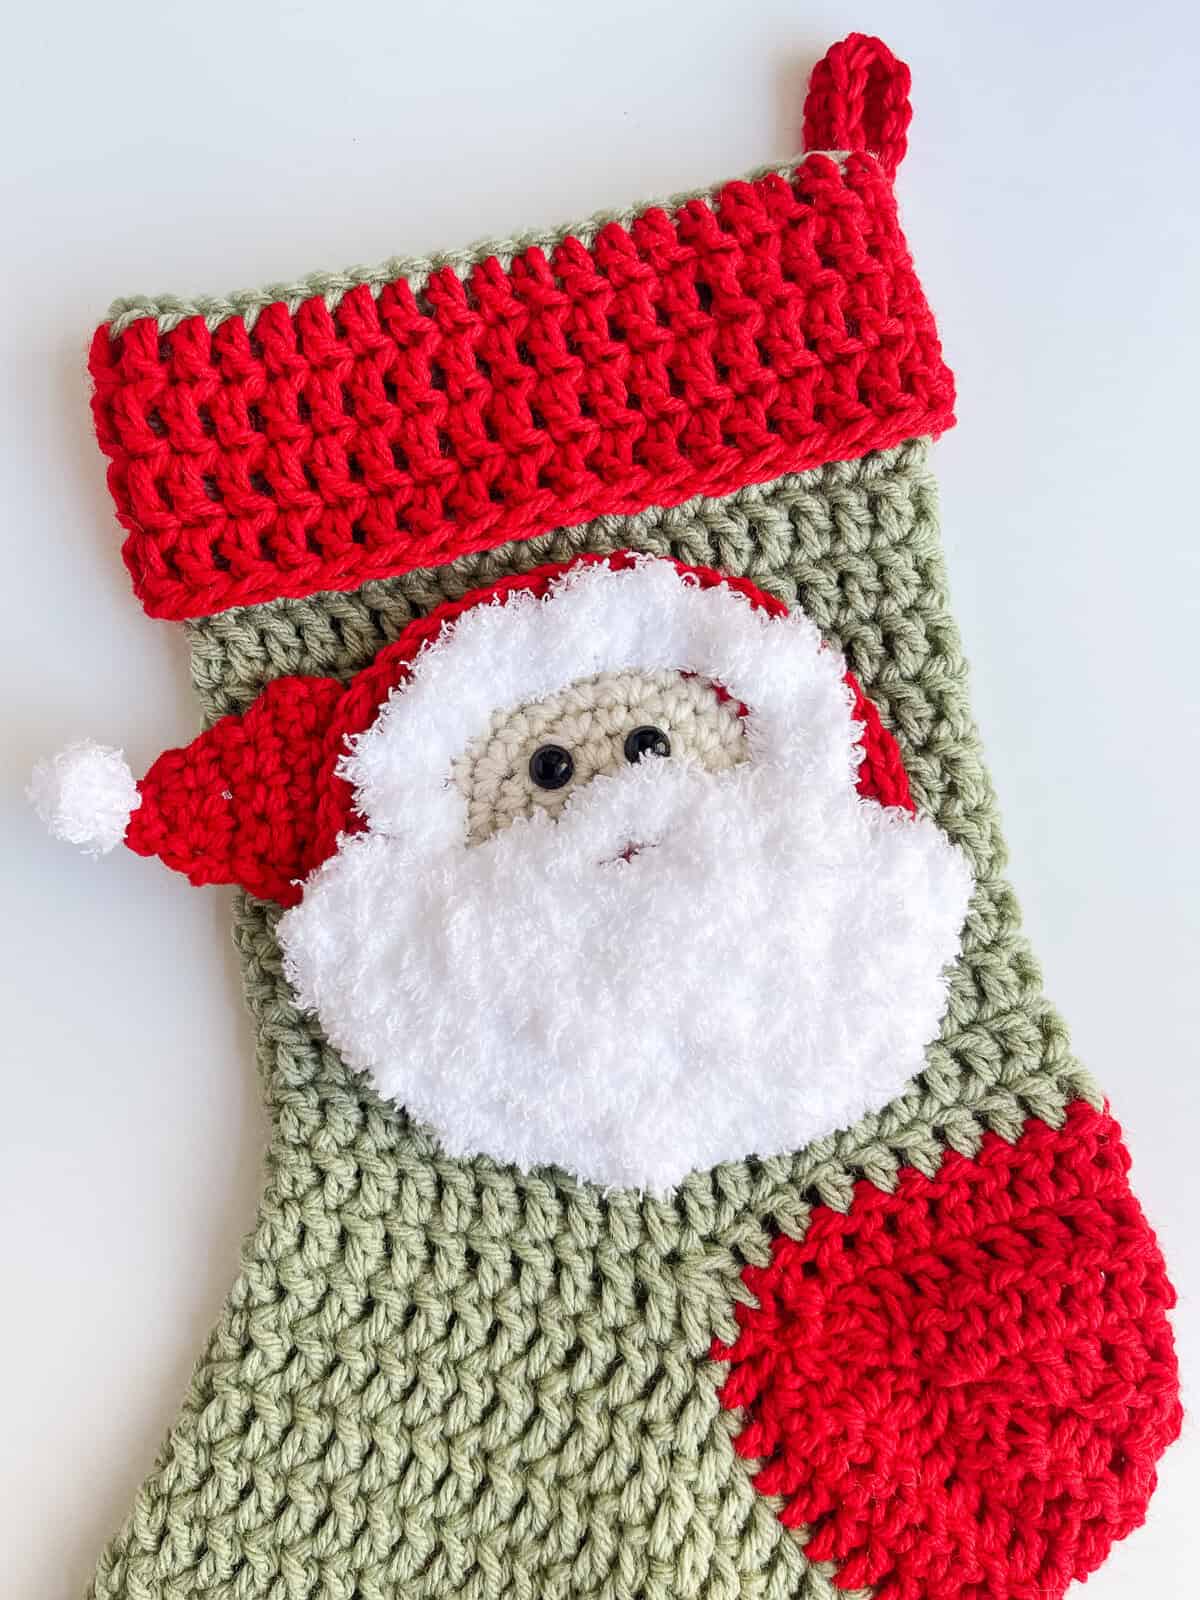
Santa Applique free crochet pattern
Supplies:
- Red Heart Super Saver Weight 4 / Medium (100% acrylic)
- White 0.2 oz / 11 yds (White)
- Aran 0.2 oz / 11 yds (Cream)
- Cherry Red 0.2 oz / 27 yds (Red)
- Bernat Pipsqueak Weight 5 / Bulky
- Whitey White 0.4 oz / 12 yds (Fuzzy)
Size I (5.5 mm) crochet hook
2 – 10 mm black safety eyes
Scissors
Tapestry Needle
Stitch Markers
Approximate finished size: 5” round
Abbreviations:
- WS = wrong side
- RS = right side
- MC = magic circle
- ch(s) = chain(s)
- sc = single crochet
- sl st = slip stitch
- st(s) = stitch(es)
- sk = skip
- sp = space
- BLO = back loop only
- FLO = front loop only
- hdc = half double crochet
Pattern Notes:
- Work in continuous rounds, do not join, instead use a stitch marker to mark the first stitch of each round.
- When changing colors on face, carry and work over colors (tapestry crochet method) not being used unless otherwise indicated.
Recommended Tutorial:
Face Panel
Round 1: (RS) With cream, make a MC, ch 1, 3 sc in MC, switch to white, 3 sc in MC, switch to cream, tighten ring. (6)
Round 2: 2 sc in next 3 sts, switch to white, working in BLO, 2 sc in next 3 sts, switch to cream. (12)
Round 3: Working in both loops, *2 sc in next st, 1 sc in next st,* repeat from * to * 2 times, switch to white, in BLO, repeat from * to * 3 times, switch to cream. (18)
Round 4: Working in both loops, 1 sc in next st, 2 sc in next st, *1 sc in next 2 sts, 2 sc in next st* repeat from * to * 1 time, 1 sc in next st, switch to white, in BLO, 1 sc in next st, 2 sc in next st, repeat from * to * 2 times, 1 sc in last st, switch to cream. (24)
Round 5: Working in both loops, *2 sc in next st, 1 sc in next 3 sts,* repeat from * to * 2 times, switch to white, in BLO, repeat from * to * 3 times, switch to cream. (30)
Round 6: Working in both loops, 1 sc in next 2 sts, 2 sc in next st, *1 sc in next 4 sts, 2 sc in next st,* repeat from * to * 1 time, 1 sc in next 2 sts, switch to white and fasten off cream, in BLO, 1 sc in next 2 sts, 2 sc in next st, repeat from * to * 2 times, 1 sc in last 2 sts, switch to red. (36)
Round 7: Working in BLO, *2 sc in next st, 1 sc in next 5 sts,* repeat from * to * 2 times, switch to white and fasten off red, repeat from * to * 3 times, switch to red and fasten off white. (42)
Round 8: Working in both loops, 1 sc in next 3 sts, 2 sc in next st, *1 sc in next 6 sts, 2 sc in next st,* repeat from * to * 1 time, 1 sc in next 3 sts, switch to white and fasten off red, in BLO, 1 sc in next 3 sts, 2 sc in next st, repeat from * to * 2 times, 1 sc in last 3 sts, switch to red and fasten off white. (48)
Round 9: Working in both loops, *2 sc in next st, 1 sc in next 7 sts,* repeat from * to * 2 times, switch to white and fasten off red, in BLO, repeat from * to * 3 times, sl st to first st. (54)
Fasten off. Weave in ends.
Beard
With Fuzzy yarn, (working in FLO from rounds 2 – 9) sl st to first unused front loop from round 9, *ch 2, sl st in FLO of next st,* repeat from * to * to end of round. Repeat from * to * in FLO of every round working a ch-2 between rounds working in a zig-zag back and forth fashion without cutting yarn between rounds. Note: for round 7 you will work every FLO stitch around face to create fur lining of hat.
Fasten off, weave in ends.
Hat
With red, ch 3.
Row 1: Sc in second ch from hook and in last ch. Turn. (2)
Row 2: Ch 1, 2 sc in each st. Turn. (4)
Rows 3 – 4: Ch 1, 1 sc in each st. Turn.
Row 5: Ch 1, 2 sc in same st, 1 sc in each st to last st, 2 sc in last st. Turn. (6)
Rows 6 -7: Ch 1, 1 sc in each st. Turn. Fasten off, leaving a long tail for sewing hat to top of face panel.
Hat Pom Pom
With fuzzy yarn, make MC, ch 1, 4 sc in MC, sl st to first st.
Fasten off. Sew pom pom to small end of hat.
Weave in ends.
Assembly
Attach black safety eyes to RS of panel.
With a long length of red yarn on tapestry needle, embroider mouth below round 2 on face between fuzzy yarn rounds.
With long tail, sew hat to behind face panel just above beard section.
Weave in remaining ends.
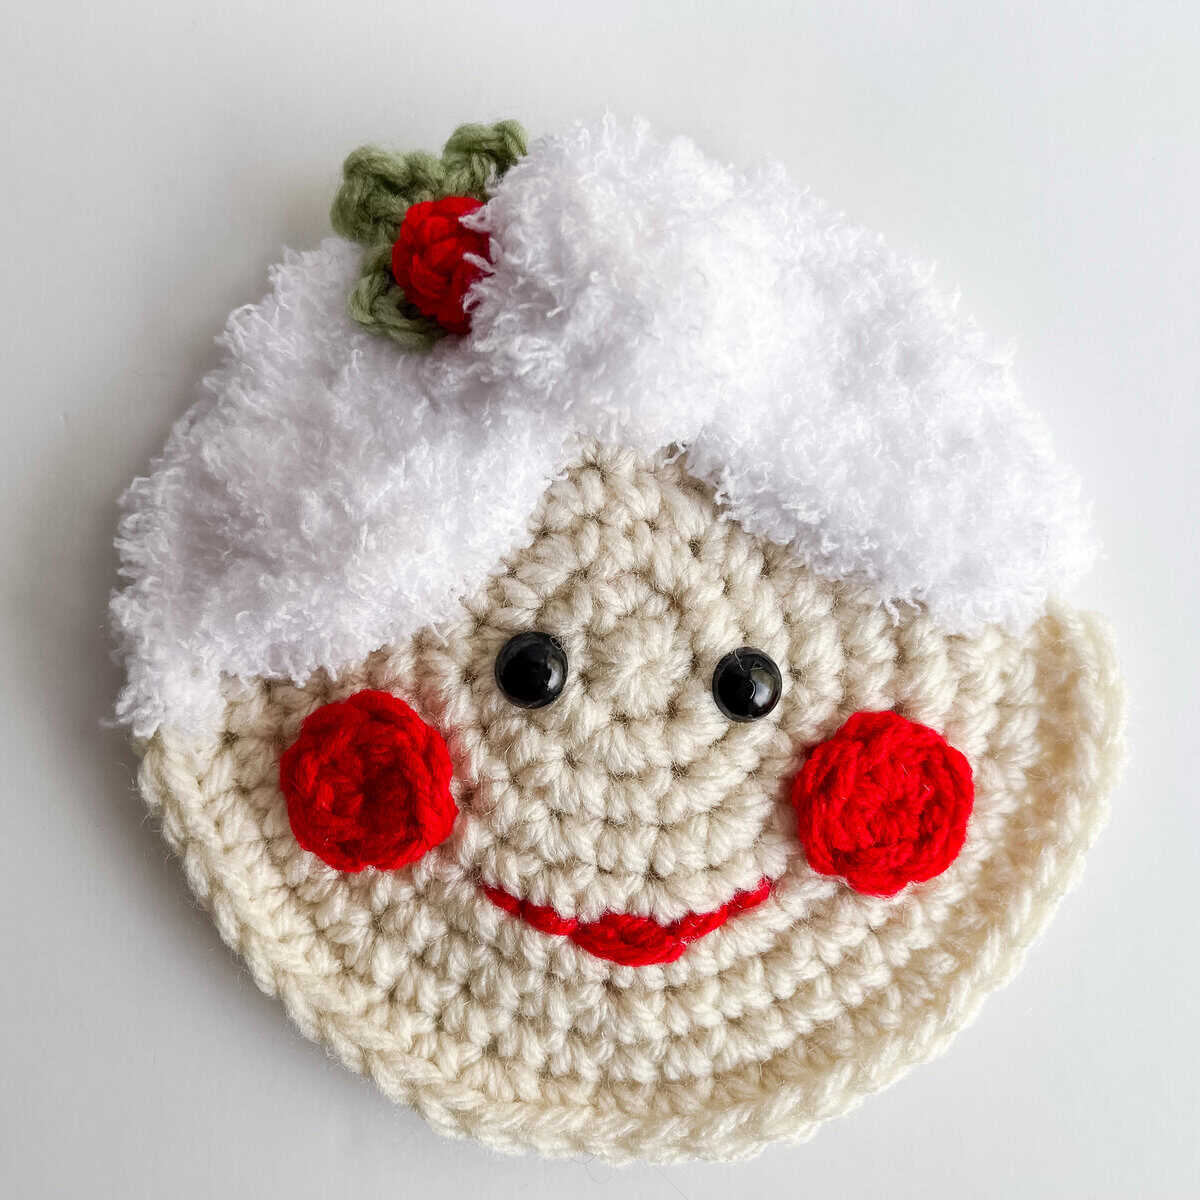
Mrs. Claus Applique free crochet pattern
Supplies:
- Red Heart Super Saver Weight 4 / Medium
- Aran 0.4 oz / 21 yds (Cream)
- Cherry Red 0.2 oz / 11 yds (Red)
- Frosty Green 0.1 oz / 5 yds (Green)
- Bernat Pipsqueak Weight 5 / Bulky
- Whitey White 0.4 oz / 12 yds (Fuzzy)
Size I (5.50 mm) crochet hook
2 – 12 mm plastic safety eyes
Scissors
Tapestry Needle
Stitch Markers
Approximate finished size: 5” round
Abbreviations:
- WS = wrong side
- RS = right side
- MC = magic circle
- ch(s) = chain(s)
- sc = single crochet
- sl st = slip stitch
- st(s) = stitch(es)
- sk = skip
- sp = space
Pattern Notes:
- Work in continuous rounds, do not join, instead use a stitch marker to mark the first stitch of each round.
- When using the fuzzy yarn in rounds 8-9, carry cream yarn when using fuzzy, cut fuzzy yarn when using cream yarn.
Recommended Tutorial:
Face Panel
With cream, make MC.
Round 1: (RS) Ch 1, 6 sc in MC. (6)
Round 2: 2 sc in each st. (12)
Round 3: *2 sc in next st, 1 sc in next st,* repeat from * to * to end. (18)
Round 4: 1 sc in next st, 2 sc in next st, *1 sc in next 2 sts, 2 sc in next st* repeat from * to * to last st, 1 sc in last st. (24)
Round 5: *2 sc in next st, 1 sc in next 3 sts,* repeat from * to * to end. (30)
Round 6: 1 sc in next 2 sts, 2 sc in next st, *1 sc in next 4 sts, 2 sc in next st,* repeat from * to * to last 2 sts, 1 sc in last 2 sts. (36)
Round 7: *2 sc in next st, 1 sc in next 5 sts,* repeat from * to * to end. (42)
Round 8: 1 sc in next 3 sts, switch to fuzzy yarn, 2 sc in next st, *1 sc in next 6 sts, 2 sc in next st,* repeat from * to * 1 time, fasten off fuzzy yarn and switch to cream, repeat from * to * 3 times, 1 sc in last 3 sts, switch to fuzzy yarn. (48)
Round 9: *2 sc in next st, 1 sc in next 7 sts,* repeat from * to * 3 times, fasten off fuzzy yarn and switch to cream, repeat from * to * to end, sl st to first st. (54)
Fasten off. Weave in ends.
Hair Bangs (make 2)
With fuzzy yarn, make MC.
Row 1: (WS) Ch 1, 3 sc in MC. Turn. (3)
Row 2: Ch 1, 2 sc in same st, sc in next st, 2 sc in last st. Turn. (5)
Row 3: Ch 1, 2 sc in same st, sc in each st to last st, 2 sc in last st. Turn. (7)
Row 4: Repeat row 3. (9)
Fasten off, leaving a long tail for sewing. Weave in remaining ends.
Hair Bun
With white, make MC.
Round 1: (RS) Ch 1, 6 sc in MC. (6)
Round 2: 2 sc in each st. (12)
Round 3: *2 sc in next st, 1 sc in next st,* repeat from * to * to end. (18)
Fasten off, leave a tail for sewing.
Cheeks (make 2)
With red, make MC, ch 1, 6 sc in MC, sl st to first st. (6) Fasten off.
Ivy
With green, make MC, ch 1, work (sc, ch 3, sl st in third ch from hook) three times in MC, sc in MC, tighten MC. Fasten off.
Holly Berry
With red, make MC, ch 1, 3 sc in MC, sl st in first st, tighten MC. (3) Fasten off.
Assembly
With long tails, sew hair bangs to each side of face.
With long tail from hair bun on tapestry needle, weave through stitches of round 3 and pull together. Sew between hair bangs at top of face. No need for stuffing – should make a small ball.
With long tails, sew cheeks to face.
Attach black safety eyes.
With long length of red, embroider smile.
Sew holly berry to ivy and sew ivy next to hair bun.
Weave in remaining ends not left for sewing appliqué.
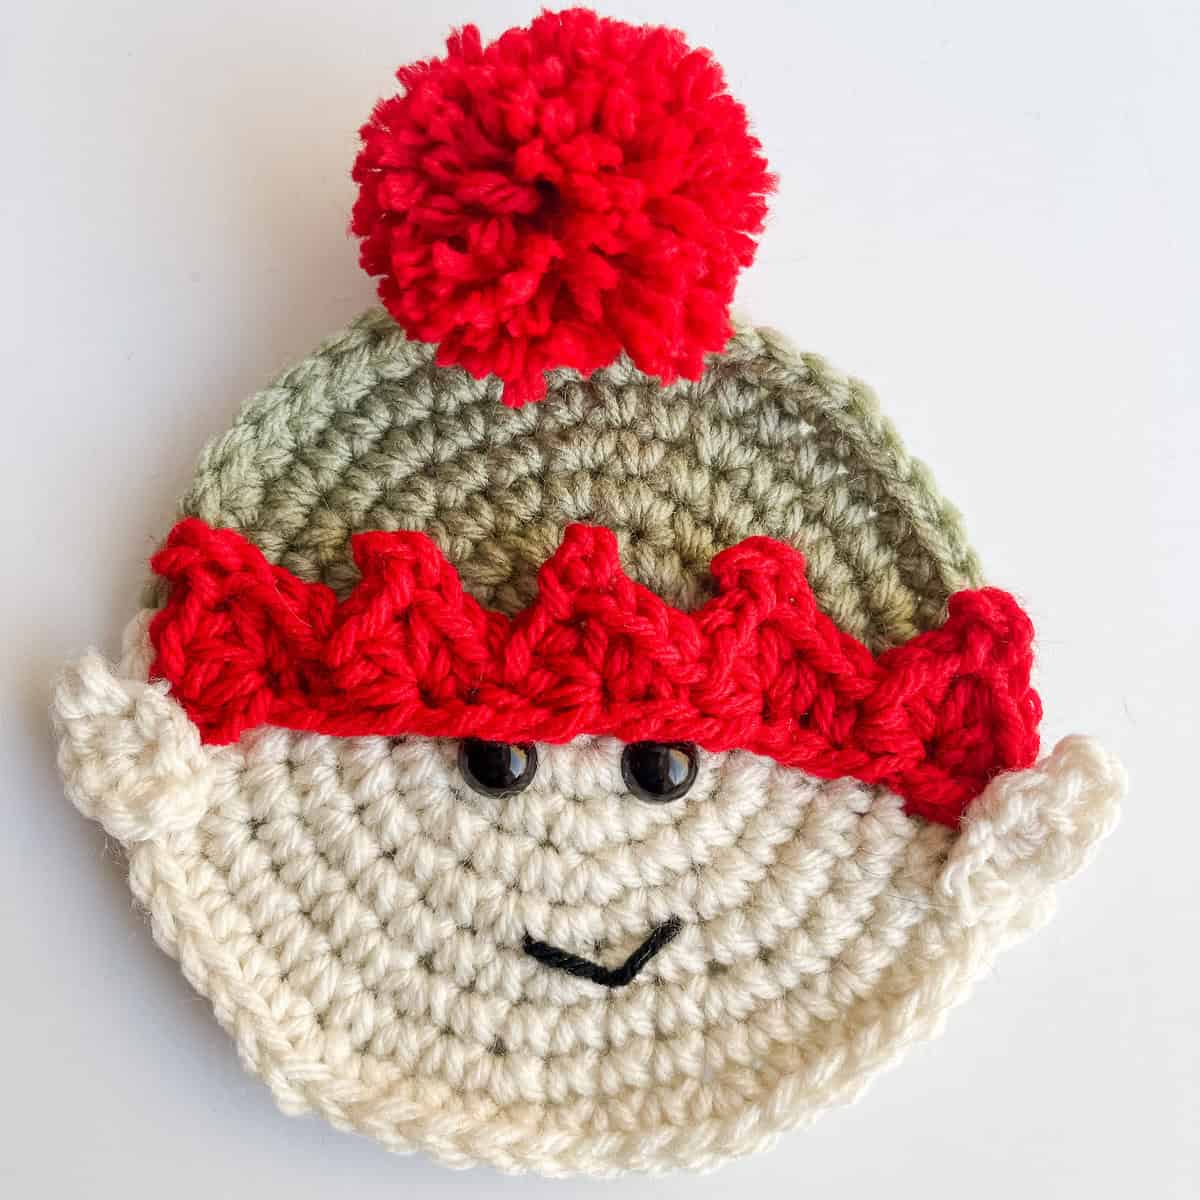
Boy Elf Applique free crochet pattern
Supplies:
- Red Heart Super Saver Weight 4 / Medium (100% acrylic)
- Frosty Green 0.3 oz / 16 yds (Green)
- Aran 0.2 oz /11 yds (Cream)
- Cherry Red 0.1 oz / 6 yds (Red)
- Black 0.01 oz / 1 yard (Black)
Size I (5.5 mm) crochet hook
2 – 14 mm plastic safety eyes
Scissors
Tapestry Needle
Stitch Markers
Approximate finished size: 5” round
Abbreviations:
- WS = wrong side
- RS = right side
- MC = magic circle
- ch(s) = chain(s)
- sc = single crochet
- sl st = slip stitch
- st(s) = stitch(es)
- hdc = half double crochet
Special Stitches:
Picot: Ch 3, sl st in third ch from hook.
Pattern Notes:
- Work in continuous rounds, do not join, instead use a stitch marker to mark the first stitch of each round.
- When changing colors on face, carry and work over colors (tapestry crochet method) not being used unless otherwise indicated.
Recommended Tutorials:
Face Panel
With green, make MC.
Round 1: (RS) Ch 1, 3 sc in MC, switch to cream, 3 sc in MC, switch to green, tighten MC. (6)
Round 2: 2 sc in next 3 sts, switch to cream, 2 sc in next 3 sts, switch to green. (12)
Round 3: *2 sc in next st, 1 sc in next st,* repeat from * to * 2 times, switch to cream, repeat from * to * 3 times, switch to green. (18)
Round 4: 1 sc in next st, 2 sc in next st, *1 sc in next 2 sts, 2 sc in next st* repeat from * to * 1 time, 1 sc in next st, switch to cream, 1 sc in next st, 2 sc in next st, repeat from * to * 2 times, 1 sc in last st, switch to green. (24)
Round 5: *2 sc in next st, 1 sc in next 3 sts,* repeat from * to * 2 times, switch to cream, repeat from * to * 3 times, switch to green. (30)
Round 6: 1 sc in next 2 sts, 2 sc in next st, *1 sc in next 4 sts, 2 sc in next st,* repeat from * to * 1 time, 1 sc in next 2 sts, switch to cream, 1 sc in next 2 sts, 2 sc in next st, repeat from * to * 2 times, 1 sc in last 2 sts, switch to green. (36)
Round 7: *2 sc in next st, 1 sc in next 5 sts,* repeat from * to * 2 times, switch to cream, repeat from * to * 3 times, switch to green. (42)
Round 8: 1 sc in next 3 sts, 2 sc in next st, *1 sc in next 6 sts, 2 sc in next st,* repeat from * to * 1 time, 1 sc in next 3 sts, switch to cream, 1 sc in next 3 sts, 2 sc in next st, repeat from * to * 2 times, 1 sc in last 3 sts, switch to green. (48)
Round 9: *2 sc in next st, 1 sc in next 7 sts,* repeat from * to * 2 times, switch to cream and fasten off green leaving a long tail for sewing, repeat from * to * 3 times, sl st to first st. (54)
Fasten off leaving a long tail for sewing. Weave in ends.
Hat Band
With red, ch 22.
Row 1:Sc in second ch from hook, *sk next ch, (2 hdc, picot, 2 hdc) in next ch, sk next ch, sc in next ch,* repeat from * to * to end of ch.
Fasten off leaving a long tail for sewing.
Ears (make 2)
With cream, ch 3.
Row 1: Sc in second ch from hook, (2 sc, picot, 1 sc) in last ch.
Fasten off.
Assembly
Sew hat band just above face.
Sew ears to each side of face panel below hat band.
Attach safety eyes to face.
With long length of black, embroider mouth on face.
With red, make a 1 5/8” pom pom and sew to top of face panel.
Weave in ends not left for sewing appliqué.
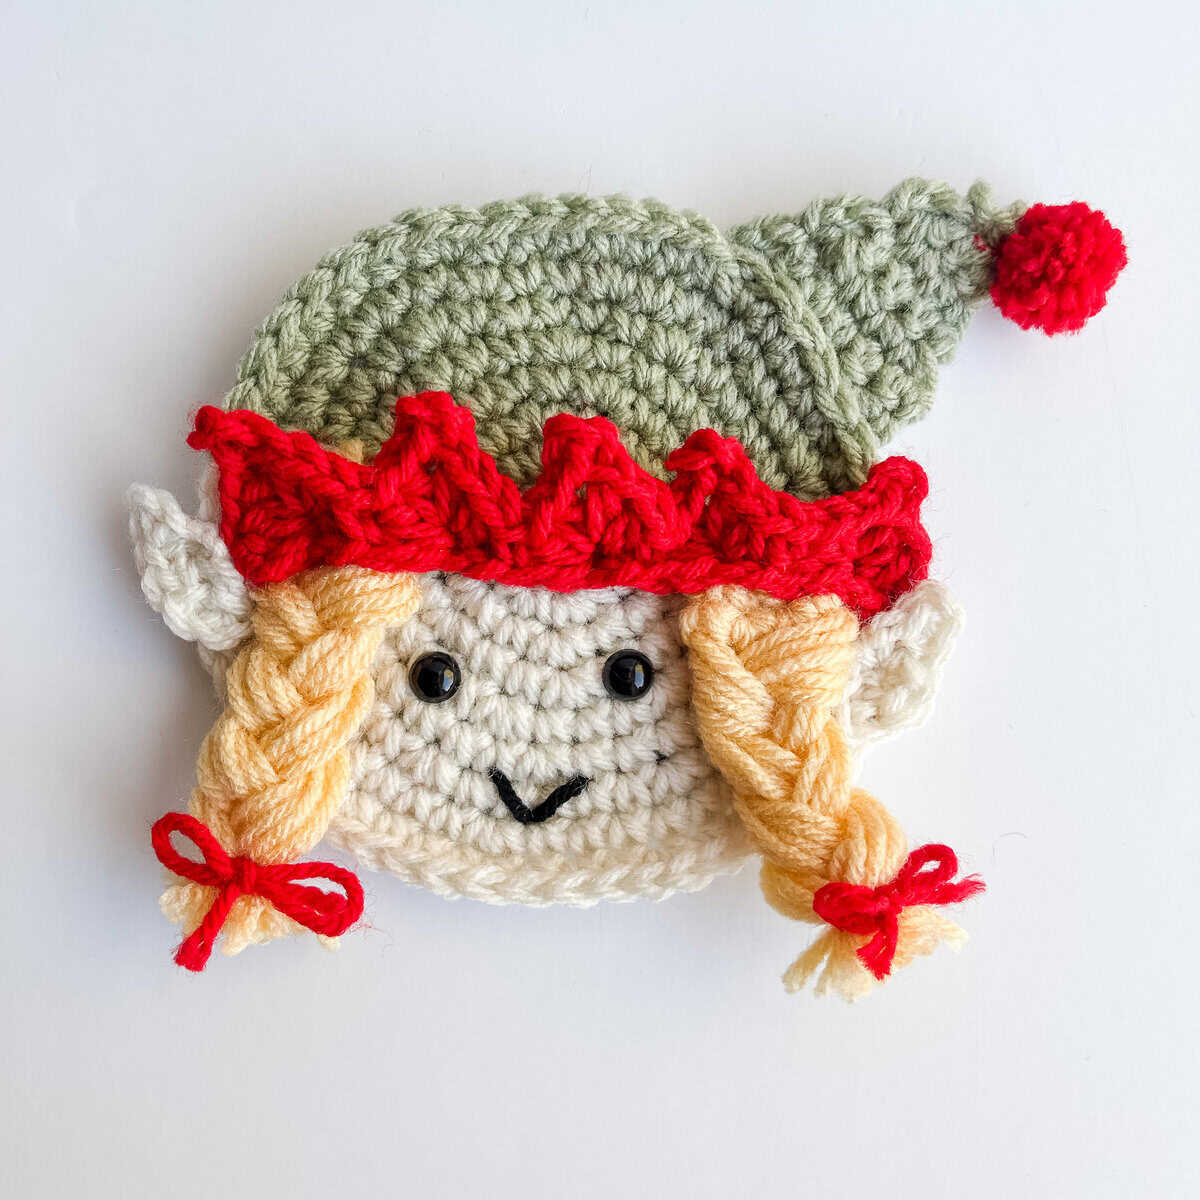
Girl Elf Applique
Supplies:
- Red Heart Super Saver Weight 4 / Medium (100% acrylic)
- Frosty Green 0.3 oz / 16 yds (Green)
- Aran 0.2 oz /11 yds (Cream)
- Cherry Red 0.1 oz / 6 yds (Red)
- Cornmeal 0.2 oz / 11 yds (Yellow)
- Black 0.01 oz / 1 yard (Black)
Size I (5.5 mm) crochet hook
2 – 12 mm plastic safety eyes
Scissors
Tapestry Needle
Stitch Markers
Approximate finished size: 5” round
Abbreviations:
- WS = wrong side
- RS = right side
- MC = magic circle
- ch(s) = chain(s)
- sc = single crochet
- sl st = slip stitch
- st(s) = stitch(es)
- hdc = half double crochet
Special Stitches:
Picot: Ch 3, sl st in third ch from hook.
Pattern Notes:
- Work in continuous rounds, do not join, instead use a stitch marker to mark the first stitch of each round.
- When changing colors on face, carry and work over colors (tapestry crochet method) not being used unless otherwise indicated.
Recommended Tutorials:
Face Panel
With green, make MC.
Round 1: (RS) Ch 1, 3 sc in MC, switch to cream, 3 sc in MC, switch to green, tighten MC. (6)
Round 2: 2 sc in next 3 sts, switch to cream, 2 sc in next 3 sts, switch to green. (12)
Round 3: *2 sc in next st, 1 sc in next st,* repeat from * to * 2 times, switch to cream, repeat from * to * 3 times, switch to green. (18)
Round 4: 1 sc in next st, 2 sc in next st, *1 sc in next 2 sts, 2 sc in next st* repeat from * to * 1 time, 1 sc in next st, switch to cream, 1 sc in next st, 2 sc in next st, repeat from * to * 2 times, 1 sc in last st, switch to green. (24)
Round 5: *2 sc in next st, 1 sc in next 3 sts,* repeat from * to * 2 times, switch to cream, repeat from * to * 3 times, switch to green. (30)
Round 6: 1 sc in next 2 sts, 2 sc in next st, *1 sc in next 4 sts, 2 sc in next st,* repeat from * to * 1 time, 1 sc in next 2 sts, switch to cream, 1 sc in next 2 sts, 2 sc in next st, repeat from * to * 2 times, 1 sc in last 2 sts, switch to green. (36)
Round 7: *2 sc in next st, 1 sc in next 5 sts,* repeat from * to * 2 times, switch to cream, repeat from * to * 3 times, switch to green. (42)
Round 8: 1 sc in next 3 sts, 2 sc in next st, *1 sc in next 6 sts, 2 sc in next st,* repeat from * to * 1 time, 1 sc in next 3 sts, switch to cream, 1 sc in next 3 sts, 2 sc in next st, repeat from * to * 2 times, 1 sc in last 3 sts, switch to green. (48)
Round 9: *2 sc in next st, 1 sc in next 7 sts,* repeat from * to * 2 times, switch to cream and fasten off green leaving a long tail for sewing, repeat from * to * 3 times, sl st to first st. (54)
Fasten off leaving a long tail for sewing. Weave in ends.
Hat Band
With red, ch 22.
Row 1:Sc in second ch from hook, *sk next ch, (2 hdc, picot, 2 hdc) in next ch, sk next ch, sc in next ch,* repeat from * to * to end of ch.
Fasten off leaving a long tail for sewing.
Braids (make 2)
To make base for braids, with red, ch 7.
Row 1: Sc in second ch from hook and in each ch to end. (6)
Fasten off, leaving a long tail for sewing. Weave in remaining end.
Cut 12 long pieces of yellow yarn approximately 10” long. Take 2 strands of yarn and add to each stitch of base as fringe. To form fringe, insert hook into first sc stitch of base, fold 2 strands of yarn in half, place fold of strands on hook, pull through stitch to form a loop, pull ends of fringe through loop and gently tighten to form fringe. Repeat for each of the 6 stitches of base.
To braid, separate yarn fringe into 3 sections of 8 strands of yarn per section. Braid sections. Use a long strand of red yarn to tie a knot at the bottom of the braid and form a bow. Trim ends. See photos below.
Ears (make 2)
With cream, ch 3.
Row 1: Sc in second ch from hook, (2 sc, picot, 1 sc) in last ch.
Fasten off.
Hat
With green, ch 3.
Row 1: Sc in second ch from hook and in last ch. Turn. (2)
Row 2: Ch 1, 2 sc in each st. Turn. (4)
Rows 3 – 4: Ch 1, 1 sc in each st. Turn.
Row 5: Ch 1, 2 sc in same st, 1 sc in each st to last st, 2 sc in last st. Turn. (6)
Rows 6 -7: Ch 1, 1 sc in each st. Turn.
Fasten off, leaving a long tail for sewing hat to top of face panel.
With red yarn make a 3/4” pom pom.
Sew pom pom to tip of hat.
Assembly
Sew braids to face panel just above face portion.
Sew hat band over braids on face panel.
Sew ears to each side of face panel below hat band.
Attach safety eyes to face.
With long length of black, embroider mouth on face.
Sew hat behind face panel.
Weave in ends not left for sewing appliqué.
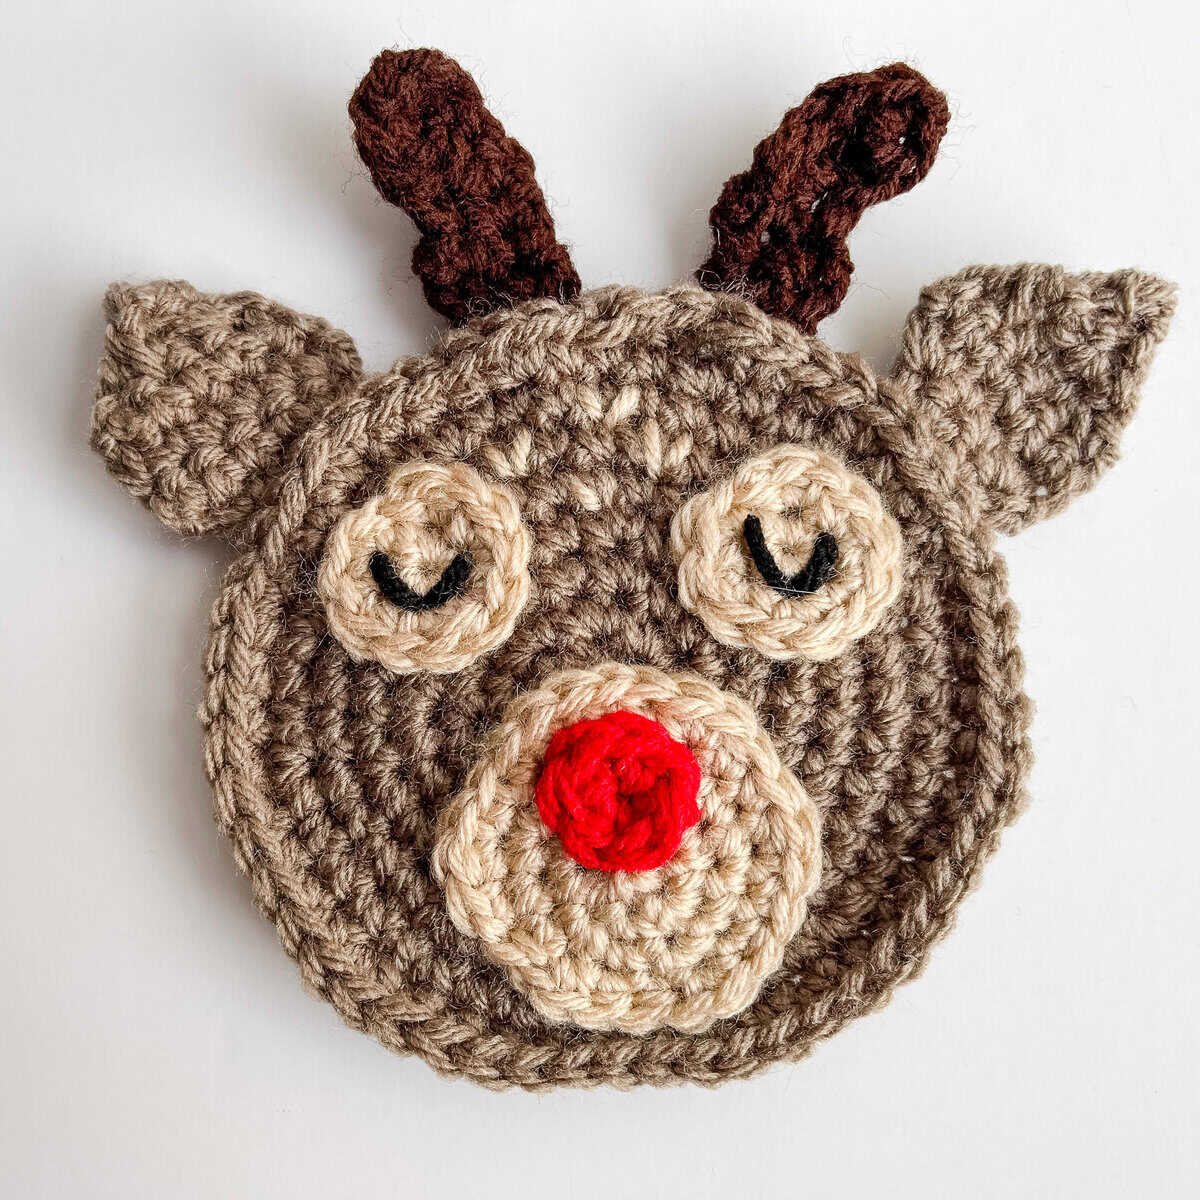
Reindeer Applique free crochet pattern
Supplies:
- Red Heart With Love Weight 4 Medium (100% acrylic)
- Taupe 0.4 oz / 21 yds (Brown)
- Red Heart Super Saver Weight 4 Medium (100% acrylic)
- Buff 0.1 oz / 6 yds (Tan)
- Cherry Red 0.1 oz / 6 yds (Red)
- Coffee 0.2 oz / 10 yds (Dark Brown)
- Black 0.1 oz / 6 yards (Black)
Size I (5.5 mm) crochet hook
Scissors
Tapestry Needle
Stitch Markers
Approximate finished size: 5” round
Abbreviations:
- WS = wrong side
- RS = right side
- MC = magic circle
- ch = chain
- sc = single crochet
- sl st = slip stitch
- st(s) = stitch(es)
- sk = skip
Pattern Notes:
- Worked in seamless rounds – do not sl st join at the end of each round, use a stitch marker in first st of each round and move up to keep track of rounds.
Face Panel
With brown, repeat instructions for face panel of Gingerbread man.
Ears (make 2)
Leaving a long tail for sewing, with brown, ch 2.
Row 1:(RS) 2 sc in second ch from hook. Turn. (2)
Row 2: Ch 1, 2 sc in each st. Turn. (4)
Row 3: Ch 1, 2 sc in first st, 1 sc in next 2 sts, 2 sc in last st. Turn. (6)
Row 4: Ch 1, 1 sc in each st. Turn. (6)
Row 5: Ch 1, sc2tog, 1 sc in next 2 sts, sc2tog. Turn. (4)
Row 6: Ch 1, sc2tog x 2. Turn. (2)
Row 7: Ch 1, sc2tog. (1)
Fasten off, weave in end not left for sewing.
Eyes (make 2)
With tan, make MC.
Round 1: (RS) Ch 1, 6 sc in MC. (6)
Round 2: 2 sc in each st. (12)
Fasten off, leaving a long tail for sewing. Weave in remaining end.
With black, embroider eyes, weave in ends.
Muzzle
With tan, make MC.
Round 1: (RS) Ch 1, 6 sc in MC. (6)
Round 2: 2 sc in each st. (12)
Round 3: *2 sc in next st, 1 sc in next st,* repeat from * to * to end. (18)
Round 4: 1 sc in next st, 2 sc in next st, *1 sc in next 2 sts, 2 sc in next st* repeat from * to * to last st, 1 sc in last st, sl st in first st. (24)
Fasten off, leaving a long tail for sewing. Weave in remaining end.
Nose
With red, make MC.
Round 1: Ch 1, 6 sc in MC, sl st join to first st. Tighten MC. (6)
Fasten off, leaving a long tail for sewing. Weave in remaining end.
Antlers (make 2)
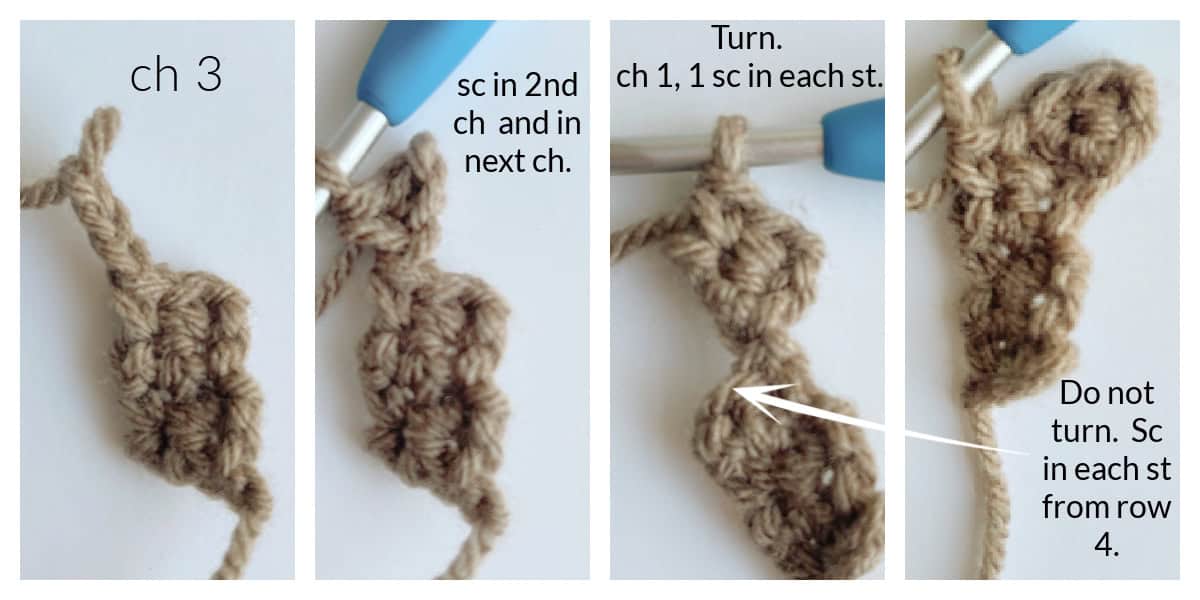
Leaving a long tail for sewing and with dark brown, ch 3.
Row 1: 1 sc in second ch from hook and in next ch. Turn. (2)
Rows 2 – 3: Ch 1, 1 sc in each st. Turn. (2)
Row 4: Ch 1, 1 sc in each st. Do not turn. Ch 3, 1 sc in second ch from hook and in next ch. (4) Turn.
Row 5: Ch 1, 1 sc in each st. Do not turn. Twist the base (rows 1-4) so the unused top edge of row 4 now faces you. Sc in each st across the top of row 4 to join the tab seamlessly. (4)
Fasten off. Weave in ends not left for sewing.
Assembly
With long tail, sew nose to muzzle.
With long tail, sew muzzle to face panel.
With long tail, sew eyes to face panel.
With long tail, sew ears behind face panel.
With long tail, sew antlers behind face panel.
With long length of tan, embroider v’s on RS of face panel between eyes and above muzzle. Weave in ends.
Copyright 2025 Tonya Bush / Nana’s Crafty Home, LLC.
Social Media links:
Facebook: https://www.facebook.com/nanascraftyhome
Instagram: https://www.instagram.com/nanascraftyhome/
Pinterest: https://www.pinterest.com/nanascraftyhome/
YouTube: https://www.youtube.com/c/TonyaBush
Facebook Group: https://www.facebook.com/groups/829792060522798
Sign up for my Newsletter: https://nanascraftyhome.com/sign-up-for-my-free-newsletter/
 Hi! Thank you so much for being here! I am Tonya the designer behind Nana's Crafty Home. As a wife, mother, Nana of 9 & with 2 fur babies, my days are filled with love, laughter, hugs and yarn! Here you will find colorful and creative crochet designs for yourself or loved ones. My hope is that you will be inspired to learn and create along with me!