This Blanket Cardigan crochet pattern is a free crochet pattern by Nana’s Crafty Home!
This crochet blanket cardigan is one of the easiest cardigan patterns you can possibly make! This simple blanket cardigan is essentially just one large square which is then folded to create the armholes with a one-size fits most approach.
The predominant color of this crochet blanket cardigan is a deep navy blue, which gives the cardigan a rich and luxurious appearance. Stripes of burnt orange shade adds complementary contrast that is both vibrant and warm, reminiscent of the colors of autumn.

The cardigan is beginner-friendly, with a square shape and unique construction that provides fantastic drape.
The cardigan is designed with an open front which is secured with a singular button near the top. This open design allows it to be worn with ease, suitable for layering over other garments, making it versatile for different seasons.
The overall length of the cardigan reaches just above the knees, giving it a stylish, yet relaxed silhouette.
This crochet blanket cardigan is a perfect blend of style and comfort. Its beginner-friendly pattern ensures that even those new to crocheting can create a fashionable piece. The choice of colors and the variation in stitches add a touch of sophistication, making it suitable for various occasions. It’s a lovely piece that anyone would be proud to add to their wardrobe.
Blanket Cardigan Crochet Pattern Details
The main body of the cardigan is made with the block stitch or modern granny as it is sometimes referred to. One of my very favorite stitches as you can see in my Retro Duster Vest, the Grapevine Afghan or the Boho Market Bag! Using this stitch with contrasting colors really sets this stitch off.
I designed this pattern for Lion Brand Jeans* yarn as the drape is just lovely and I absolutely love the available colors! This unbelievably soft yarn is 100% pure acrylic, and is an absolute dream to work with! Lion Brand Jeans is a medium #4 weight yarn so it can be easily substituted with another medium weight yarn. Even a self-striping yarn that does all the color-work for you would be a great option.

*This post contains affiliate links. You can click on any yarn or material highlighted to purchase. I will receive a small commission if you purchase but it won’t cost you any extra! As an Amazon Associate I earn from qualifying purchases.
The ribbing for the outside edge lapel for the front of the cardigan is made with the front and back post double crochet stitches. If you wanted to make the cardigan even longer you could certainly add the ribbing to the bottom of the square as well.

I found when designing this blanket cardigan that many patterns call for you to fold the square in half. This then causes a large “lip” or bulk right at the hip area — not an area most people want added bulk! I decided to fold this a little differently which lets the back of the square fall completely free and eliminates that unsightly bulk at the rear. Much more flattering! The Kimono comes to about knee level on me and I am 5′ 6″ so it is nicely long.

This cardigan is so very easy to resize! And frankly, this one-size approach will work for many sizes as well. With a 40″ square it looks great on a small/medium/large/x-large. However, if you are petite and would like a shorter length work a smaller square. If you would like a plus size square just work more rounds for a larger square. Use stitch markers to fold down the top of the square to create arm holes and try it on as you are making your square for the perfect fit!
I also have a complete step-by-step video tutorial for this cardigan if you want some guidance during any “tricky” bits. You can find the video tutorial below at the bottom of the post or on Youtube. Subscribe to my YouTube Channel to get notified whenever I post a new video.
The newly-updated crochet blanket cardigan pattern PDF now includes a stitch diagram for the square made for the main part of the cardigan!
This Comfy Kimono Blanket Cardigan pattern is also available as an ad-free, printable PDF! You can purchase the individual pattern, or if you love PDFs, you might want to check out my Lifetime Membership. It’s an awesome deal! Never pay for one of my PDFs again!! (Or, scroll down for the free version!)

Purchase the ad-free pdf of this crochet blanket cardigan pattern for a small fee. Thank you so much for supporting my work!

If you would like daily crochet inspiration be sure to follow me on Facebook, Instagram, Pinterest, YouTube, Twitter and Tumblr!
To get notified of my free easy crochet patterns and future giveaways, sign up for my newsletter. I never share or sell your information to third parties — it stays private!
You may also like the following free crochet patterns by Nana’s Crafty Home:


- 1. Sedona Ruana free pattern
- 2. Arm Candy Wrap free crochet pattern
- 3. Many Wonders Ruana free crochet pattern

Comfy Kimono Blanket Cardigan Free Crochet pattern instructions
Pattern written in US crochet terminology
Lion Brand Jeans Weight 4 / Medium (100% acrylic)
Brand New 14 oz / 984 yds (Color A)
Top Stitch 10.5 oz / 738 yds (Color B)
Size I (5.5 mm) crochet hook
Stitch markers
Tapestry needle
Scissors
Finished Size: Finished square = 40” x 40” before folding, seaming and arms are added.
One Size fits most adults S/M/L
Estimated bust measurement: 49”
Estimated length: 40”
Gauge: First 5 rounds of square = 4” x 4”
Ribbing gauge: 5 rows of ribbing = 2″
Abbreviations:
ch(s) = chain(s)
dc = double crochet
st(s) = stitch(es)
sp(s) = space(s)
sc = single crochet
sl st = slip stitch
FPdc = front post double crochet (see special stitches section below)
hdc = half double crochet
BPdc = back post double crochet (see special stitches section below)
dc2tog = double crochet 2 stitches together (see special stitches section below)
Special Stitches:
FPdc (front post double crochet stitch): yo and insert your hook from front to back to front around the dc stitch post from the row below, yo, pull up a loop (3 loops on hook), yo, pull through 2 loops, yo, pull through remaining 2 loops.
BPdc (back post double crochet stitch): yo and insert your hook from back to front to back around the dc stitch post indicated from the row below, yo, pull up a loop (3 loops on hook), yo, pull through 2 loops, yo, pull through remaining 2 loops.
Cluster: 3 dc stitches worked in the same space.
dc2tog: Yo, insert hook into next stitch and pull up a loop (three loops on hook), yo, pull through two loops (two loops on hook), yo, insert hook into next st, pull up a loop (four loops on hook), yo, pull through two loops (three loops on hook), yo, pull through remaining three loops on hook.
Recommended Tutorials:
Comfy Kimono Blanket Cardigan complete video tutorial
Pattern Notes:
- Ch 3 or ch 2 counts as stitch throughout.
- Pattern is worked RS facing throughout.
- Basically you are making one large square measuring approximately 40” across for a one-size approach. You can add or subtract rows if you would like to make smaller or larger.
Square Instructions
With color A, ch 4.
Round 1: 2 dc in fourth ch from hook (skipped chs count as first st), ch 2, *3 dc in same ch, ch 2,* repeat from * to * 2 times, sl st into top of ch-3. (4 clusters + 4 ch-2 corner sps)
Fasten off color A.
Round 2: Attach color B with a sc into any ch-2 corner sp, ch 3, sc in same corner sp, *ch 3, (sc, ch 3, sc) in next corner space,* repeat from * to * 2 times, ch 3, sl st in first sc. (8 ch-3 sps)
Round 3: Sl st into next corner sp, (ch 3, 2 dc, ch 2, 3 dc) in same sp, 3 dc cluster in next ch-3 sp, *(3 dc, ch 2, 3 dc) in next corner sp, 3 dc cluster in next ch-3 sp,* repeat from * to * 2 times, sl st in top of ch-3. (12 clusters + 4 ch-2 corner sps)
Fasten off color B.
Round 4: Attach color A with a sc into any ch-2 corner sp, ch 3, sc in same corner sp, [*ch 3, sk next 3 dc cluster, sc in sp between clusters,* repeat from * to * ch-2 corner sp, ch 3, (sc, ch 3, sc) in corner sp] 4 times, omitting final corner, sl st to first st. (16 ch-3 sps)
Round 5: Sl st into corner sp, (ch 3, 2 dc, ch 2, 3 dc) in same sp, *3 dc cluster in each ch-3 sp to next corner, (3 dc, ch 2, 3 dc) in corner sp,* repeat from * to * 2 times, 3 dc in each ch-3 sp to end, sl st in top of first st. (20 clusters + 4 ch-2 corner sps)
Fasten off color A.
Rounds 6 – 53: Repeat rounds 4 – 5 alternating colors A & B until square measures approximately 40” square, ending on a repeat of color A (or main color).
Fasten off. Weave in ends.
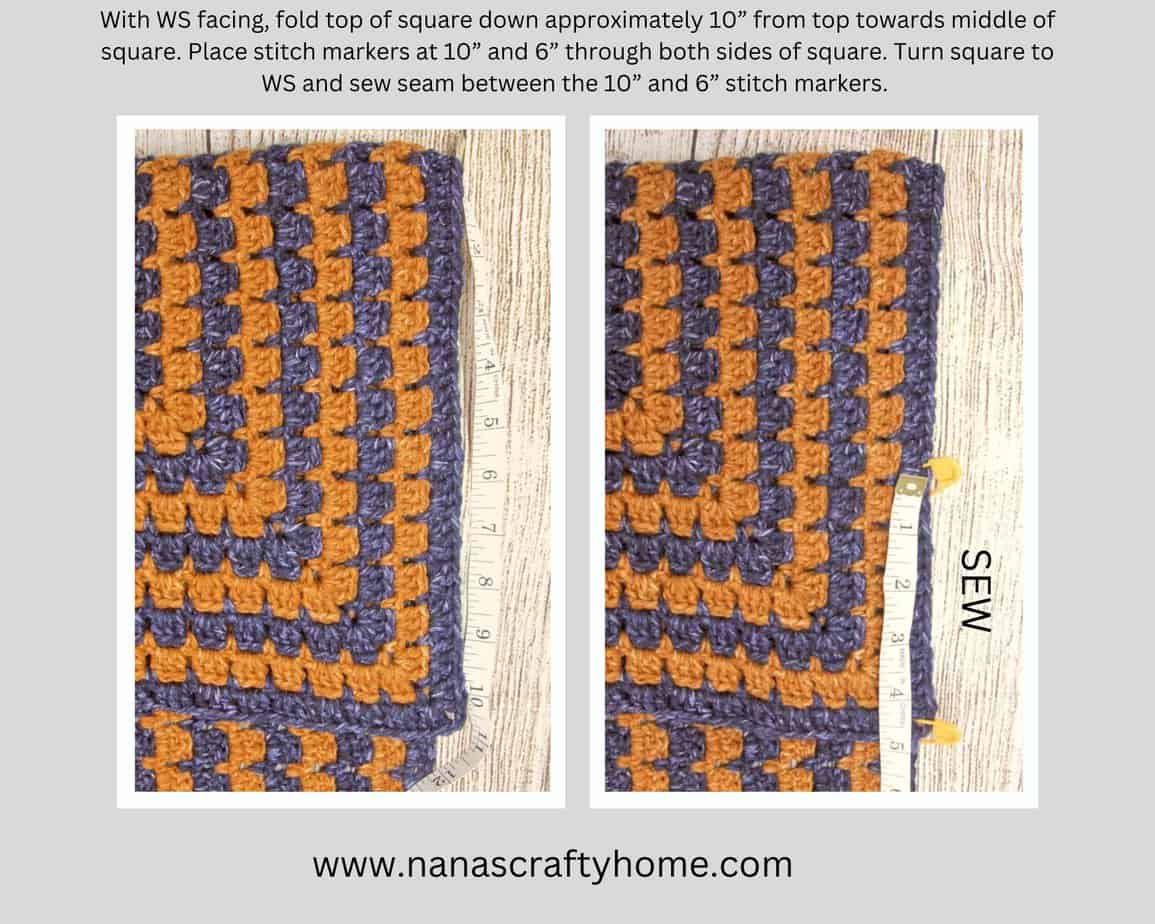
With WS facing, fold top of square down approximately 10” from top towards middle of square. Place stitch markers at 10” and 6” approximately through both sides of square. Turn square to WS and sew seam between the 10” and 6” stitch markers.
Edging
With RS facing, attach color A with sl st to bottom front of kimono.
Row 1: Ch 3, dc in each st evenly around inside edge of kimono to bottom of other side. Turn.
Rows 2 – 11: Ch 2, *FPdc in next dc st from previous row, BPdc in next st,* repeat from * to * to end, hdc in top of ch-2. Turn.
Sleeve
Attach color A to bottom of arm hole with sl st.
Round 1: Ch 3, dc in each st around evenly, sl st to top of ch-3.
Rounds 2 – 8: Ch 3, dc2tog in next 2 sts, dc in each st to last 2 stitches, dc2tog in last 2 stitches, sl st to top of ch-3. Note: Try on cardigan after 2-3 rounds of decreasing and stop decreasing when sleeve has reached desired size.
Rounds 9 – 12: Ch 3, dc in each st to end, sl st to top of ch-3.
Round 13: Ch 1, sc in same st and in each st to end.
Fasten off. Repeat instructions for second sleeve.
With embroidery thread, attach button where desired. Mine is place about even with seam for sleeves approximately 1 – 2” from front edge of cardigan. The FPdc/BPdc pattern will make holes large enough for the button to fit through if using a 1” button.
Weave in ends.
Copyright 2023 Tonya Bush/Nana’s Crafty Home
Social Media links:
Facebook: https://www.facebook.com/nanascraftyhome
Instagram: https://www.instagram.com/nanascraftyhome/
Pinterest: https://www.pinterest.com/nanascraftyhome/
YouTube: https://www.youtube.com/c/TonyaBush
Twitter: https://twitter.com/nanascraftyhome
Facebook Group: https://www.facebook.com/groups/829792060522798
Sign up for my Newsletter: https://nanascraftyhome.com/sign-up-for-my-free-newsletter/

 Hi! Thank you so much for being here! I am Tonya the designer behind Nana's Crafty Home. As a wife, mother, Nana of 9 & with 2 fur babies, my days are filled with love, laughter, hugs and yarn! Here you will find colorful and creative crochet designs for yourself or loved ones. My hope is that you will be inspired to learn and create along with me!