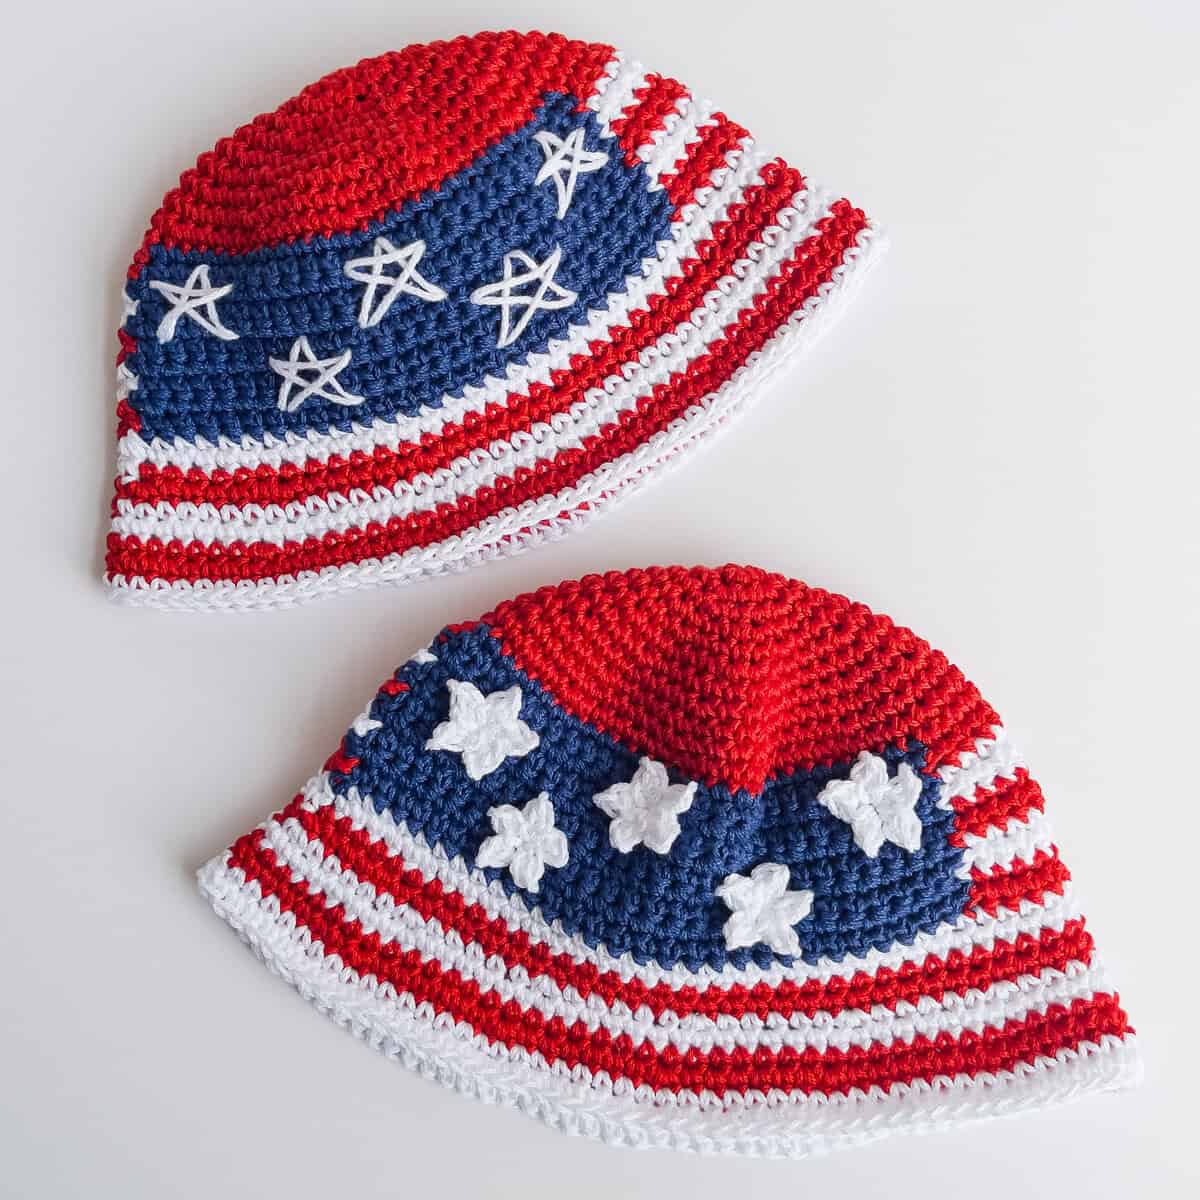
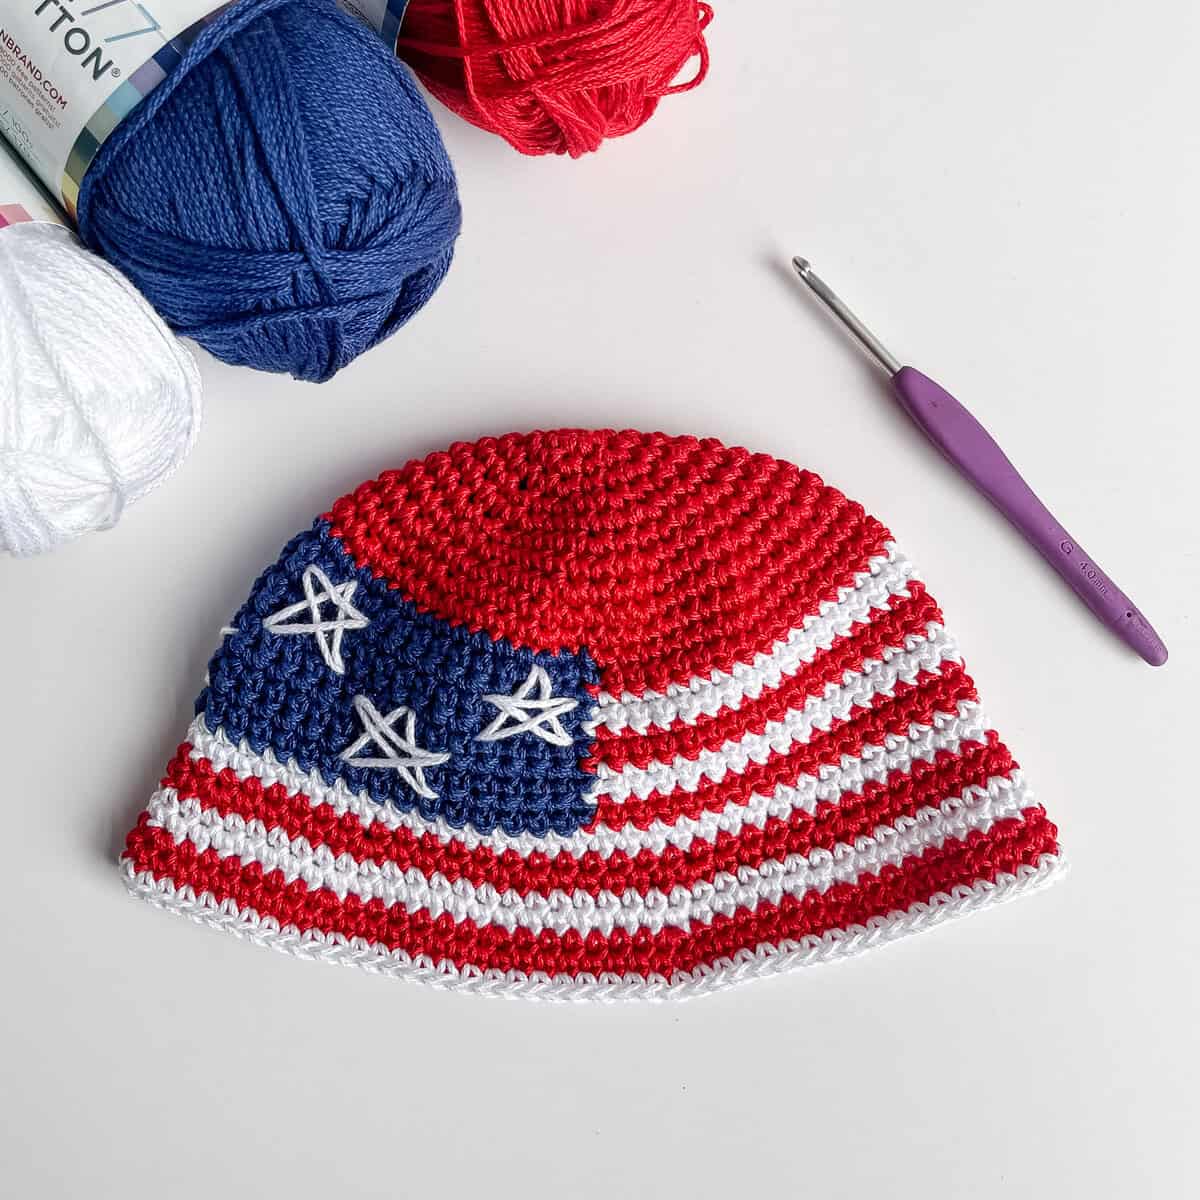
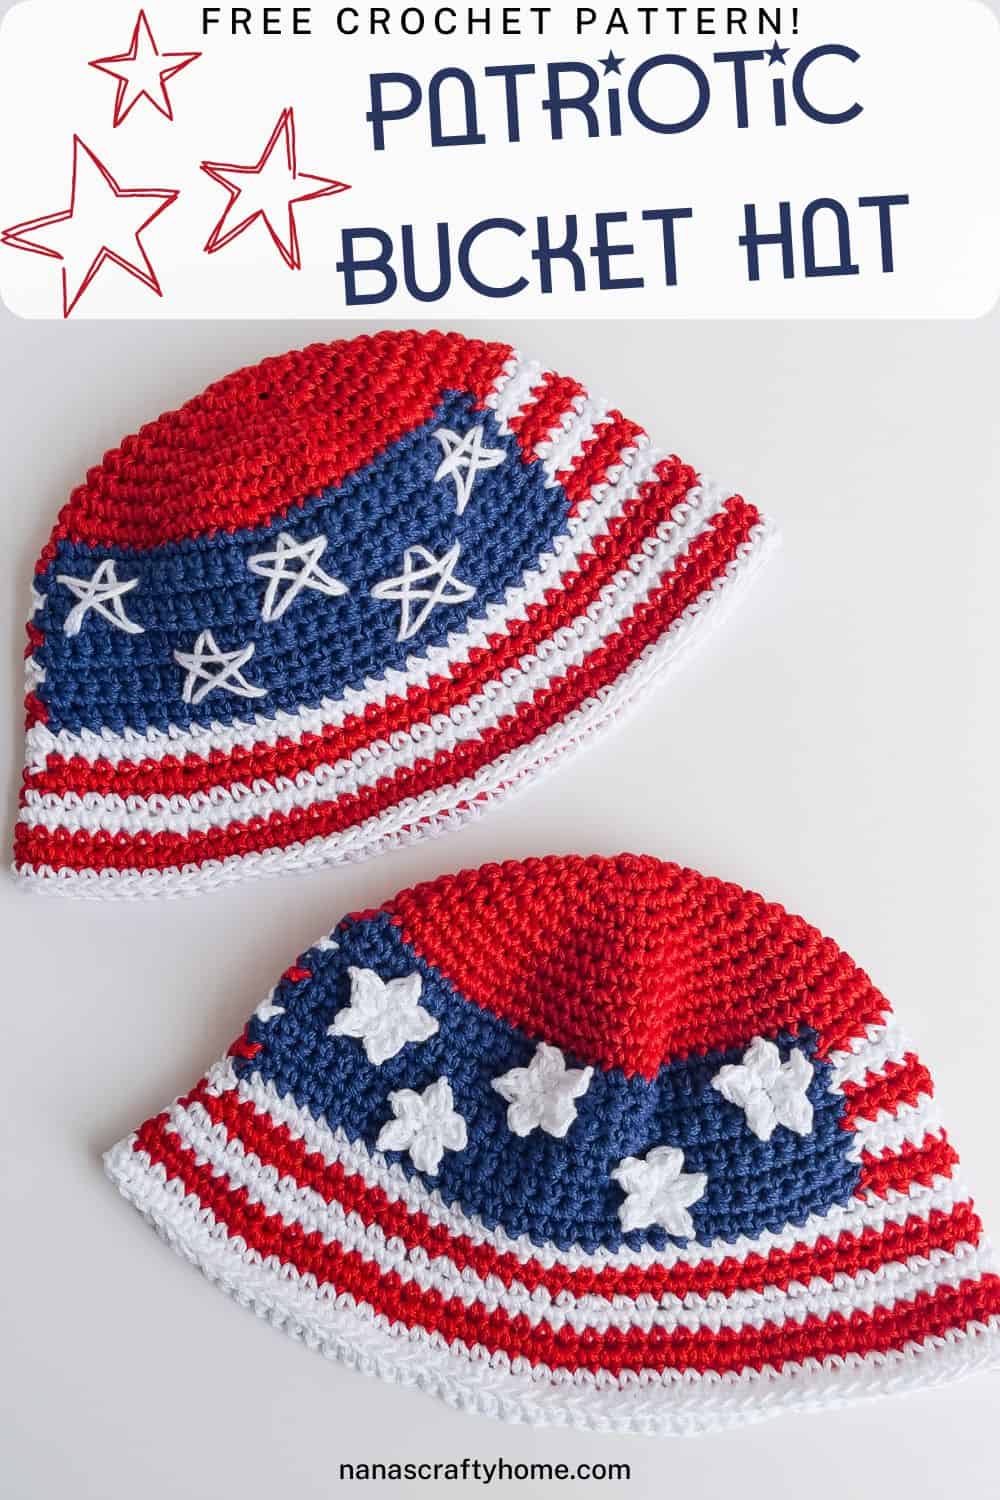
If you’ve been looking for the perfect crochet American flag hat to show off your patriotic spirit, I’ve got just the thing! This Patriotic Bucket Hat is designed on the foundation of my Essential Basic Bucket Hat and takes it to a whole new level with classic red and white stripes, a navy blue canton, and hand-embroidered white stars. Whether you’re crocheting for a Fourth of July parade or cookout, or just because you love red, white, and blue, this pattern is going to be your new summer favorite!
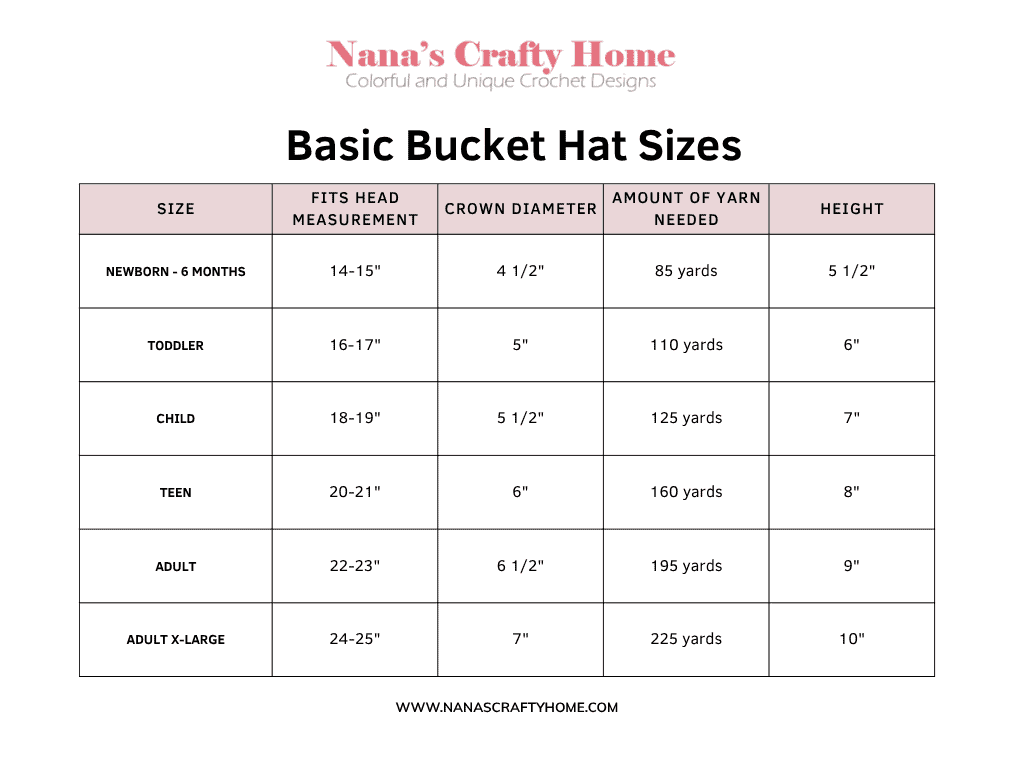
The best part? It’s available in all six sizes – from Newborn/6 Months all the way up to Adult XL – so you can make one for every member of the family. There’s something so special about a whole crew showing up in matching patriotic hats, don’t you think? And with straightforward single crochet stitches throughout and clever turned-round color work that dramatically reduces the number of ends to weave in, this hat is more achievable than it looks!
I used Lion Brand 24/7 Cotton in Red, White, and Navy for this crochet American flag hat and it’s honestly the perfect choice – it’s soft, washable, and gives you that crisp stitch definition that really makes the stripes pop. Pair it with my tapestry crochet tips tutorial and the Essential Basic Bucket Hat tutorial and you’ll be set up for success from the very first round!
Why You’ll Love This Crochet American Flag Hat
Intermediate Skill Level. This pattern uses basic single crochet stitches throughout, but the color changing and tapestry crochet technique give it just enough of a challenge to keep things interesting. If you’ve made simple hats before, you’re ready for this one!
Six Sizes, One Pattern. From tiny newborns to adult XL, I’ve got you covered – literally. Make the whole family match for your next patriotic celebration.
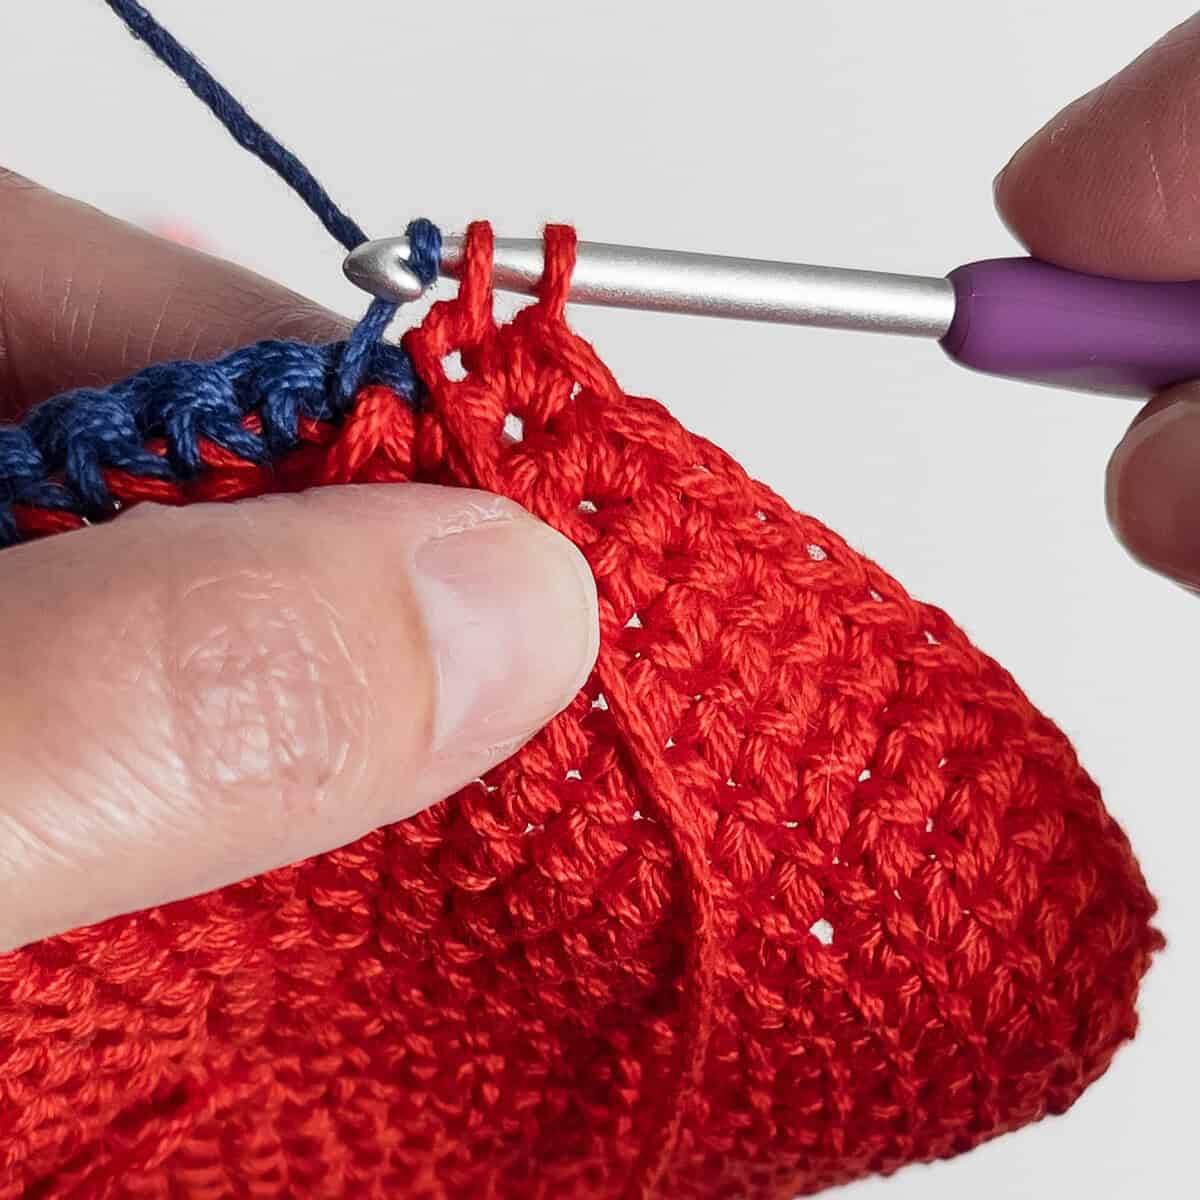
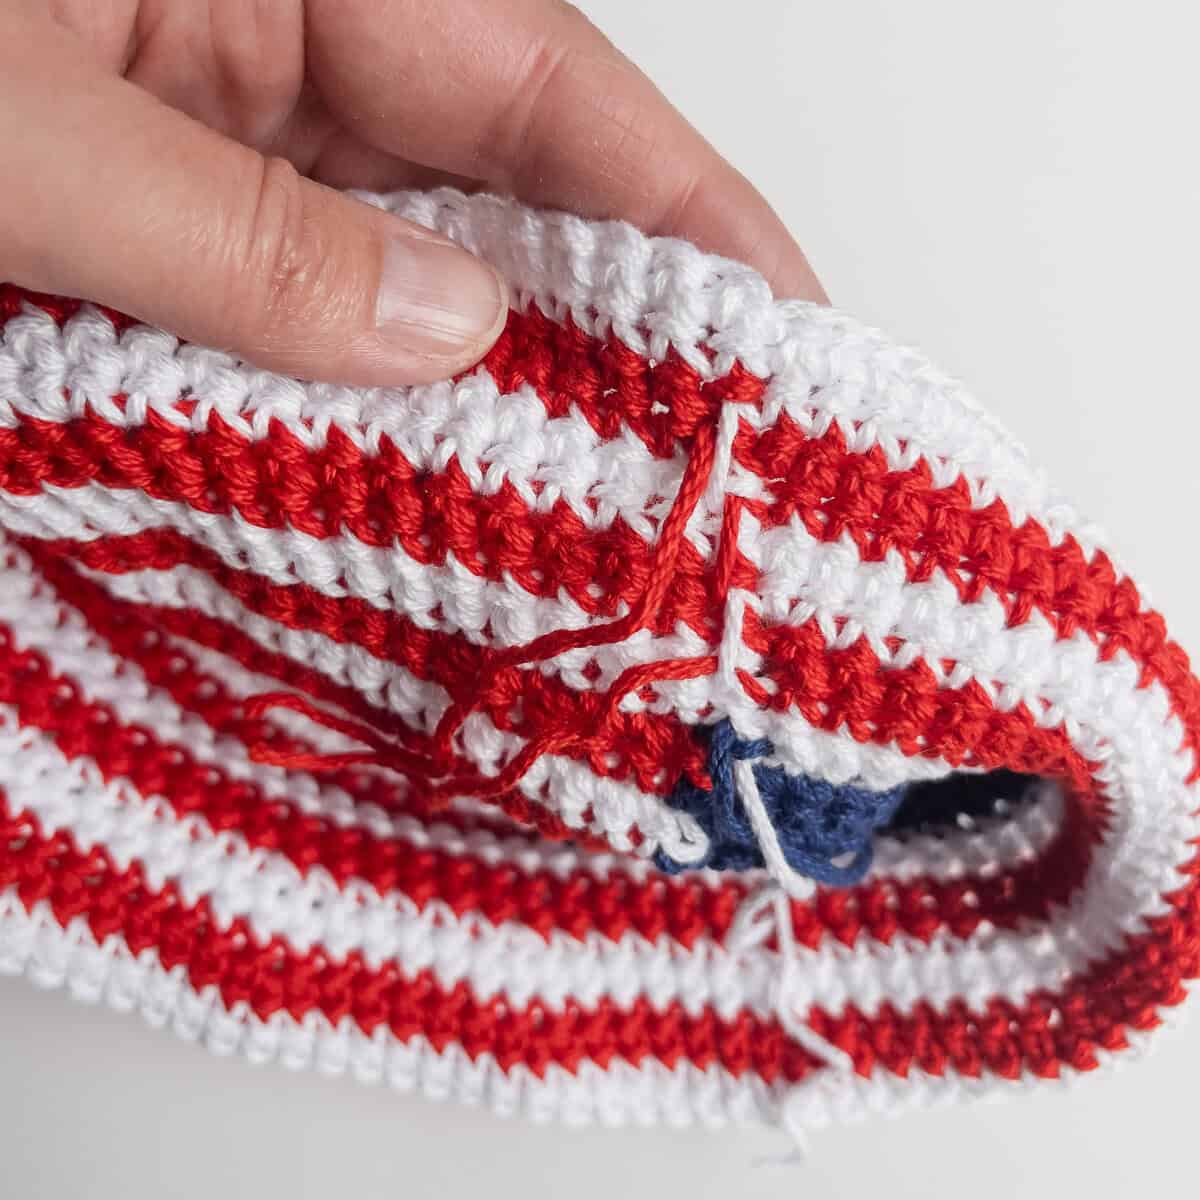
Minimal Ends to Weave In. The turned-round construction for the stripe and canton sections means you’re dropping and pulling in your yarn colors as needed instead of cutting and rejoining constantly. Your future end weaving self will thank you!
Crisp, Vivid Colors. Lion Brand 24/7 Cotton in Red, White, and Navy gives you bold, beautiful color with excellent stitch definition. It’s also machine washable – perfect for summer sun and outdoor fun.
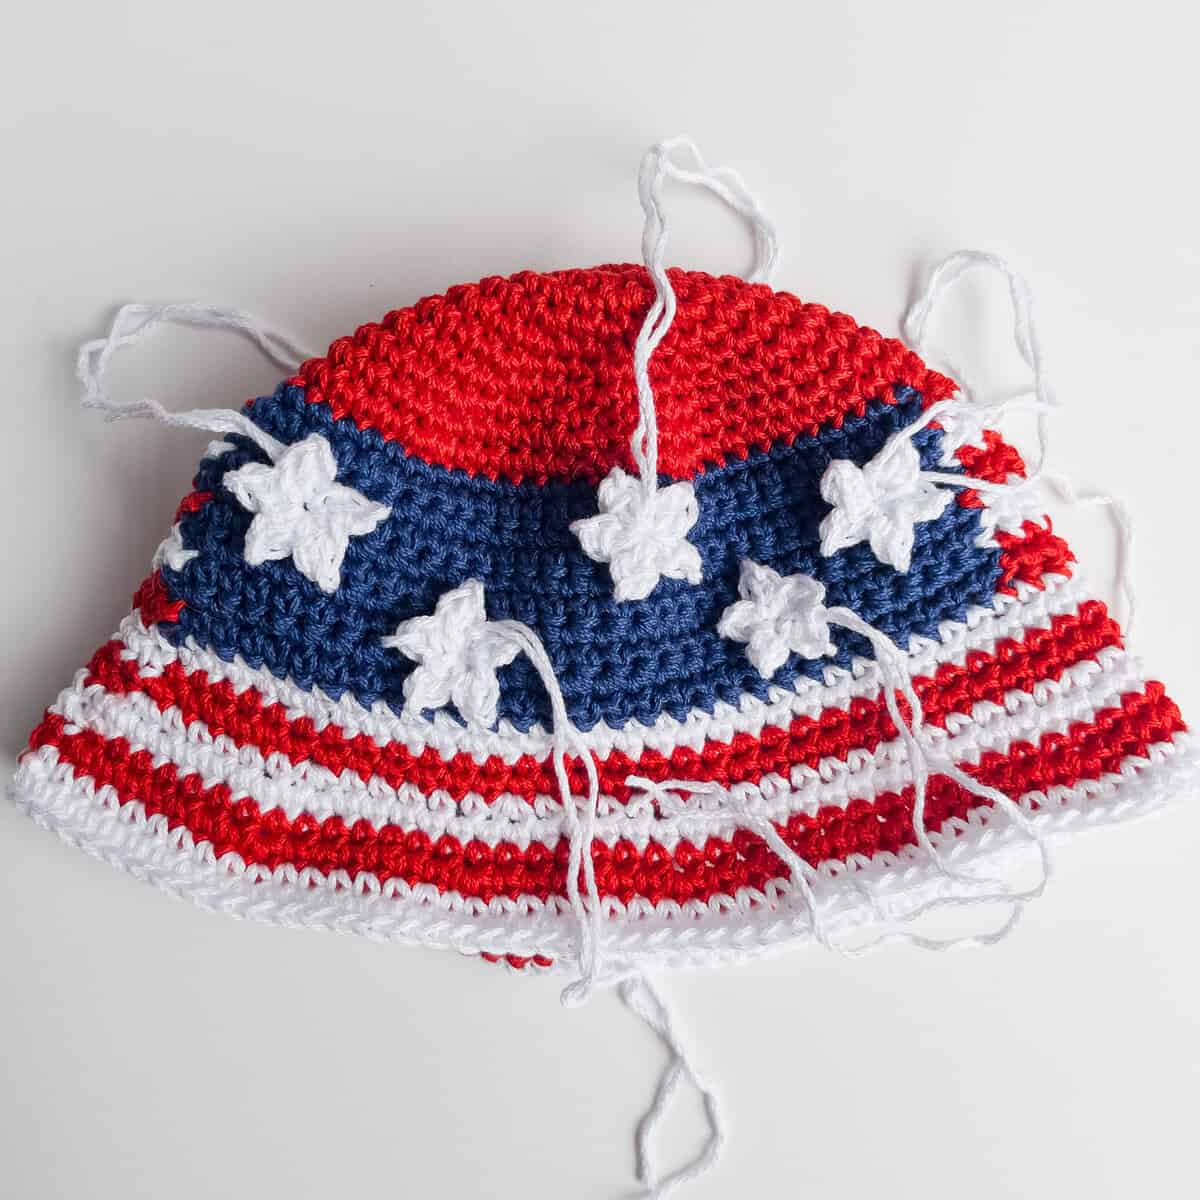
Hand-Embroidered Stars. The white stars on the navy canton are embroidered after the hat is complete using a long strand of white yarn with a tapestry needle. I’ve included a step-by-step guide with a numbered diagram to make it totally approachable. I put together a short video walking through the steps of my 5-point embroidery star as well! However, if you would prefer an applique or solid star for your hat I would recommend using my Mini Star Appliques which would be the perfect substitute!

Video Support Available. My Essential Basic Bucket Hat tutorial walks you through the main construction, and I’ve also linked my tapestry crochet color work tips video to help you nail those color changes. I also have a brand new video tutorial for How to Make a Magic Circle – the easy way!
Get the Crochet American Flag Hat Ad-Free Printable PDF
| Want an ad-free, printer-friendly version of the American Flag Patriotic Bucket Hat pattern? The printable PDF is available in my shop! It’s perfectly formatted, easy to read while you’re working, and great for keeping in your pattern binder.👉 [LINK TO PDF ] If you love PDFs, you might want to check out my Lifetime Membership. It’s an awesome deal! Never pay for one of my PDFs again!! |


You Will Also Love The Summer Kids’ Bucket Hat Bundle!
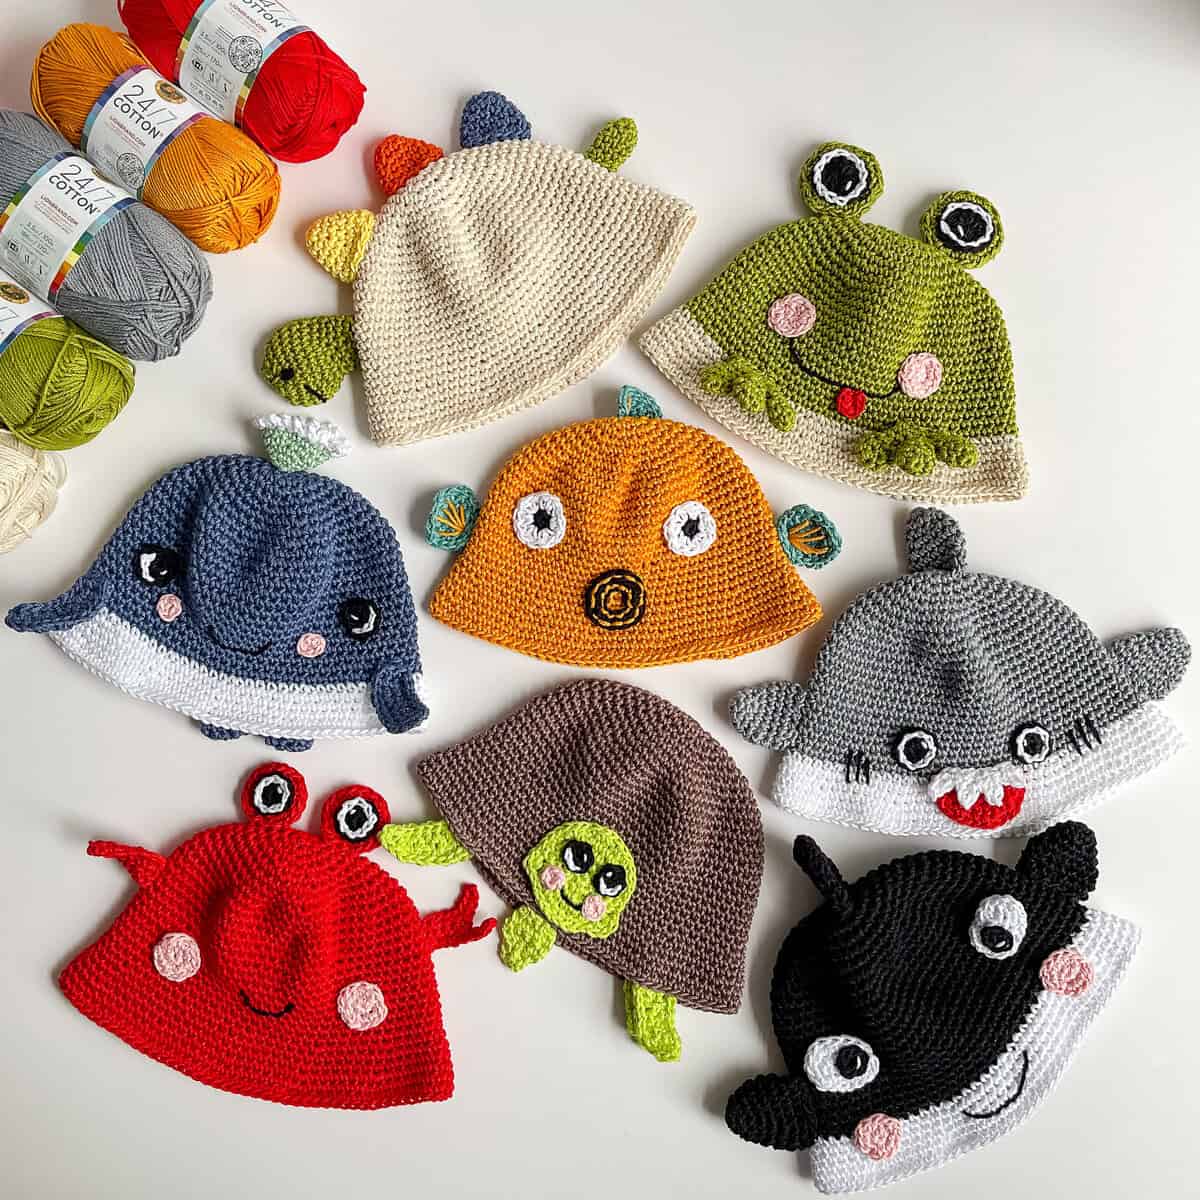
If you’re on a mission to crochet all the hats this summer (same, honestly), you’re going to want to grab the Summer Kids’ Bucket Hat Crochet Pattern Bundle! This bundle features 8 adorable kids’ bucket hat designs – a sea turtle, crab, frog, dinosaur, shark, fish, blue whale, and orca. They’re all built on the same bucket hat base, so once you’ve got the construction down, you can work through the whole collection. Perfect for beach days, pool parties, or just the most fun gift you’ve ever made.
Supplies for the Stars & Stripes Bucket Hat Pattern
*This post contains affiliate links. You can click on any yarn or material highlighted to purchase. I will receive a small commission if you purchase but it won’t cost you any extra! As an Amazon Associate I earn from qualifying purchases.
I am using Lion Brand 24/7 Cotton for my crochet American Flag hat which is a 100% mercerized cotton. it has a beautiful sheen, holds its shape well, and is completely machine washable. It’s soft against skin, which makes it especially great for babies and kids.
If you are substituting with a different cotton yarn be sure to check gauge!
Looking for More Free Patriotic Crochet Patterns?
I have several free patriotic crochet patterns right here on the blog, from blankets to fun and whimsical crochet ideas. And if you don’t want to miss a single new release – be sure to sign up for my free newsletter! You’ll get new patterns, tutorials, and crafty inspiration delivered straight to your inbox.
👉 Sign up for my free newsletter here!
Let’s Stay Connected!
I love seeing your finished makes – tag me on social media so I can cheer you on!
Check out these free summer crochet patterns!


- Sea Shells by the Seashore Beach Bag free crochet pattern
- Bonjour Belle Mesh Cover Up free crochet pattern
- Happy Sun Towel Holder free crochet pattern
American Flag Bucket Hat Free Crochet Pattern
Pattern written in US crochet terminology
Supplies:
Lion Brand 24/7 Cotton Weight 4 / Medium (100% mercerized cotton)
- Newborn 1.6 oz / 85 yards
- Toddler 2.0 oz / 110 yards
- Child 2.3 oz / 125 yards
- Teen 3.0 oz 160 yards
- Adult 3.6 oz / 195 yards
- Adult X-Large 4.0 oz / 225 yards
Colorways:
- Red (Red)
- White (White)
- Navy (Blue)
Size G-6 (4.0 mm) crochet hook
Scissors
Tapestry Needle
Stitch Markers
Approximate finished size:
Gauge: 4” = 9 rounds of sc
Abbreviations:
- Rnd(s) = round(s)
- RS = right side
- MC = magic circle
- ch(s) = chain(s)
- sc = single crochet
- sl st = slip stitch
- st(s) = stitch(es)
Pattern Notes:
- Hat is worked from the top-down.
- Fit Note: Sizes are based on standard head circumference measurements for a close fit. For a more relaxed or oversized look, go up one size. To add width to the brim, work one additional increase round after the final increase round, then add 2–3 rounds of single crochet before fastening off.
General Color Handling
- Three colors are used throughout: Red (R), White (W), and Blue (B).
- Do not fasten off when changing colors unless specified. Drop the non-working yarn to the wrong side of hat and pick it up again when needed.
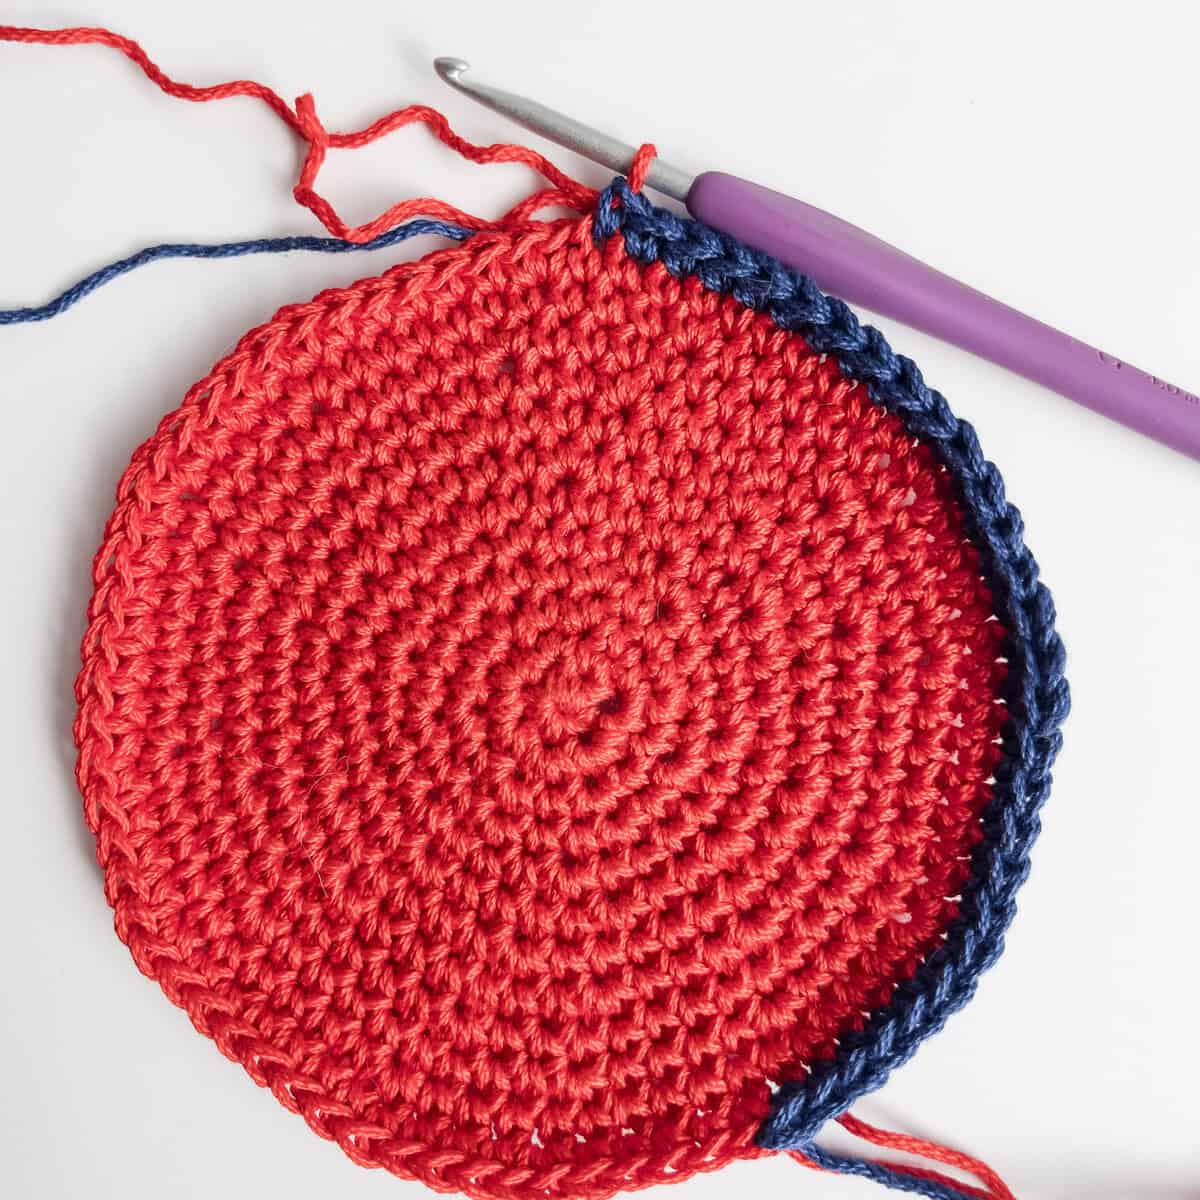
Crown & Stripe Section (Red and White)
- Worked in continuous rounds. Do not join at end of round; use a stitch marker to track round beginnings.
- Alternate Red and White as indicated in the pattern. Each color change occurs at the start of a new round.
Canton Section (Blue field with stars)
- Worked in joined, turned rounds — this is a departure from the continuous crown rounds. At the end of each round, join with a slip stitch, chain 1, then turn before beginning the next round. Tip: place a stitch marker in the first stitch after the ch-1 and another in the slip stitch at the end of the round so neither gets accidentally skipped.
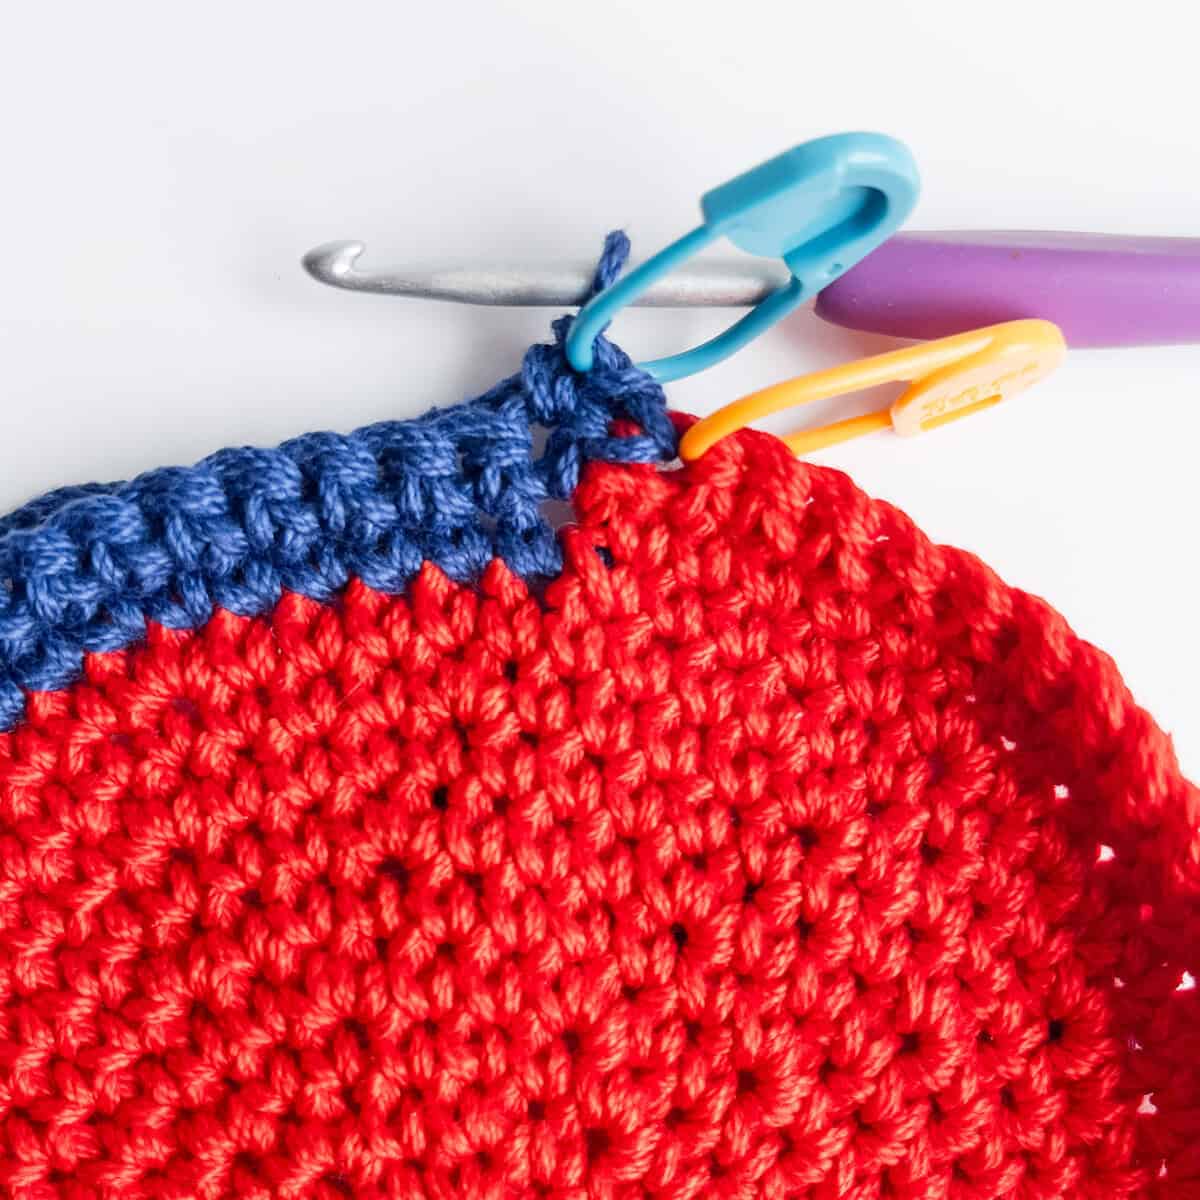
- The canton is worked simultaneously with the stripe section. Pattern instructions will tell you exactly where the blue field begins and ends horizontally on each round.
- The Main Body round’s instructions are presented in two parts:
- Line 1 — the stitch pattern for the full round
- Lines 2 – number of rounds worked — the specific color placement (where to switch between Blue, Red, and White within that round)
Recommended Tutorials:
How to make a Magic Circle – the Easy Way!
How to make a perfect circle in single crochet tutorial
Essential Basic Bucket Hat complete video tutorial
Tapestry Crochet Tutorial – How to Change Colors
5-Point Embroidery Star on Crochet Tutorial
Pattern Instructions
Newborn – 6 months
With Red, make a MC.
Rnd 1: (RS) Ch 1, 6 sc in MC. (6)
Rnd 2: 2 sc in each st. (12)
Rnd 3: *2 sc in next st, 1 sc in next st,* repeat from * to * to end. (18)
Rnd 4: 1 sc in next st, 2 sc in next st, *1 sc in next 2 sts, 2 sc in next st,* repeat from * to * to last st, 1 sc in last st. (24)
Rnd 5: *2 sc in next st, 1 sc in next 3 sts,* repeat from * to * to end. (30)
Rnd 6: 1 sc in next 2 sts, 2 sc in next st, *1 sc in next 4 sts, 2 sc in next st,* repeat from * to * to last 2 sts, 1 sc in last 2 sts. (36)
Rnd 7: *2 sc in next st, 1 sc in next 5 sts,* repeat from * to * to end. (42)
Rnd 8: 1 sc in next 3 sts, 2 sc in next st, *1 sc in next 6 sts, 2 sc in next st,* repeat from * to * to last 3 sts, 1 sc in last 3 sts. (48)
Rnd 9: *2 sc in next st, 1 sc in next 7 sts,* repeat from * to * to end. (54)
Rnd 10: 1 sc in next 4 sts, 2 sc in next st, *1 sc in next 8 sts, 2 sc in next st,* repeat from * to * to last 4 sts, 1 sc in last 4 sts. (60)
Circle (crown) should measure approximately 4 1/2”.
Fasten off Red and change to Blue.
Note: This first round of color changes you will fasten off your red at the beginning of the round and then rejoin after the blue stitches are completed. You could also carry your red yarn through the blue stitches if preferred. After this round you will drop and pick up your yarn as needed.
Main Body
(Begin color changes see below)
Note: Beginning with Main Body, rounds are no longer worked continuously. At the end of each round, join with a sl st to the first st, turn, ch 1. Do not count ch-1 as a st.
Rnds 11 – 22: 1 sc in each st around. (60)
← Row 11 [RS]: (Blue) x 23, (Red) x 37
→ Row 12 [WS]: (Red) x 37, (Blue) x 23
← Row 13 [RS]: (Blue) x 23, (White) x 37
→ Row 14 [WS]: (White) x 37, (Blue) x 23
← Row 15 [RS]: (Blue) x 23, (Red) x 37
→ Row 16 [WS]: (Red) x 37, (Blue) x 23
← Row 17 [RS]: (Blue) x 23, (White) x 37
→ Row 18 [WS]: (White) x 37, (Blue) x 23
Fasten off
← Row 19 [RS]: Join (Red) x 60 Note: Do not turn at end of Rnd 19, resume continuous rounds throughout remainder of pattern.
← Row 20 [RS]: (Red) x 60
← Row 21 [RS]: (White) x 60
← Row 22 [RS]: (White) x 60
Brim
Rnd 23: With Red, *2 sc in next st, 1 sc in next 5 sts,* repeat from * to * to end. (70)
Rnd 24: With Red, 1 sc in each st around.
Rnd 25: With White, *2 sc in next st, 1 sc in next 6 sts,* repeat from * to * to end. (80)
Rnd 26: With White, 1 sc in each st around, sl st in next st.
Fasten off. Weave in ends.
Size Toddler
With Red, make a MC.
Rnd 1: (RS) Ch 1, 6 sc in MC. (6)
Rnd 2: 2 sc in each st. (12)
Rnd 3: *2 sc in next st, 1 sc in next st,* repeat from * to * to end. (18)
Rnd 4: 1 sc in next st, 2 sc in next st, *1 sc in next 2 sts, 2 sc in next st,* repeat from * to * to last st, 1 sc in last st. (24)
Rnd 5: *2 sc in next st, 1 sc in next 3 sts,* repeat from * to * to end. (30)
Rnd 6: 1 sc in next 2 sts, 2 sc in next st, *1 sc in next 4 sts, 2 sc in next st,* repeat from * to * to last 2 sts, 1 sc in last 2 sts. (36)
Rnd 7: *2 sc in next st, 1 sc in next 5 sts,* repeat from * to * to end. (42)
Rnd 8: 1 sc in next 3 sts, 2 sc in next st, *1 sc in next 6 sts, 2 sc in next st,* repeat from * to * to last 3 sts, 1 sc in last 3 sts. (48)
Rnd 9: *2 sc in next st, 1 sc in next 7 sts,* repeat from * to * to end. (54)
Rnd 10: 1 sc in next 4 sts, 2 sc in next st, *1 sc in next 8 sts, 2 sc in next st,* repeat from * to * to last 4 sts, 1 sc in last 4 sts. (60)
Rnd 11: *2 sc in next st, 1 sc in next 9 sts,* repeat from * to * to end. (66)
Circle (crown) should measure approximately 5”.
Fasten off Red and change to Blue.
Main Body
(Begin color changes see below)
Note: Beginning with Main Body, rounds are no longer worked continuously. At the end of each round, join with a sl st to the first st, turn, ch 1. Do not count ch-1 as a st.
Rnds 12 – 24: 1 sc in each st around. (66)
← Rnd 12 [RS]: (Blue) x 26, (Red) x 40
→ Rnd 13 [WS]: (Red) x 40, (Blue) x 26
← Rnd 14 [RS]: (Blue) x 26, (White) x 40
→ Rnd 15 [WS]: (White) x 40, (Blue) x 26
← Rnd 16 [RS]: (Blue) x 26, (Red) x 40
→ Rnd 17 [WS]: (Red) x 40, (Blue) x 26
← Rnd 18 [RS]: (Blue) x 26, (White) x 40
→ Rnd 19 [WS]: (White) x 40, (Blue) x 26
← Rnd 20 [RS]: (Blue) x 26, (Red) x 40
→ Rnd 21 [WS]: (Red) x 40, (Blue) x 26
Fasten off
← Rnd 22 [RS]: Join (White) x 66 Note: Do not turn at end of Rnd 22, resume continuous rounds throughout remainder of pattern.
← Rnd 23 [RS]: (White) x 66
← Rnd 24 [RS]: (Red) x 66
Brim
Rnd 25: With Red, *2 sc in next st, 1 sc in next 5 sts,* repeat from * to * to end. (77)
Rnd 26 – 27: With White, 1 sc in each st around.
Rnd 28: With Red, *2 sc in next st, 1 sc in next 6 sts,* repeat from * to * to end. (88)
Rnds 29 (Red) – 30 (White): 1 sc in each st around. At end of round 30, sl st in next st.
Fasten off. Weave in ends.
Size Child
With Red, make a MC.
Rnd 1: (RS) Ch 1, 6 sc in MC. (6)
Rnd 2: 2 sc in each st. (12)
Rnd 3: *2 sc in next st, 1 sc in next st,* repeat from * to * to end. (18)
Rnd 4: 1 sc in next st, 2 sc in next st, *1 sc in next 2 sts, 2 sc in next st,* repeat from * to * to last st, 1 sc in last st. (24)
Rnd 5: *2 sc in next st, 1 sc in next 3 sts,* repeat from * to * to end. (30)
Rnd 6: 1 sc in next 2 sts, 2 sc in next st, *1 sc in next 4 sts, 2 sc in next st,* repeat from * to * to last 2 sts, 1 sc in last 2 sts. (36)
Rnd 7: *2 sc in next st, 1 sc in next 5 sts,* repeat from * to * to end. (42)
Rnd 8: 1 sc in next 3 sts, 2 sc in next st, *1 sc in next 6 sts, 2 sc in next st,* repeat from * to * to last 3 sts, 1 sc in last 3 sts. (48)
Rnd 9: *2 sc in next st, 1 sc in next 7 sts,* repeat from * to * to end. (54)
Rnd 10: 1 sc in next 4 sts, 2 sc in next st, *1 sc in next 8 sts, 2 sc in next st,* repeat from * to * to last 4 sts, 1 sc in last 4 sts. (60)
Rnd 11: *2 sc in next st, 1 sc in next 9 sts,* repeat from * to * to end. (66)
Rnd 12: 1 sc in next 5 sts, 2 sc in next st, *1 sc in next 10 sts, 2 sc in next st,* repeat from * to * to last 5 sts, 1 sc in last 5 sts. (72)
Circle (crown) should measure approximately 5 1/2”.
Fasten off Red and change to Blue.
Main Body
(Begin color changes see below)
Note: Beginning with Main Body, rounds are no longer worked continuously. At the end of each round, join with a sl st to the first st, turn, ch 1. Do not count ch-1 as a st.
Rnds 13 – 26: 1 sc in each st around. (72)
← Rnd 13 [RS]: (Blue) x 29, (Red) x 43
→ Rnd 14 [WS]: (Red) x 43, (Blue) x 29
← Rnd 15 [RS]: (Blue) x 29, (White) x 43
→ Rnd 16 [WS]: (White) x 43, (Blue) x 29
← Rnd 17 [RS]: (Blue) x 29, (Red) x 43
→ Rnd 18 [WS]: (Red) x 43, (Blue) x 29
← Rnd 19 [RS]: (Blue) x 29, (White) x 43
→ Rnd 20 [WS]: (White) x 43, (Blue) x 29
← Rnd 21 [RS]: (Blue) x 29, (Red) x 43
→ Rnd 22 [WS]: (Red) x 43, (Blue) x 29
Fasten off
← Rnd 23 [RS]: Join (White) x 72 Note: Do not turn at end of Rnd 23, resume continuous rounds throughout remainder of pattern.
← Rnd 24 [RS]: (White) x 72
← Rnd 25 [RS]: (Red) x 72
← Rnd 26 [RS]: (Red) x 72
Brim
Rnd 27: With White, *2 sc in next st, 1 sc in next 5 sts,* repeat from * to * to end. (84)
Rnds 28 (White) – 29 (Red): 1 sc in each st around.
Rnd 30: With Red, *2 sc in next st, 1 sc in next 6 sts,* repeat from * to * to end. (96)
Rnds 31 – 32: With White, 1 sc in each st around, sl st in next st.
Fasten off. Weave in ends.
Size Teen
With Red, make a MC.
Rnd 1: (RS) Ch 1, 6 sc in MC. (6)
Rnd 2: 2 sc in each st. (12)
Rnd 3: *2 sc in next st, 1 sc in next st,* repeat from * to * to end. (18)
Rnd 4: 1 sc in next st, 2 sc in next st, *1 sc in next 2 sts, 2 sc in next st,* repeat from * to * to last st, 1 sc in last st. (24)
Rnd 5: *2 sc in next st, 1 sc in next 3 sts,* repeat from * to * to end. (30)
Rnd 6: 1 sc in next 2 sts, 2 sc in next st, *1 sc in next 4 sts, 2 sc in next st,* repeat from * to * to last 2 sts, 1 sc in last 2 sts. (36)
Rnd 7: *2 sc in next st, 1 sc in next 5 sts,* repeat from * to * to end. (42)
Rnd 8: 1 sc in next 3 sts, 2 sc in next st, *1 sc in next 6 sts, 2 sc in next st,* repeat from * to * to last 3 sts, 1 sc in last 3 sts. (48)
Rnd 9: *2 sc in next st, 1 sc in next 7 sts,* repeat from * to * to end. (54)
Rnd 10: 1 sc in next 4 sts, 2 sc in next st, *1 sc in next 8 sts, 2 sc in next st,* repeat from * to * to last 4 sts, 1 sc in last 4 sts. (60)
Rnd 11: *2 sc in next st, 1 sc in next 9 sts,* repeat from * to * to end. (66)
Rnd 12: 1 sc in next 5 sts, 2 sc in next st, *1 sc in next 10 sts, 2 sc in next st,* repeat from * to * to last 5 sts, 1 sc in last 5 sts. (72)
Rnd 13: *2 sc in next st, 1 sc in next 11 sts,* repeat from * to * to end. (78)
Circle (crown) should measure approximately 6”.
Fasten off Red and change to Blue.
Main Body
(Begin color changes see below)
Note: Beginning with Main Body, rounds are no longer worked continuously. At the end of each round, join with a sl st to the first st, turn, ch 1. Do not count ch-1 as a st.
Rnds 14 – 30: 1 sc in each st around. (78)
← Rnd 14 [RS]: (Blue) x 26, (Red) x 52
→ Rnd 15 [WS]: (Red) x 52, (Blue) x 26
← Rnd 16 [RS]: (Blue) x 26, (White) x 52
→ Rnd 17 [WS]: (White) x 52, (Blue) x 26
← Rnd 18 [RS]: (Blue) x 26, (Red) x 52
→ Rnd 19 [WS]: (Red) x 52, (Blue) x 26
← Rnd 20 [RS]: (Blue) x 26, (White) x 52
→ Rnd 21 [WS]: (White) x 52, (Blue) x 26
← Rnd 22 [RS]: (Blue) x 26, (Red) x 52
→ Rnd 23 [WS]: (Red) x 52, (Blue) x 26
← Rnd 24 [RS]: (Blue) x 26, (White) x 52
→ Rnd 25 [WS]: (White) x 52, (Blue) x 26
← Rnd 26 [RS]: (Blue) x 26, (Red) x 52
→ Rnd 27 [WS]: (Red) x 52, (Blue) x 26
Fasten off
← Rnd 28 [RS]: Join (White) x 78 Note: Do not turn at end of Rnd 28, resume continuous rounds throughout remainder of pattern.
← Rnd 29 [RS]: (White) x 78
← Rnd 30 [RS]: (Red) x 78
Brim
Rnd 31: With Red, *2 sc in next st, 1 sc in next 5 sts,* repeat from * to * to end. (91)
Rnds 32 (White) 33 (White) 34 (Red): 1 sc in each st around.
Rnd 35: With Red, *2 sc in next st, 1 sc in next 6 sts,* repeat from * to * to end. (104)
Rnds 36 (White) 37 (White) 38 (Red): 1 sc in each st around, sl st in next st.
Fasten off. Weave in ends.
Adult
With Red, make a MC.
Rnd 1: (RS) Ch 1, 6 sc in MC. (6)
Rnd 2: 2 sc in each st. (12)
Rnd 3: *2 sc in next st, 1 sc in next st,* repeat from * to * to end. (18)
Rnd 4: 1 sc in next st, 2 sc in next st, *1 sc in next 2 sts, 2 sc in next st,* repeat from * to * to last st, 1 sc in last st. (24)
Rnd 5: *2 sc in next st, 1 sc in next 3 sts,* repeat from * to * to end. (30)
Rnd 6: 1 sc in next 2 sts, 2 sc in next st, *1 sc in next 4 sts, 2 sc in next st,* repeat from * to * to last 2 sts, 1 sc in last 2 sts. (36)
Rnd 7: *2 sc in next st, 1 sc in next 5 sts,* repeat from * to * to end. (42)
Rnd 8: 1 sc in next 3 sts, 2 sc in next st, *1 sc in next 6 sts, 2 sc in next st,* repeat from * to * to last 3 sts, 1 sc in last 3 sts. (48)
Rnd 9: *2 sc in next st, 1 sc in next 7 sts,* repeat from * to * to end. (54)
Rnd 10: 1 sc in next 4 sts, 2 sc in next st, *1 sc in next 8 sts, 2 sc in next st,* repeat from * to * to last 4 sts, 1 sc in last 4 sts. (60)
Rnd 11: *2 sc in next st, 1 sc in next 9 sts,* repeat from * to * to end. (66)
Rnd 12: 1 sc in next 5 sts, 2 sc in next st, *1 sc in next 10 sts, 2 sc in next st,* repeat from * to * to last 5 sts, 1 sc in last 5 sts. (72)
Rnd 13: *2 sc in next st, 1 sc in next 11 sts,* repeat from * to * to end. (78)
Rnd 14: 1 sc in next 6 sts, 2 sc in next st, *1 sc in next 12 sts, 2 sc in next st,* repeat from * to * to last 6 sts, 1 sc in last 6 sts. (84)
Circle (crown) should measure approximately 6 1/2”.
Fasten off Red and change to Blue.
Main Body
(Begin color changes see below)
Note: Beginning with Main Body, rounds are no longer worked continuously. At the end of each round, join with a sl st to the first st, turn, ch 1. Do not count ch-1 as a st.
Rnds 15 – 30: 1 sc in each st around. (84)
← Rnd 15 [RS]: (Blue) x 29, (Red) x 55
→ Rnd 16 [WS]: (Red) x 55, (Blue) x 29
← Rnd 17 [RS]: (Blue) x 29, (White) x 55
→ Rnd 18 [WS]: (White) x 55, (Blue) x 29
← Rnd 19 [RS]: (Blue) x 29, (Red) x 55
→ Rnd 20 [WS]: (Red) x 55, (Blue) x 29
← Rnd 21 [RS]: (Blue) x 29, (White) x 55
→ Rnd 22 [WS]: (White) x 55, (Blue) x 29
← Rnd 23 [RS]: (Blue) x 29, (Red) x 55
→ Rnd 24 [WS]: (Red) x 55, (Blue) x 29
← Rnd 25 [RS]: (Blue) x 29, (White) x 55
→ Rnd 26 [WS]: (White) x 55, (Blue) x 29
← Rnd 27 [RS]: (Blue) x 29, (Red) x 55
→ Rnd 28 [WS]: (Red) x 55, (Blue) x 29
Fasten off
← Rnd 29 [RS]: Join (White) x 84 Note: Do not turn at end of Rnd 29, resume continuous rounds throughout remainder of pattern.
← Row 30 [RS]: (White) x 84
Brim
Rnd 31: With Red, *2 sc in next st, 1 sc in next 5 sts,* repeat from * to * to end. (98)
Rnds 32 (Red) 33 (White) 34 (White): 1 sc in each st around.
Rnd 35: With Red, *2 sc in next st, 1 sc in next 6 sts,* repeat from * to * to end. (112)
Rnds 36 (Red) 37 (White) 38 (White): 1 sc in each st around.
Rnd 39: With Red, *2 sc in next st, 1 sc in next 7 sts,* repeat from * to * to end. (126)
Rnds 40 (Red) 41 (White): 1 sc in each st around, sl st in next st.
Fasten off. Weave in ends.
Adult X-Large
With Red, make a MC.
Rnd 1: (RS) Ch 1, 6 sc in MC. (6)
Rnd 2: 2 sc in each st. (12)
Rnd 3: *2 sc in next st, 1 sc in next st,* repeat from * to * to end. (18)
Rnd 4: 1 sc in next st, 2 sc in next st, *1 sc in next 2 sts, 2 sc in next st,* repeat from * to * to last st, 1 sc in last st. (24)
Rnd 5: *2 sc in next st, 1 sc in next 3 sts,* repeat from * to * to end. (30)
Rnd 6: 1 sc in next 2 sts, 2 sc in next st, *1 sc in next 4 sts, 2 sc in next st,* repeat from * to * to last 2 sts, 1 sc in last 2 sts. (36)
Rnd 7: *2 sc in next st, 1 sc in next 5 sts,* repeat from * to * to end. (42)
Rnd 8: 1 sc in next 3 sts, 2 sc in next st, *1 sc in next 6 sts, 2 sc in next st,* repeat from * to * to last 3 sts, 1 sc in last 3 sts. (48)
Rnd 9: *2 sc in next st, 1 sc in next 7 sts,* repeat from * to * to end. (54)
Rnd 10: 1 sc in next 4 sts, 2 sc in next st, *1 sc in next 8 sts, 2 sc in next st,* repeat from * to * to last 4 sts, 1 sc in last 4 sts. (60)
Rnd 11: *2 sc in next st, 1 sc in next 9 sts,* repeat from * to * to end. (66)
Rnd 12: 1 sc in next 5 sts, 2 sc in next st, *1 sc in next 10 sts, 2 sc in next st,* repeat from * to * to last 5 sts, 1 sc in last 5 sts. (72)
Rnd 13: *2 sc in next st, 1 sc in next 11 sts,* repeat from * to * to end. (78)
Rnd 14: 1 sc in next 6 sts, 2 sc in next st, *1 sc in next 12 sts, 2 sc in next st,* repeat from * to * to last 6 sts, 1 sc in last 6 sts. (84)
Rnd 15: *2 sc in next st, 1 sc in next 13 sts,* repeat from * to * to end. (90)
Circle (crown) should measure approximately 7”.
Fasten off Red and change to Blue.
Main Body
(Begin color changes see below)
Note: Beginning with Main Body, rounds are no longer worked continuously. At the end of each round, join with a sl st to the first st, turn, ch 1. Do not count ch-1 as a st.
Rnds 16 – 33: 1 sc in each st around. (90)
← Rnd 16 [RS]: (Blue) x 32, (Red) x 58
→ Rnd 17 [WS]: (Red) x 58, (Blue) x 32
← Rnd 18 [RS]: (Blue) x 32, (White) x 58
→ Rnd 19 [WS]: (White) x 58, (Blue) x 32
← Rnd 20 [RS]: (Blue) x 32, (Red) x 58
→ Rnd 21 [WS]: (Red) x 58, (Blue) x 32
← Rnd 22 [RS]: (Blue) x 32, (White) x 58
→ Rnd 23 [WS]: (White) x 58, (Blue) x 32
← Rnd 24 [RS]: (Blue) x 32, (Red) x 58
→ Rnd 25 [WS]: (Red) x 58, (Blue) x 32
← Rnd 26 [RS]: (Blue) x 32, (White) x 58
→ Rnd 27 [WS]: (White) x 58, (Blue) x 32
← Rnd 28 [RS]: (Blue) x 32, (Red) x 58
→ Rnd 29 [WS]: (Red) x 58, (Blue) x 32
Fasten off
← Rnd 30 [RS]: Join (White) x 90 Note: Do not turn at end of Rnd 30, resume continuous rounds throughout remainder of pattern.
← Rnd 31 [RS]: (White) x 90
← Rnd 32 [RS]: (Red) x 90
← Rnd 33 [RS]: (Red) x 90
Brim
Rnd 34: With White, *2 sc in next st, 1 sc in next 5 sts,* repeat from * to * to end. (105)
Rnds 35 (White) 36 (Red) 37 (Red) 38 (White): 1 sc in each st around.
Rnd 39: With White, *2 sc in next st, 1 sc in next 6 sts,* repeat from * to * to end. (120)
Rnds 40 (Red) 41 (Red) 43 (White): 1 sc in each st around.
Rnd 44: With White, *2 sc in next st, 1 sc in next 7 sts,* repeat from * to * to end. (135)
Rnds 45 – 46: With Red, 1 sc in each st around, sl st in next st.
Fasten off. Weave in ends.
Embroider Stars Option
Space stars evenly across fabric. My stars were spaced over 4 sts and 4 rnds.
Thread a tapestry needle with a long length of White yarn. To begin, bring the needle up through the fabric at Point 1 (bottom center-left of the star), leaving a tail on the wrong side to weave in later.
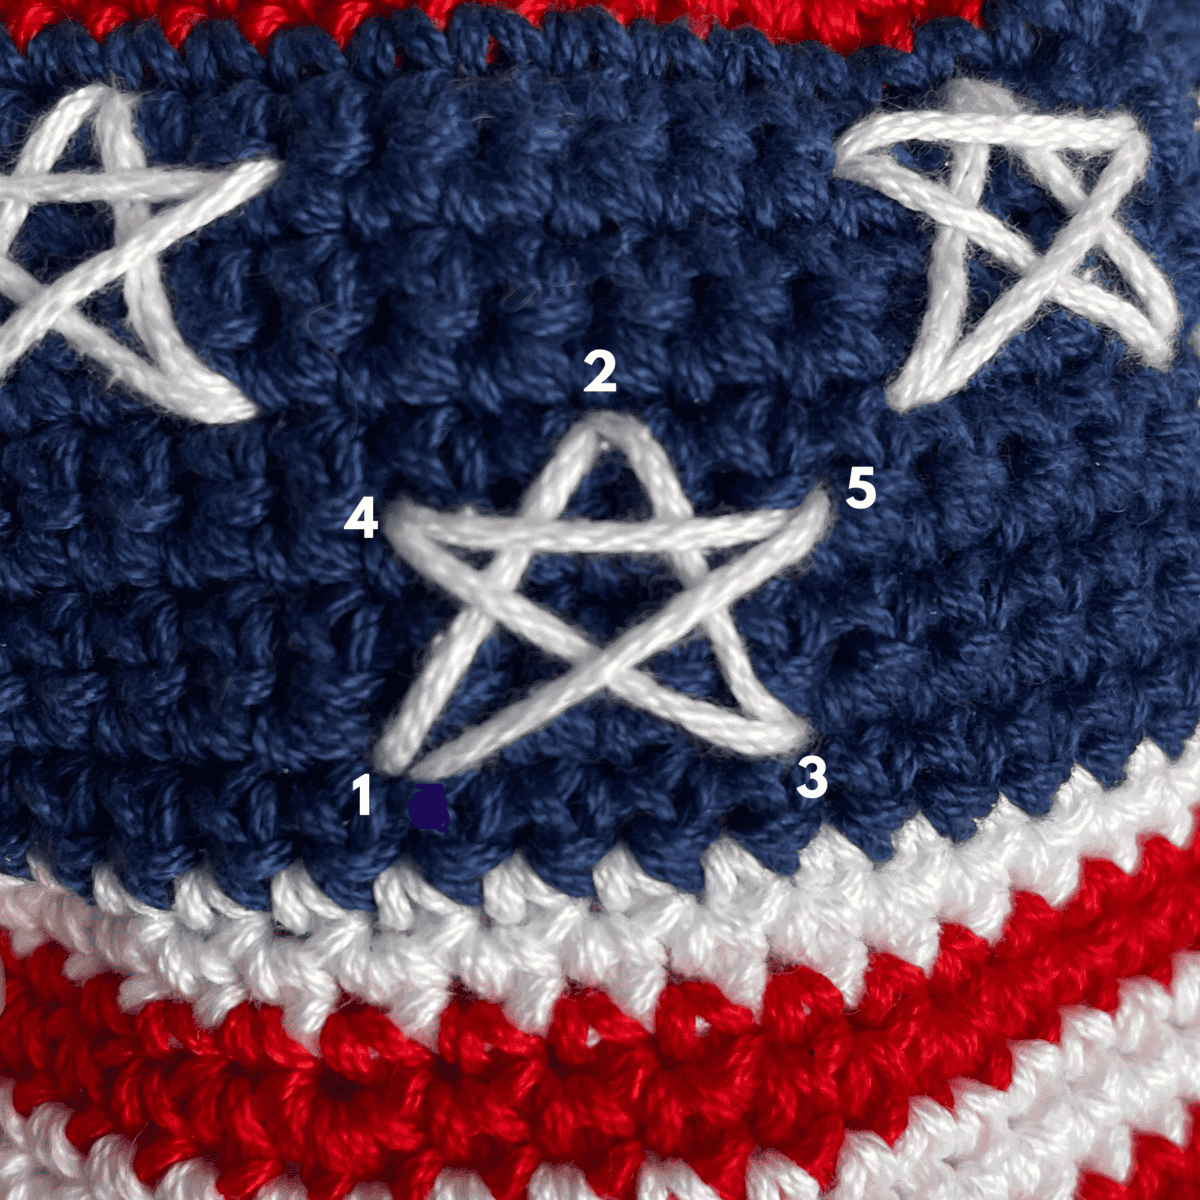
- 1 → 2: Insert needle down at Point 2 (top center). (This creates the left diagonal stroke of the star.)
- 2 → 3: Bring needle up at Point 3 (bottom right).
- 3 → 2: Insert needle down at Point 2 (top center). (This creates the right diagonal stroke of the star.)
- 2 → 4: Bring needle up at Point 4 (middle left).
- 4 → 5: Insert needle down at Point 5 (this creates the horizontal crossbar).
- 5→ 3: Bring needle up at Point 3 (bottom right)
- 3→ 4: Insert needle down at Point 4.
- 4 → 1: Bring needle up at Point 1.
- 1 → 5: Insert needle down at Point 5. (This completes the star.)
Repeat above instructions for each star.
Fasten off by weaving yarn tails securely on the wrong side.
Mini Applique Stars Option (Make 5)
With White, make a MC.
Rnd 1: (Ch 2, sc in second ch from hook, sl st in ring) 5 times.
Fasten off, leaving a long tail for sewing to hat.
Assembly
With RS of hat facing and long length of yarn left for sewing, sew stars to canton section where desired.
Weave in any remaining ends.
Looking for More Crochet Patterns?
If you loved making this crochet American flag hat, you’re going to want to browse all the free patriotic patterns over at nanascraftyhome.com! And don’t miss out on new patterns, tutorials, and crafty inspiration – sign up for my free newsletter so you never miss a thing.
Sign up here: https://nanascraftyhome.com/sign-up-for-my-free-newsletter/
Copyright 2026 Tonya Bush / Nana’s Crafty Home, LLC.
Social Media links:
Facebook: https://www.facebook.com/nanascraftyhome
Instagram: https://www.instagram.com/nanascraftyhome/
Pinterest: https://www.pinterest.com/nanascraftyhome/
YouTube: https://www.youtube.com/c/TonyaBush
Twitter: https://twitter.com/nanascraftyhome
Facebook Group: https://www.facebook.com/groups/829792060522798
Sign up for my Newsletter: https://nanascraftyhome.com/sign-up-for-my-free-newsletter/
Disclaimer: This pattern is for personal use or small-scale crafting. If you intend to sell the finished product in the EU, ensure it complies with the General Product Safety Regulation (EU) 2023/988, including safety, labeling, and traceability requirements.
 Hi! Thank you so much for being here! I am Tonya the designer behind Nana's Crafty Home. As a wife, mother, Nana of 9 & with 2 fur babies, my days are filled with love, laughter, hugs and yarn! Here you will find colorful and creative crochet designs for yourself or loved ones. My hope is that you will be inspired to learn and create along with me!