This simple crochet blanket that looks woven is a free crochet pattern for a modern crochet blanket with fringe by Nana’s Crafty Home.

The very first pattern in my popular Mountain Trail pattern series was the Mountain Trail Tweed Poncho and it was a big hit and much loved! I had several requests to turn the poncho into a blanket and since I love the stitch pattern and yarn combo I just had to share the pattern with you.
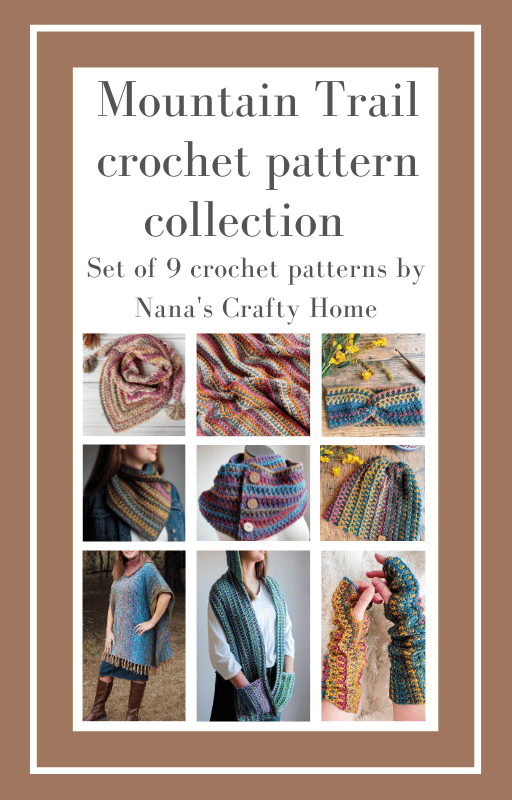
Since that original poncho pattern was released I now have a complete set of matching patterns using the very same stitch! The other patterns in this series are the Mountain Trail Beanie Hat, Mountain Trail crochet cowl pattern, Mountain Trail Infinity Scarf pattern, Mountain Trail Twisted Headband, Mountain Trail Arm Warmers and the Mountain Trail Pocket Scoodie!
This is the perfect kind of throw blanket – simple, easy and beautiful! Great for the back of the couch yet perfect for gifts, too!
Throw Blanket Pattern Details

All of the patterns in this series, including the Mountain Trail Tweed Blanket, use the Interlocking Arches Columns crochet stitch which looks woven! This stitch may look complicated but it really isn’t. This stitch uses a combination of double crochet, single crochet and chain stitches with unique placement of the dc stitches.
What makes the stitch so unique looking is that you are working a row of double crochets with skipped stitches and then the next row you are “dropping” your double crochet stitches into those skipped stitches – either in front of or behind the ch-1 space created from the previous row. I have a complete photo and video tutorial for this stitch which will help you crochet this blanket. Subscribe to my YouTube Channel to get notified whenever I post a new video.

The woven look is enhanced further by using a strand of yarn from a second yarn cake – making sure you are starting on a different color in the self-striping cake as you work the rows. And don’t worry, you won’t have a ton of ends to weave in because you will drop your yarn and pick it back up when needed – yay!
Since this stitch is just a combination of basic stitches – chains, double and single crochet stitches I think an adventurous beginning crocheter could easily master this stitch pattern!

The original Lion Brand Mandala Tweed Stripes yarn I recommended for this stitch and patterns has now unfortunately become discontinued. So I reworked the blanket in Lion Brand Ferris Wheel* in two different color ways to try to mimic the look of the original. And even though it doesn’t have quite the same tweedy look, it really does look pretty great! I think the trick with this stitch is to find a short ombre self-striping yarn in two different complementary color ways – one light and one dark. The bursts of color are fantastic!
The best thing about using the Ferris Wheel yarn as a substitute is that the gauge is the same so I didn’t have to do any math gymnastics to get the pattern to turn out. However, using two different color ways to achieve the woven look means I needed the same amount of cakes in each color way. You will need to adjust the yardage accordingly.
You could also substitute another worsted weight yarn in self-striping or even solids. So many different variations possible for this simple pattern.
*This post contains affiliate links. You can click on any yarn or material highlighted to purchase. I will receive a small commission if you purchase but it won’t cost you any extra! As an Amazon Associate I earn from qualifying purchases.
This easy crochet blanket is a rectangle that is worked from side to side so it is really easy to customize the size of your blanket and I have provided 7 different blanket sizes for you!
This easy blanket pattern is also available as an ad-free, printable PDF! You can purchase the individual pattern, or if you love PDFs, you might want to check out my Lifetime Membership. It’s an awesome deal! Never pay for one of my PDFs again!! (Or, scroll down for the free version!)
This easy crocheted blanket pattern is also included in the Mountain Trail ebook which includes all 9 patterns in this stitch pattern series!


Purchase the ad-free pdf of this pattern for a small fee. Thank you so much for supporting my work!
If you would like daily crochet inspiration be sure to follow me on Facebook, Instagram, Pinterest, YouTube, Twitter and Tumblr!
To get notified of my free crochet patterns and future giveaways, sign up for my newsletter. I never share or sell your information to third parties — it stays private!
You may also like the following free crochet patterns at Nana’s Crafty Home!


- Marjorie Blanket free crochet pattern
- Ties that Bind Blanket free crochet patterrn
- Flower Meadow Blanket free crochet pattern

Simple Crochet Blanket Pattern
Pattern written in US crochet terminology
Supplies:
Lion Brand Ferris Wheel, Weight 4/Medium (100% acrylic)
- Cherry on Top 3 (4, 5, 7, 8, 9,10) cakes
- Full Moon 3 (4, 5, 7, 8, 9,10) cakes
Total of: 1620 (2160, 2700, 3780, 4320, 4860, 5400) yards
Crochet hook size H/8 (5.0 mm)
Scissors
Tapestry Needle
Approximate finished size:
Baby Blanket: 39” width x 40” length
Lapghan: 39” x 48”
Throw: 47” x 58”
Twin: 56” x 76”
Full: 69” x 76”
Queen: 73” x 88”
King: 86” x 88″
Gauge: 13.5 pattern rows x 16 dc st = 4” x 4”
Abbreviations:
ch(s) = chain(s)
dc = double crochet
sk = skip(ped)
st = stitch
sc = single crochet
sl st = slip stitch
RS = right side
WS = wrong side
Recommended Tutorial:
Interlocking Arched Columns Stitch Tutorial
Pattern Notes:
- Blanket is worked by alternating colors from two yarn cakes, switching colors every second row.
- Do not cut yarn when changing between yarn cakes – gently pull dropped yarn into your work. Yarn will be covered during seaming process.
- Chain 4 at beginning of a row counts as first dc + ch 1 throughout.
- Stitch counts are listed according to size baby (lapghan, throw, twin, full, queen, king)
- Rows with even numbers are RS, odd numbers are WS.
- To adjust length of blanket, chain foundation chain in multiples of 2 + 5.
Pattern Instructions
With Cake A, ch 157 (191, 225, 295, 295, 347, 347)
Row 1: dc in 5th ch from hook (sk chains count as 1st dc + ch 1), ch 1, *sk next ch, dc in next ch, ch 1* repeat from * to * to last 2 chs, sk next ch, 1 dc in last ch. Turn. Do not fasten off. Switch to Cake B. 78 (95, 112, 147, 147, 173, 173) sts, 77 (94, 111, 146, 146, 172, 172) ch-1 sps
Row 2 (RS): ch 1, sc in same st, *working in front of ch-1 sp work dc in skipped ch from foundation chain, sc in next dc of row 1; repeat from * across working last dc in 4th ch from foundation ch and sc in top of ch-3. Turn. 155 (189, 223, 293, 293, 345, 345)
Row 3: ch 4 (counts as first dc + ch 1), sk next st, *dc in sc, ch 1, sk next st* repeat from * to * to last st, dc in last st. Turn. Do not fasten off. Switch to Cake A.
Row 4: ch 1, sc in same st, *dc in sk st from previous row (work dc behind ch 1 from previous row), sc in next st* repeat from * to * to end, sc in last st (work sc in the dc of dc + 1). Turn.
Row 5: ch 4 (counts as first dc + ch 1), sk next st, *dc in next st, ch 1, sk next st* repeat from * to * to last st, dc in last st. Turn. Do not fasten off. Switch to Cake B.
Row 6: ch 1, sc in same st, *dc in sk st from previous row (work dc in front of the ch-1 from the previous row), sc in next st (top of dc post from previous row),* repeat from * to * to end. Turn.
Repeat rows 3-6 to desired width or 39 (39, 47, 56, 69, 73, 86) inches, ending after either row 4 or 6.
Fasten off. Weave in ends.
Fringe
Note: Before adding fringe, if your blanket’s bottom edge has noticeable yarn jogs from changing colors between rows that will not be covered up by the fringe, I recommend working one row of single crochet stitches evenly across bottom and top edges of blanket.
Cut approximately 328 (408, 488, 688, 688, 728, 728) pieces of 8” fringe. With RS of blanket facing up, insert hook from the top down and grab four strands of fringe. Pull up loop, insert fingers through loop just made and pull fringe tails through the loop. Gently tighten.
Attach fringe approximately 1” apart along blanket bottom edge. Repeat for top edge of blanket.

Copyright 2024 Nana’s Crafty Home
Social Media links:
Facebook: https://www.facebook.com/nanascraftyhome
Instagram: https://www.instagram.com/nanascraftyhome/
Pinterest: https://www.pinterest.com/nanascraftyhome/
YouTube: https://www.youtube.com/c/TonyaBush
Twitter: https://twitter.com/nanascraftyhome
Facebook Group: https://www.facebook.com/groups/829792060522798
Sign up for my Newsletter: https://nanascraftyhome.com/sign-up-for-my-free-newsletter/

 Hi! Thank you so much for being here! I am Tonya the designer behind Nana's Crafty Home. As a wife, mother, Nana of 9 & with 2 fur babies, my days are filled with love, laughter, hugs and yarn! Here you will find colorful and creative crochet designs for yourself or loved ones. My hope is that you will be inspired to learn and create along with me!