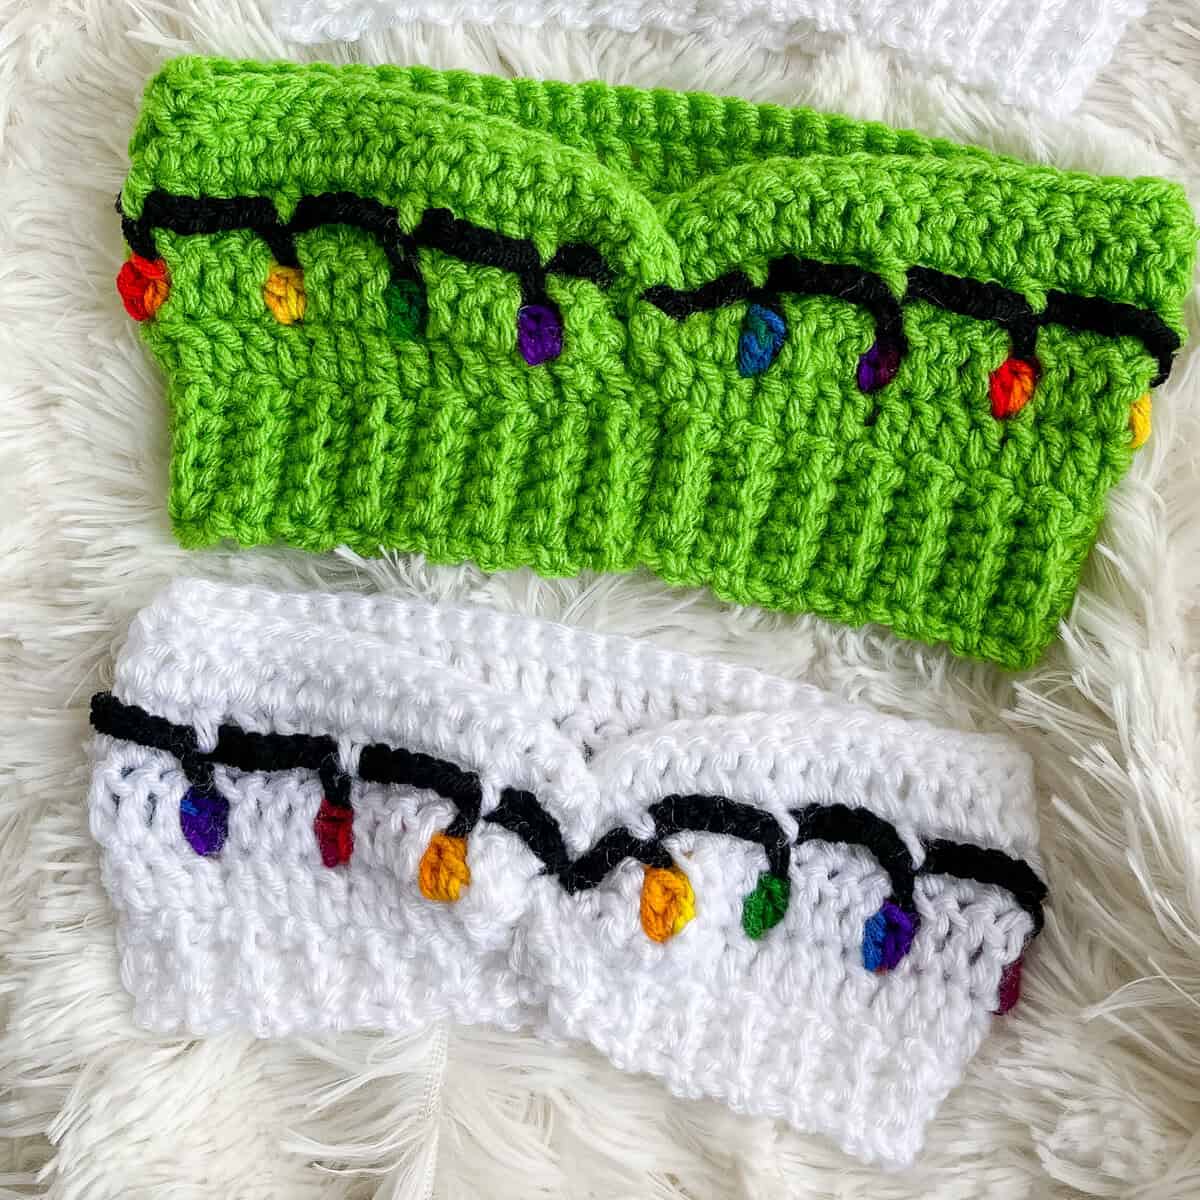
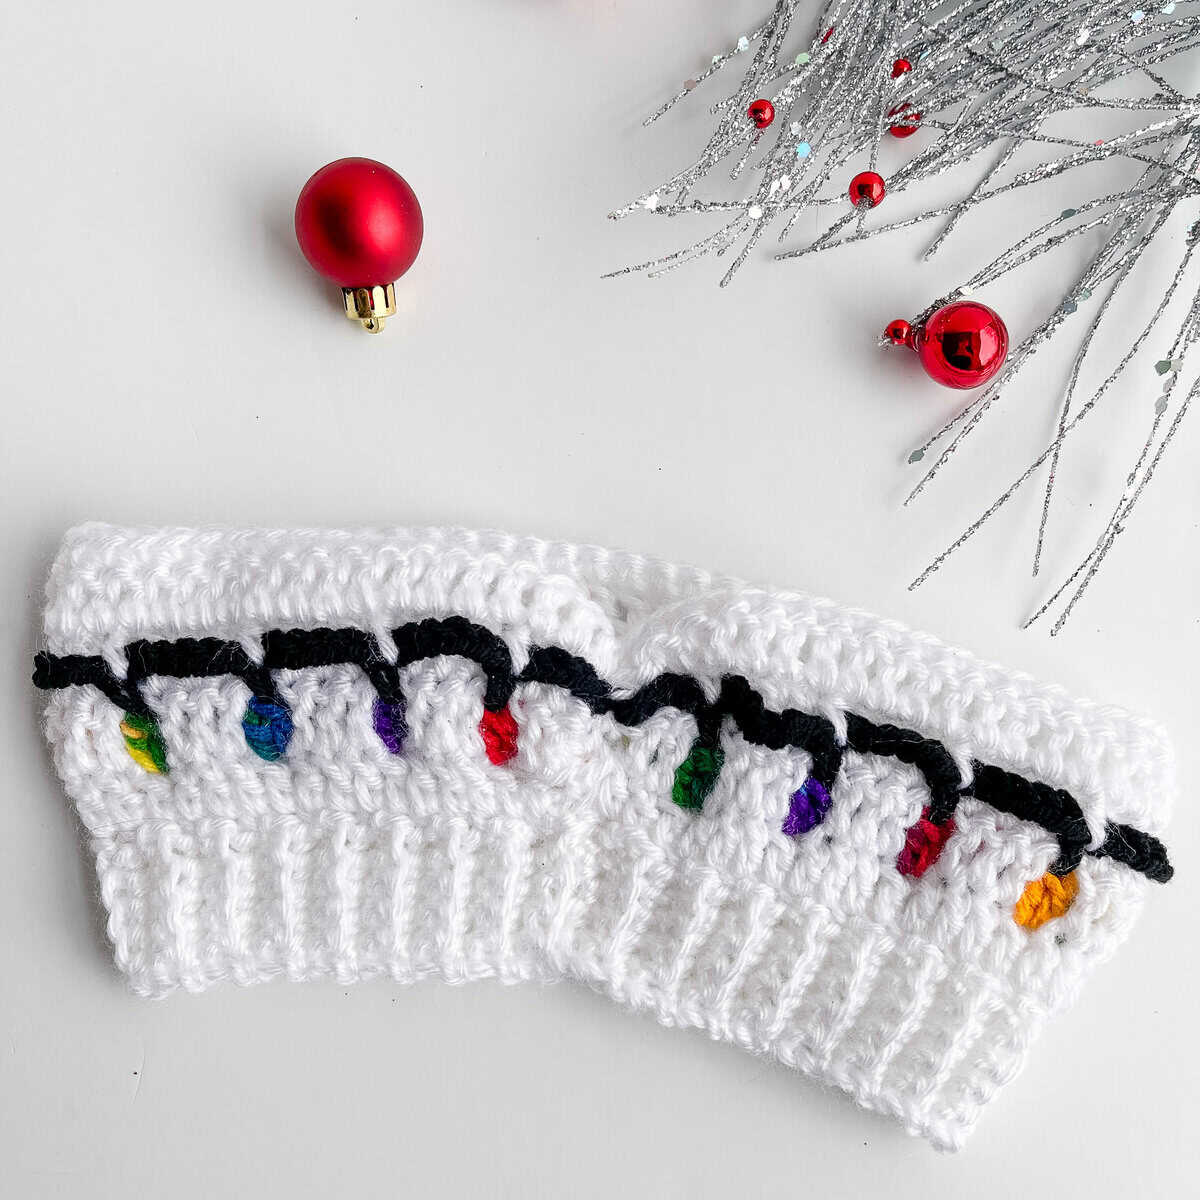
A crochet Christmas headband featuring a brand new and festive crochet stitch!
The crochet holiday season is officially here, and what better way to spread some cheer than by wearing actual Christmas lights on your head?
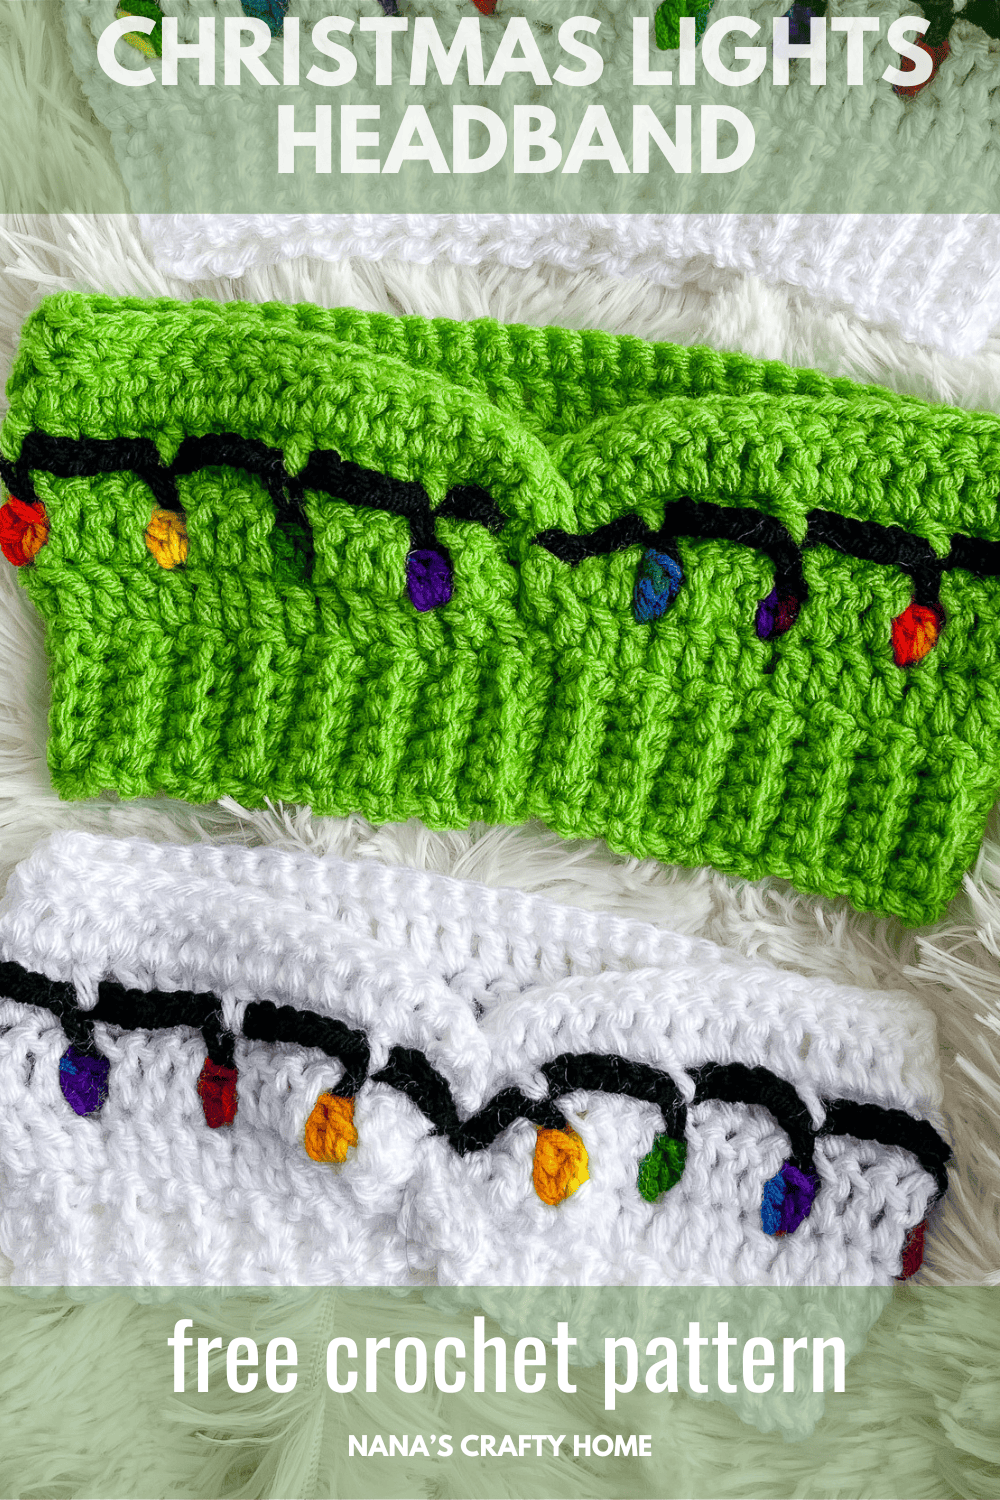
Introducing the Christmas Lights Headband – a quick, festive, and ridiculously cute crochet project that will make you the star of every holiday party, Christmas market, or cozy cocoa night!
This isn’t your average ear warmer. This headband features my brand-new Christmas lights crochet stitch – a super simple technique that creates the look of colorful twinkling bulbs strung across a black “wire,” all worked seamlessly into the fabric. No sewing on a million little appliqués. The lights are crocheted right in as you go!
Trust me, once you make one Christmas Lights Headband, you’ll want to whip up a dozen for gifts, craft fairs, or just to match every fun Christmas sweater in your closet!

How to Make the Crochet Christmas Lights Headband
For the full free written pattern instructions for the Christmas Lights Headband Pattern, scroll down below. You can also purchase the ad-free PDF of this pattern for a small fee. Or, become a Lifetime Member and never pay for a PDF again!
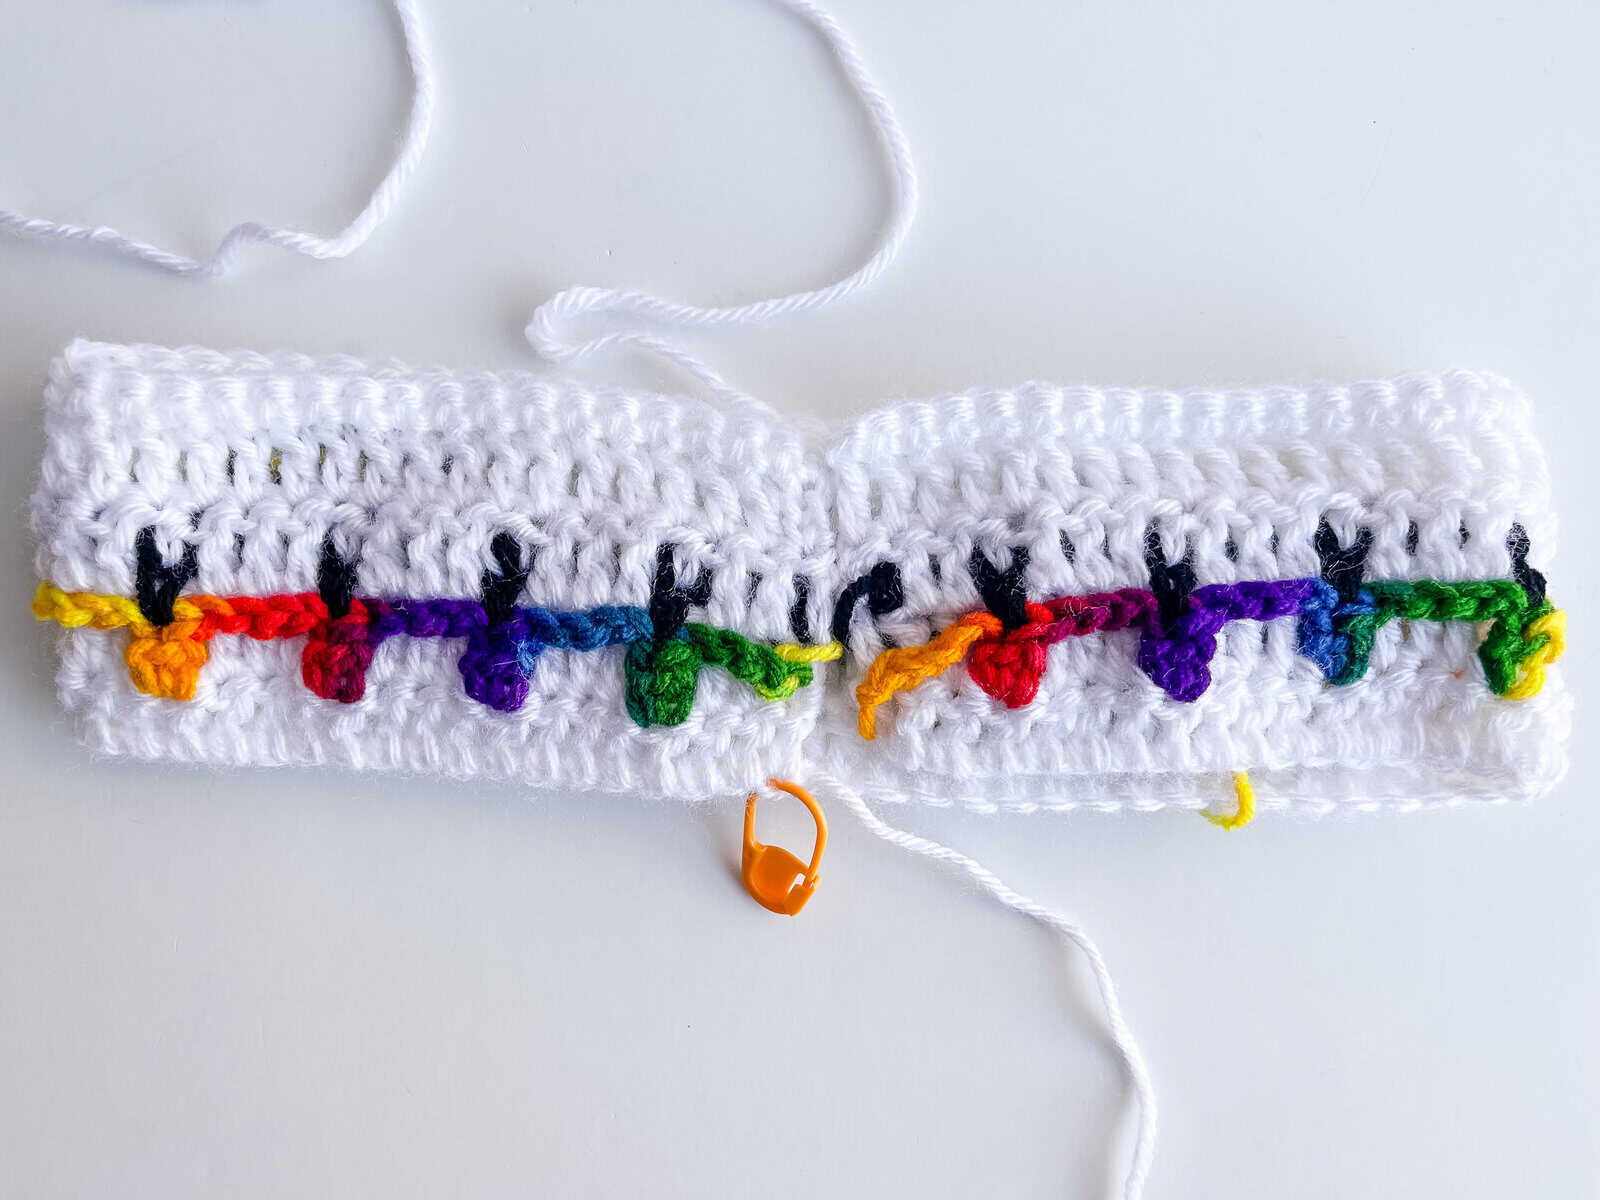
1. This crochet Christmas headband is made from a stitch adapted from my Pumpkin Patch crochet stitch!
2. The Christmas lights crochet stitch is made with simple bobble stitches and chains – so easy!
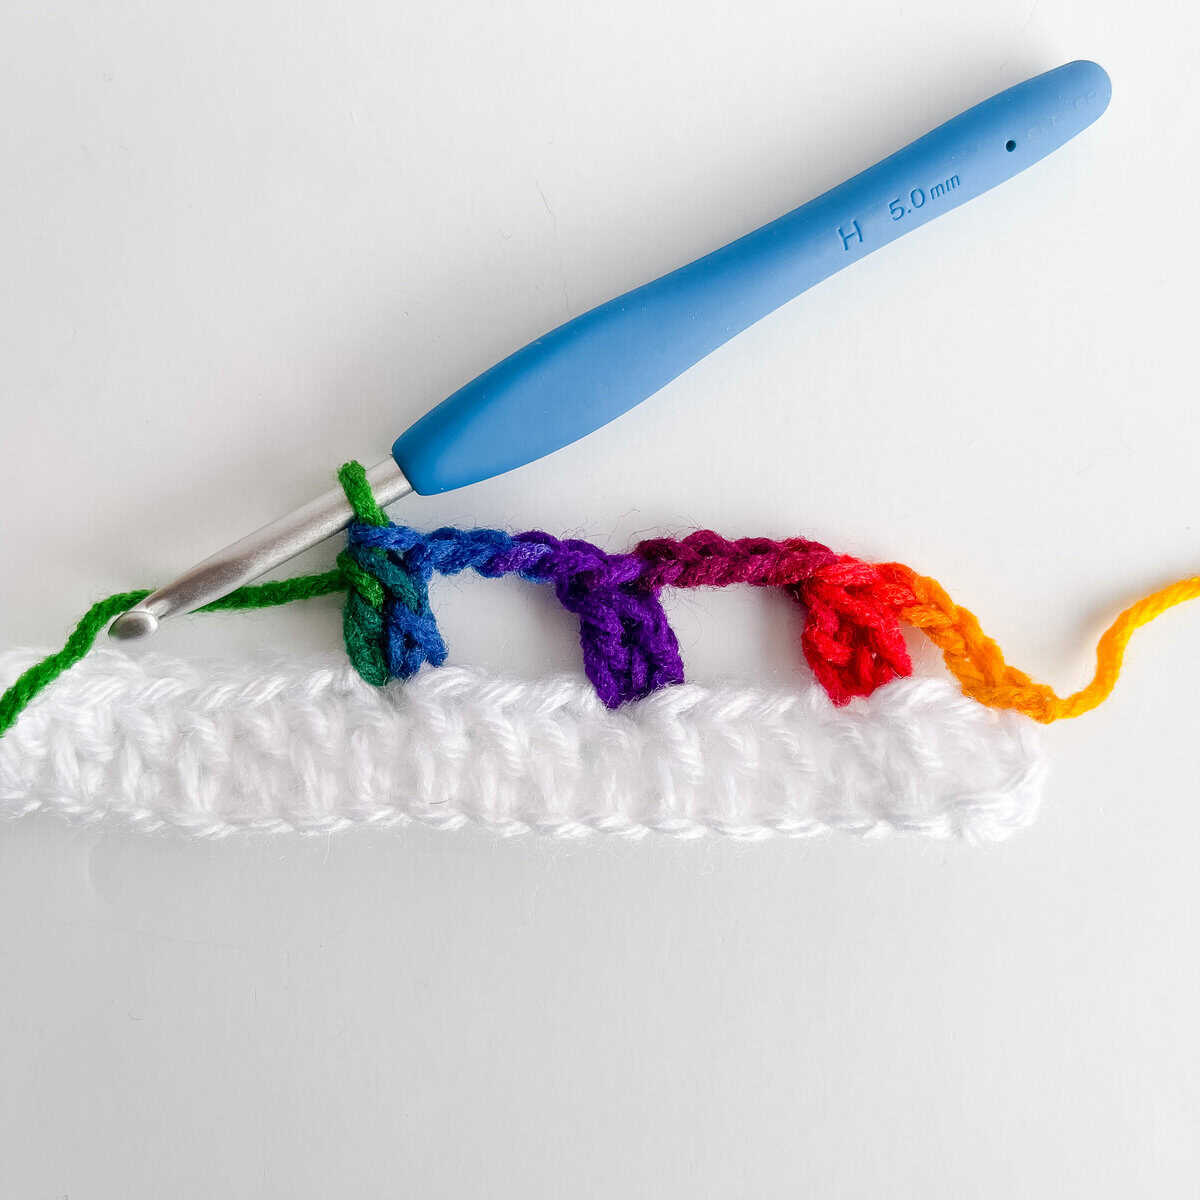
3. The “wire” is then made by crocheting a single crochet stitch into each bobble and then working chain stitches along the top edge.
4. Once the main body of the headband is complete you will fold, twist and sew the ends to create a modern twist headband. I have a video tutorial to help!
5. Then you will add ribbing to the bottom edge of your headband. If you have never added crochet ribbing to one of your projects I recommend heading over to my Remember Me Beanie pattern where I have a photo tutorial to help you.
I have provided 3 different sizes – toddler, child & adult! Further size adjustments can be made by simply changing up the yarn weight or by changing your foundation chain in multiples of 4 + 5 to make any size.
I hope you enjoy making, wearing or gifting the fun Christmas Lights Headband!
Tonya 💕

Supplies for Christmas Light Headband
*This post contains affiliate links. You can click on any yarn or material highlighted to purchase. I will receive a small commission if you purchase but it won’t cost you any extra! As an Amazon Associate I earn from qualifying purchases.
I made my crochet Christmas headband using Red Heart Super Saver, which is a sturdy and economical medium worsted weight acrylic yarn. Substitute with your favorite yarn!
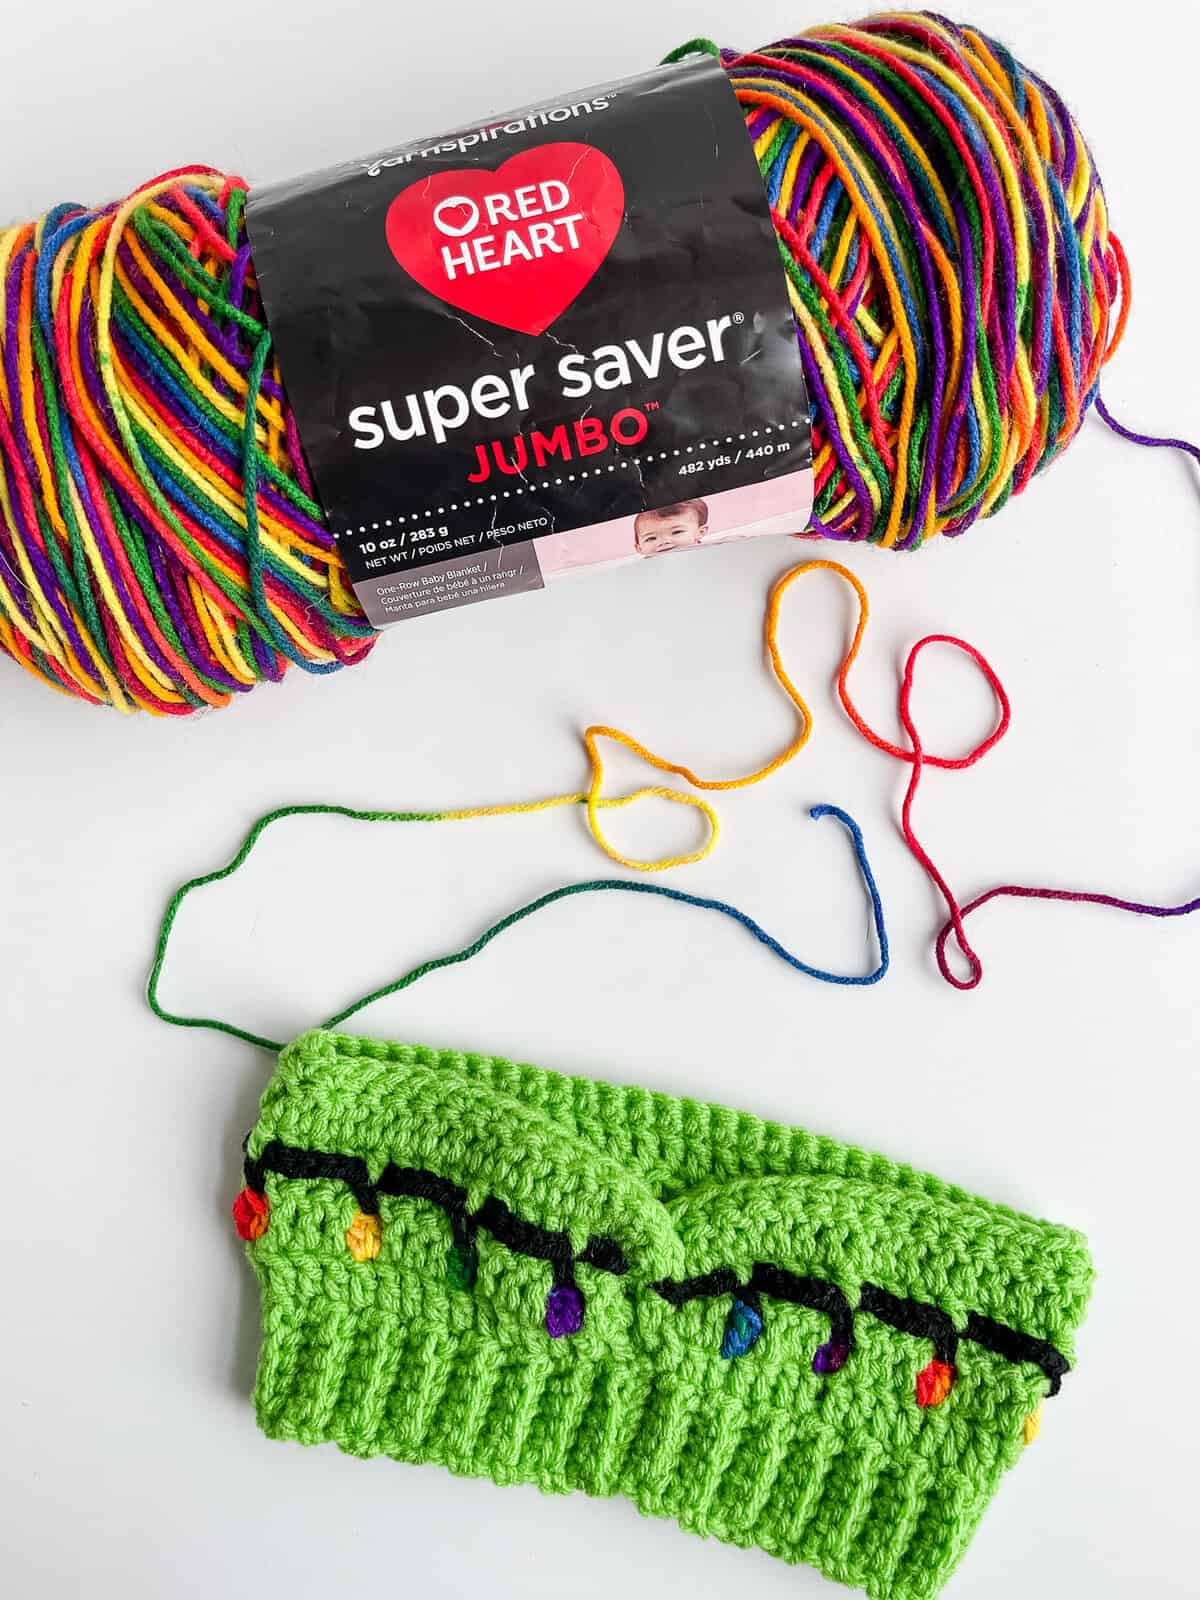
I honestly wasn’t sure this Christmas Lights Headband was ever going to see the light of day 😅. I knew I wanted that classic, vintage Christmas-light feel, but I refused to weave in 47 ends by changing colors for every single bulb, and none of the solid colors felt festive enough. I searched high and low for the perfect solution… and then I found it: Red Heart Super Saver in the “Mexicana” color way! This variegated beauty has bright, abrupt bursts of red, orange, yellow, green, blue, and purple—exactly the old-school Christmas light vibe I was dreaming of. The short color runs lined up almost magically with my bulbs, so no color changes were needed! If you love the rainbow effect, grab Mexicana (it’s widely available at Walmart or on Amazon). But the pattern works just as well with any variegated yarn that has quick color changes, or even a solid color if you prefer a modern twist.

Holiday Stashdown CAL Event
So excited to share that this pattern is part of a fun Holiday Stashdown Crochet Along hosted by Underground Crafter! This festive event takes place in the CAL Central Facebook and Ravelry groups, where designers come together to spread the joy of the season. You’ll discover free crochet patterns perfect for holiday gifting, decorating your home, or just to indulge your creative spirit. Join the fun of this crochet along, share ideas with fellow crafters, and get a chance to win some exciting prizes while spreading holiday cheer! Use the #HolidayStashdownCAL to share your projects!
Purchase the ad-free PDF
You can purchase the ad-free PDF of this crochet Christmas Lights Headband for a small fee. You can purchase the individual pattern, or if you love PDFs, you might want to check out my Lifetime Membership. It’s an awesome deal! Never pay for one of my PDFs again!!


If you would like daily crochet inspiration be sure to follow me on Facebook, Instagram, Pinterest, YouTube, Twitter and Tumblr!
To get notified of my free crochet patterns and future giveaways, sign up for my newsletter. I never share or sell your information to third parties — it stays private!
You may also like the following free Christmas crochet patterns by Nana’s Crafty Home:
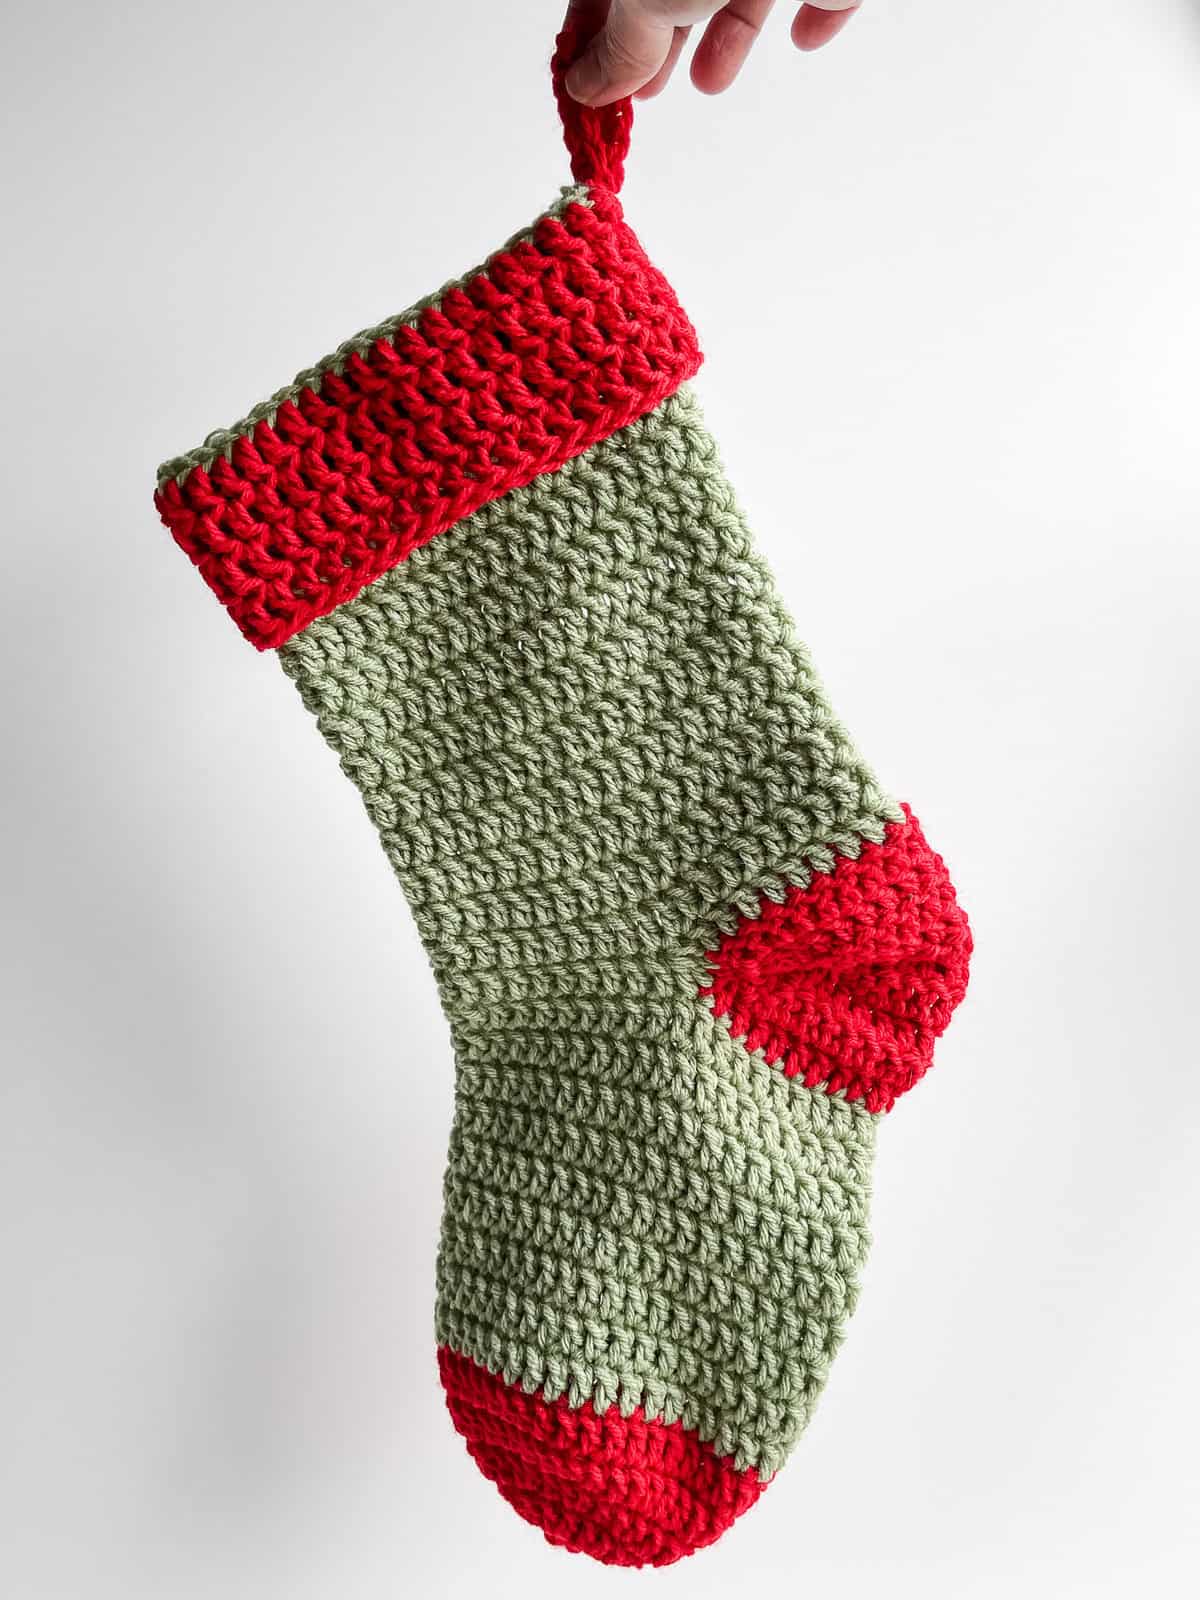


- Classic Christmas Stocking free crochet pattern
- Red Truck Christmas Towel Holder free crochet pattern
- Gingerbread House Tissue Box Cover free crochet pattern
Christmas Lights Head Band free crochet pattern
Pattern written in US crochet terminology
Supplies:
Red Heart Super Saver, Weight 4 / Medium (100% acrylic)
- Color White (MC)
- Adult 1.2 oz /63 yards
- Color Mexicana (Mexi)
- Adult 0.2 oz / 11 yards
- Color Black (black)
- Adult 0.1oz / 6 yards
Crochet hook size H (5 mm)
Stitch Marker
Scissors
Tapestry Needle
Approximate finished size:
- Toddler: Approximately 17” circumference x 3 1/2” height
- Child: Approximately 19” circumference x 4” height
- Adult: Approximately 21” circumference x 4” height
Gauge: 14 dc sts x 13 rows = 4” x 4”
Abbreviations:
- MC = main color
- ch(s) = chain(s)
- RS = right side
- WS = wrong side
- dc = double crochet
- sl st = slip stitch
- sc = single crochet
- bob = bobble (see special stitches section below)
- hdc = half double crochet
- sk = skip
- BLO = back loop only
Special Stitches:
Bobble: (Yo, insert hook into stitch, yo, pull up a loop, yo and pull through 2 loops on hook) twice (3 loops on hook), yo and pull through all 3 loops on hook.
Pattern Notes:
- Resize by working foundation chain in multiples of 4 + 5.
- Instructions are written for sizes toddler, child and adult in parentheses as toddler (child, adult).
- Chain 3 at beginning of row counts as first st.
Recommended Tutorial:
How to Make a Modern Twist Headband Tutorial
Pattern Instructions
With MC, ch 61 (65, 73)
Row 1: (RS) Dc in fourth ch from hook (skipped chs count as first st) and in each ch to end. Do not fasten off, place stitch marker in loop to hold stitch. Do not turn. 59 (63, 71)
Row 2: (RS) Join Mexi to first st (top of skipped chs from previous row) with sl st, ch 4, sk next 2 sts, bob in next st, *ch 4, sk next 3 sts, bob in next st,* repeat from * to * to last 3 sts, ch 4, sk next 2 sts, sl st in last st. Fasten off Mexi. Turn. 14 (15, 17) clusters
Row 3: (WS) Insert hook into loop of MC, ch 3, working behind chs and into skipped sts from previous row, dc in next 2 sts, *ch 1, sk over bob, dc in next 3 sts,* repeat from * to * to end. Do not fasten off, place stitch marker in loop to hold stitch. Turn. 45 (48, 54) + 14 (15, 17) ch-1 sps.
Row 4: (RS) Join black to first st with sl st, ch 4, sk next 2 sts, sc into bob st from row 2 and over ch-1 sp from previous row, *ch 6, sk next 3 sts, sc into bob st,* repeat from * to * to last 3 sts, ch 4, sk next 2 sts, sl st in last st. Fasten off black. Do not turn.
Row 5: (RS) Insert hook into loop of MC, ch 3, working behind chs and into skipped sts from previous row, dc in next 2 sts, *hdc in sc st from previous row, dc in next 3 sts,* repeat from * to * to end. Turn. 59 (63, 71)
Row 6: (WS) Ch 3, 1 dc in each st. Turn.
Row 7: (RS) Ch 1, 1 sc in each st.
Fasten off, leaving a long tail for sewing.
Finishing
Lay the headband flat with the right side (RS) facing up.
Place a stitch marker into unused loop of last stitch of foundation chain. This marks the stitch for ribbing later.
Fold each end of the headband in half lengthwise, bringing the outer edges toward the center.
Bring the two folded ends together, with the wrong side (WS) facing outward. Slide the folded ends into each other, ensuring all four raw edges align neatly (refer to the diagram for guidance).

Using the long tail left for sewing, thread a yarn needle. Sew through all four layers along the aligned edges for a secure and invisible seam.
Fasten off. Weave in ends.
Turn the headband right side out to reveal the twisted front design.
Ribbing

Join MC to unused loop foundation chain marked with stitch marker.
Ch 4 (6, 6)
Row 1: Sc in second ch from hook and in each ch to end, now working in unused loops from foundation ch, sl st in next two sts. Turn. 3 (5, 5)
Row 2: Skip 2 sl sts, working in BLO of sc sts from row 1 of ribbing, sc in BLO of each st to last st, sc in both loops of last st. Turn. 3 (5, 5)
Row 3: Ch 1, sc both loops of first st, then sc in BLO of each st to end, sl st in next two sts of foundation ch. Turn.
Rows 4 – 59 (63, 71): Repeat rows 2 – 3.
Fasten off leaving a long tail for sewing.
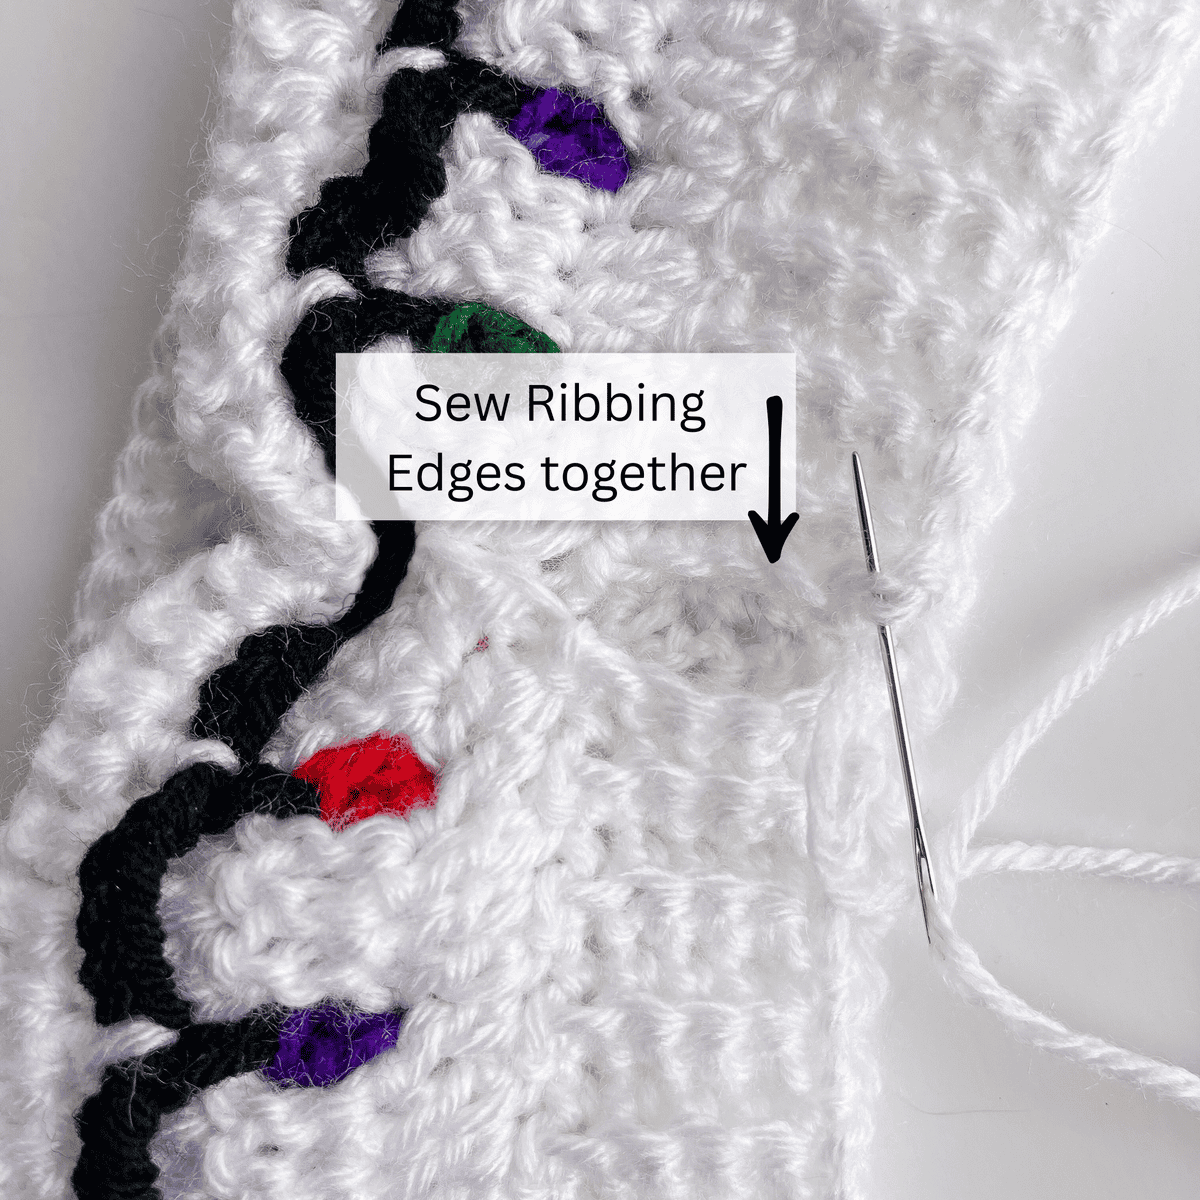
Thread a yarn needle with the long tail left from the ribbing (or attach a new length of matching yarn if the tail is too short). Starting at the bottom edge of the ribbing, sew the ribbing edges together using a whip stitch or mattress stitch for an invisible seam. Work evenly through both layers, matching stitches as you go. Sew any remaining gap between ribbing and main body of headband.
Weave in any remaining ends.
Copyright 2025 Tonya Bush / Nana’s Crafty Home, LLC.
Social Media links:
Facebook: https://www.facebook.com/nanascraftyhome
Instagram: https://www.instagram.com/nanascraftyhome/
Pinterest: https://www.pinterest.com/nanascraftyhome/
YouTube: https://www.youtube.com/c/TonyaBush
Facebook Group: https://www.facebook.com/groups/829792060522798
Sign up for my Newsletter: https://nanascraftyhome.com/sign-up-for-my-free-newsletter/
 Hi! Thank you so much for being here! I am Tonya the designer behind Nana's Crafty Home. As a wife, mother, Nana of 9 & with 2 fur babies, my days are filled with love, laughter, hugs and yarn! Here you will find colorful and creative crochet designs for yourself or loved ones. My hope is that you will be inspired to learn and create along with me!