Learn the granny square crochet pattern with this free crochet pattern and tutorial by Nana’s Crafty Home.
This complete step by step granny square tutorial will walk you through each stitch so you can make your own traditional basic granny square crochet pattern!

I love the classic granny square so much! I learned to crochet in the 70s when granny squares were “hip” and “groovy”. Or, at least I thought they were. Didn’t everyone wear a granny square poncho to school in the 70s?? And truly I have learned that everything old will eventually be new again. The granny square definitely proves that to be true!
The classic granny square has seen a surge in popularity over the last few years and now it seems you can’t turn the corner in a store, click on a TV show or even walk down the street without seeing a granny square somewhere. How cool is that?
I have a new pattern coming out using a basic granny stitch square and since I haven’t yet provided a tutorial for a traditional granny square I thought I had better get on it!
And once you know how to make a basic granny square you can turn those squares into blankets, scarves, hats, bags, and so much more!

Granny Square Crochet Pattern Details
In this tutorial I am going to show you a classic granny square worked in the round without turning. “In the round” means you are not working in turned rows. Since you aren’t turning each round it also means one side would be the right side (or front side) and one side would be the wrong or back side of your work. This granny square pattern would not be reversible.
This granny square will be great for working with a solid color yarn or a self-striping yarn if you want the color work without all the weaving in the ends work. If you want to raid your scrap basket and work with multiple colors, I will also show you how to change colors between rounds. Scrap grannies are the best!
I also have a complete video tutorial for how to make a classic granny square. You can scroll down to find it here on the blog or head on over to YouTube to watch.
I have an ad-free printable PDF available with the complete written instructions, stitch diagram and links to the video tutorial.
The traditional granny stitch square is made with all double crochet stitches which makes it a wonderful beginner-friendly project! The stitch pattern is easy to memorize in a simple one-round repeat.
You can make several crochet granny squares that you can then join together to make a variety of different projects or just continue repeating rounds to grow your granny square into a larger granny square blanket!
*This post contains affiliate links. You can click on any yarn or material highlighted to purchase. I will receive a small commission if you purchase but it won’t cost you any extra! As an Amazon Associate I earn from qualifying purchases.
This basic easy Granny Square pattern is also available as an ad-free, printable PDF! You can purchase the individual pattern, or if you love PDFs, you might want to check out my Lifetime Membership. It’s an awesome deal! Never pay for one of my PDFs again!! (Or, scroll down for the free version!)
The ad-free PDF also includes a complete stitch diagram!
Purchase the ad-free pdf of the Basic Granny Square pattern for a small fee. Thank you so much for supporting my work!
If you would like daily crochet inspiration be sure to follow me on Facebook, Instagram, Pinterest, YouTube, Twitter and Tumblr!
To get notified of my free crochet patterns and future giveaways, sign up for my newsletter. I never share or sell your information to third parties — it stays private!
What yarn to use?
Any yarn you want to use! Yes, I mean it! From light to bulky to super bulky yarns – there is no wrong answer here. The main thing to remember is to pick a hook that matches the weight of the yarn you decide to use. You can get that information on the yarn label. A medium worsted #4 weight yarn would typically use a size I – J (5.5 mm – 6.0 mm) hook, a light or DK weight #3 would typically use a size G-7-H (4.0, 4.5 or 5.0 mm) hook. A bulky weight #5 yarn would typically use a size K-L (6.5 – 7.0 mm) hook. Pick your favorite and let’s get crocheting up our first square!
How to Begin Your Granny Square
There are a few different ways to begin your square – simply pick your favorite:
1) Make a Magic Circle – work round 1 into Magic Circle. This is not my favorite method for beginning crocheters as if you are not very careful about securing your end the circle can come undone later with use and washing. No one wants their work to unravel.
2) Chain 4, slip stitch in fourth ch from the hook to make a loop. This is a great alternative to the Magic Circle but you may need to close the gap made by working into the loop. No easy way to “close” the center loop.
3) Chain 4, begin working your first round in the fourth chain from the hook. This is my preferred method of beginning.
How to Change Colors
You can change colors in a couple of different ways. At the end of a round you could slip stitch into the beginning ch-3 as normal then fasten off your yarn and join your new color with a slip stitch into any ch-2 corner space. Or, slip stitch into the top of the next 2 stitches with the original yarn and change colors with your slip stitch into the ch-2 corner space.
If you are working a color work granny square and want to change colors in the middle of a round you will work the final cluster of 3 dc stitches in the original color of yarn but do not finish the final dc of the cluster and leave the final 2 loops on your hook, yarn over with the new color and pull through those final 2 loops on your hook to complete the last double crochet stitch of the cluster. Work the next cluster with the new color yarn. Continue repeating the same steps as needed for your color work graph.
If you need additional visual help to walk you through color changing I go through this in detail on the video. Sometimes seeing something in action can be just what I need to understand the concept.
To Block or not to Block? That is the Question!
So I get asked a lot by crocheters – should I block my granny square? The answer is more complex than just a yes or no answer. To be honest, I rarely block my squares. I probably should, but I don’t. Even though every time I block something, I am always so glad I did – it opens the stitches, makes it easier to join and looks more professional. Adds the finishing touch, so to speak. But, even though I know all of those things I still rarely block. However, I do make it a priority for projects with more open stitches or if the squares will not be seamed or joined together at the end.
If you decide to block your square, I have an easy wet block tutorial to walk you through the process.
If you imagine blocking all the squares and want a tool to help you, I recommend this beautiful wood blocking board from Amazon. It is so pretty and so functional!
Joining your Crochet Granny Squares
If you are making several crochet granny squares and need to join them together to create a larger project there are several ways to join your squares.
For a truly invisible join I recommend using the Mattress Seam Stitch. This is a sewing method of joining which means you will pick up a tapestry needle, add yarn and sew your squares together.
If you are a beginner and you are looking for the absolutely easiest way to join your squares I recommend the single crochet join method. This method uses single crochet stitches to join your squares. This method creates an added dimension and texture to your finished project. However, you can choose to join from the wrong side of your squares so that seam is less visible from the right side of your project.
If you want a crocheted flat join with a little extra flair, I recommend the Braided slip stitch join method also known as the Zig Zag Slip Stitch Join. It is a little more “finicky” than the other join methods so I wouldn’t label it beginner friendly. This method is fantastic if you want the join to stand out from your project.
Looking for a more lacy, open join concept then you will love the Crochet Lace Join Method with many variations available to choose from!
I have the complete written crochet patterns for the basic granny square below. The first set of instructions are for when you aren’t changing colors between rounds. The second set of instructions or for changing colors between rounds. Change it up to working several rounds of a solid color, then change colors for several rounds. Your choice – and unlimited color palettes await!
What to make with your Granny Square?
You have now mastered the granny square – what to make? Oh, so many options are open to you now! Here are a few of my free patterns you can find for free on the blog using granny squares:


- Sedona Granny Square Ruana free crochet pattern
- Ferris Wheel Granny Square Hat free crochet pattern
- Ferris Wheel Granny Square Scarf free crochet pattern
Looking for another Granny Stitch Shape?


Rectangle Granny: Turn your granny square into a granny stitch rectangle!
Triangle Granny: Bottom up Granny Stitch Triangle shape

Basic Granny Square Written Crochet Free Pattern
Pattern written in US crochet terminology
Supplies:
Paintbox Cotton Aran Weight 4 Medium (100% cotton)
Size 7 (4.5 mm) crochet hook
Scissors
Tapestry Needle
Abbreviations:
- MC = magic circle
- RS = right side
- sl st = slip stitch
- ch(s) = chain(s)
- st(s) = stitch(es)
- sk = skip
- dc = double crochet
- beg = beginning
- sp(s) = space(s)
- Special Stitches:
- Beg cluster = ch 3, 2 dc stitches worked in same stitch or space.
- Cluster = group of 3 dc stitches worked in same stitch or space.
Pattern Notes:
- Stitch count increases by 4 clusters each round.
Recommended Tutorials:

Pattern Instructions No Color Changes
Ch 4.
Round 1: (RS) Beg cluster in fourth ch from hook, ch 2, *(cluster, ch 2) in same sp,* repeat from * to * twice, sl st in top of ch-3. (4 clusters + 4 ch-2 sps)

Round 2: Sl st in next 2 sts, sl st in ch-2 sp, (beg cluster, ch 2, cluster) in same sp, *sk next cluster, (cluster, ch 2, cluster) in next ch-2 sp,* repeat from * to * twice, sl st in top of ch-3 from beg cluster. (8 clusters + 4 ch-2 sps)

Round 3: Sl st in next 2 sts, sl st in ch-2 sp, (beg cluster, ch 2, cluster) in same sp, *3 dc cluster in sp between clusters to next ch-2 sp, (cluster, ch 2, cluster) in next ch-2 sp,* repeat from * to * twice, cluster in sp between next clusters, sl st in top of ch-3 from beg cluster. (12 dc clusters + 4 ch-2 sps)
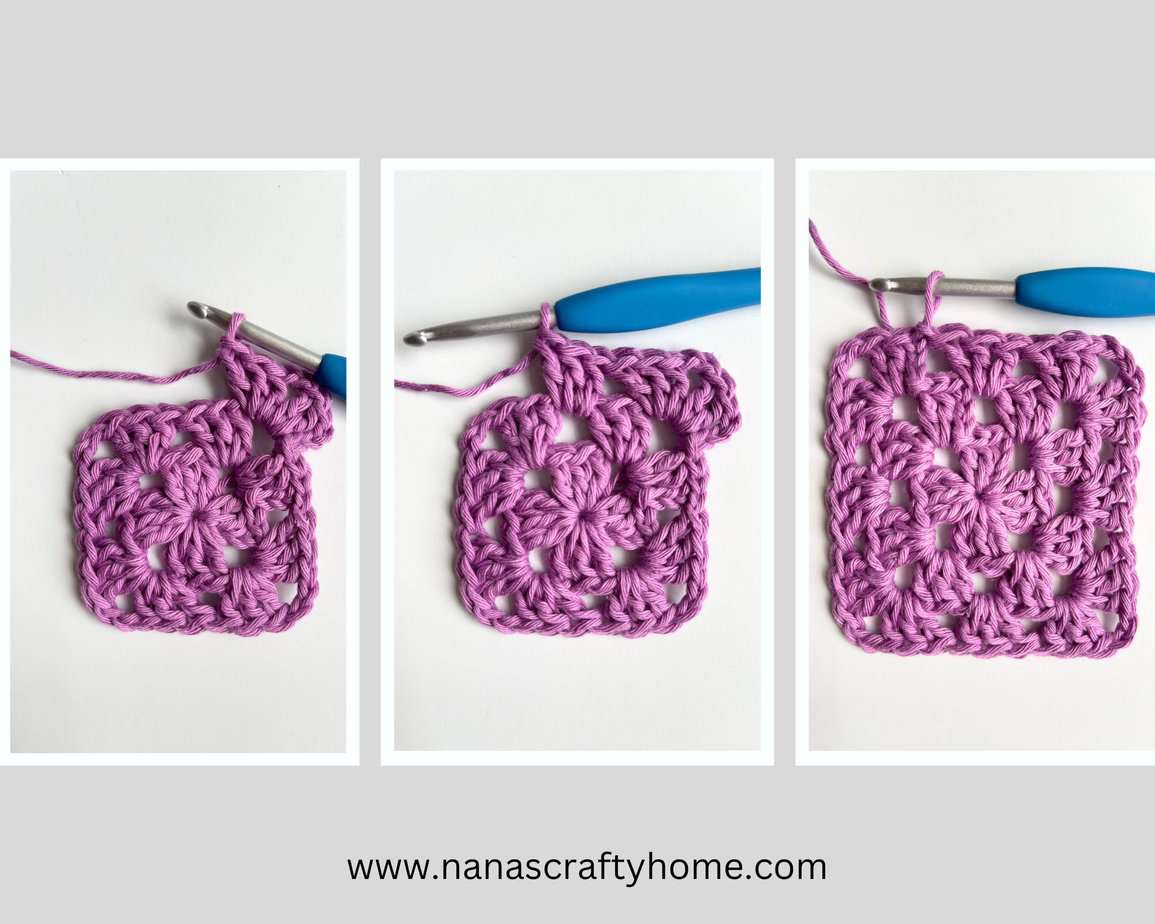
Round 4: Sl st in next 2 sts, sl st in ch-2 sp, (beg cluster, ch 2, cluster) in same sp, *3 dc cluster in each sp between clusters to next ch-2 sp, (cluster, ch 2, cluster) in same sp,* repeat from * to * twice, 3 dc cluster in each sp between clusters to end, sl st in top of ch-3 from beg cluster. (16 dc clusters + 4 ch-2 sps)

Continue repeating round 4 to size desired.
Fasten off. Weave in ends.
Pattern Instructions With Color Changes
With Color A, ch 4.
Round 1: (RS) Beg cluster in fourth ch from hook, ch 2, *(cluster, ch 2) in same sp,* repeat from * to * twice, sl st in top of ch-3, sl st in next 2 sts. (4 clusters + 4 ch-2 sps)
Fasten off Color A.
Round 2: With Color B, sl st in ch-2 sp, (beg cluster, ch 2, cluster) in same sp, *sk next cluster, (cluster, ch 2, cluster) in next ch-2 sp,* repeat from * to * twice, sl st in top of ch-3 from beg cluster, sl st in next 2 sts. (8 clusters + 4 ch-2 sps)
Fasten off Color B.
Round 3: With Color C, sl st in ch-2 sp, (beg cluster, ch 2, cluster) in same sp, *3 dc cluster in sp between clusters to next ch-2 sp, (cluster, ch 2, cluster) in next ch-2 sp,* repeat from * to * twice, cluster in sp between next clusters, sl st in top of ch-3 from beg cluster, sl st in next 2 sts. (12 dc clusters + 4 ch-2 sps)
Fasten off Color C.
Round 4: With Color A, sl st in ch-2 sp, (beg cluster, ch 2, cluster) in same sp, *3 dc cluster in each sp between clusters to next ch-2 sp, (cluster, ch 2, cluster) in same sp,* repeat from * to * twice, 3 dc cluster in each sp between clusters to end, sl st in top of ch-3 from beg cluster, sl st in next 2 sts. (16 dc clusters + 4 ch-2 sps)
Continue repeating round 4 alternating colors to size desired. For the final round omit sl st in next 2 sts at end of round.
Fasten off. Weave in ends.
Copyright 2024 Tonya Bush / Nana’s Crafty Home, LLC.
Social Media links:
Facebook: https://www.facebook.com/nanascraftyhome
Instagram: https://www.instagram.com/nanascraftyhome/
Pinterest: https://www.pinterest.com/nanascraftyhome/
YouTube: https://www.youtube.com/c/TonyaBush
Twitter: https://twitter.com/nanascraftyhome
Facebook Group: https://www.facebook.com/groups/829792060522798
Sign up for my Newsletter: https://nanascraftyhome.com/sign-up-for-my-free-newsletter/

 Hi! Thank you so much for being here! I am Tonya the designer behind Nana's Crafty Home. As a wife, mother, Nana of 9 & with 2 fur babies, my days are filled with love, laughter, hugs and yarn! Here you will find colorful and creative crochet designs for yourself or loved ones. My hope is that you will be inspired to learn and create along with me!