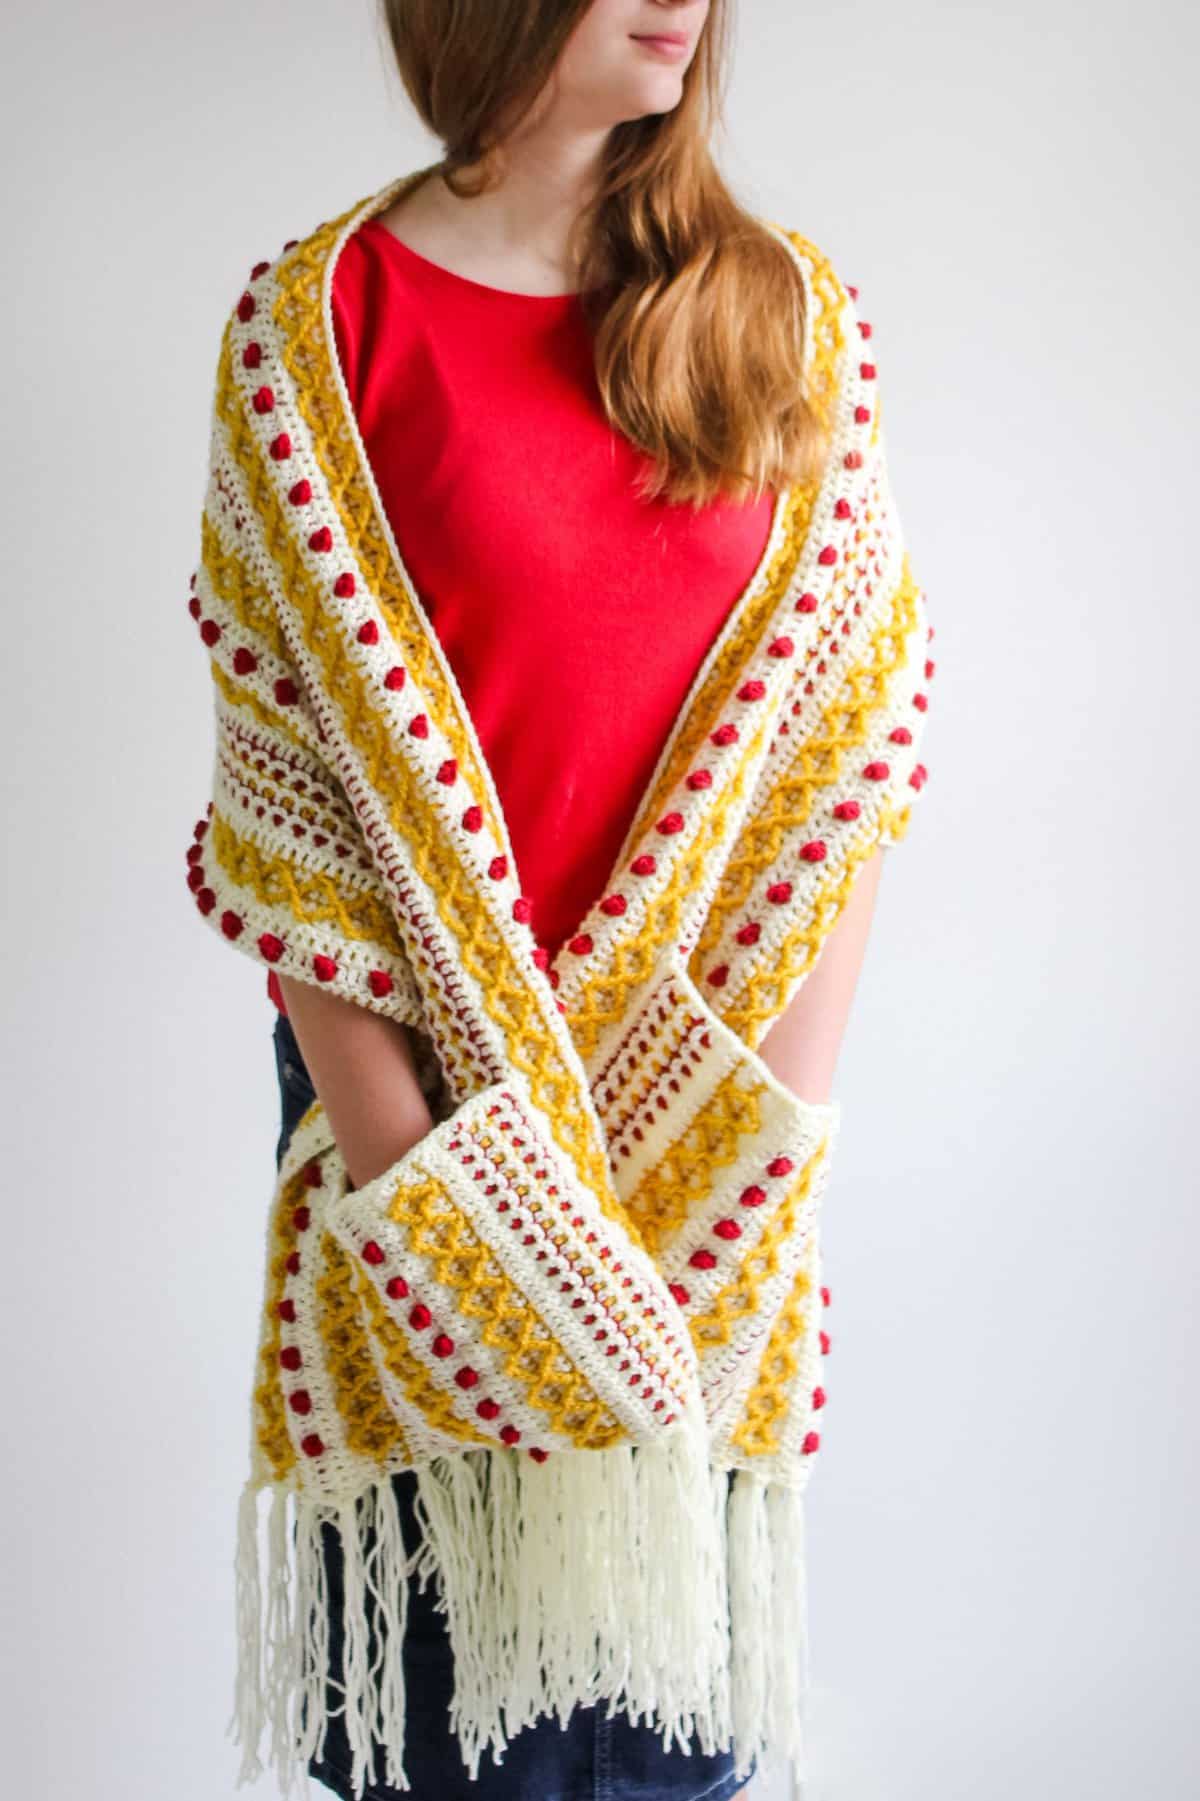
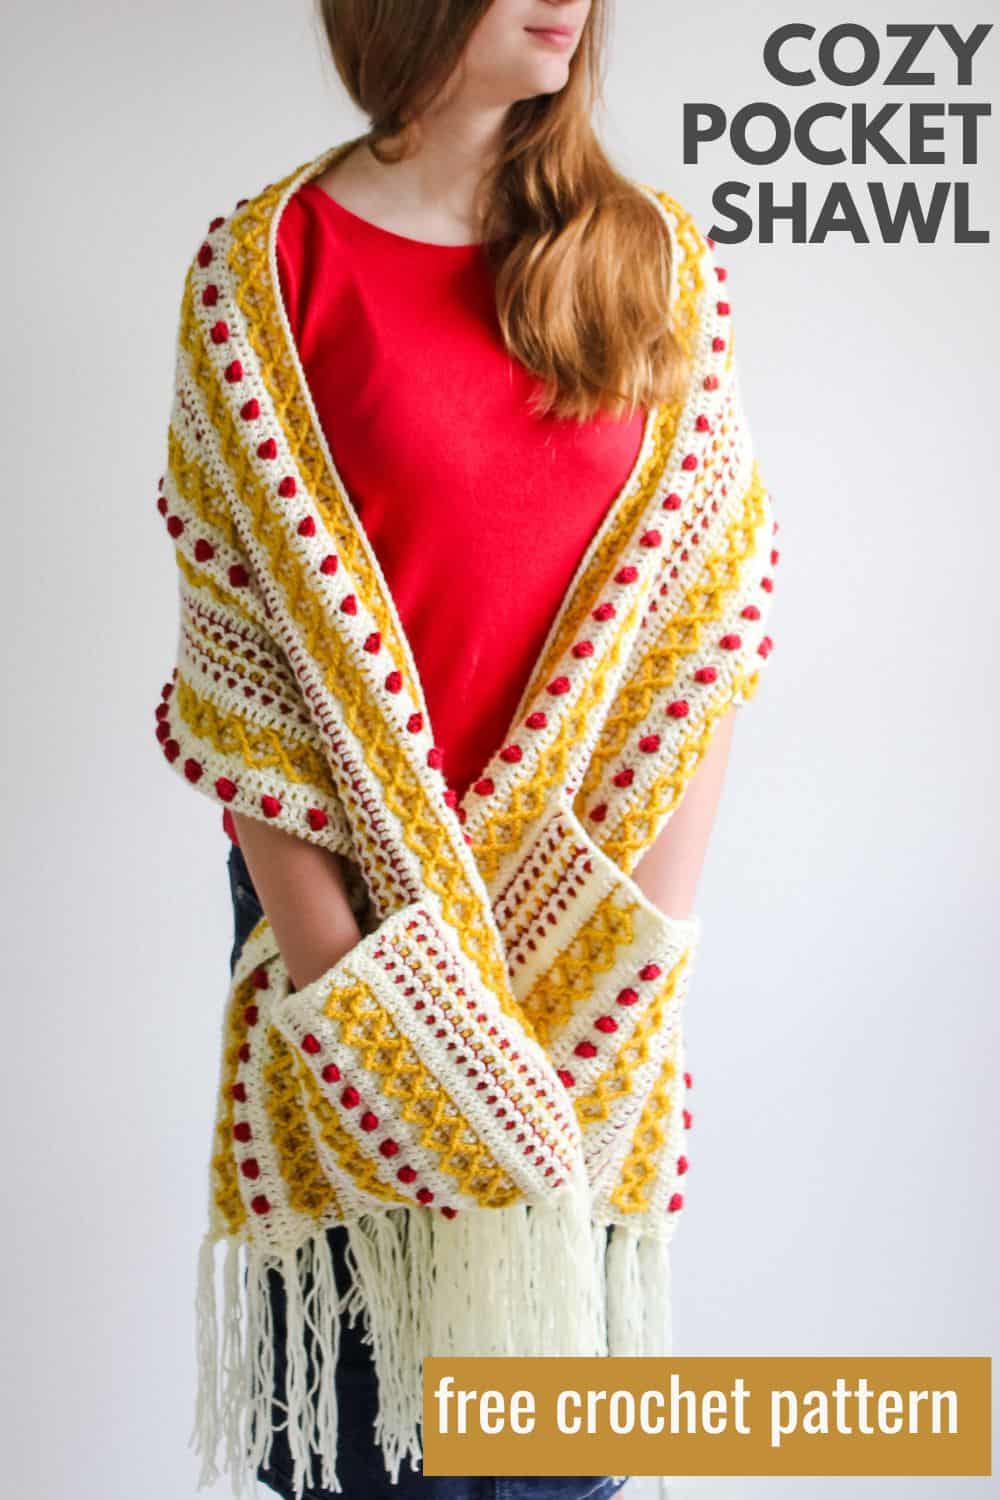
A beautiful crochet pocket shawl with gorgeous texture and bright pops of color is the perfect addition to your fall and winter wardrobe!
A crochet pocket shawl showcasing intricate textured stitch details, vibrant colors, and finished with fun boho-inspired fringe providing a touch of elegance. The pockets, which are a practical and cozy feature, provide additional warmth and function.
A practical and decorative crochet pocket shawl, with its bright, cheerful colors and detailed patterns making it a standout accessory.
This crochet pocket shawl features 3 different unique stitches worked in a repetitive stitch pattern. Once you master these stitches it will be smooth sailing for the rest of your pocket scarf. Make your own textured scarf in your favorite three colors, or it would look fantastic in a solid color as well!

How to Make the Marjorie Crochet Pocket Shawl
For the full written pattern instructions for the Marjorie Pocket Shawl pattern, scroll down below. I have the ad-free PDF available for this beautiful pocket shawl in my shop. Or, become a Lifetime Member and never pay for a PDF again!
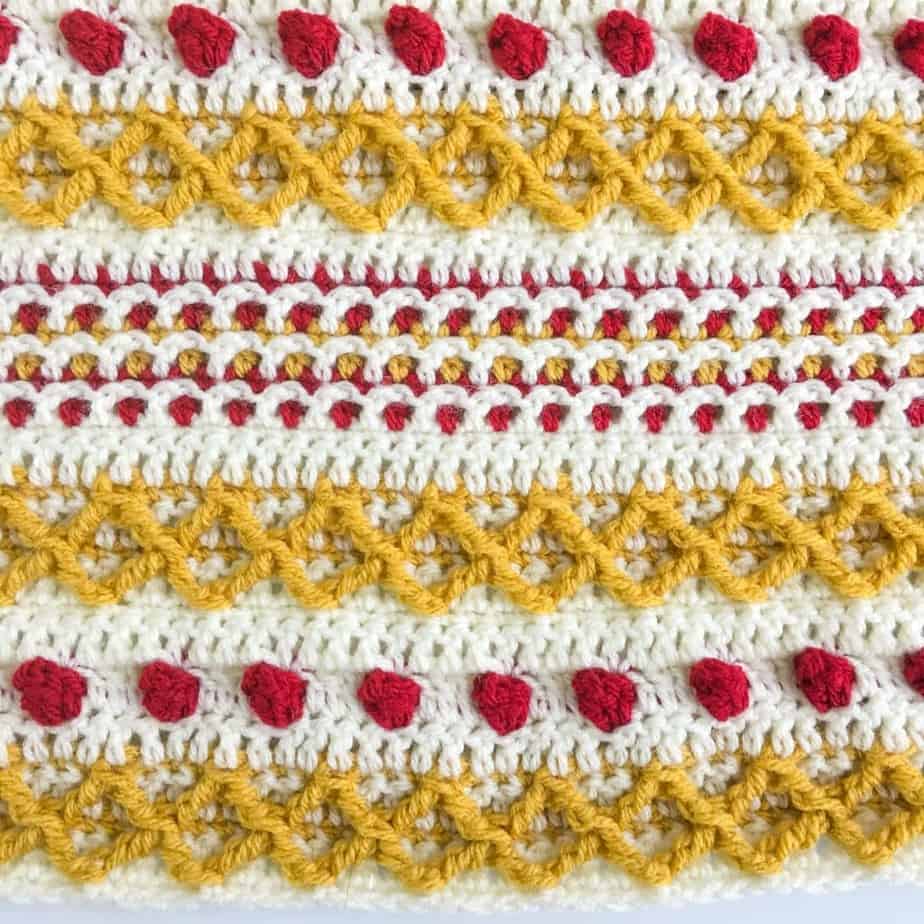
This beautifully textured pocket shawl features three unique and textured stitches – the Diamond Waffle Stitch, Interlocking Arches Stitch and the Popcorn Stitch worked in 2 colors which will show you my preferred method for using 2 different colors for this stitch. Remember to subscribe to my YouTube Channel so you never miss a new video.
The Interlocking Arches Stitch is one of my personal favorites and I also use it in one of my most popular designs – the Mosaic Medley Potholder made from a center-out square!
- 1. Start the main body of the scarf with a long chain. The finished size of scarf with provided chain and gauge is approximately 64″ long. To adjust the length of the scarf, adjust foundation chain in multiples of 4.
- 2. The individual stitches used for this crochet pocket shawl are single crochet, double crochet, front post treble crochet, front post treble 2 together and the popcorn stitch. The front post stitches are used to create the textured diamond shape. My photo and video tutorial will help you each step of the way if you have never worked this stitch before. It may become your new favorite!
- 3. I recommend switching up from a traditional ch-3 turning chain to the chainless starting dc stitch or the stacked sc stitch (my new favorite!) – beginner friendly and a great way to eliminate that “gap” at the beginning of a row!
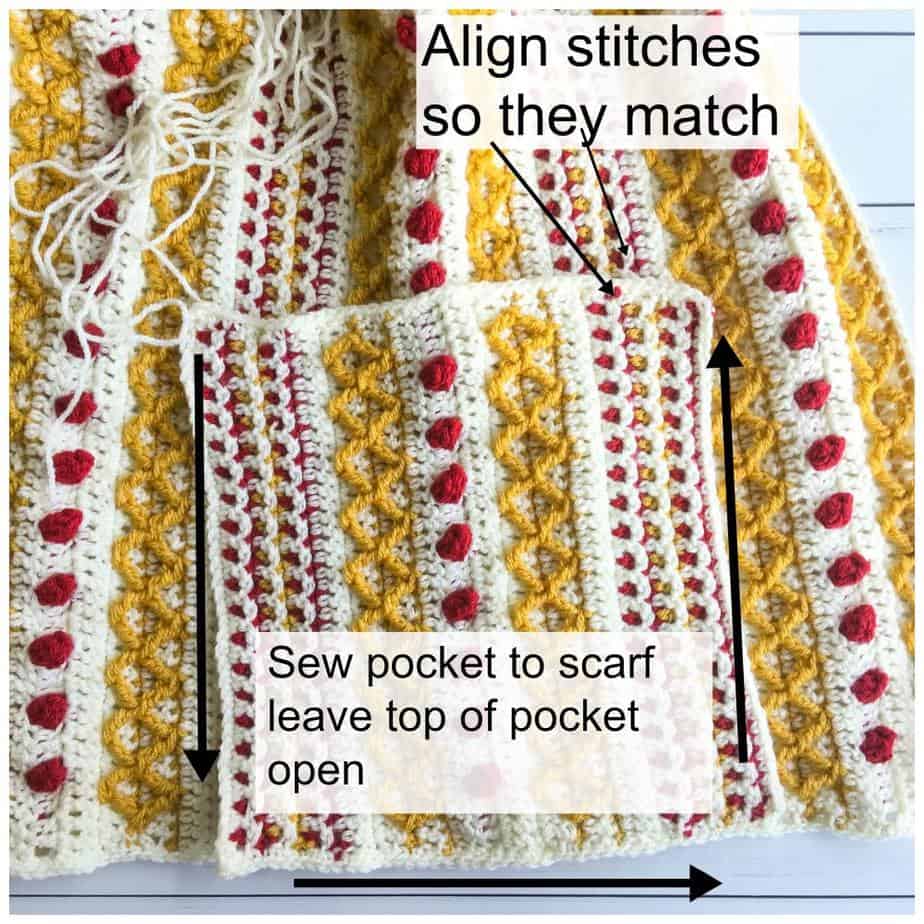
- 4. Once you have worked through the main body of the scarf you will make 2 identical pockets matching up the stitch pattern in the main body.

- 5. Sew the pockets to each bottom edge of scarf – matching up the rows of stitches on the scarf.

- 6. Optional – add fringe to the bottom edges of the scarf

All done! This pocket shawl makes for a fun and interesting crochet project. Just enough variety to keep you interested but with enough repeating to make for evenings of relaxing crochet!
I hope you enjoy making your Marjorie Pocket Shawl – I would love to see the colors you choose for yours!
Tonya
Marjorie Pocket Shawl Yarn Supplies
*This post contains affiliate links. You can click on any yarn or material highlighted to purchase. I will receive a small commission if you purchase but it won’t cost you any extra! As an Amazon Associate I earn from qualifying purchases.

I originally used Lion Brand’s Basic Stitch Premium* for this scarf as I just love the stitch definition and it really is soft and cozy! Since the Basic Stitch Premium has been discontinued, I would recommend Lion Brand Basic Stitch Anti-Pilling for a substitute. Frankly, I can’t really tell a difference between the two so perhaps that is why the premium went away. The colors I would recommend if you want to duplicate this look would be Ivory, Red Heather and Mustard color ways. This color combo looks so rich and luxurious!
If you are looking for another potential color combination or think this stitch combination would make a fantastic blanket (it does!), check out my Marjorie Blanket which is also a free crochet pattern on the blog! I also had a bit of yarn left over from my pocket scarf and worked up a hat using the same stitches – the Marjorie Hat is a stunner!
If you are using a yarn substitute for your shawl, this yarn is listed as a #4 medium worsted weight yarn. However, I feel it works up midway between a #3 light & a #4 medium. So you may have some variation in size with that change. You could certainly check gauge and change up hook sizes to get closer to my gauge if you want the same size shawl.
There are so many different color variations to choose from and I can’t wait to see what you all have chosen for your shawls!

This pattern is also available as an ad-free, printable PDF! You can purchase the individual pattern, or if you love PDFs, you might want to check out my Lifetime Membership. It’s an awesome deal! Never pay for one of my PDFs again!! (Or, scroll down for the free version!)
You may also like the following free crochet pocket scarf patterns at Nana’s Crafty Home:


- Mountain Trail Pocket Scarf with Hood free crochet pattern
- Bring Back Spring Pocket Shawl free crochet pattern made from 5 identical triangles!
- Fairytale Hooded Pocket Scarf free crochet pattern


Marjorie Pocket Crochet Scarf free crochet pattern
Pattern written in US crochet terminology
Supplies:
(4) Lion Brand Basic Stitch, Color Cream, Weight 4/Medium 13.25 oz / 830 yds (Color A)
(2) Lion Brand Basic Stitch, Color Saffron, 6.2 oz / 390 yds (Color B)
(1) Lion Brand Basic Stitch, Color Garnet, 2.5 oz / 160 yds (Color C)
- Yarn substitute: Lion Brand Basic Stitch Anti-Pilling, Weight 4/Medium 3.5 oz / 185 yd
- (5) Color Ivory (Color A)
- (3) Color Mustard (Color B)
- (1) Color Red Heather (Color C)
Crochet Hook Size H/8 (5.0 mm)
Stitch Markers
Scissors
Tapestry Needle
Approximate finished size: 18” wide x 64” long (not including fringe)
Gauge: 9 dc rows x 14 dc st = 4” x 4”
Abbreviations:
RS = right side
ch = chain
sc = single crochet
dc = double crochet
FPtr = front post treble crochet (see special stitches section below)
yo = yarn over
sk = skip
st(s) = stitch(es)
FPtr2tog = FPtr 2 together (see special stitches section below)
pc = popcorn (see special stitches section below)
Special Stitches:
FPtr (front post treble crochet): yo twice, insert hook around post of stitch indicated below, yo, pull up a loop (4 loops on hook), yo, pull through 2 loops on hook (3 loops on hook), yo, pull through 2 loops on hook (2 loops on hook), yo, pull through remaining 2 loops on hook.
FPtr2tog (front post treble 2 together): make your first incomplete FPtr by yo twice, insert hook around post of stitch indicated below, yo, pull up a loop (4 loops on hook), yo, pull through 2 loops on hook (3 loops on hook), yo, pull through 2 loops on hook (2 loops on hook) leave remaining 2 loops on hook and make 2nd incomplete FPtr by yo twice, insert hook around post of stitch indicated below, yo, pull up a loop (5 loops on hook), yo, pull through 2 loops on hook (4 loops on hook), yo, pull through 2 loops on hook (3 loops on hook), yo, pull through remaining 3 loops on hook.
pc (popcorn): 4 dc st in same st, drop loop from hook, insert hook into top of 1st dc made, place dropped loop on hook and pull loop through st. When changing colors at the end of the pc, pull new color yarn through loop to finish st.
Pattern Notes:
- Ch 3 at beginning of each row does count as a stitch.
- To resize, adjust foundation chain in multiples of 4.
- I used a Chainless Starting Double Crochet Stitch in place of the beginning chain 3 of row. My new favorite stitch for a ch-3 replacement is the stacked sc stitch – so easy!
- Stitch count remains the same throughout unless otherwise indicated.
- Scarf is formed as one long rectangle and pockets are made separately and sewn to scarf.
Recommended Tutorials
Diamond Waffle Stitch Tutorial
Interlocking Arches Stitch Tutorial
Popcorn Crochet Stitch
Chainless Starting Double Crochet Tutorial
Pattern Instructions
Scarf
With Color A, ch 248
Row 1: (RS) 1 sc in 2nd ch from hook and in each ch to end. Turn. (247)
Row 2: ch 3 (counts as first st), 1 dc in each st to end. Turn.
Fasten off Color A
Row 3: With Color B, ch 1, 1 sc in first st, FPtr around 4th sc from 2 rows below, sk 1 st on current row, 1 sc in next 3 sts, *FPtr2tog (work 1st incomplete FPtr around post of same sc as previous FPtr, sk next 3 sc st from 2 rows below and work 2nd incomplete FPtr around next sc from 2 rows below), sk 1 st in current row, 1 sc in next 3 sts,* repeat between * * to last 2 st, 1 FPtr around last sc st worked in row 1, sk next st in current row, 1 sc in last st. Turn.
Fasten off Color B
Row 4: With Color A, ch 3, 1 dc in each st to end. Turn.
Fasten off Color A
Row 5: With Color B, 1 sc in first 3 sts, *FPtr2tog (work 1st incomplete FPtr around FPtr from 2 rows below, work 2nd incomplete Fptr around next Fptr), sk 1 st in current row, 1 sc in next 3 sts,* repeat between * * to last 4 sts, FPtr2tog over last 2 FPtr sts from 2 rows below, sk 1 st in current row, 1 sc in last 3 sts. Turn.
Fasten off Color B
Row 6: With Color A, ch 3, 1 dc in each st to end. Turn.
Row 7: (Carry Color C) working with Color A, ch 3, 1 dc in next 4 sts, *with Color C, pc in next st, with color A, 1 dc in next 3 sts,* repeat between * * to last 2 sts, 1 dc in last 2 sts. Turn.
Fasten off Color C
Row 8: With Color A, ch 3, 1 dc in each st to end. Turn.
Row 9: ch 1, 1 sc in each st to end. Turn.
Row 10: ch 3, 1 dc in each st to end. Turn.
Fasten off Color A
Row 11: With Color B, repeat row 3.
Fasten off Color B
Row 12: With Color A, ch 3, 1 dc in each st to end. Turn.
Fasten off Color A
Row 13: With Color B, repeat row 5.
Fasten off Color B
Row 14: With Color A, ch 3, 1 dc in each st to end. Turn.
Row 15: ch 1, 1 sc in each st to end. Turn.
Row 16: ch 4 (counts as first dc + ch 1), sk next st, *dc in next st, ch 1, sk next st* repeat between * * to last st, dc in last st. Turn. (124 dc st + 123 ch 1 sp)
Fasten off Color A
Row 17: With Color C, ch 1, sc in same st, *dc in skipped st from previous row (place dc behind the ch 1 from the previous row), sc in next st (top of dc post from previous row),* repeat between * * to end. Turn.
Fasten off Color C
Row 18: With Color A, repeat row 16.
Fasten off Color A
Row 19: With Color B, repeat row 17.
Fasten off Color B
Row 20: With Color A, repeat row 16.
Fasten off Color A
Row 21: With Color C, repeat row 17.
Fasten off Color C
Row 22: With Color A, ch 3, 1 dc in each st to end. Turn.
Row 23: ch 1, 1 sc in each st to end. Turn.
Row 24: ch 3, 1 dc in each st to end. Turn.
Fasten off Color A
Row 25: With Color B, repeat row 3.
Fasten off Color B
Row 26: With Color A, ch 3, 1 dc in each st to end. Turn.
Fasten off Color A
Row 27: With Color B, repeat row 5.
Fasten off Color B
Row 28: With Color A, ch 3, 1 dc in each st to end. Turn.
Row 29: (Carry Color C) working with Color A, ch 3, 1 dc in next 4 sts, *with Color C, pc in next st, with color A, 1 dc in next 3 sts,* repeat between * * to last st, 1 dc in last st. Turn.
Fasten off Color C.
Row 30: ch 3, 1 dc in each st to end. Turn.
Row 31: ch 1, 1 sc in each st to end. Turn.
Row 32: ch 3, 1 dc in each st to end. Turn.
Fasten off Color A
Row 33: With Color B, ch 1, 1 sc in first st, FPtr around 4th sc from 2 rows below, sk 1 st on current row, 1 sc in next 3 sts, *FPtr2tog (work 1st incomplete FPtr around post of same sc as previous FPtr, sk next 3 sc st from 2 rows below and work 2nd incomplete FPtr around next sc from 2 rows below), sk 1 st in current row, 1 sc in next 3 sts,* repeat between * * to last 2 st, 1 FPtr around last sc st worked in previous row, sk next st in current row, 1 sc in last st. Turn.
Fasten off Color B
Row 34: With Color A, ch 3, 1 dc in each st to end. Turn.
Fasten off Color A
Row 35: With Color B, 1 sc in first 3 sts, *FPtr2tog (work 1st incomplete FPtr around FPtr from 2 rows below, work 2nd incomplete Fptr around next Fptr), sk 1 st in current row, 1 sc in next 3 sts,* repeat between * * to last 4 sts, FPtr2tog over last 2 FPtr sts from 2 rows below, sk 1 st in current row, 1 sc in last 3 sts. Turn.
Fasten off Color B
Row 36: With Color A, ch 3, 1 dc in each st to end. Turn.
Row 37: ch 1, 1 sc in each st to end. Turn.
Row 38: ch 4 (counts as first dc + ch 1), sk next st, *dc in next st, ch 1, sk next st* repeat between * * to last st, dc in last st. Turn.
Fasten off Color A
Row 39: With Color C, ch 1, sc in same st, *dc in skipped st from previous row (place dc behind the ch 1 from the previous row), sc in next st (top of dc post from previous row),* repeat between * * to end. Turn.
Fasten off Color C
Row 40: With Color A, repeat row 38.
Fasten off Color A
Row 41: With Color B, repeat row 39.
Fasten off Color B
Row 42: With Color A, repeat row 38.
Fasten off Color A
Row 43: With Color C, repeat row 39.
Fasten off Color C
Row 44: With Color A, ch 3, 1 dc in each st to end. Turn.
Row 45: ch 1, 1 sc in each st to end. Turn.
Row 46: ch 3, 1 dc in each st to end. Turn.
Fasten off Color A
Row 47: With Color B, repeat row 33.
Fasten off Color B
Row 48: With Color A, ch 3, 1 dc in each st to end. Turn.
Fasten off Color A
Row 49: With Color B, repeat row 35.
Fasten off Color B
Row 50: With Color A, ch 3, 1 dc in each st to end. Turn.
Row 51: (Carry Color C) working with Color A, ch 3, 1 dc in next 4 sts, *with Color C, pc in next st, with color A, 1 dc in next 3 sts,* repeat between * * to last st, 1 dc in last st. Turn.
Fasten off Color C
Row 52: With Color A, ch 3, 1 dc in each st to end. Turn.
Row 53: ch 1, 1 sc in each st to end. Turn.
Row 54: ch 3, 1 dc in each st to end. Turn.
Fasten off Color A
Row 55: With Color B, With Color B, ch 1, 1 sc in first st, FPtr around 4th sc from 2 rows below, sk 1 st on current row, 1 sc in next 3 sts, *FPtr2tog (work 1st incomplete FPtr around post of same sc as previous FPtr, sk next 3 sc st from 2 rows below and work 2nd incomplete FPtr around next sc from 2 rows below), sk 1 st in current row, 1 sc in next 3 sts,* repeat between * * to last 2 st, 1 FPtr around last sc st worked in row 1, sk next st in current row, 1 sc in last st. Turn.
Fasten off Color B
Row 56: With Color A, ch 3, 1 dc in each st to end. Turn.
Fasten off Color A
Row 57: With Color B, 1 sc in first 3 sts, *FPtr2tog (work 1st incomplete FPtr around FPtr from 2 rows below, work 2nd incomplete Fptr around next Fptr), sk 1 st in current row, 1 sc in next 3 sts,* repeat between * * to last 4 sts, FPtr2tog over last 2 FPtr sts from 2 rows below, sk 1 st in current row, 1 sc in last 3 sts. Turn.
Fasten off Color B – Do not turn!
Row 58: With RS facing, Attach Color A to 1st st of row 57, ch 1, 1 sc in each st to end.
Fasten off, weave in ends.
Pockets (make 2)
With Color A, ch 40
Row 1: (RS) 1 sc in 2nd ch from hook and in each ch to end. Turn. (39)
Row 2: ch 4 (counts as first dc + ch 1), sk next st, *dc in next st, ch 1, sk next st* repeat between * * to last st, dc in last st. Turn. (20 dc st + 19 ch 1 sp)
Fasten off Color A
Row 3: With Color C, ch 1, sc in same st, *dc in skipped st from previous row (place dc behind the ch 1 from the previous row), sc in next st (top of dc post from previous row),* repeat between * * to end. Turn.
Fasten off Color C
Row 4: With Color A, repeat row 2.
Fasten off Color A
Row 5: With Color B, repeat row 3
Fasten off Color B
Row 6: With Color A, repeat row 2.
Fasten off Color A
Row 7: With Color C, repeat row 3
Fasten off Color C
Row 8: With Color A, ch 3, 1 dc in each st to end. Turn.
Row 9: ch 1, 1 sc in each st to end. Turn.
Row 10: ch 3, 1 dc in each st to end. Turn.
Fasten off Color A
Row 11: With Color B, ch 1, 1 sc in first st, FPtr around 4th sc from 2 rows below, sk 1 st on current row, 1 sc in next 3 sts, *FPtr2tog (work 1st incomplete FPtr around post of same sc as previous FPtr, sk next 3 sc st from 2 rows below and work 2nd incomplete FPtr around next sc from 2 rows below), sk 1 st in current row, 1 sc in next 3 sts,* repeat between * * to last 2 st, 1 FPtr around last sc st worked in row 1, sk next st in current row, 1 sc in last st. Turn.
Fasten off Color B
Row 12: With Color A, ch 3, 1 dc in each st to end. Turn.
Fasten off Color A
Row 13: With Color B, 1 sc in first 3 sts, *FPtr2tog (work 1st incomplete FPtr around FPtr from 2 rows below, work 2nd incomplete Fptr around next Fptr), sk 1 st in current row, 1 sc in next 3 sts,* repeat between * * to last 4 sts, FPtr2tog over last 2 FPtr sts from 2 rows below, sk 1 st in current row, 1 sc in last 3 sts. Turn.
Fasten off Color B
Row 14: With Color A, ch 3, 1 dc in each st to end. Turn.
Row 15: (Carry Color C) working with Color A, ch 3, 1 dc in next 4 sts, *with Color C, pc in next st, with color A, 1 dc in next 3 sts,* repeat between * * to last st, 1 dc in last st. Turn.
Fasten off Color C
Row 16: ch 3, 1 dc in each st to end. Turn.
Row 17: ch 1, 1 sc in each st to end. Turn.
Row 18: ch 3, 1 dc in each st to end. Turn.
Fasten off Color A
Row 19: With Color B, ch 1, 1 sc in first st, FPtr around 4th sc from 2 rows below, sk 1 st on current row, 1 sc in next 3 sts, *FPtr2tog (work 1st incomplete FPtr around post of same sc as previous FPtr, sk next 3 sc st from 2 rows below and work 2nd incomplete FPtr around next sc from 2 rows below), sk 1 st in current row, 1 sc in next 3 sts,* repeat between * * to last 2 st, 1 FPtr around last sc st worked in row 1, sk next st in current row, 1 sc in last st. Turn.
Fasten off Color B
Row 20: With Color A, ch 3, 1 dc in each st to end. Turn.
Fasten off Color A
Row 21: With Color B, 1 sc in first 3 sts, *FPtr2tog (work 1st incomplete FPtr around FPtr from 2 rows below, work 2nd incomplete Fptr around next Fptr), sk 1 st in current row, 1 sc in next 3 sts,* repeat between * * to last 4 sts, FPtr2tog over last 2 FPtr sts from 2 rows below, sk 1 st in current row, 1 sc in last 3 sts. Turn.
Fasten off Color B
Row 22: With Color A, ch 3, 1 dc in each st to end. Turn.
Row 23: ch 1, 1 sc in each st to end. Turn.
Row 24: ch 4 (counts as first dc + ch 1), sk next st, *dc in next st, ch 1, sk next st* repeat between * * to last st, dc in last st. Turn.
Fasten off Color A
Row 25: With Color C, ch 1, sc in same st, *dc in skipped st from previous row (place dc behind the ch 1 from the previous row), sc in next st (top of dc post from previous row),* repeat between * * to end. Turn.
Fasten off Color C
Row 26: With Color A, repeat row 24.
Fasten off Color A
Row 27: With Color B, repeat row 25.
Fasten off Color B
Row 28: With Color A, repeat row 24.
Fasten off Color A
Row 29: With Color C, repeat row 25.
Fasten off Color C
Row 30: Attach Color A to 1st st of row 29, ch 1, 1 sc in each st to end.
Do not fasten off, continue working along top (or bottom) edge of pocket, sc evenly along edge to end.
Fasten off, leave a long tail approximately 60” for sewing pocket to scarf.
Attach Color A to bottom (or top) edge of pocket, sc evenly along edge to end.
Fasten off. Weave in ends (other than long end left for sewing).
Place pocket on RS bottom edge of each end of the scarf with RS of pocket facing out. Align stitches of the pocket so that they match the direction of the stitches on the scarf underneath. Use stitch markers to hold in place if needed.
With long end left for sewing, sew pocket to scarf using the back loop of each stitch from the pocket from top left corner to top right corner. Leave top portion of pocket open and unsewn.
Fringe
Cut 160 strands of Color A approx 16” long. With the RS of the scarf facing up, start at bottom corner and attach them in groups of 4 strands with 1” spacing between fringe along the entire bottom edge of each side of the scarf.
Copyright 2022 Tonya Bush/Nana’s Crafty Home
Social Media links:
Facebook: https://www.facebook.com/nanascraftyhome
Instagram: https://www.instagram.com/nanascraftyhome/
Pinterest: https://www.pinterest.com/nanascraftyhome/
YouTube: https://www.youtube.com/c/TonyaBush
Twitter: https://twitter.com/nanascraftyhome
Facebook Group: https://www.facebook.com/groups/829792060522798
Sign up for my Newsletter: https://nanascraftyhome.com/sign-up-for-my-free-newsletter/
If you love making crochet pocket shawls, check out this list of 25+ free pocket shawl patterns!

Copyright 2024 Tonya Bush/Nana’s Crafty Home
Social Media links:
Facebook: https://www.facebook.com/nanascraftyhome
Instagram: https://www.instagram.com/nanascraftyhome/
Pinterest: https://www.pinterest.com/nanascraftyhome/
YouTube: https://www.youtube.com/c/TonyaBush
Twitter: https://twitter.com/nanascraftyhome
Facebook Group: https://www.facebook.com/groups/829792060522798
Sign up for my Newsletter: https://nanascraftyhome.com/sign-up-for-my-free-newsletter/
 Hi! Thank you so much for being here! I am Tonya the designer behind Nana's Crafty Home. As a wife, mother, Nana of 9 & with 2 fur babies, my days are filled with love, laughter, hugs and yarn! Here you will find colorful and creative crochet designs for yourself or loved ones. My hope is that you will be inspired to learn and create along with me!