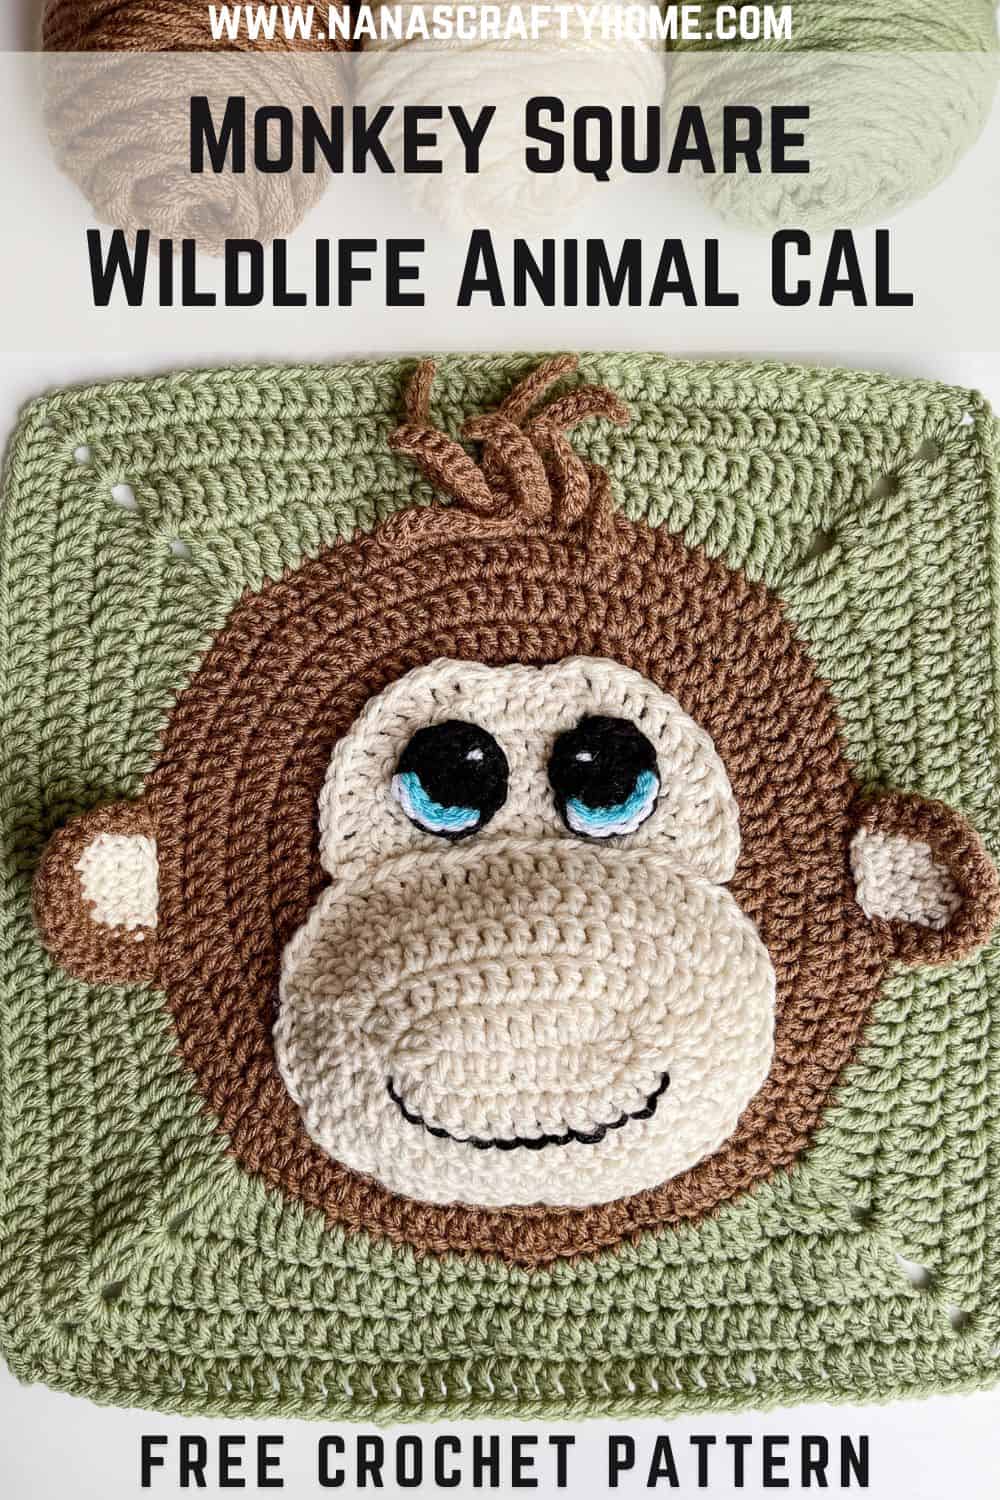
This monkey free crochet pattern is part of a wildlife animal blanket and an adorable large granny square free crochet pattern by Nana’s Crafty Home!
This Monkey Square is Part 8 of the Wildlife Animal Blanket CAL. This is a year long crochet a long event featuring wildlife animals.
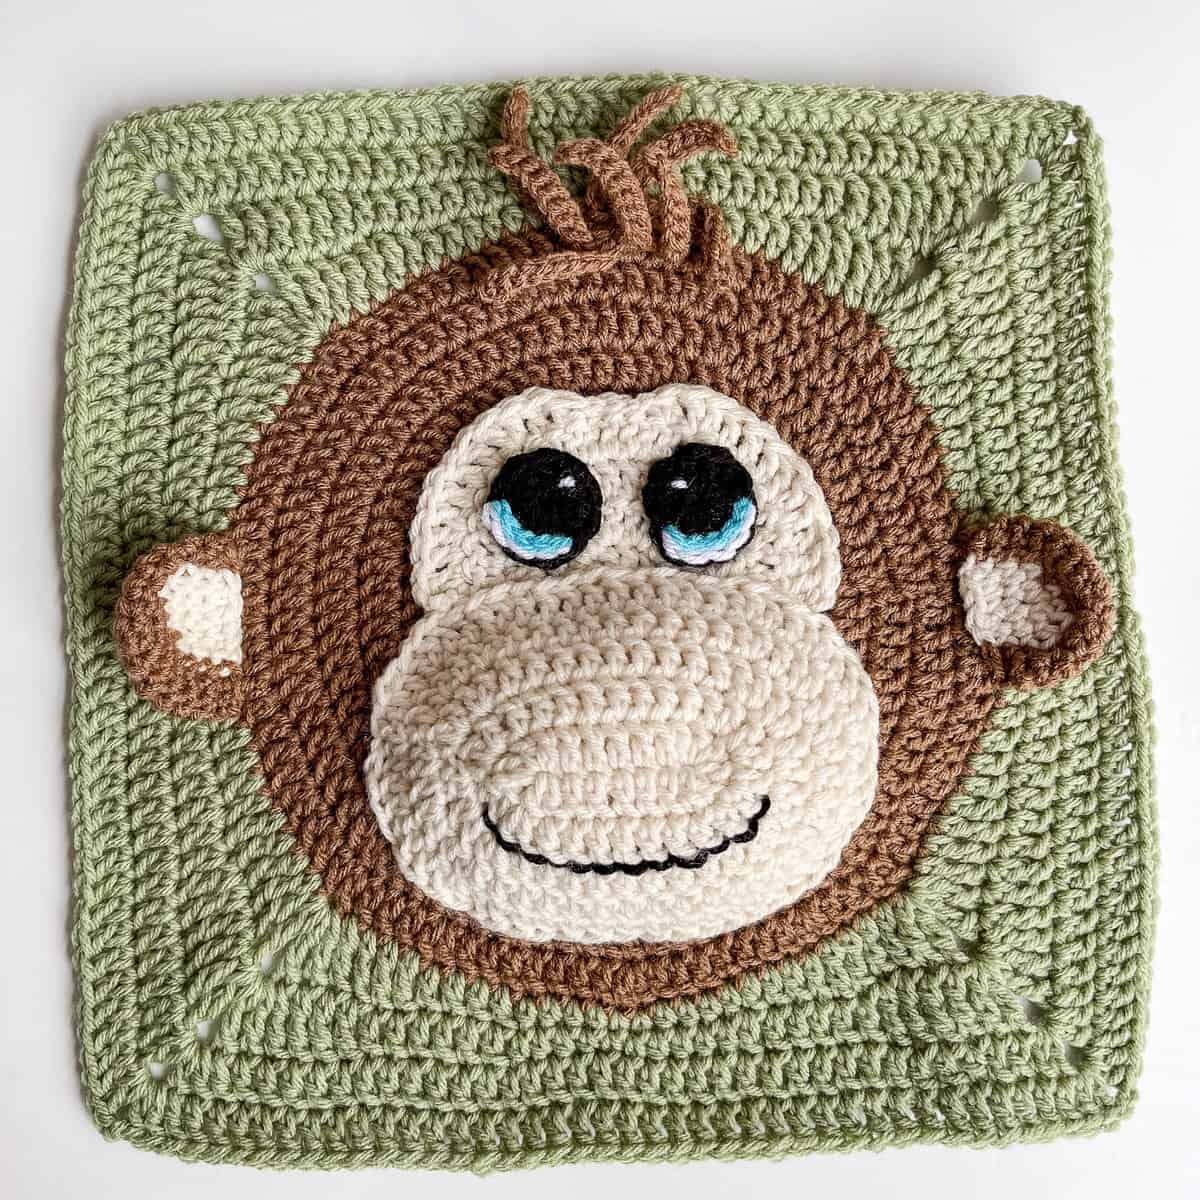
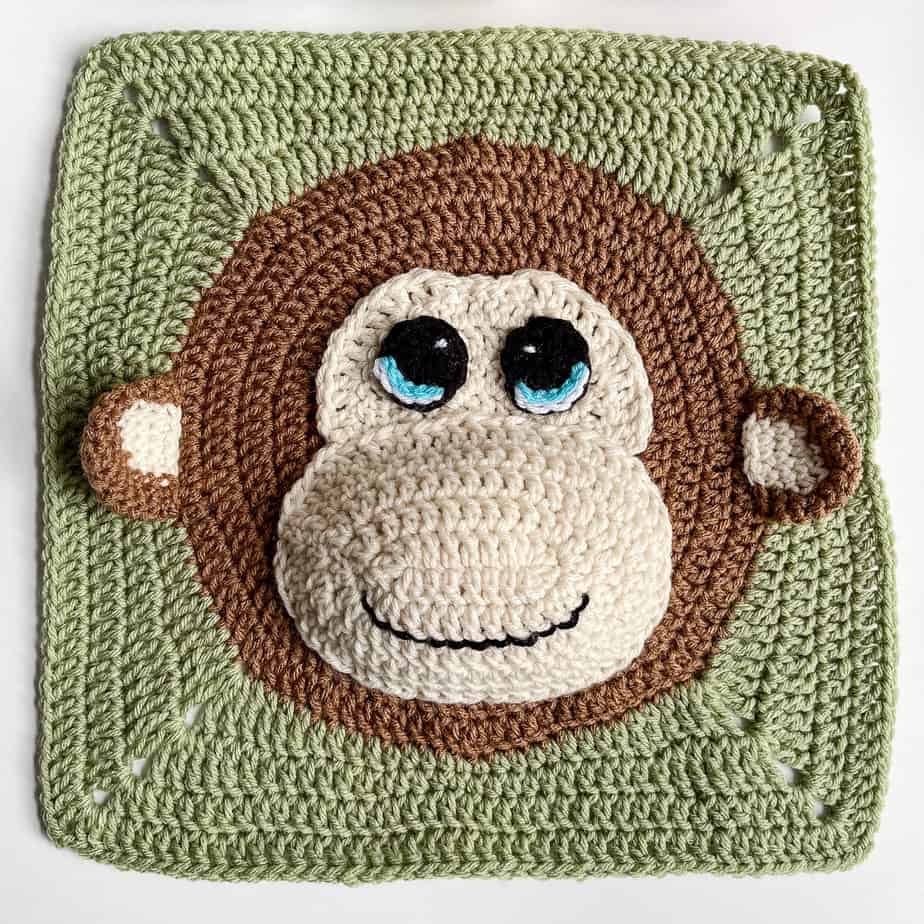
I really love how simple and sweet this monkey square turned out to be. So adorable with his sweet smiling expression!
This free crochet monkey granny square is part of the Wildlife Animal Blanket CAL and if you would like all the details on this year-long event you can find it on the blog.
When I first began this CAL, I didn’t have all the squares planned out for the year and asked for animal suggestions from my readers and monkey was one of the top picks. It really isn’t surprising since monkeys are perfect for babies and little ones. My grandkids love watching the old original Little Rascals black & white episodes and their favorite ones are with baby Spanky and a little monkey pal. So cute!

Monkey Free Crochet Pattern Details
These “circle in a square” squares begin as a double crochet circle and then the circle is squared off for easy joining. The main portion of the circle in a square uses all beginner-friendly crochet stitches – single, half double, double crochet stitch and treble stitches.
The circle portion of the monkey’s face is worked in all brown yarn and then the circle is squared off with green to finish.
This adorable monkey square would make a lovely blanket for a baby as well. If you wanted to make a baby size blanket from the center square, simply work more rounds of double crochet to the size desired. What a sweet baby blanket this cute monkey would make!
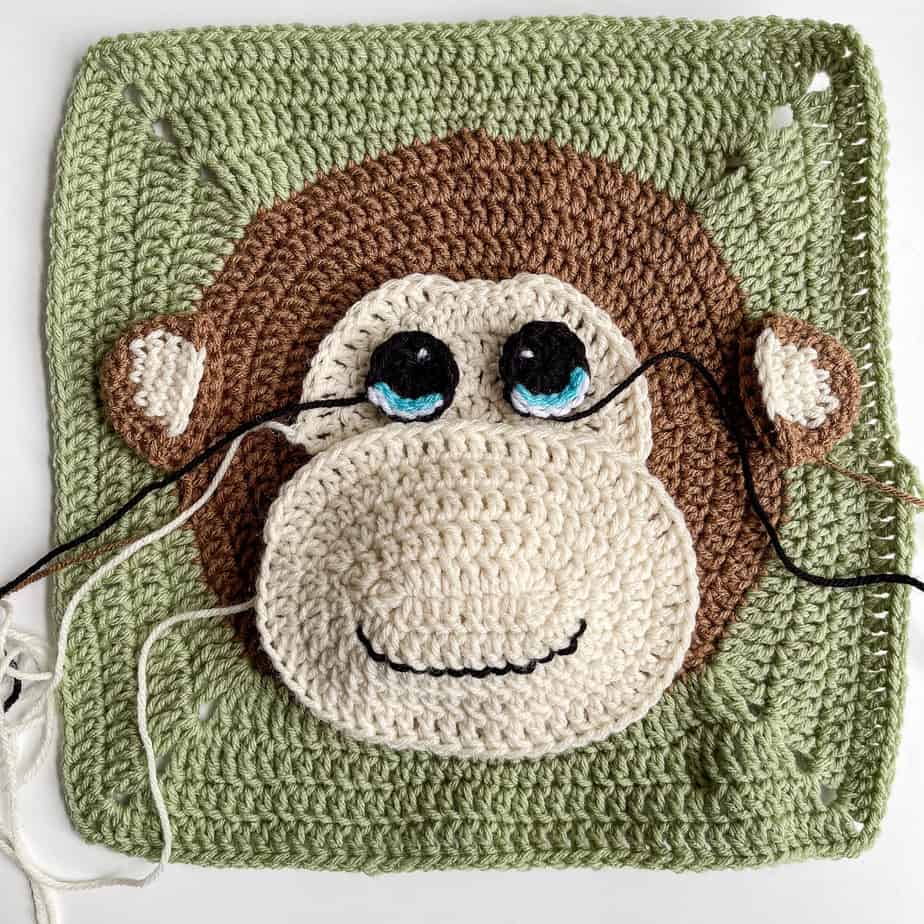
Once the square is complete, you will crochet the applique pieces separately – ears, eyes, face portion for behind the eyes, and the muzzle. Once he was complete I decided he needed a little something extra so I added the little tuft of fur at the top of his head but he looks really cute without it as well!
This is just the third square to incorporate stuffing. The Giraffe and Hippo Squares also have some stuffing to give depth and character to the squares.
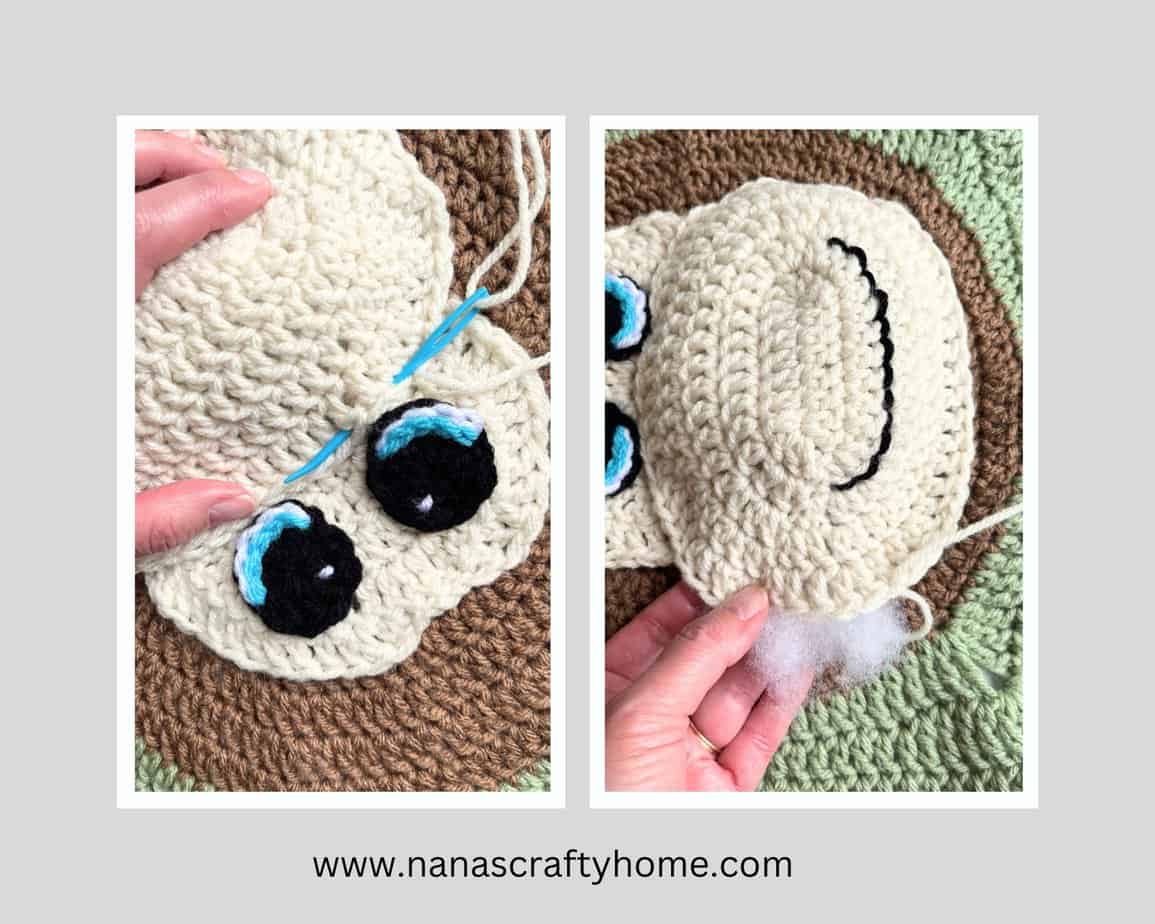
We are adding stuffing to the monkey’s muzzle to help define and provide fun texture for baby. The stuffing is completely optional! The stuffing is added as you are sewing the muzzle to the front of the square.
This square works up to a large 14″ x 14″ square. Perfect size for a matching pillow!
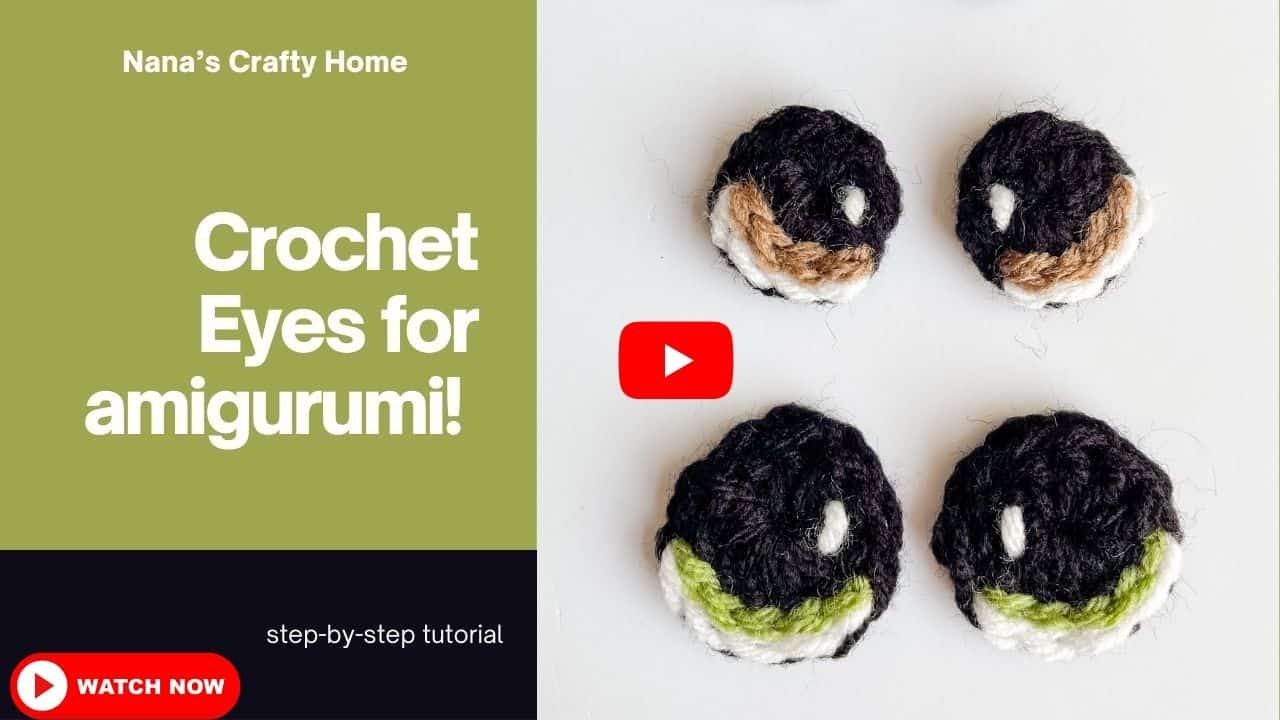
Instead of using plastic safety eyes for my monkey crochet pattern, I am using my single crochet cartoon Crochet Eyes. These are the same crochet eyes I have used for my previous blankets and I just love how much personality they add! I have a complete photo and video tutorial for the crochet eyes to help you make them as well.

I am going to have to get a little more creative if I want to fit all of these squares in one photo! They look so adorable together – I can’t wait to put them all together into my blanket. The grandkids are all going to fight for this one!
My monkey free crochet pattern and the entire Wildlife Animal Blanket use Red Heart Super Saver* which is a medium worsted weight acrylic yarn. Very economical and with plentiful color options! You can certainly substitute your favorite worsted weight yarn – Hobby Lobby’s I Love This Yarn!, Red Heart With Love, Paintbox Simply Aran, Vanna’s Choice, Big Twist Value, Caron Simply Soft, Caron One Pound and so many more! Raid your yarn stash – even mix and match.
*This post contains affiliate links. You can click on any yarn or material highlighted to purchase. I will receive a small commission if you purchase but it won’t cost you any extra! As an Amazon Associate I earn from qualifying purchases.
Be sure to come back for September’s Elephant Square!
You can purchase the ad-free PDF of the Monkey crochet square for a small fee. You can purchase the individual pattern, or if you love PDFs, you might want to check out my Lifetime Membership. It’s an awesome deal! Never pay for one of my PDFs again!!

Purchase the ad-free pdf of my Monkey Square for a small fee. Thank you so much for supporting my work!


If you would like daily crochet inspiration be sure to follow me on Facebook, Instagram, Pinterest, YouTube, Twitter and Tumblr!
To get notified of my free crochet patterns and future giveaways, sign up for my newsletter. I never share or sell your information to third parties — it stays private!
You may also like the following free crochet patterns by Nana’s Crafty Home:

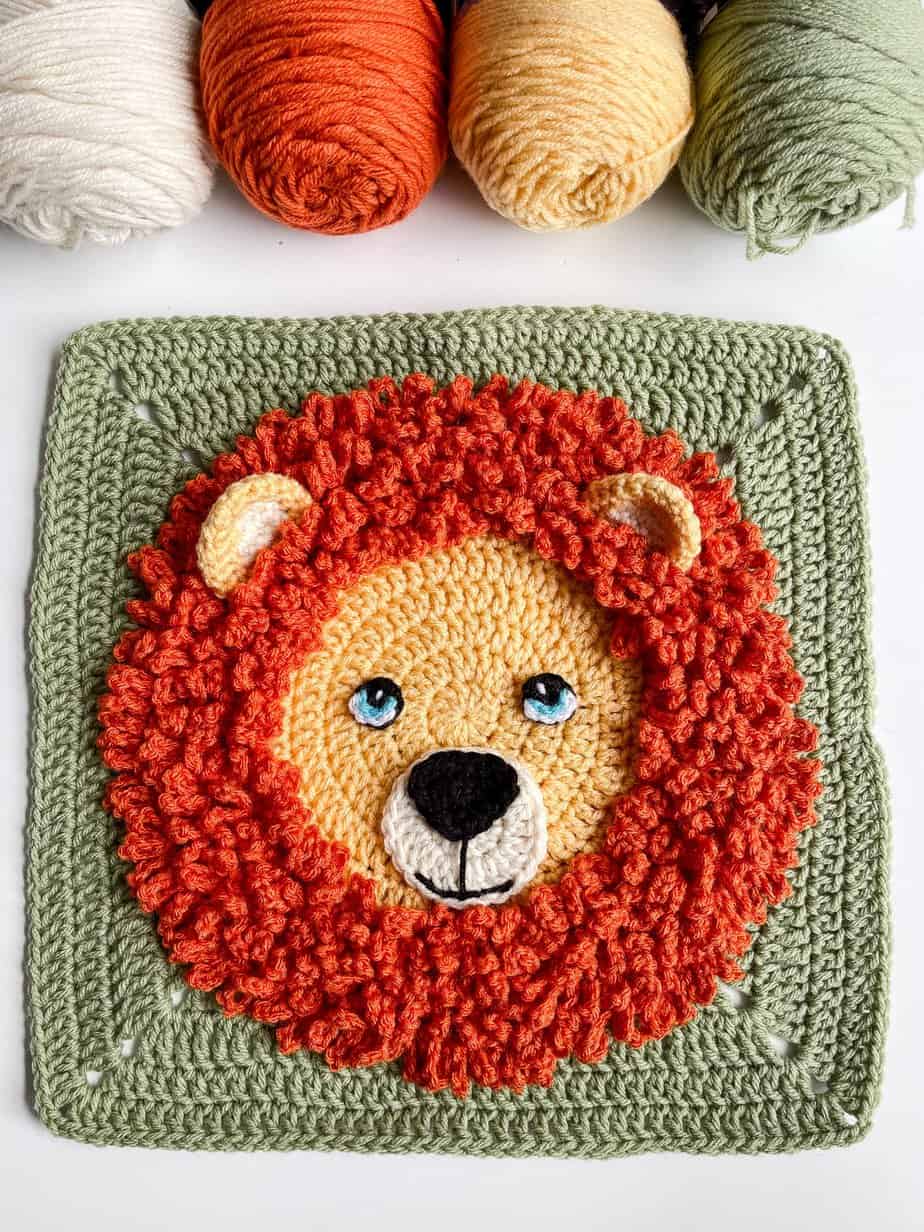
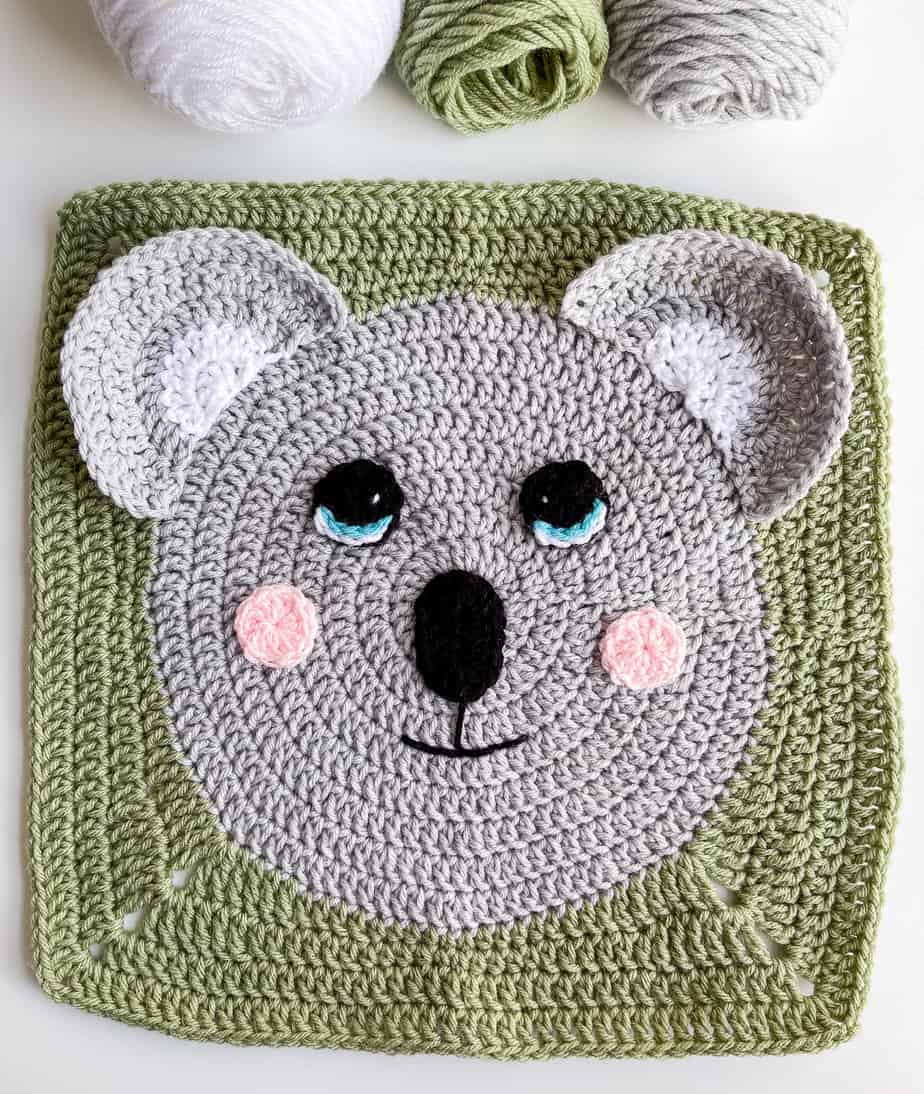
- 1. Hippo Crochet Square free crochet pattern
- 2. Lion Crochet Square free crochet pattern
- 3. Koala Crochet Square free crochet pattern
Monkey Square Free Crochet Pattern
Pattern written in US crochet terminology
Supplies:
Red Heart Super Saver Weight 4 / Medium (100% acrylic)
- Cafe Latte 2.2 oz / 115 yds (Brown)
- Frosty Green 1.5 oz / 80 yds (Green)
- Aran 0.8 oz / 42 yds (Cream)
- Black 0.2 oz / 11 yds (Black)
- Turqua 0.01 oz / 1 yard (Blue)
- White 0.1 oz / 6 yards (White)
Size I (5.5 mm) crochet hook
Small amount of polyfil to stuff muzzle
Scissors
Stitch marker (optional)
Tapestry needle
Approximate finished size: 14” square
Gauge: First 4 rounds = 4” / 4 dc sts = 1”
Abbreviations:
- MC = magic circle
- ch(s) = chain(s)
- sc = single crochet
- hdc = half double crochet
- dc = double crochet
- tr = treble
- sp = space
- st(s) = stitch(es)
- sk = skip
- sl st = slip stitch
- WS = wrong side
- RS = right side
Pattern Notes:
- Ch 3 at beginning of each round counts as first dc stitch.
- Ears, eyes, muzzle, fur and base for eyes are worked separately and then sewn to front of panel.
Recommended Tutorial:
Crochet Eyes in 3 Sizes Tutorial
Pattern Instructions
With brown, make MC.
Round 1: Ch 3, 11 dc in MC, join with sl st in top of ch-3 and tighten ring. (12)
Round 2: Ch 3, 1 dc in same st, 2 dc in each st around, sl st in top of ch-3. (24)
Round 3: Ch 3, 1 dc in same st, 1 dc in next st, *2 dc in next st, 1 dc in next st,* repeat from * to * to end, sl st in top of ch-3. (36)
Round 4: Ch 3, 2 dc in next st, *1 dc in next 2 sts, 2 dc in next st,* repeat from * to * to last st, 1 dc in last st, sl st in top of ch-3. (48)
Round 5: Ch 3, 1 dc in same st, 1 dc in next 3 sts, *2 dc in next st, 1 dc in next 3 sts,* repeat from * to * to end, sl st in top of ch-3. (60)
Round 6: Ch 3, 1 dc in next st, 2 dc in next st, *1 dc in next 4 sts, 2 dc in next st,* repeat from * to * to last 2 sts, 1 dc in last 2 sts, sl st in top of ch-3. (72)
Round 7: Ch 3, 1 dc in same st, 1 dc in next 5 sts, *2 dc in next st, 1 dc in next 5 sts,* repeat from * to * to end, sl st in top of ch-3. (84)
Round 8: Ch 3, 1 dc in next 2 sts, 2 dc in next st, *1 dc in next 6 sts, 2 dc in next st,* repeat from * to * to last 3 sts, 1 dc in last 3 sts, sl st in top of ch-3. (96)
Round 9: Ch 3, 1 dc in same st, 1 dc in next 7 sts, *2 dc in next st, 1 dc in next 7 sts,* repeat from * to * to end, sl st in top of first st. (108)
Fasten off brown.
Round 10: Join green in first st, ch 1, sc in same st, sc in next st, hdc in next 4 sts, dc in next 4 sts, tr in next 4 sts, *(2 tr, ch 2, 2 tr) in next st, tr in next 4 sts, dc in next 4 sts, hdc in next 4 sts, sc in next 2 sts, hdc in next 4 sts, dc in next 4 sts, tr in next 4 sts,* repeat from * to * two times; (2 tr, ch 2, 2 tr) in next st, tr in next 4 sts, dc in next 4 sts, hdc in next 4 sts, sl st in first st. (120 + 4 ch-2 corner sp)
Round 11: Ch 1, sc in same st, sc in next st, hdc in next 4 sts, dc in next 6 sts, tr in next 4 sts, *(2 tr, ch 2, 2 tr) in ch-2 sp, tr in next 4 sts, dc in next 6 sts, hdc in next 4 sts, sc in next 2 sts, hdc in next 4 sts, dc in next 6 sts, tr in next 4 sts,* repeat from * to * two times; (2 tr, ch 2, 2 tr) in ch-2 sp, tr in next 4 sts, dc in next 6 sts, hdc in next 4 sts, sl st in first st. (136 + 4 ch-2 corner sp)
Round 12 – 13: Ch 3 (counts as first st), *dc in each st to next ch-2 sp, (2 dc, ch 2, 2 dc) in ch-2 sp,* repeat from * to * to end, sl st top of ch-3. (152 round 12, 168 round 13)
Fasten off. Weave in ends.
Ears (make 2)
Round 1: (RS) With brown, make a MC, ch 1, 6 sc in MC. (6)
Round 2: 2 sc in each st. (12)
Round 3: *2 sc in next st, 1 sc in next st,* repeat from * to * to end. (18)
Round 4: 1 sc in next 3 sts, switch to cream, 1 sc in next 3 sts, switch to brown, 1 sc in next 12 sts. (18)
Round 5: 1 sc in next 2 sts, switch to cream, 1 sc in next 5 sts, switch to brown, 1 sc in next 11 sts. (18)
Round 6 – 7: Repeat round 5.
Fasten off, leaving a long tail for sewing.
Eyes (make 2)
With black, make MC.
Round 1: (RS) Ch 3, 10 dc in MC, join with sl st in top of ch-3, tighten ring. (11)
Fasten off black, leaving a long tail for sewing.
Row 2: Join blue in first st of round 1, sl st in next 5 sts.
Fasten off blue.
Row 3: Join white in first st of round 1 (behind slip stitches of row 2), sl st in next 5 sts.
Fasten off white, leaving a long tail for embroidery of eye.
With long tail of white, embroider center of eye.
Weave in remaining ends not left for sewing.
Muzzle
With cream, ch 10.
Round 1: (RS) 2 dc in fourth ch from hook (skipped chs count as first st), dc in next 5 chs, 6 dc in last ch, rotate work to begin working in unused loop of foundation ch; 1 dc in next 5 loops, 3 dc in last loop, sl st in top of skipped chs. (22)
Round 2: Ch 3, dc in same st, 2 dc in next st, dc in next 8 sts, 2 dc in next 3 sts, dc in next 8 sts, 2 dc in last st, sl st top of ch-3. (28)
Round 3: Ch 3, dc in same st, 2 dc in next 2 sts, dc in next 9 sts, 2 dc in next 5 sts, dc in next 9 sts, 2 dc in next 2 sts, sl st top of ch-3. (38)
Round 4: Ch 3, dc in same st, (1 dc in next st, 2 dc in next st) twice, dc in next 11 sts, (2 dc in next st, 1 dc in next st) 4 times, 2 dc in next st, dc in next 9 sts, (2 dc in next st, 1 dc in next st) twice, sl st top of ch-3. (48)
Round 5: Ch 3, dc in same st, (1 dc in next 2 sts, 2 dc in next st) twice, dc in next 13 sts, (2 dc in next st, 1 dc in next 2 sts) 4 times, 2 dc in next st, dc in next 9 sts, (2 dc in next st, 1 dc in next 2 sts) twice, sl st top of ch-3. (58)
Leaving a long tail for sewing, fasten off.
With a long length of black, embroider smile on muzzle between rounds 2 and 3 on RS of muzzle.
Base for eyes
With cream, make a MC.
Row 1: (RS) Ch 3, 5 dc in MC. Tighten circle. Turn. (6)
Row 2: Ch 3, dc in same st, 2 dc in each st to end. Turn. (12)
Row 3: Ch 3, dc in same st, *1 dc in next st, 2 dc in next st,* repeat from * to * 4 times, dc in last st. Turn. (18)
Row 4: Ch 3, dc in same st, *1 dc in next 2 sts, 2 dc in next st,* repeat from * to * 4 times, dc in last 2 sts. Turn. (24)
Row 5: Ch 3, dc in same st, *1 dc in next 3 sts, 2 dc in next st,* repeat from * to * 1 time, dc in next st, sl st in next 4 sts, dc in next 2 sts, 2 dc in next st, repeat from * to * 1 time, dc in last 3 sts. (29)
Fur
With brown, ch 10.
Row 1: Sl st in second ch from hook, (ch 10, sl st in second ch from hook and in each ch, sl st in next st) 8 times. (8 fringes)
Fasten off, leaving a tail for sewing.
Assembly
Note: Sew following pieces to RS of square.
With long tails, sew eyes to base for eyes.
With long tail, sew base with eyes to face.
With long tail, sew muzzle to face. Note: Slightly stuff prior to sewing to help keep shape, then stuff completely just before sewing is complete.
With long tails, sew ears to each side of face. Note: Ears will cup slightly inward so take that into account when sewing.
Fold ends of fur together and with long tail, sew fur to top of face.
Weave in remaining ends.
Copyright 2024 Tonya Bush/Nana’s Crafty Home
Social Media links:
Facebook: https://www.facebook.com/nanascraftyhome
Instagram: https://www.instagram.com/nanascraftyhome/
Pinterest: https://www.pinterest.com/nanascraftyhome/
YouTube: https://www.youtube.com/c/TonyaBush
X (Formerly Twitter): https://twitter.com/nanascraftyhome
Facebook Group: https://www.facebook.com/groups/829792060522798
Sign up for my Newsletter: https://nanascraftyhome.com/sign-up-for-my-free-newsletter/
 Hi! Thank you so much for being here! I am Tonya the designer behind Nana's Crafty Home. As a wife, mother, Nana of 9 & with 2 fur babies, my days are filled with love, laughter, hugs and yarn! Here you will find colorful and creative crochet designs for yourself or loved ones. My hope is that you will be inspired to learn and create along with me!