Introducing a cozy crochet Granny Square Bag: A Bulky Crochet Pattern with Faux Fur Flair!
Looking for your next crochet project that’s both stylish and functional? Say hello to the Posh Panache Granny Square Tote Bag! This stunning design combines the timeless charm of granny squares with the modern elegance of faux fur trim, resulting in a chic and sturdy tote that’s perfect for everyday use.
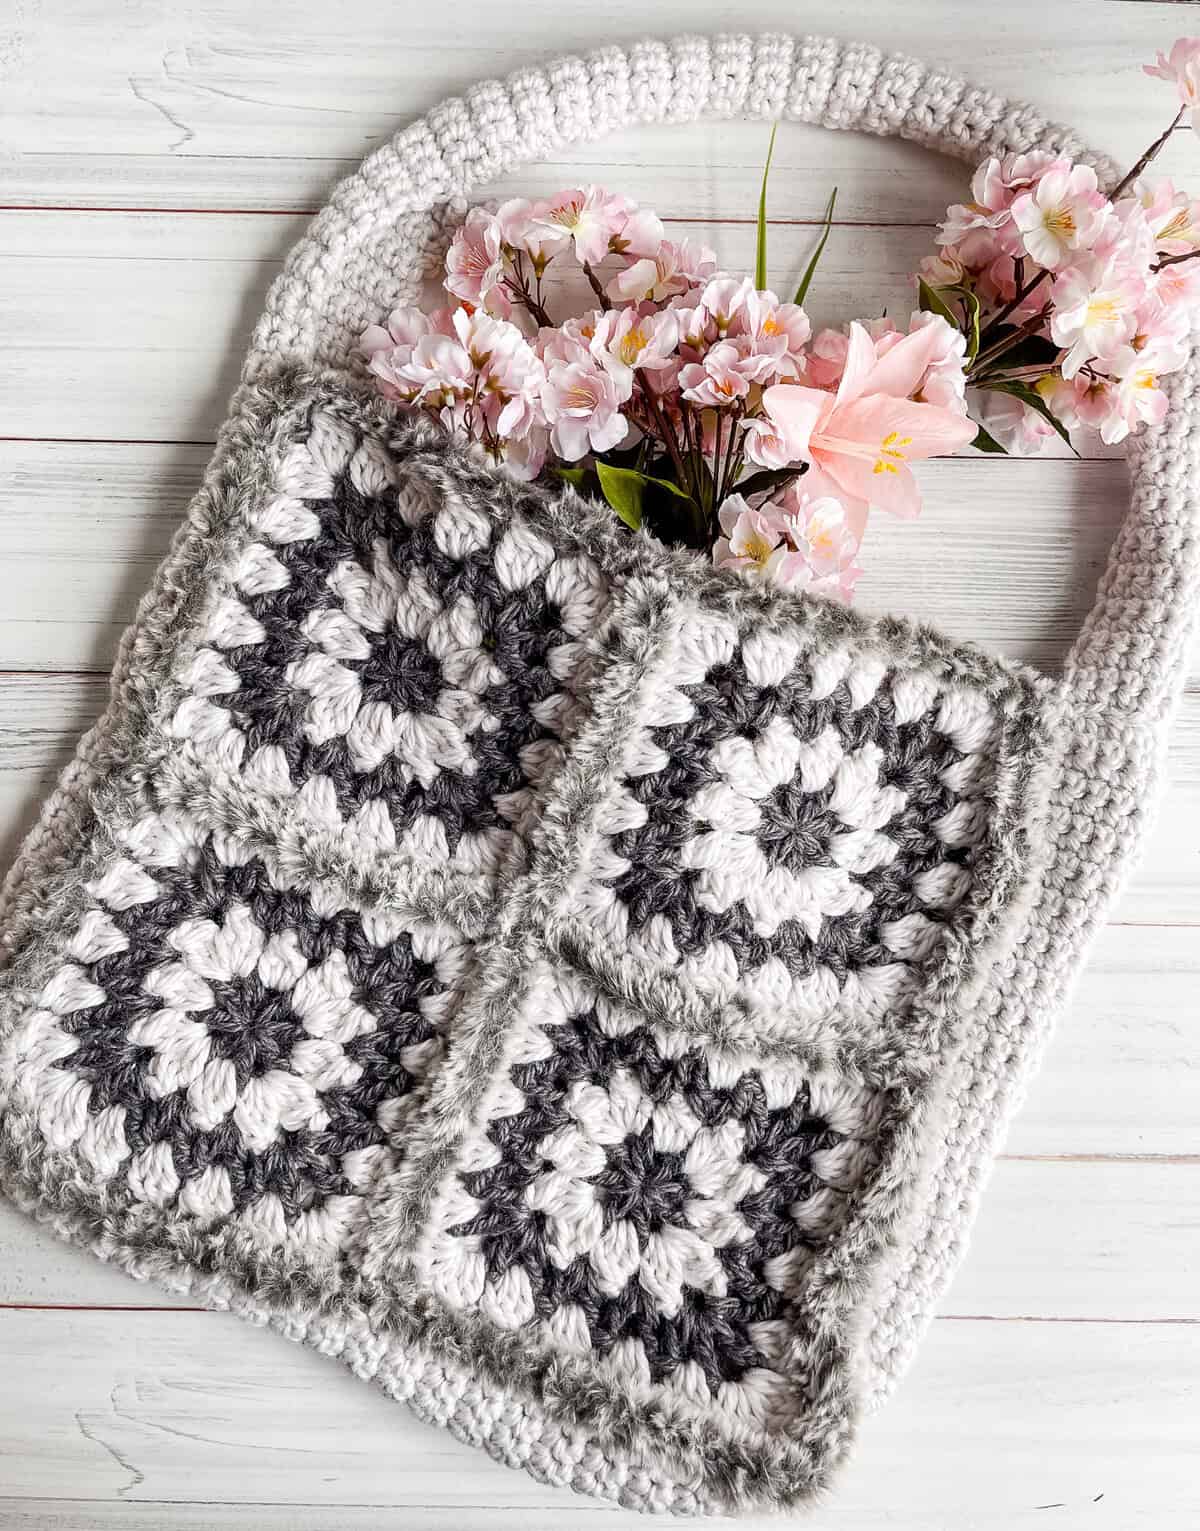
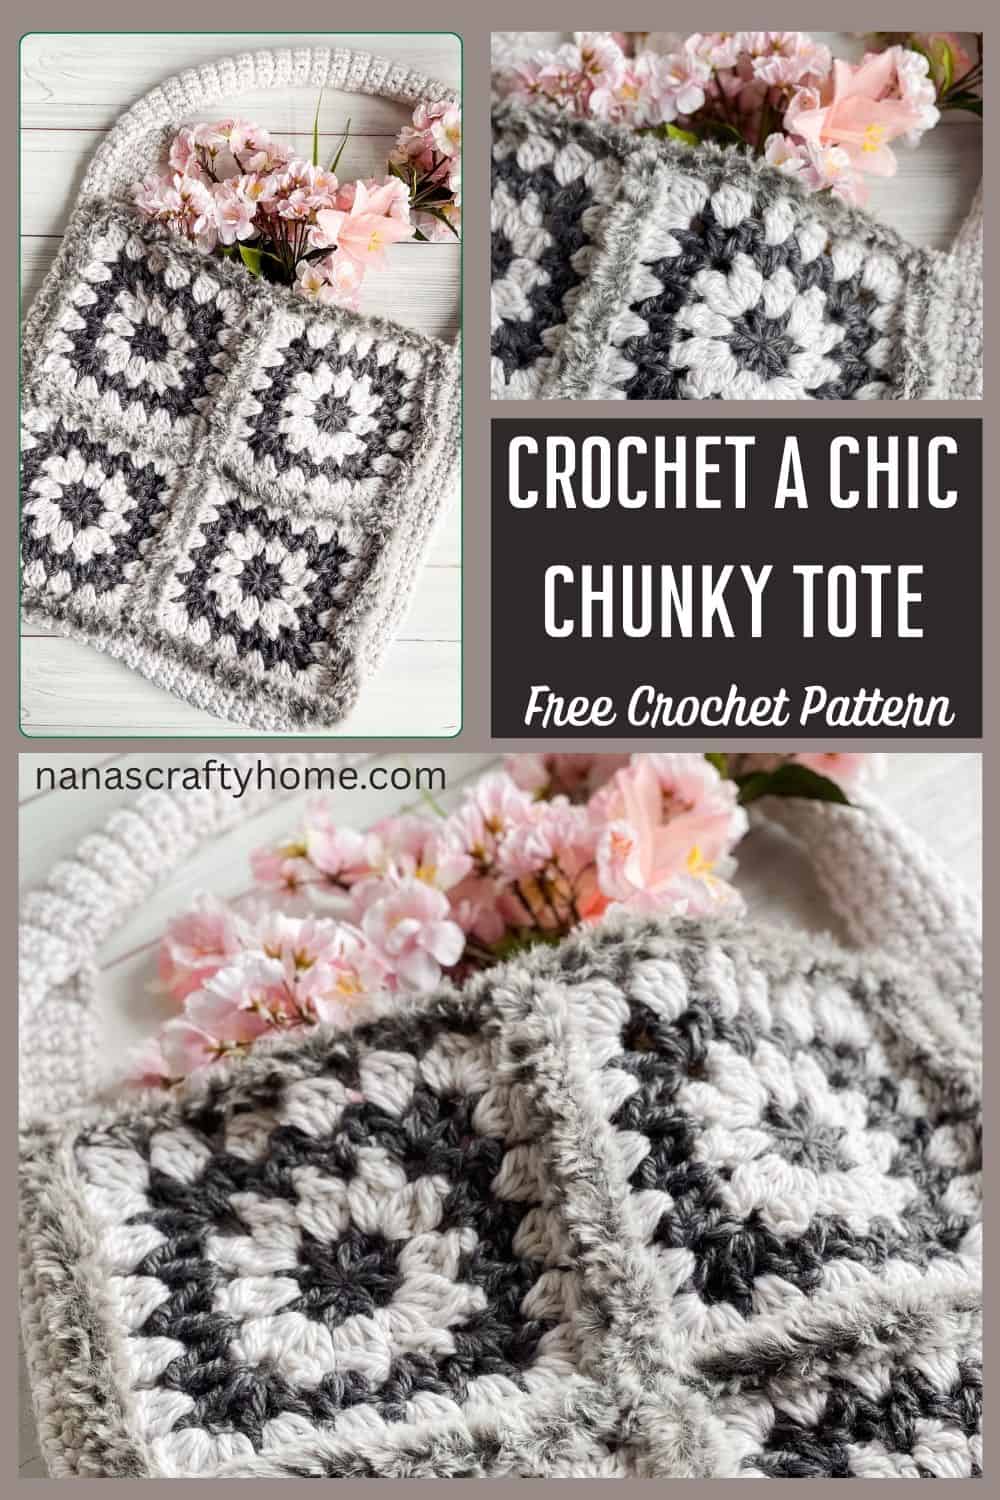
The Posh Panache Bag is a stylish, oversized crochet tote that combines timeless granny square charm with modern cozy vibes. This free crochet granny square bag pattern creates a generously sized bag perfect for everyday adventures, market runs, or hauling your latest yarn project. Made with bulky yarn, the bag works up quickly despite its impressive proportions. It features 8 cluster stitch granny squares arranged to form the body—4 for the front and 4 for the back, joined seamlessly to create a structured yet soft tote.
The squares showcase a beautiful two-tone design in soft white and charcoal gray. What elevates this bag to true “posh” status is the luxurious faux fur yarn trim edging the top and dramatically accenting the thick, chunky handles. The plush, fuzzy border adds a touch of glamorous texture and softness against the squares, while the extra-thick handles provide comfortable, sturdy support for carrying heavier loads. Easy to customize with your favorite color combinations, this easy crochet bag pattern delivers a trendy, handmade accessory with high-end appeal. Whip it up in a weekend and enjoy a spacious, eye-catching tote that’s as practical as it is pretty!
Why stop at the bag? Grab the matching Posh Panache Bucket Hat and rock the ultimate granny-square set!

How to Make a Bulky Crochet Granny Square Bag
For the full free written pattern instructions for the Posh Panache Bag, scroll down below. You can also purchase the ad-free PDF of this pattern for a small fee. Or, become a Lifetime Member and never pay for a PDF again!
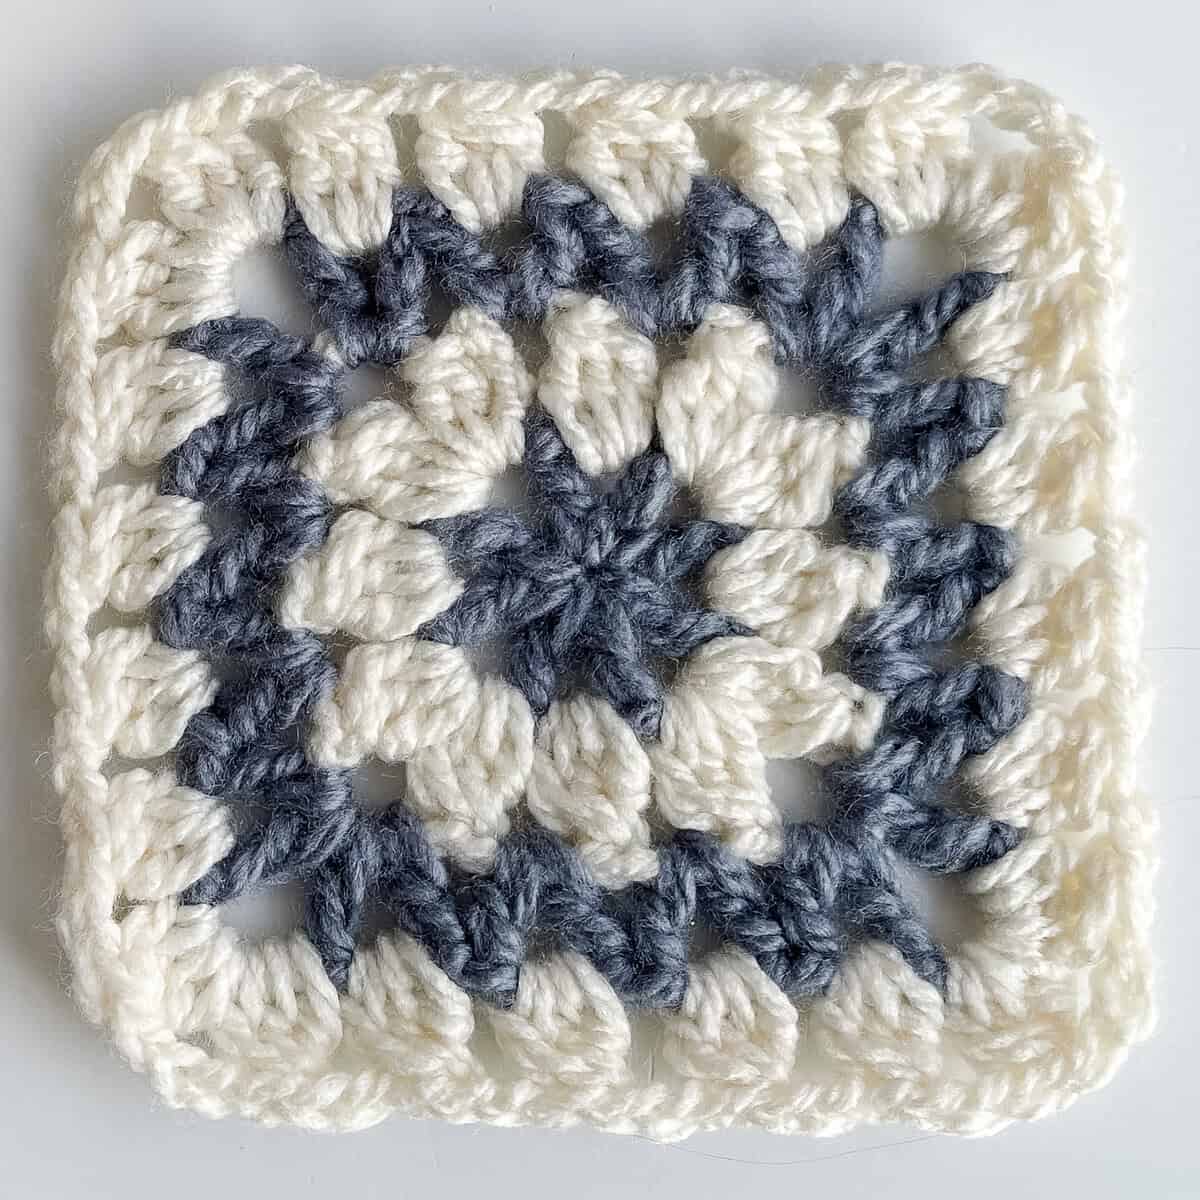
1. This bulky granny square bag is made from 8 identical Granny Squares made with a combination of Cluster and V-Stitches.
2. The strap is one long single crochet panel that creates both the sides and the strap of the bag.
3. Once the squares and strap are complete, join two sets of 4 squares together using single crochet stitches with faux fur yarn.
4. Join the sides/strap to the panels with faux fur yarn and single crochet stitches.
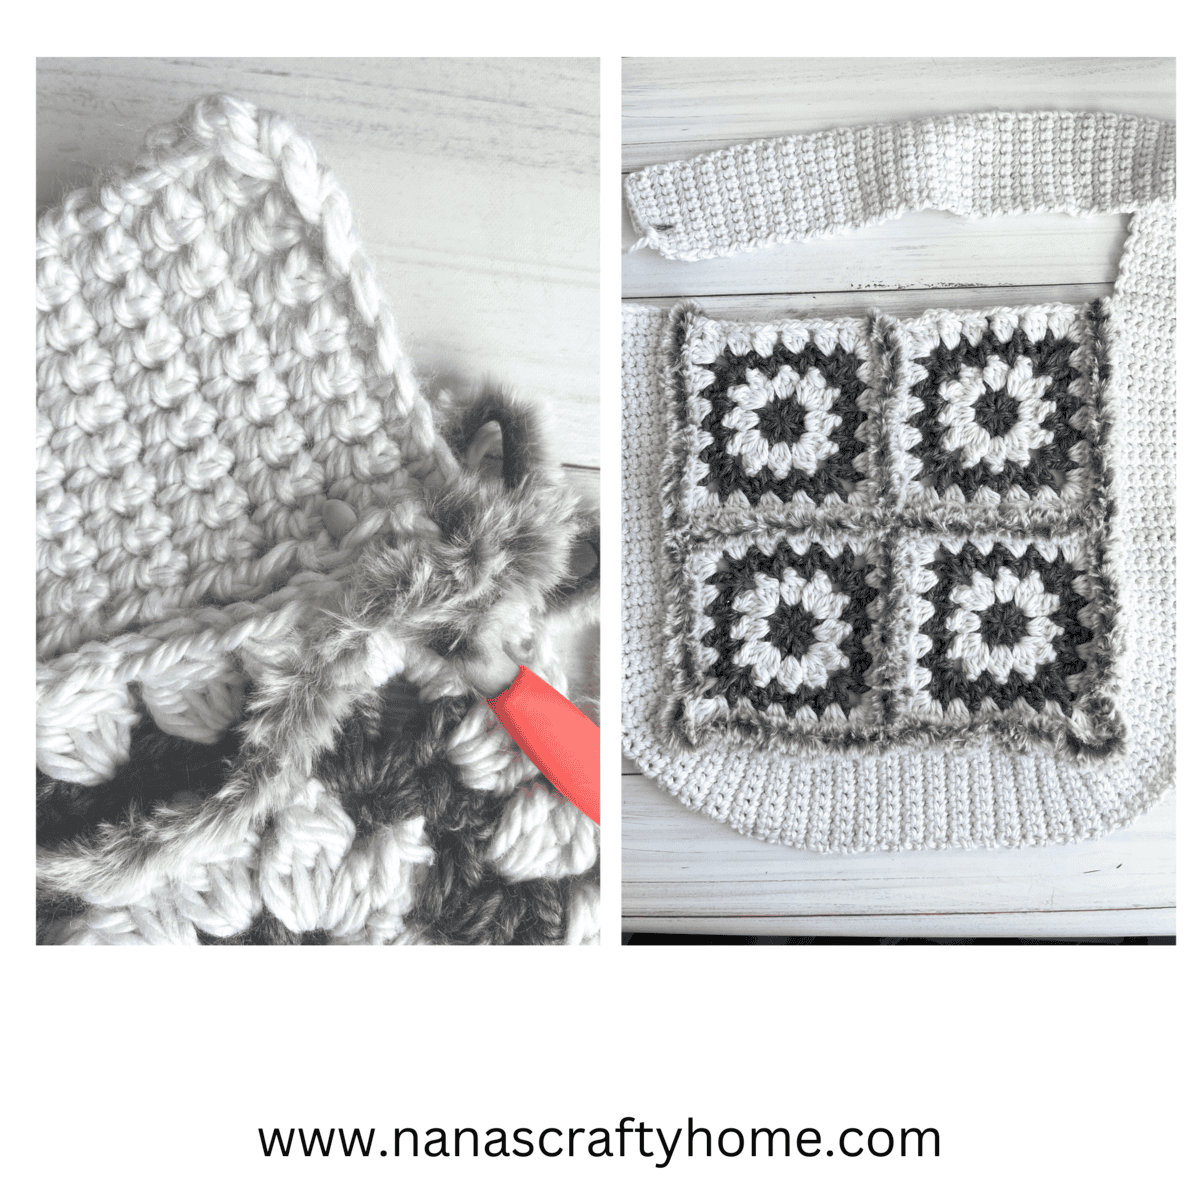
5. Create a double-thick handle with the top of the strap by folding the edges together and sewing.
I have a video tutorial for the Posh Panache Square if you need a bit of help as well!
All done!
I hope you love your chunky crochet granny square bag!
Tonya 💕
Supplies for the Posh Panache Granny Square Bag Pattern
*This post contains affiliate links. You can click on any yarn or material highlighted to purchase. I will receive a small commission if you purchase but it won’t cost you any extra! As an Amazon Associate I earn from qualifying purchases.
For the granny squares I originally used Lion Brand Basic Stitch Thick & Quick yarn which is a bulky yarn weight #5 – unfortunately now discontinued. I have been on the search for a good substitute and I am recommending Lion Brand Jiffy Bonus Bundle which is a bulky-weight, 100% acrylic yarn with a brushed, slightly fuzzy texture for added warmth and softness.
I worked up a square with the Jiffy yarn plus the recommended hook size of K (6.5 mm) and my finished square ended up with a finished size of approximately 6″ x 6″ which is about 1″ less. With this size your bag will be smaller at approximately 13″ x 13″ with probably a 3 1/2″ depth or so. You could also increase the hook size to an L to get a little closer to the original size. Nice thing about bags is that it really won’t make much difference in your finished project!
For the faux fur trim I used Lion Brand’s Go For Faux which is a super bulky yarn. Creates such a fun and interesting texture! Using the faux fur is optional however – you could just use the same bulky yarn you used for the squares.
Purchase the ad-free PDF
You can purchase the ad-free printable PDF of Posh Panache Crochet Bag for a small fee. You can purchase the individual pattern, or if you love PDFs, you might want to check out my Lifetime Membership. It’s an awesome deal! Never pay for one of my PDFs again!!
Extra bonus – the ad free PDF has a stitch diagram for the Cluster V-Stitch Square!


To get notified of my free crochet patterns and future giveaways, sign up for my newsletter. I never share or sell your information to third parties — it stays private!
You may also like the following free crochet patterns by Nana’s Crafty Home that can be found on the blog:


- 1. Posh Panache Bucket Hat free crochet pattern
- 2. Bewitching Braids Bag free crochet pattern
- 3. Carry Me Away Tote Bag free crochet pattern

Posh Panache Granny Square Bag free crochet pattern
Pattern written in US crochet terminology
Supplies:
Lion Brand Basic Stitch Thick & Quick, Weight 5 Bulky (65% recycled polyester / 35% Amicor Acrylic)
- (4) Color Vintage 14 oz / 348 yards (Color A)
- (1) Color Charcoal 3.5 oz / 87 yards (Color B)
Since Basic Stitch Thick and Quick is no longer available I am recommending Substitute:
Lion Brand Jiffy Bonus Bundle, Weight 5 Bulky (100% acrylic)
- (1) Color Cream
- (1) Coastal
Lion Brand Go For Faux, Weight 6 Super Bulky (100% polyester)
- (1) Color Grey Wolf 1.3 oz / 25 yards (Fur)
Crochet hook size M/N (9.0 mm)
Scissors
Stitch Markers
Tapestry Needle
Approximate finished size: 15” wide x 15” tall (not including strap) with 4” depth
Gauge: 1 square = 7” x 7”
Abbreviations:
- MC = magic circle
- RS = right side
- ch(s) = chain(s)
- sc = single crochet
- dc = double crochet
- sl st = slip stitch
- sp = space
- yo = yarn over
- beg = beginning
- 2dcCL = two double crochet cluster stitch (see special stitches section below)
- 3dcCL = three double crochet cluster stitch (see special stitches section below)
- Beg V-st = beginning v-stitch (see special stitches section below)
- V-st = v-stitch (see special stitches section below)
Special Stitches:
2dcCL = yo, insert hook in specified stitch, yo and pull up loop, yo, pull through 2 loops (2 loops on hook), yo, insert hook into same stitch, yo, pull up a loop, yo, pull through 2 loops (3 loops on hook), yo and pull through all 3 loops.
3dcCL = yo, insert hook in specified stitch, yo, pull up loop, yo, pull through 2 loops (2 loops on hook), yo, insert hook into same stitch, yo, pull up a loop, yo, pull through 2 loops (3 loops on hook), yo, insert hook into same stitch, yo, pull up a loop, yo and pull through 2 loops (4 loops on hook), yo and pull through all 4 loops.
Beg V-st = (ch 4, dc) worked in the same st. Note: ch 4 counts as first dc + ch 1.
V-st = (dc, ch 1, dc) worked in the same st.
Pattern Notes:
- 4 squares are joined together for each panel of bag.
- Sides, bottom and strap are made with one long strip which is then joined to the sides of the panels with remaining strip creating the strap.
Recommended Tutorials:
Cluster V-Stitch Granny Square Tutorial
Pattern Instructions
Squares (make 8)
With Color B make MC. Alternatively, chain 4, sl st in first st to form a ring.
Round 1: (RS) ch 4 (counts as first dc + ch 1), (dc, ch 1) 7 times in MC or in ring, sl st top of ch 3. (8 dc + 8 ch-1 sp)
Fasten off Color B.
Round 2: Attach Color A with sl st to any ch-sp of round 1, (ch 2, 2dcCL, ch 3, 3dcCL) in same sp, ch 2, *3dcCL in next ch-1 sp, ch 2, (3dcCL, ch 3, 3dcCL, ch 2) – corner made;* repeat from * to * to last ch-1 sp, (3dcCL, ch 2) in last ch-1 sp, sl st top of beg cluster. (4 cluster corners + 4 cluster stitches)
Fasten off Color A.
Round 3: Attach Color B with sl st to any ch-3 corner sp of round 2, (Beg V-st, ch 3, V-st) in same sp – beg V-st corner made; *V-st in each ch-2 sp to next corner ch-3 sp, (V-st, ch 3, V-st) in corner, – V-st corner made;* repeat from * to * to last ch-2 sps, V-st in each ch-2 sp to end, sl st top of ch-3. (4 V-st corners + 8 V-st)
Fasten off Color B.
Round 4: Attach Color A with sl st to any ch-3 corner sp of round 3, (ch 2, 2dcCL, ch 3, 3dcCL) in same sp, ch 2, *(3dcCL, ch 2) in each ch-1 sp to next corner ch-3 sp, (3dcCL, ch 3, 3dcCL, ch 2) – corner made;* repeat from * to * around, (3dcCL, ch 2) in remaining ch-1 sp to end, sl st top of beg cluster. (4 cluster corners + 16 cluster stitches)
Fasten off and weave in ends.
Join Squares
With WS of squares 1-2 together and working through both squares, join fur yarn in ch-3 sp with sl st, ch 1, 1 sc in same sp, *sc in next st, 2 sc in ch-2 sp,* repeat from * to * to ch-3 corner sp, 1 sc in corner sp.
At the corner space, sc in the ch-3 corner space in both squares.
With RS of Squares 3 & 4 facing up, sc in the ch-3 corner sp of both squares.
Repeat from * to * along sides of both Squares 3 and 4 to corner space, 1 sc in last corner sp.
Fasten off.
To finish joining squares, working through both squares 2-4, join fur yarn in ch-3 sp with sl st, ch 1, 1 sc in same sp, *sc in next st, 2 sc in ch-2 sp,* repeat from * to * to ch-3 corner sp, 1 sc in corner sp, sc in the ch-3 sp of squares 1-3, repeat from * to * to last corner sp, 1 sc in last corner sp.
Fasten off. Weave in ends.
To join squares for second panel, repeat above instructions with final 4 squares.
Side & Strap
With Color A, ch 10.
Row 1: Sc in second ch from hook and in each ch to end. Turn. (9)
Row 2: Ch 1, sc in each st to end. Turn.
Continue repeating row 2 to a length of approximately 70” – 75”.
Fasten off, leaving a long tail for sewing.
Join Squares to Side Strip
Note: Each stitch will be worked through end of squares and sides of strap. If working two stitches in same space of square, you will work in two different stitches of strap. Work your stitches into the strap at the end of each row of sc. With WS of both strap and squares together and working through both pieces, join fur yarn to ch-3 corner space of panel and side of strap at row 1, ch 1, 2 sc in same sp, [*sc in next st, 2 sc in ch-2 sp,* repeat from * to * to ch-3 corner sp, 2 sc in corner sp, sc in join between squares, repeat from * to * to next ch-3 corner sp, 3 sc in next corner sp] three times, omitting last corner sp, sc in last ch-3 sp.
Fasten off. Weave in ends.
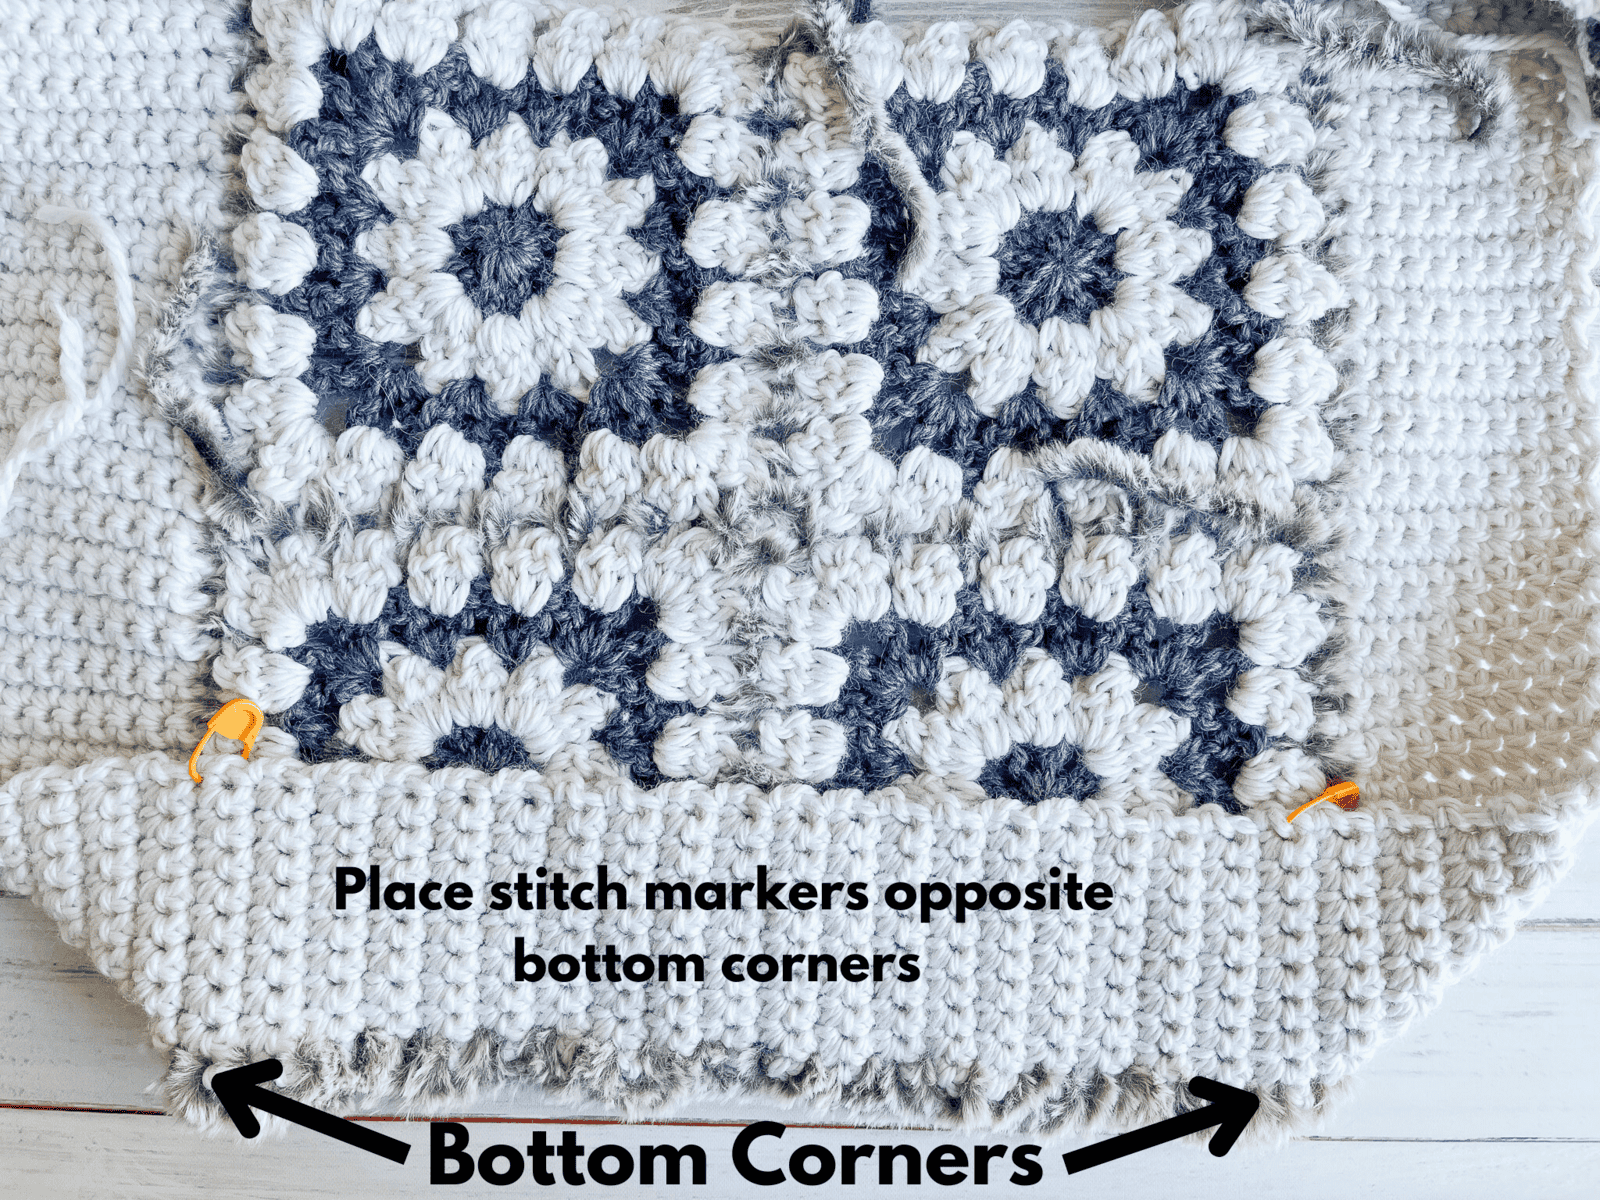
Before adding the second panel to strap, place stitch markers at the opposite side of the strap at the bottom corners.
With WS of strap and second panel facing, repeat above instructions for joining the second panel to strap. Work evenly into strap to stitch markers being sure to work bottom corners of panel into same row as other side of strap.
Fasten off and weave in ends.
With long end of yarn left for sewing strap, sew top edge of strap to bottom edge of strap on other side of bag.
Fasten off and weave in ends.
Top Edge
Join fur yarn in ch-3 sp of first panel next to strap with sl st, ch 1, 1 sc in same sp, *sc in next st, 2 sc in ch-2 sp,* repeat from * to * to ch-3 corner sp, 1 sc in corner sp, ch 1, sc in the next ch-3 sp of next square, repeat from * to * to last corner sp, 1 sc in last corner sp.
Fasten off.
Repeat above instructions for top of second panel.
Fasten off and weave in ends.
Strap
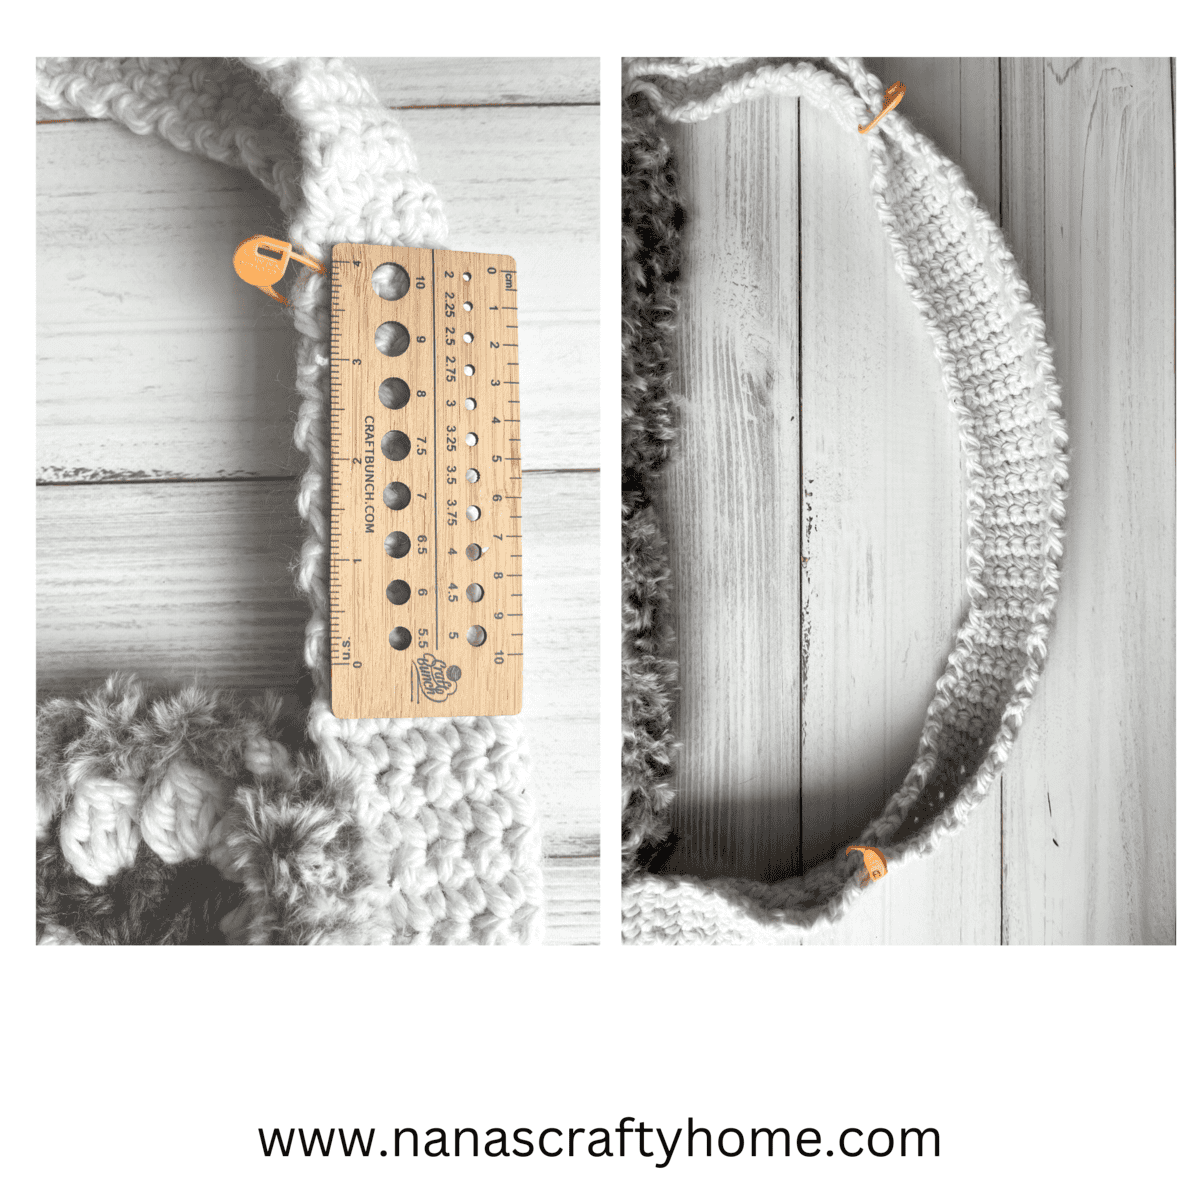
Measure from top edge of bag approximately 4” and place a stitch marker on strap through both edges. Repeat for second side of strap.
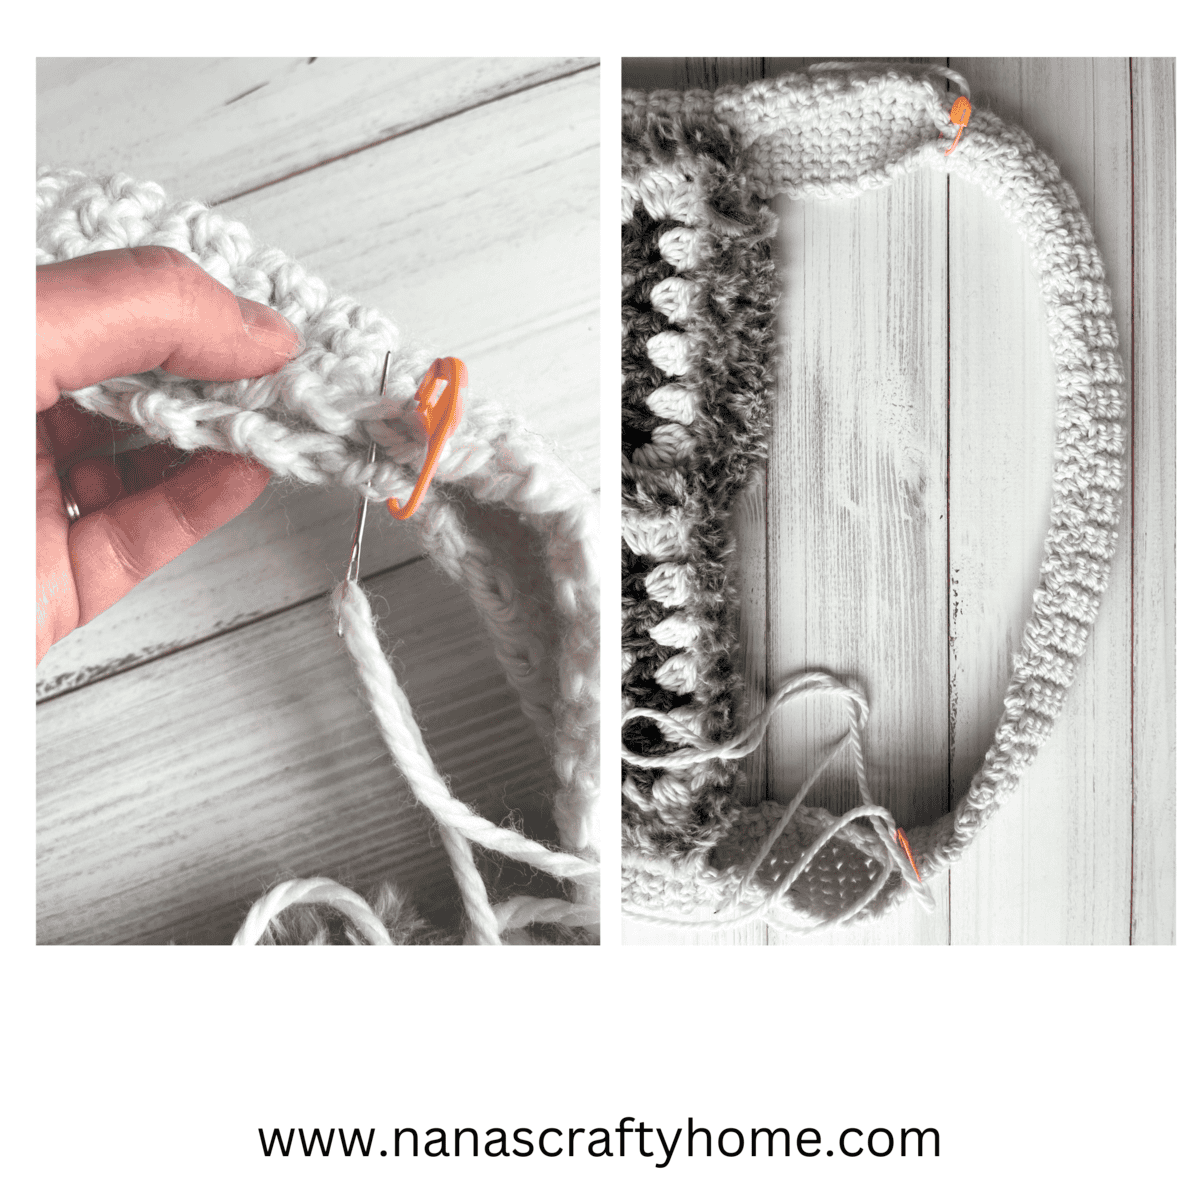
Fold edges of strap together between stitch markers. With a long length of Color A yarn on tapestry needle, sew edges together between stitch markers.
Weave in remaining ends.
Copyright 2026 Tonya Bush / Nana’s Crafty Home, LLC.
Social Media links:
Facebook: https://www.facebook.com/nanascraftyhome
Instagram: https://www.instagram.com/nanascraftyhome/
Pinterest: https://www.pinterest.com/nanascraftyhome/
YouTube: https://www.youtube.com/c/TonyaBush
Twitter: https://twitter.com/nanascraftyhome
Facebook Group: https://www.facebook.com/groups/829792060522798
Sign up for my Newsletter: https://nanascraftyhome.com/sign-up-for-my-free-newsletter/
Disclaimer: This pattern is for personal use or small-scale crafting. If you intend to sell the finished product in the EU, ensure it complies with the General Product Safety Regulation (EU) 2023/988, including safety, labeling, and traceability requirements.
 Hi! Thank you so much for being here! I am Tonya the designer behind Nana's Crafty Home. As a wife, mother, Nana of 9 & with 2 fur babies, my days are filled with love, laughter, hugs and yarn! Here you will find colorful and creative crochet designs for yourself or loved ones. My hope is that you will be inspired to learn and create along with me!