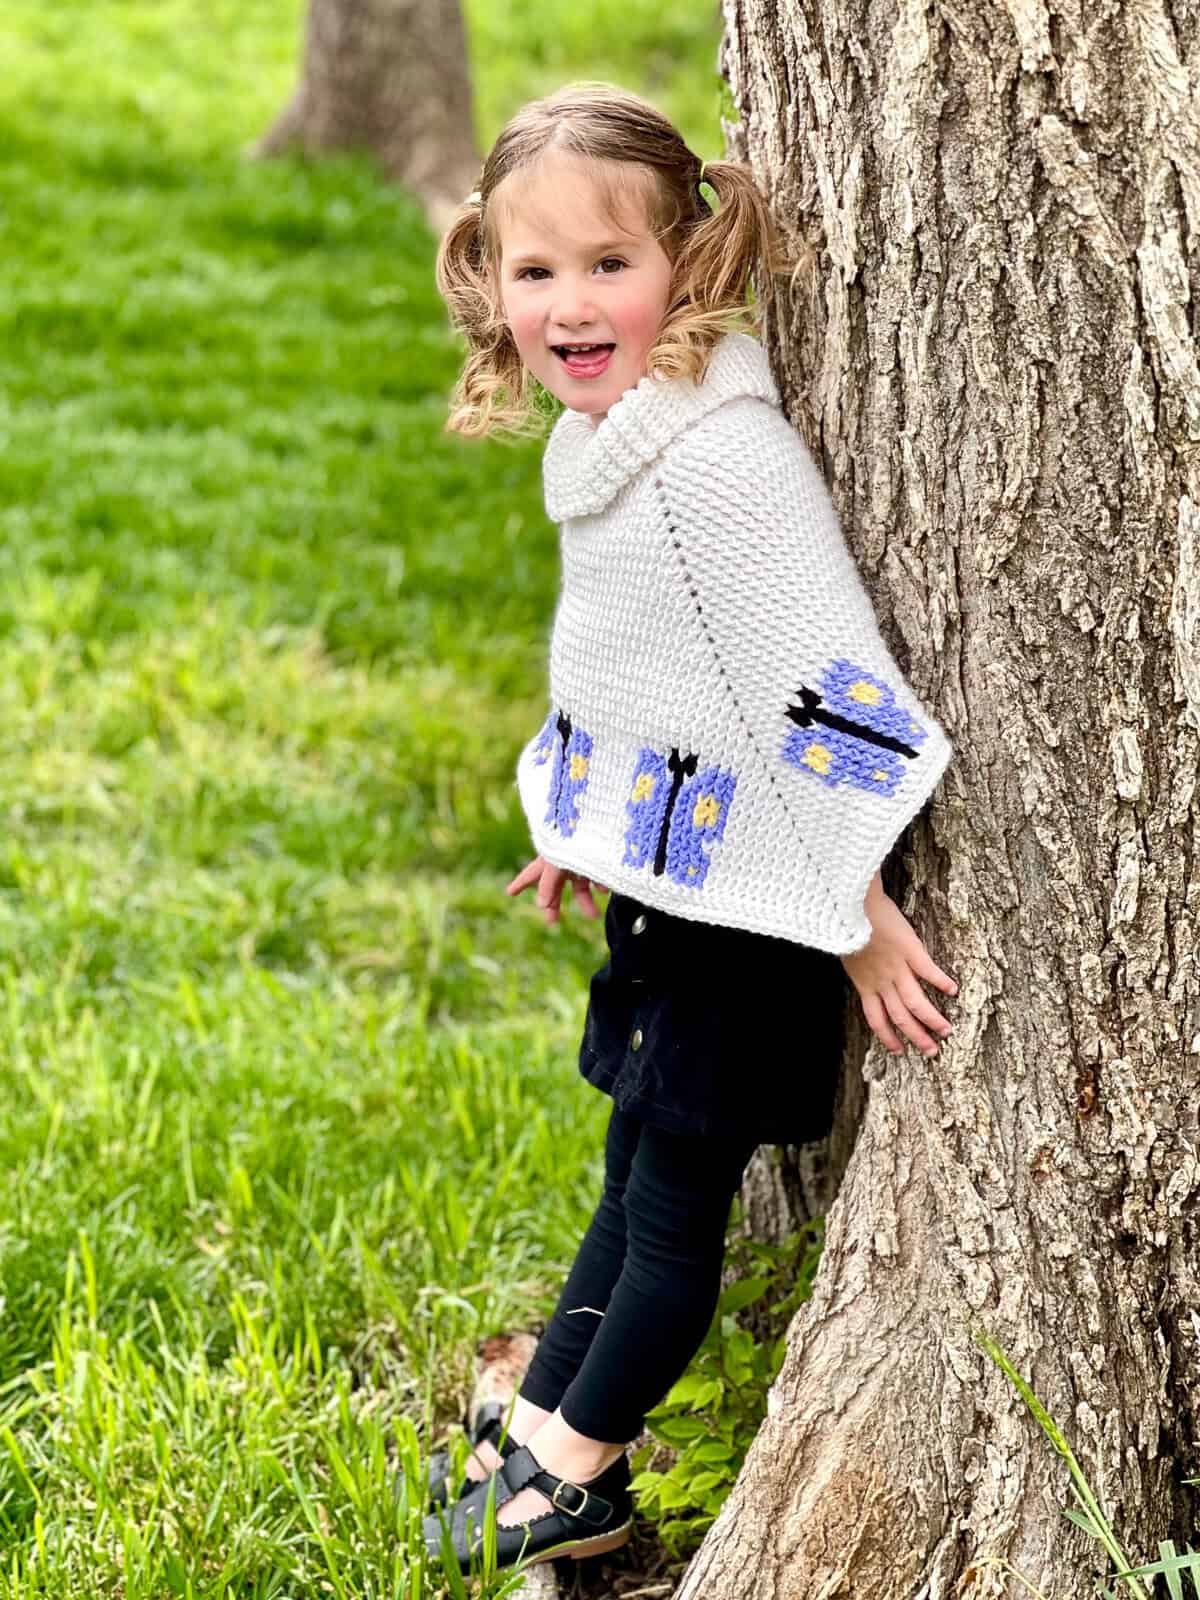
A crochet childs poncho featuring butterflies is easy to crochet and easy to wear. Perfect for cool spring or summer evenings!
This child’s butterfly poncho is a charming poncho made using the front post double crochet (dc) colorwork crochet technique. Made in the round from the top-down, it features a playful design with butterflies around the bottom edge in shades of purple, black, and yellow.
This crochet child’s poncho has a split cowl neck, adding a cozy and stylish touch, perfect for keeping warm while allowing easy wear. The front post double crochet stitches provide beautiful gentle texture. A lovely and whimsical addition to your child’s wardrobe!
I have been a bit obsessed with the Front Post Double Crochet color work technique after releasing my Peek-a-Boo Bunny Hat, Hearts in a Row Hat, Counting Sheep Hat, Peek a Boo Bunny Basket and the Counting Sheep Basket. There are so many possibilities with this crochet color work technique – I have so many ideas!


How to Make a Crochet Childs Poncho
For the full written pattern instructions for the Child’s Butterfly Poncho, scroll down below. You can purchase the ad-free PDF of this poncho for a small fee. Or, become a Lifetime Member and never pay for a PDF again!
1. The main body of this crochet poncho for kids is made from the top-down using the FPdc color work technique. This easy color work crochet technique is made with all double and front post dc stitches throughout.
2. Note that I did not carry colors from butterfly to butterfly. Instead I measured out lengths of yarn I would need for each butterfly and then dropped and picked up each round for every butterfly. This gave me a few more ends to weave in at the end. However, carrying colors between butterflies would have been difficult. If you decide to carry yarn colors to each butterfly to minimize ends I would recommend not carrying yarn across the corners as you would see the yarn through the ch-2. It would also be difficult to keep the correct tension and you might have a problem with how your poncho would lay in the end.
3. I have a complete tutorial to help walk you through this technique including how to read graphs!
4. Once the main body of the poncho is complete you will crochet a separate cowl neck which is made with single crochet stitches worked in the back loop only for a ribbed texture.
5. This split cowl neck is sewn to the top opening of the poncho by overlapping the ends of the ribbed rectangle.
6. I am providing just one size for this poncho which should fit a range of sizes from 2T – 6T. My granddaughter in the photo wears a size 3-4T. You could easily make your poncho smaller by using a light DK weight yarn with a smaller hook size. Make a little larger with a larger hook size.
7. If you would like the poncho to be longer simply add a couple of rounds at the end before finishing off with the round of single crochet.
8. If you are adjusting the size of the poncho you would also want to adjust the cowl for the neck opening. Your finished rectangle should measure approximately 2″ wider than the size of the neck opening.
I hope you love making this Butterfly Poncho and your little one loves wearing it!
Tonya 💕
Butterfly Crochet Poncho Yarn Supplies
*This post contains affiliate links. You can click on any yarn or material highlighted to purchase. I will receive a small commission if you purchase but it won’t cost you any extra! As an Amazon Associate I earn from qualifying purchases.
I used I Love This Yarn! which is a medium worsted #4 weight acrylic yarn. A very economical yarn that you can find at Hobby Lobby. You could also easily substitute your favorite brand of worsted weight acrylic – Red Heart Super Saver, Caron Simply Soft, Vanna’s Choice – so many different options! The perfect raid your stash project!
This easy crochet butterfly poncho pattern is also available as an ad-free, printable PDF! You can purchase the individual pattern, or if you love PDFs, you might want to check out my Lifetime Membership. It’s an awesome deal! Never pay for one of my PDFs again!! (Or, scroll down for the free version!)


If you would like daily crochet inspiration be sure to follow me on Facebook, Instagram, Pinterest, YouTube, Twitter and Tumblr!
To get notified of my free crochet patterns and future giveaways, sign up for my newsletter. I never share or sell your information to third parties — it stays private!
You may also like the following free crochet patterns at Nana’s Crafty Home!


- 1. Triangle Trio Boho Vest in Child Sizes free crochet pattern
- 2. Brandywine Falls Vest 2T/4T free crochet pattern
- 3. Hearts in a Row Ear Warmer pattern – sizes Toddler to Adult!

Butterfly Child Poncho free crochet pattern
Pattern written in US crochet terminology
Supplies:
I Love This Yarn!, Weight 4 Medium (100% acrylic)
- Antique White 10.3 oz / 525 yards (MC)
- Periwinkle 1.6 oz / 82 yards (P)
- Buttercup 0.5 oz / 25 yards (Y)
- Black 0.4 oz / 20 yards (BL)
Crochet hook size I (5.5 mm)
Stitch markers
Straight pins
Scissors
Tapestry Needle
Approximate finished size:
Child: 19” neck opening x 11” L at sides x 13 1/2 ” L at center point
Gauge: 13 FPdc sts x 10 rounds = 4” x 4”
Abbreviations:
- MC = main color
- P = Purple
- Y = Yellow
- BL = Black
- RS = right side
- ch(s) = chain(s)
- dc = double crochet
- sl st = slip stitch
- sk = skip
- yo = yarn over
- FPdc = front post double crochet (see special stitches section below)
- sc = single crochet
- Rnd(s) = round(s)
- BLO = back loop only
Special Stitches:
FPdc (front post double crochet stitch): Yo and insert your hook from front to back to front around the dc stitch post from the row below, yo, pull up a loop (3 loops on hook), yo, pull through 2 loops, yo, pull through remaining 2 loops.
Pattern Notes:
- Poncho is worked from the top-down.
- Stitch count increases by 4 each round.
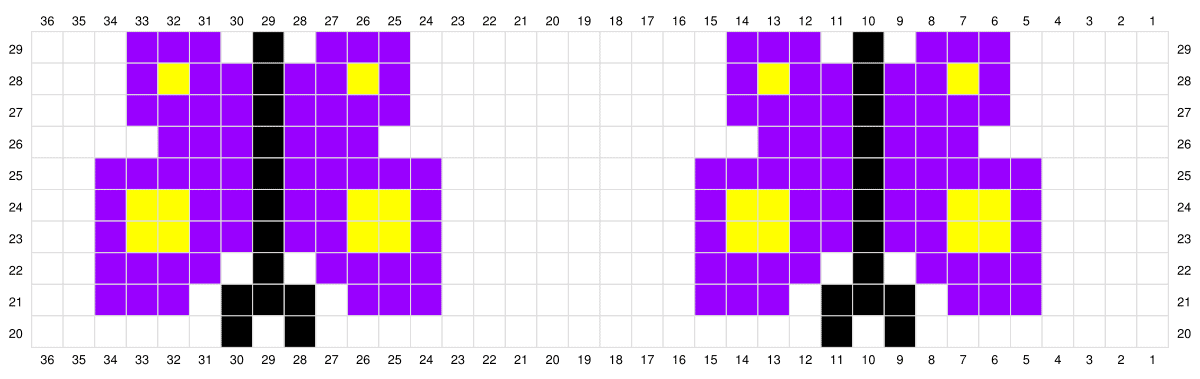
- Graph is worked as FPdc around the stitch in the round directly below.
- Each pixel of the graph corresponds to 1 FPdc.
- Poncho is worked in the round without turning. Slip stitch join at the end of each round into the top of the first FPdc, not the beginning ch-2.
- To work color changes, work last dc stitch before new color until there are two loops on the hook, pull in new color with last yo.
- For each butterfly I cut enough yarn of each color in order to carry the non-working yarn as yarn “floats” on the wrong side of the poncho. I did not carry colors beyond each butterfly of the poncho.
- Ch-2 at beginning of each round does not count as a stitch.
Recommended Tutorial:
How to change colors and read graph for FPdc
Pattern Instructions
With MC, ch 70, without twisting ch sl st in first ch to form a ring.
Rnd 1: (RS) Ch 2 (does not count as st), dc in same st, dc in next 16 chs, (1 dc, ch 2, 1 dc) in next ch, dc in next 34 chs, (1 dc, ch 2, 1 dc) in next ch, dc in next 17 chs, sl st in top of first dc st. (72)
Rnd 2: Ch 2, FPdc in st below ch-2 (first dc st), *FPdc in each st to ch-2 corner sp, (1 dc, ch 2, 1 dc) in ch-2 sp,* repeat from * to * once, FPdc in each st to end, sl st in first st. (76)
Rnds 3-19: Repeat Round 2. (144 sts at the end of Round 19)
Rnd 20: (Begin color changes see below) Repeat as for Round 2 with the following color changes:
Note: I cut the following lengths for each color to carry and float yarn for each butterfly:
Purple: (8) 360” (10 yards) lengths
Black: (8) 90” (2.5 yards) lengths
Yellow: (8) 120” (4 yards) lengths
Rnd 20: MC8, BL1, MC1, BL1, MC16, BL1, MC1, BL1, MC6, (MC1, ch 2, MC1) in ch-2 sp, MC6, [BL1, MC1, BL1, MC16] three times, BL1, MC1, BL1, MC6, (MC1, ch 1, MC1) in ch-2 sp, MC6, repeat from [ to ] once, BL1, MC1, BL1, MC8. (148)
Rnd 21: MC4, P3, MC1, BL3, MC1, P3, MC8, P3, MC1, BL3, MC1, P3, MC3, (MC1, ch 2, MC1) in ch-2 sp, MC3, [P3, MC1, BL3, MC1, P3, MC8] three times, P3, MC1, BL3, MC1, P3, MC3, (MC1, ch 2, MC1) in ch-2 sp, MC3, repeat from [ to ] once, P3, MC1, BL3, MC1, P3, MC4. (152)
Rnd 22: MC4, P4, MC1, BL1, MC1, P4, MC8, P4, MC1, BL1, MC1, P4, MC4, (MC1, ch 2, MC1) in ch-2 sp, MC4, [P4, MC1, BL1, MC1, P4, MC8] three times, P4, MC1, BL1, MC1, P4, MC4 (MC1, ch 2, MC1) in ch-2 sp, MC4, repeat from [ to ] once, P4, MC1, BL1, MC1, P4, MC 4. (156)
Rnd 23: MC4, P1, Y2, P2, BL1, P2, Y2, P1, MC8, P1, Y2, P2, BL1, P2, Y2, P1, MC5, (MC1, ch 2, MC1) in ch-2 sp, MC5, [P1, Y2, P2, BL1, P2, Y2, P1, MC8] three times, P1, Y2, P2, BL1, P2, Y2, P1, MC5, (MC 1, ch 2, MC1) in ch-2 sp, MC5, repeat from [ to ] once, P1, Y2, P2, BL1, P2, Y2, P1, MC4. (160)
Rnd 24: MC4, P1, Y2, P2, BL1, P2, Y2, P1, MC8, P1, Y2, P2, BL1, P2, Y2, P1, MC6, (MC1, ch 2, MC1) in ch-2 sp, MC6, [P1, Y2, P2, BL1, P2, Y2, P1, MC8] three times, P1, Y2, P2, BL1, P2, Y2, P1, MC6, (MC1, ch 2, MC1) in ch-2 sp, MC6, repeat from [ to ] once, P1, Y2, P2, BL1, P2, Y2, P1, MC4. (164)
Rnd 25: MC4, P5, BL1, P5, MC8, P5, BL1, P5, MC7, (MC1, ch 2, MC1) in ch-2 sp, MC7, [P5, BL1, P5, MC8] three times, P5, BL1, P5, MC7, (MC1, ch 2, MC1) in ch-2 sp, MC7, repeat from [ to ] once, P5, BL1, P5, MC4. (168)
Rnd 26: MC6, P3, BL1, P3, MC12, P3, BL1, P3, MC10, (MC 1, ch 2, MC1) in ch-2 sp, MC10, [P3, BL1, P3, MC12] three times, P3, BL1, P3, MC10, (MC1, ch 2, MC1) in ch-2 sp, MC10, repeat from [ to ] once, P3, BL1, P3, MC6. (172)
Rnd 27: MC5, [P4, BL1, P4, MC10] twice, (MC1, ch 2, MC1) in ch-2 sp, MC10, repeat from [ to ] four times, (MC1, ch 2, MC1) in ch-2 sp, MC10, repeat from [ to ] once, P4, BL1, P4, MC5. (176)
Rnd 28: MC5, P1, Y1, P2, BL1, P2, Y1, P1, MC10, P1, Y1, P2, BL1, P2, Y1, P1, MC11, (MC1, ch 2, MC1) in ch-2 sp, MC11, [P1, Y1, P2, BL1, P2, Y1, P1, MC10] three times, P1, Y1, P2, BL1, P2, Y1, P1, MC11, (MC1, ch 2, MC1) in ch-2 sp, MC 11, repeat from [ to ] once, P1, Y1, P2, BL1, P2, Y1, P1, MC5. (180)
Rnd 29: MC5, P3, MC1, BL1, MC1, P3, MC10, P3, MC1, BL1, MC1, P3, MC12, (MC1, ch 2, MC1) in ch-2 sp, MC12, [P3, MC1, BL1, MC1, P3, MC10] three times, P3, MC1, BL1, MC1, P3, MC12, (MC1, ch 2, MC1) in ch-2 sp, MC12, repeat from [ to ] once, P3, MC1, BL1, MC1, P3, MC5. (184)
Bottom Edge
Rnd 30: Ch 1, sc in each st to ch-2 sp, 3 sc in ch-2 sp, sc in each st to next ch-2 sp, 3 sc in ch-2 sp, sc in each st to end, sl st to first st. (190)
Fasten off and weave in ends.
Cowl Neck
With MC, ch 17.
Row 1: Sc in second ch from hook and in each ch across. Turn. (16)
Row 2: Ch 1 (working in BLO), sc in each st. Turn.
Rows 3 – 88 (or length measures approximately 21”): Repeat row 2.
Fasten off, leaving a long tail for sewing.
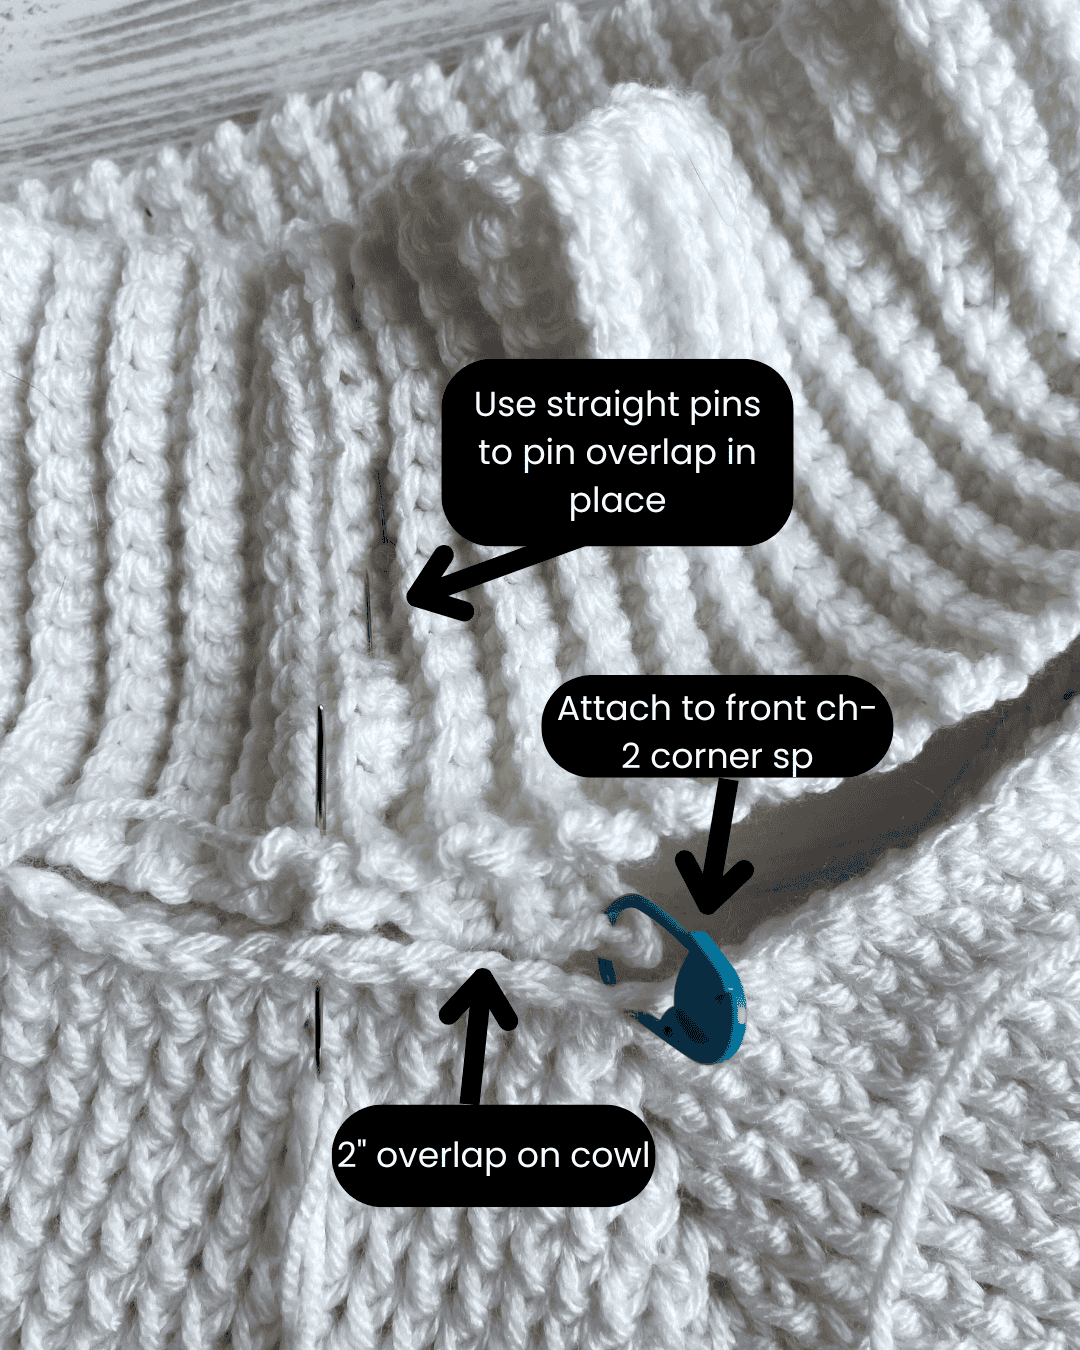
Fold ends of cowl together, overlapping by approximately 2” and pin overlap in place with straight pins. Affix to neck opening with stitch markers placing bottom edge under 2” overlap in front corner space of neck opening.
With long end left for sewing on tapestry needle sew to neck opening of poncho. Be sure to sew through overlap section of cowl when sewing to neck opening. Weave in remaining end.
Butterfly Graph
Graph of Butterflies at beginning of color work section.
Copyright 2025 Tonya Bush / Nana’s Crafty Home
Social Media links:
Facebook: https://www.facebook.com/nanascraftyhome
Instagram: https://www.instagram.com/nanascraftyhome/
Pinterest: https://www.pinterest.com/nanascraftyhome/
YouTube: https://www.youtube.com/c/TonyaBush
Twitter: https://twitter.com/nanascraftyhome
Facebook Group: https://www.facebook.com/groups/829792060522798
Sign up for my Newsletter: https://nanascraftyhome.com/sign-up-for-my-free-newsletter/

 Hi! Thank you so much for being here! I am Tonya the designer behind Nana's Crafty Home. As a wife, mother, Nana of 9 & with 2 fur babies, my days are filled with love, laughter, hugs and yarn! Here you will find colorful and creative crochet designs for yourself or loved ones. My hope is that you will be inspired to learn and create along with me!
0 Comments