This crochet hot pad pattern is a beginner friendly crochet pattern by Nana’s Crafty Home!

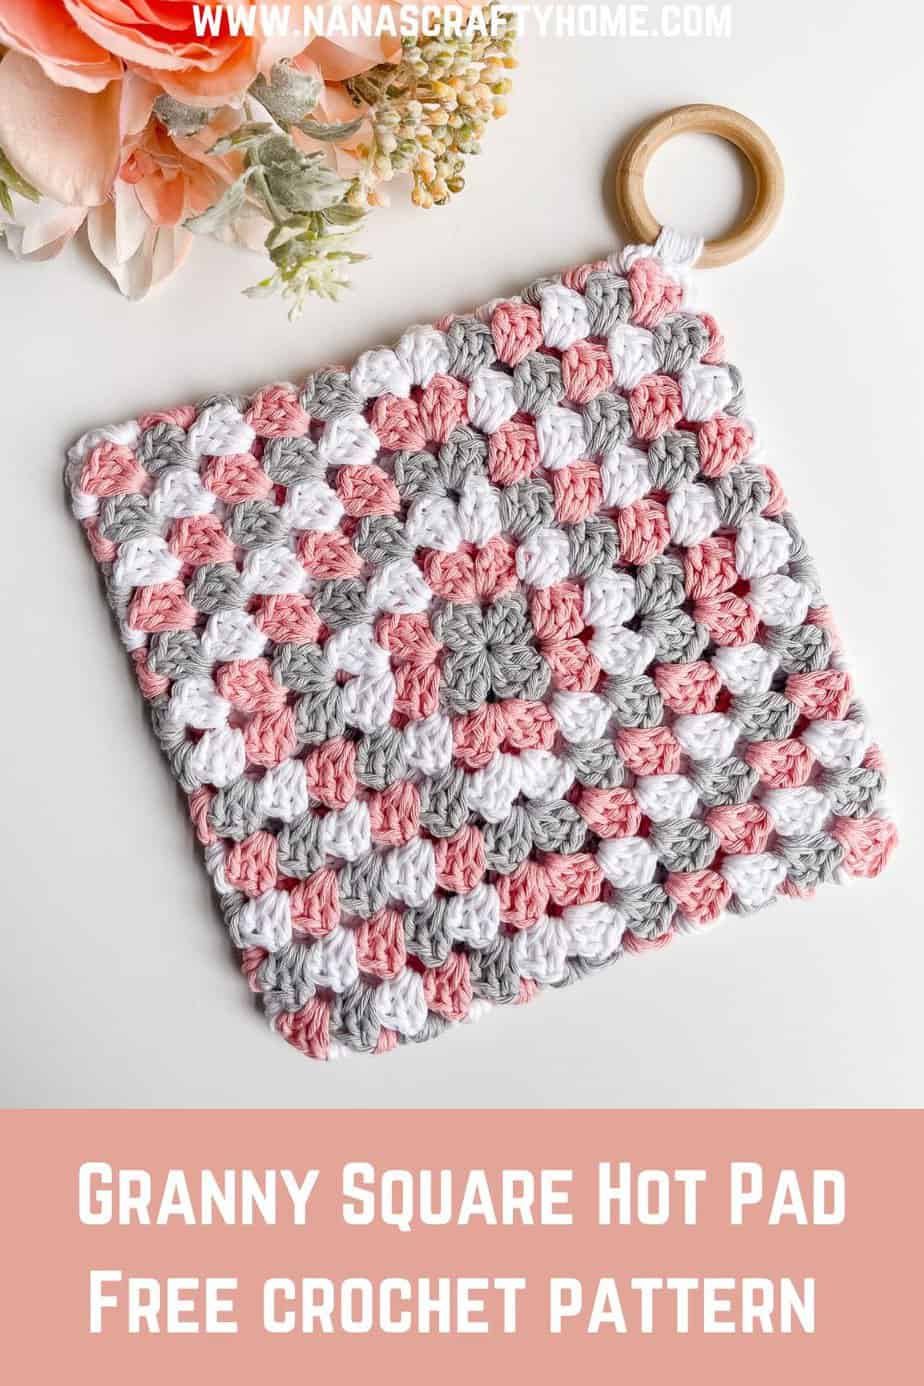
A practical, functional, beginner-friendly, double-thick crochet hot pad made from a basic granny square!
This simple and easy crochet potholder uses up scrap amounts of cotton yarn and is the perfect mindless crochet project.
Crochet potholders are a wonderful project if you are needing quick crochet gratification as a “done in an evening” type of crochet pattern, need a quick gift or just an excuse to raid your scrap basket.
I especially love these mindless types of crochet projects after a big or more complicated pattern is complete.
And the best part is at the end you have a pretty & functional pot holder perfect for gifts or for your own kitchen.
Easy to customize to any size and color palette. Make as scrappy as you want with every round being a different color for a truly unique pot holder!

Crochet Hot Pad Pattern Details
This granny square pot holder starts with a basic, beginner-friendly granny square which means it is perfect for the newbie crocheter! And, I put together a complete photo and video tutorial for the granny square if you are new to crocheting (or want a granny square refresher! You only need to know how to work a chain and double crochet stitch to complete a granny square.
Once your granny square is complete, you will fold and seam to create a double-thick hot pad. I have a complete photo and video tutorial for this fun potholder method as well! This easy method creates a thick crochet potholder making it durable and functional.

I am using Paintbox Cotton Aran yarn for my potholders which is a 100% medium weight #4 cotton yarn. You can certainly use your favorite cotton yarn for this project. If you decide to make yarn substitutions, I do recommend cotton yarn for pot holders as acrylic yarn may scorch or melt upon contact with hot pots or hot dishes.
I decided to work a different color each round but you could mix it up as much as you want – make in one solid color throughout, make 2 rounds of each color, or truly use up your cotton scraps and use a different color for every round. The sky really is the limit with how you can customize your own.
You have a couple of options for a hanging loop. I went with a 2″ wood ring but you could also simply crochet a loop at the corner of your potholder if you don’t have any wood rings on hand.
*This post contains affiliate links. You can click on any yarn or material highlighted to purchase. I will receive a small commission if you purchase but it won’t cost you any extra! As an Amazon Associate I earn from qualifying purchases.
This easy crochet hot pad pattern is also available as an ad-free, printable PDF! You can purchase the individual pattern, or if you love PDFs, you might want to check out my Lifetime Membership. It’s an awesome deal! Never pay for one of my PDFs again!! (Or, scroll down for the free version!)
And, if your purchase the ad-free PDF, the pattern includes a complete stitch diagram as well!
Purchase the ad-free pdf of the Granny Square crochet potholder pattern for a small fee. Thank you so much for supporting my work!
If you would like daily crochet inspiration be sure to follow me on Facebook, Instagram, Pinterest, YouTube, Twitter and Tumblr!
To get notified of my free crochet patterns and future giveaways, sign up for my newsletter. I never share or sell your information to third parties — it stays private!
You may also like the following free crochet patterns for the kitchen at Nana’s Crafty Home:


- 1. Mosaic Medley free crochet potholder pattern
- 2. Rustic Sunflower crochet potholder free pattern
- 3. Modern Ring Towel Holder free crochet pattern
Granny Square Hot Pad free crochet pattern
Pattern written in US crochet terminology
Supplies:
Paintbox Cotton Aran Weight 4 Medium (100% cotton) 3 oz / 165 yards
- Stormy Grey (Color A)
- Blush Pink (Color B)
- Paper White (Color C)
Size 7 (4.5 mm) crochet hook
Wood Cabone Ring 2” (optional)
Scissors
Tapestry Needle
Abbreviations:
- MC = magic circle
- RS = right side
- sl st = slip stitch
- ch(s) = chain(s)
- st(s) = stitch(es)
- sk = skip
- dc = double crochet
- beg = beginning
- sp(s) = space(s)
Special Stitches:
Beg cluster = ch 3, 2 dc stitches worked in same stitch or space.
Cluster = group of 3 dc stitches worked in same stitch or space.
Pattern Notes:
- Stitch count increases by 4 clusters each round.
Recommended Tutorials:
Basic Granny Square Photo & Video Tutorial
Basic Granny Square Video Tutorial
How to Turn a Square into a Double Thick Hot Pad Tutorial

Pattern Instructions With Color Changes
With Color A, ch 4.
Round 1: (RS) Beg cluster in fourth ch from hook, ch 2, *(cluster, ch 2) in same sp,* repeat from * to * twice, sl st in top of ch-3, sl st in next 2 sts. (4 clusters + 4 ch-2 sps)
Fasten off Color A.
Round 2: With Color B, sl st in ch-2 sp, (beg cluster, ch 2, cluster) in same sp, *sk next cluster, (cluster, ch 2, cluster) in next ch-2 sp,* repeat from * to * twice, sl st in top of ch-3 from beg cluster, sl st in next 2 sts. (8 clusters + 4 ch-2 sps)
Fasten off Color B.
Round 3: With Color C, sl st in ch-2 sp, (beg cluster, ch 2, cluster) in same sp, *3 dc cluster in sp between clusters to next ch-2 sp, (cluster, ch 2, cluster) in next ch-2 sp,* repeat from * to * twice, cluster in sp between next clusters, sl st in top of ch-3 from beg cluster, sl st in next 2 sts. (12 dc clusters + 4 ch-2 sps)
Fasten off Color C.
Round 4: With Color A, sl st in ch-2 sp, (beg cluster, ch 2, cluster) in same sp, *3 dc cluster in each sp between clusters to next ch-2 sp, (cluster, ch 2, cluster) in same sp,* repeat from * to * twice, 3 dc cluster in each sp between clusters to end, sl st in top of ch-3 from beg cluster, sl st in next 2 sts. (16 dc clusters + 4 ch-2 sps)
Continue repeating round 4 alternating colors to size desired.
Fasten off leaving a long tail approximately 60″ for sewing together. Weave in remaining ends.
With WS of square facing, fold corners of square towards the center of the square. With long tail on needle, whip stitch front loops only of both edges together to corner.
Fold third corner towards center. Pull end of yarn through to corner between edges to join. Whip stitch front loops of both edges to center.
Fold fourth corner towards center of square. From center of square, whip stitch front loops of edges together. There is one final set of edges to seam. Pull end of yarn through to corner between final edges to join. Whip stitch front loops of both edges together to center.
Wood Ring Option
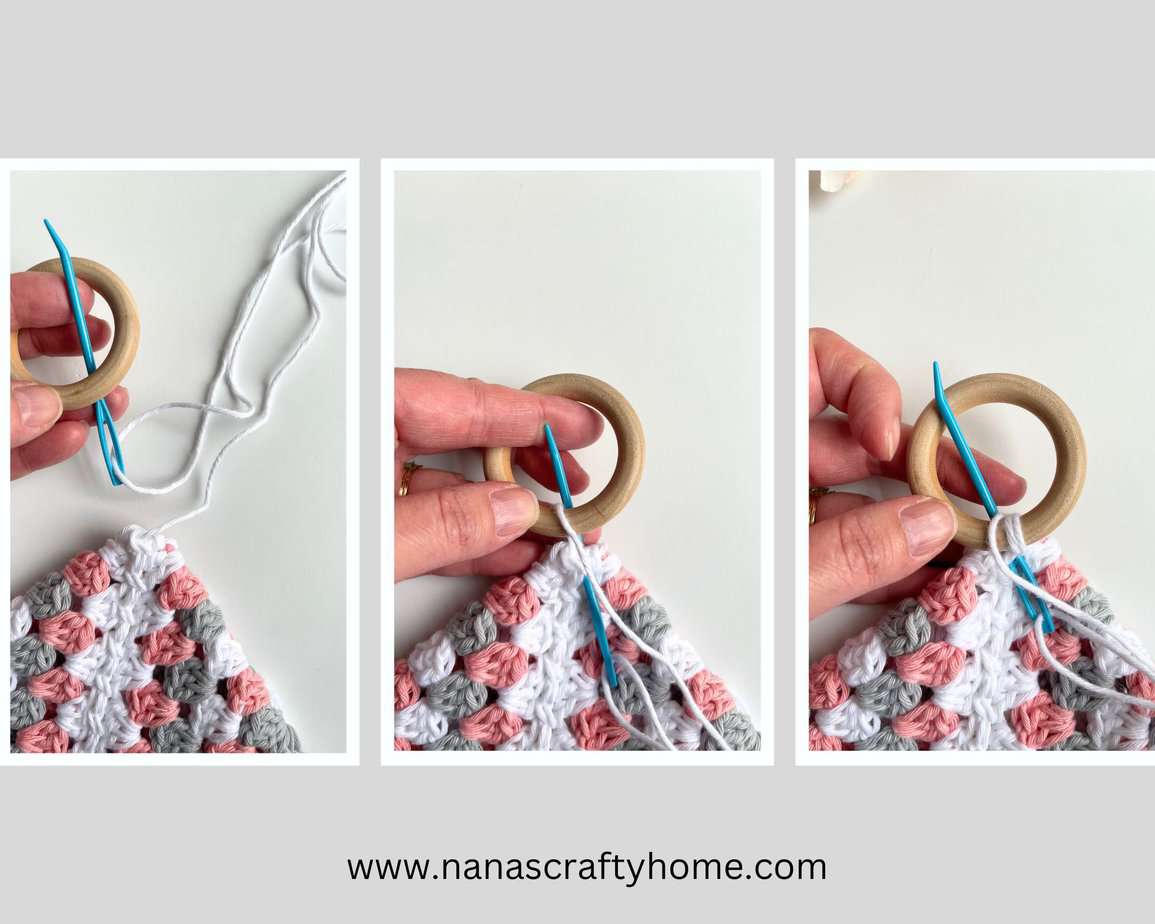
After seaming all the corners do not weave in end. With yarn end on needle, sew ring to corner of hot pad by inserting needle into center of ring, pull through, insert needle into corner of hot pad and repeat 5-7 times to securely fasten ring to corner of hot pad.
Hanging Loop Crochet Option
With desired color on hook, insert hook into any corner of hot pad, attach yarn to corner with slip stitch, ch 16, sl st in second ch from hook and in each ch to end.
Fasten off, leaving a long tail. With long end of yarn on needle, sew end of chain to corner creating a loop. Secure and weave in end.
Copyright 2024 Tonya Bush / Nana’s Crafty Home, LLC.
Social Media links:
Facebook: https://www.facebook.com/nanascraftyhome
Instagram: https://www.instagram.com/nanascraftyhome/
Pinterest: https://www.pinterest.com/nanascraftyhome/
YouTube: https://www.youtube.com/c/TonyaBush
Twitter: https://twitter.com/nanascraftyhome
Facebook Group: https://www.facebook.com/groups/829792060522798
Sign up for my Newsletter: https://nanascraftyhome.com/sign-up-for-my-free-newsletter/
 Hi! Thank you so much for being here! I am Tonya the designer behind Nana's Crafty Home. As a wife, mother, Nana of 9 & with 2 fur babies, my days are filled with love, laughter, hugs and yarn! Here you will find colorful and creative crochet designs for yourself or loved ones. My hope is that you will be inspired to learn and create along with me!