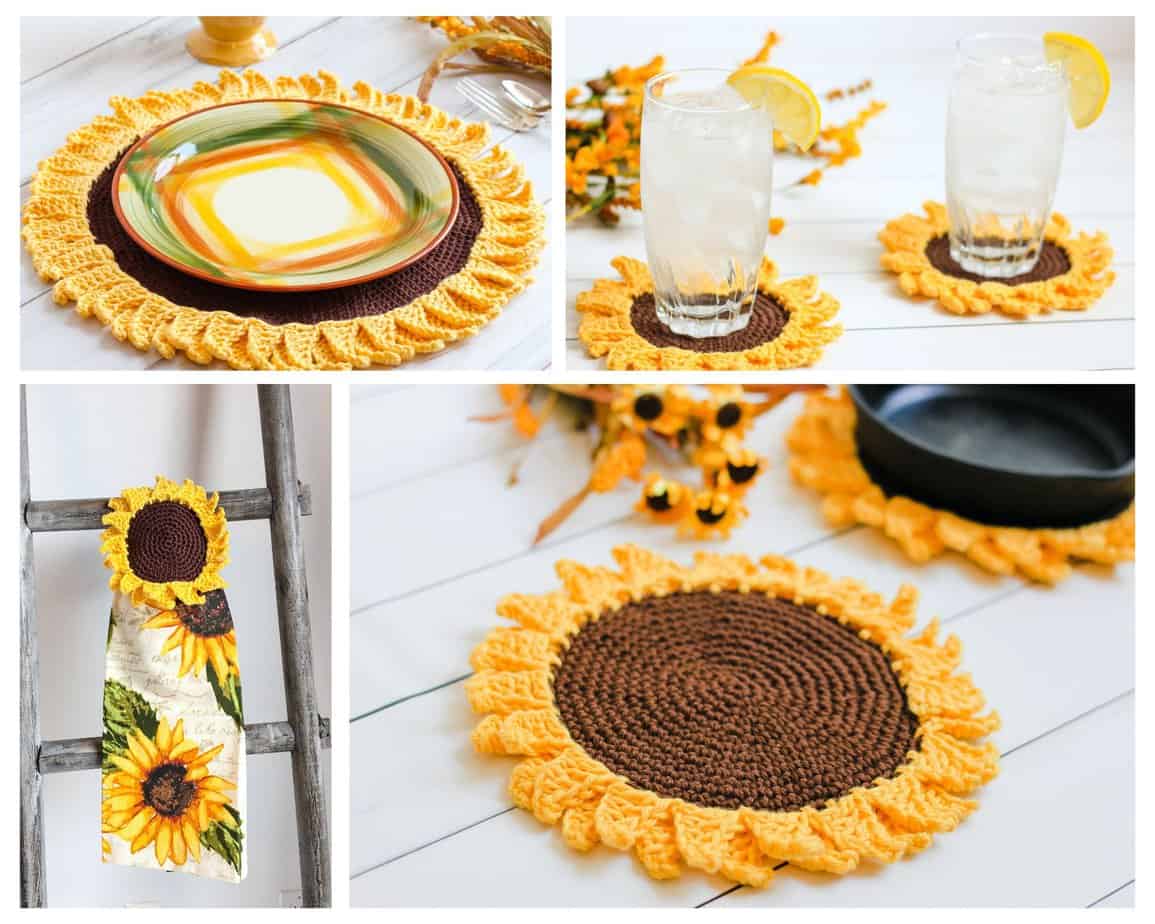
A sunflower crochet pattern – the Sunflower Placemat is a free crochet pattern by Nana’s Crafty Home!

This sunflower crochet pattern is a beautifully bright and cheerful addition to your sunflower dining decor. And you can pair it with the matching Sunflower Coaster, Sunflower Towel Topper and Sunflower Potholder – all free crochet patterns on the blog! Because I mean you can never have too many sunflowers in your life, right? At least, that is my motto 😉.
The Rustic Sunflower kitchen set of 4 crochet patterns is available together as and ad-free PDF pattern bundle for a special low price!
And, because I know so many of you are as addicted to sunflowers as I am – I have a couple more sunflower table designs coming up this summer in the Tapestry crochet technique. Update: check out the new Gingham Sunflower Table Runner and the matching Gingham Sunflower placemat which are both free crochet patterns on the blog!
And even though these look fantastic in sunflower colors, I do think they would look just lovely in any other flower colors of your choosing – imaging them in white or even bright flower colors. Really, the sky is the limit with color options!
If you are just looking for a stunning centerpiece for your table, this sunflower crochet pattern would also make a great table centerpiece or doily as well.
The basics of the sunflower crochet placemat are the same as the matching designs with just a couple of adjustments. You will be working several more rounds for the center of the sunflower to make it larger and I have also adjusted the petal pattern slightly to make the petals larger as well. The scale just wasn’t right with the smaller petals. However, the technique for adding the petals is the same – you are just working additional chains adding more stitches to your petal.

Sunflower Crochet Pattern Placemat related Tutorials
I have a couple of tutorials that will help you with this pattern –
How to crochet a perfect circle
Sunflower petals – just remember that the petals are larger for the placemat than what is shown in the video.
Supplies used for the Sunflower Crochet Pattern Placemat Doily
For my sunflower crochet placemat I used Hobby Lobby’s I Love This Cotton. You could certainly substitute any medium #4 weight yarn as well. If you are using the placemats purely for decoration, you could also substitute acrylic yarn as well. Acrylic will not hold up to high heat as it will melt. However, if you aren’t taking plates or pans out of a hot oven and placing directly onto the placemat I do think acrylic would hold up as well. Acrylic is also more colorfast than cotton and washes up well.
Purchase the ad-free PDF of the sunflower crochet placemat – scroll to bottom of post for FREE pattern
This sunflower crochet pattern placemat is also available as an ad-free, printable PDF! You can purchase the individual pattern for the Sunflower Crochet Placemat, or if you love PDFs, you might want to check out my Lifetime Membership. It’s an awesome deal! Never pay for one of my PDFs again!! (Or, scroll down for the free version!)

Purchase the ad-free pdf of this sunflower crochet pattern placemat for a small fee. Thank you so much for supporting my work!

If you would like daily crochet inspiration be sure to follow me on Facebook, Instagram, Pinterest, YouTube, Twitter and Tumblr!
To get notified of my free crochet patterns and future giveaways, sign up for my newsletter. I never share or sell your information to third parties — it stays private!
If you love all things sunflower, find more inspiration with my list of free crochet sunflower patterns:

And if you need more placemats in your life, find 20+ different crochet placemat patterns to choose from:

You may also like the following free crochet patterns at Nana’s Crafty Home:


Sunflower Crochet Pattern Placemat Doily free crochet pattern
Pattern written in US crochet terminology
Supplies:
I Love This Cotton!, Weight 4/Medium (100% cotton, 180 yds / 3.5 oz)
- Brown 2.2 oz / 115 yds (Color A)
- Curry 1.1 oz / 58 yds (Color B)
Size H/8 (5.0 mm) crochet hook
Scissors
Tapestry Needle
Stitch Markers
Approximate finished size: 15” diameter
Gauge: Diameter after round 9 = 4″
Abbreviations:
WS = wrong side
RS = right side
MC = magic circle
ch = chain
sc = single crochet
sl st = slip stitch
hdc = half double crochet
dc = double crochet
st = stitch
sk = skip
FLO = front loop only
tr = treble
Recommended Tutorials:
How to crochet a perfect circle
Sunflower Petals (Note: petals shown in video are slightly smaller but use the same technique – just be aware the stitches are different for the placemat)
Notes about pattern:
- Worked in seamless rounds – do not sl st join at the end of each round, use a stitch marker in first st of each round and move up to keep track of rounds.
Pattern Instructions
Round 1: (RS) With Color A, make a MC, ch 1, 6 sc in MC. (6)
Round 2: 2 sc in each st. (12)
Round 3: *2 sc in next st, 1 sc in next st,* repeat from * to * to end. (18)
Round 4: 1 sc in next st, 2 sc in next st, *1 sc in next 2 st, 2 sc in next st* repeat from * to * to last st, 1 sc in last st. (24)
Round 5: *2 sc in next st, 1 sc in next 3 st,* repeat from * to * to end. (30)
Round 6: 1 sc in next 2 st, 2 sc in next st, *1 sc in next 4 st, 2 sc in next st,* repeat from * to * to last 2 st, 1 sc in last 2 st. (36)
Round 7: *2 sc in next st, 1 sc in next 5 st,* repeat from * to * to end. (42)
Round 8: 1 sc in next 3 st, 2 sc in next st, *1 sc in next 6 st, 2 sc in next st,* repeat from * to * to last 3 st, 1 sc in last 3 st. (48)
Round 9: *2 sc in next st, 1 sc in next 7 st,* repeat from * to * to end. (54)
Round 10: 1 sc in next 4 st, 2 sc in next st, *1 sc in next 8 st, 2 sc in next st,* repeat from * to * to last 4 st, 1 sc in last 4 st. (60)
Round 11: *2 sc in next st, 1 sc in next 9 st,* repeat from * to * to end. (66)
Round 12: 1 sc in next 5 st, 2 sc in next st, *1 sc in next 10 st, 2 sc in next st,* repeat from * to * to last 5 st, 1 sc in last 5 st. (72)
Round 13: *2 sc in next st, 1 sc in next 11 st,* repeat from * to * to end. (78)
Round 14: 1 sc in next 6 st, 2 sc in next st, *1 sc in next 12 st, 2 sc in next st,* repeat from * to * to last 6 st, 1 sc in last 6 st. (84)
Round 15: *2 sc in next st, 1 sc in next 13 st,* repeat from * to * to end. (90)
Round 16: 1 sc in next 7 st, 2 sc in next st, *1 sc in next 14 st, 2 sc in next st,* repeat from * to * to last 7 st, 1 sc in last 7 st. (96)
Round 17: *2 sc in next st, 1 sc in next 15 st,* repeat from * to * to end. (102)
Round 18: 1 sc in next 8 st, 2 sc in next st, *1 sc in next 16 st, 2 sc in next st,* repeat from * to * to last 8 st, 1 sc in last 8 st. (108)
Round 19: *2 sc in next st, 1 sc in next 17 st,* repeat from * to * to end. (114)
Round 20: 1 sc in next 9 st, 2 sc in next st, *1 sc in next 18 st, 2 sc in next st,* repeat from * to * to last 9 st, 1 sc in last 9 st. (120)
Round 21: *2 sc in next st, 1 sc in next 19 st,* repeat from * to * to end. (126)
Round 22: 1 sc in next 10 st, 2 sc in next st, *1 sc in next 20 st, 2 sc in next st,* repeat from * to * to last 10 st, 1 sc in last 10 st. (132)
Round 23: *2 sc in next st, 1 sc in next 21 st,* repeat from * to * to end. (138)
Round 24: 1 sc in next 11 st, 2 sc in next st, *1 sc in next 22 st, 2 sc in next st,* repeat from * to * to last 11 st, 1 sc in last 11 st. (144)
Round 25: *2 sc in next st, 1 sc in next 23 st,* repeat from * to * to end. (150)
Finish final sc of round 25 by joining Color B. Fasten off Color A.
Round 26: (working in FLO), *ch 10, sl st in third ch from hook, 1 hdc in next ch, 1 dc in next 4 chs, 1 tr in next 2 chs, sk next 3 sts on circle, sl st in next st,* repeat from * to * to end (2 sts will remain unworked).
Round 27: repeat round 26 (working behind petals of previous round) sl st to first st.
Fasten off. Weave in ends.
Copyright 2021 Tonya Bush/Nana’s Crafty Home
Socia Media links:
Facebook: https://www.facebook.com/nanascraftyhome
Instagram: https://www.instagram.com/nanascraftyhome/
Pinterest: https://www.pinterest.com/nanascraftyhome/
YouTube: https://www.youtube.com/c/TonyaBush
Twitter: https://twitter.com/nanascraftyhome
Facebook Group: https://www.facebook.com/groups/829792060522798
Sign up for my Newsletter: https://nanascraftyhome.com/sign-up-for-my-free-newsletter/

 Hi! Thank you so much for being here! I am Tonya the designer behind Nana's Crafty Home. As a wife, mother, Nana of 9 & with 2 fur babies, my days are filled with love, laughter, hugs and yarn! Here you will find colorful and creative crochet designs for yourself or loved ones. My hope is that you will be inspired to learn and create along with me!